|
|
Free Lessons Courses Seminars |
TechHelp Fast Tips Templates |
Topic Index Forum ABCD |
|
||||||
|
|
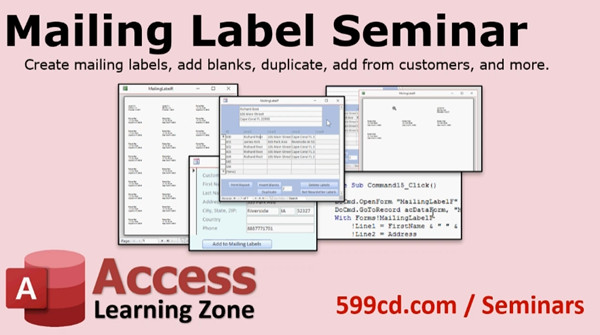
Access Mailing Label Seminar Welcome to the Microsoft Access Mailing Label Seminar. Total running time is 52 minutes Lessons
Topics Covered In this Seminar, you will learn how to work with mailing labels. You will:
Addendums
Purchase Now You can purchase the full seminar, which includes 53 minutes of video instruction covering how the database was built, an explanation of all the features, and tips on how to integrate it with your database. Click on the Buy Now button to order.
Template Only Click here if you just want to purchase the database template alone, without any instructional videos. Questions Got questions or comments? Post em below!
IntroIn this seminar, we will cover how to design and manage mailing labels in Microsoft Access. I will show you how to set up a mailing label table, build forms for easy label management, and create mailing label reports ready to print. You will learn how to handle sheets with missing labels, copy labels multiple times, add or remove labels with one click, and set up an "Active" field in your customer table to easily manage newsletter mailings. I'll also demonstrate how to quickly preview your labels and connect everything to a customer database for organized mailings.TranscriptIntroducing the mailing label seminar brought to you by AccessLearningZone.com.This seminar is all about working with mailing labels. We will create a separate mailing label table, a form, and, of course, your mailing label reports. I will show you how to leave blank spaces at the top of your page if you are missing mailing labels. That always happens when you print a couple of labels and you have a whole sheet left with all but two labels on it. I will show you how to get around that problem. I will show you how to delete all the labels in your table with one click. And, of course, how to add customers to your labels by just putting a button on the customer form that says "Add to Mailing Labels." That is good for doing individual mailings. You will see how to copy a label X number of times. That is good if you are sending one customer three or four packages, for example. Or if you want to print a full sheet of the same label, you can just click on a button and make X copies. I will show you how to make a field in your customer table. We will call it "Active" so that when you want to send your newsletters out, you can simply go through and check all the active customers, click one button, and it adds them all to your mailing label table. That is good for doing your weekly or your monthly mailings. Here is a simple walk-through of the database created in class. I provide you with a basic customer table and a customer form. Those are built in my customer database, which is a free template you can get from my website. All of the work from this database, though, is done in the mailing label form. The mailing label form is based on the mailing label table, which simply is one, two, three, four lines of text that go on each mailing label. You can type in labels yourself if you want to. Or, if you want, you can go to the customer form, click whichever customer you want to add to the mailing label list, and hit "Add to Mailing Labels." There we go. I have inserted that customer into the mailing labels. If you are sending multiple items to this customer, just click on them. Change this number here to a three, for example, and that will make three extra copies. That is handy if you want to make a full sheet of return labels, for example. Want to see what your labels are going to look like? Hit the "Print Report" button and there are your mailing labels. You can now hit the print button and send them right to the printer. Sometimes you print some labels off and then the next time you have a sheet of labels with five missing ones on top. No problem. Insert five blank records at the top and then hit report again. There you can see I have five blanks up top. Done with this sheet? Hit "Delete Labels" and it clears them off for you. Sending a monthly newsletter? Just add an "Is Active" field to your customer form. Go through your customers and mark which ones you want to receive it. Then go back to the mailing label form and select "Get Newsletter Labels," and that brings in just the customers that are marked active and have all of their address information. So they are not missing any name, address, city, state, zip, and that kind of stuff so you can mail to them. That is a quick run-through of everything covered in the mailing label seminar. The seminar includes the database, fully editable in Microsoft Access. You can customize it as you please. It also includes about 53 minutes worth of videos that teach you exactly how everything was built. There is also a template version available if you want just the database and do not need the video instruction. You can find both versions on my website at AccessLearningZone.com. Check for links in the description below the video. If you have any questions, please feel free to contact me. QuizQ1. What is the primary purpose of creating a separate mailing label table in the seminar?A. To store only customers with email addresses B. To organize and manage the details required for printing mailing labels C. To calculate customer purchase history D. To manage user access permissions Q2. What problem does leaving blank spaces at the top of the label page solve? A. It helps align labels with a new printer B. It allows you to skip used labels on a partially-used sheet C. It sorts labels by customer last name D. It prevents duplicate labels from being printed Q3. How can you add a customer to the mailing label table for individual mailings? A. Enter each mailing label manually into the table B. Import the customer data from Excel C. Click the "Add to Mailing Labels" button on the customer form D. Automatically add all customers by default Q4. What feature allows you to quickly delete all labels in your mailing label table? A. Remove Duplicates Button B. Clear Form Button C. Delete Labels Button D. Print Preview Button Q5. When might you want to copy a label multiple times using the seminar tools? A. If you are sending multiple packages to the same customer B. To sort labels by ZIP code C. To archive customer records D. To update address information Q6. What is the purpose of the "Active" field in the customer table? A. To store customer account balances B. To identify which customers should receive mailings like newsletters C. To track customer birthdays D. To record the date of last purchase Q7. How do you ensure addresses are not missing any necessary information before printing newsletter labels? A. By checking the "Is Active" box only B. By using a spell checker C. By importing from another database D. By selecting "Get Newsletter Labels" to filter out incomplete addresses Q8. Where are most operations related to mailing labels performed in the seminar database? A. The Customer Table B. The Mailing Label Form C. The Customer Report D. The Settings Page Q9. Which tool provided in the seminar allows users to preview what their printed labels will look like? A. Design View B. Table View C. Print Report Button D. Export to PDF Feature Q10. What is provided with the seminar aside from the instructional videos? A. A free Access database template that is fully editable B. A workbook for manual entry C. Third-party add-ins for Access D. Preprinted mailing labels Answers: 1-B; 2-B; 3-C; 4-C; 5-A; 6-B; 7-D; 8-B; 9-C; 10-A DISCLAIMER: Quiz questions are AI generated. If you find any that are wrong, don't make sense, or aren't related to the video topic at hand, then please post a comment and let me know. Thanks. SummaryToday's video from Access Learning Zone focuses on working with mailing labels in Microsoft Access. In this seminar, I explain how to set up a dedicated mailing label table, create a form tailored for labels, and design the mailing label reports that you need for your business or organization.One of the common challenges with mailing labels is dealing with partial sheets. For instance, when you use a few labels and are left with a sheet where only a couple are missing, it can be tricky to line your printing up again. I will guide you through the process of leaving blank spaces at the top of your label pages so your printing always lines up, saving you both time and resources. I'll also walk you through how to quickly delete all labels in your table with a single action. Adding individual customers to your labels is simple as well. By placing a button on your customer form labeled "Add to Mailing Labels," you can add any customer directly to your mailing labels list. This feature is particularly useful for one-time or individual mailings. Sometimes you might need to send multiple packages to the same customer or print several copies of a return label. I will show you how to duplicate labels as needed by simply specifying the number of copies you want. This makes mass mailings and special circumstances much more efficient. To help organize your mailings further, I will show you how to add an "Active" field to your customer table. When it comes time to send a newsletter or a similar bulk mailing, you can easily mark which customers are currently active. Then, with the click of a button, you can add all these active customers to your mailing label table. This streamlines your routine mailings, whether weekly or monthly. I provide a step-by-step walkthrough of the database used in this seminar. The seminar includes a basic customer table and customer form, both of which are available as a free template from my website. However, the focus for mailing labels is the mailing label form, connected to the mailing label table. This table contains the lines of text that make up each label. You have the flexibility to type in labels manually, or you can quickly add customers via the customer form with an easy-to-use button. If you ever need multiple copies for a single customer, all you have to do is set the count, and those duplicates will be generated automatically. Previewing your labels is straightforward with the "Print Report" feature. This lets you see your labels as they will be printed and then send them directly to your printer. If you have a partial sheet, you can account for previously used labels by inserting blank spaces at the top before printing. Once you finish working with a batch of labels, clearing them from your table is just a single click away. For newsletter and regular mailings, after marking active customers, you can automatically generate labels only for those with complete addresses, ensuring no critical information is missing. This overview touches on everything covered in the mailing label seminar. The seminar includes a fully editable Access database so you can customize it for your own needs. There are also video instructions, totaling about 53 minutes, explaining how every feature is built and used. If you are only interested in the database template and don't need the video instruction, that option is available as well. Both versions can be found on my website at AccessLearningZone.com. For step-by-step video instructions and to access the download links, visit my site using the link below. Live long and prosper, my friends. Topic ListCreating a mailing label table in AccessDesigning a mailing label entry form Building mailing label reports Handling missing labels on partial sheets Deleting all labels from the table with one click Adding an individual customer to mailing labels Copying a label multiple times for one customer Adding an 'Active' field to the customer table Bulk-adding active customers to mailing labels Previewing mailing labels before printing Printing mailing labels with custom quantities Inserting blank label spaces at the top of label sheets Clearing mailing labels after use Filtering newsletter recipients using the 'Is Active' field |
||||||||||||||||||||||||||||||||||||||||||||||
|
| |||
| Keywords: access mailing label seminar Page Tag: whatsnew PermaLink Microsoft Access Mailing Label Seminar |

 Resources


