|
|
Free Lessons Courses Seminars |
TechHelp Fast Tips Templates |
Topic Index Forum ABCD |
|
||||||
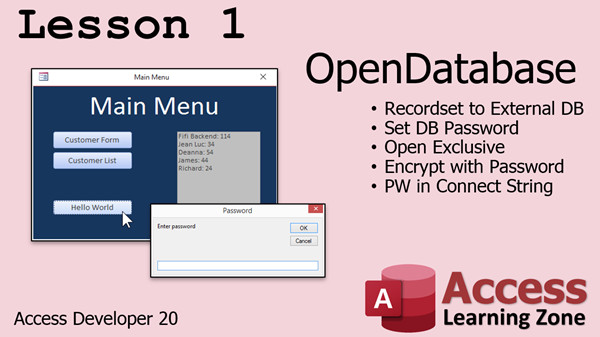
Access Developer 20WelcomeDeveloper 20 continues our study of Recordsets. We will learn how to connect to an external database using the OpenDatabase command. We will learn how to add records to a table using multiple nested recordset loops. Finally we will learn how to use the TreeView control to display heirarchical data. ResourcesTopics CoveredIn Lesson 1, we will learn how to use a recordset to connect to an external database (either on your PC or on your network). We will learn the OpenDatabase command. Then we will learn how to open the backend database exclusively, encrypt it with a password, and then use that password in the connection string to access the database with the recordset.
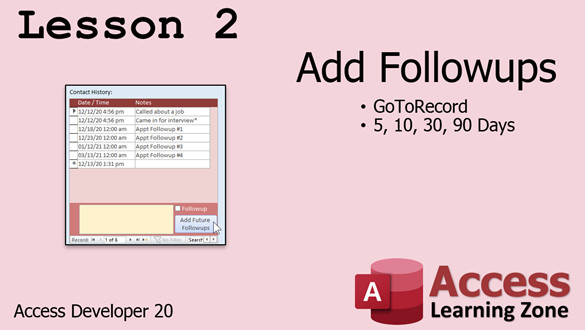
Lessons 2 and 3 are free bonus material. I had a couple of TechHelp questions that fit very nicely in with what we're covering in Developer 20 with our Recordsets. So, in Lesson 2, we will see how to add followup appointment records at various intervals to a form using the GoToRecord command.
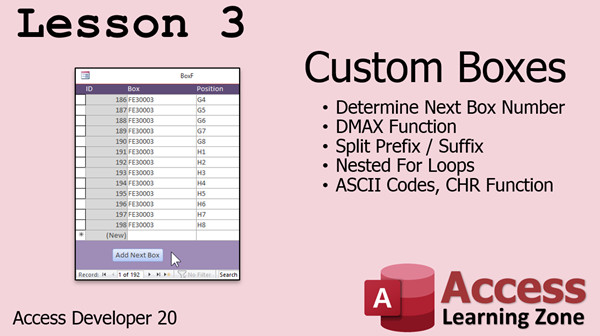
In Lesson 3, we will answer a TechHelp question sent in from one of our Developer students, Geir Arne. He wants to know how to add new records to a form with a specific set of criteria. We'll learn how to loop and again use GoToRecord to solve this problem.
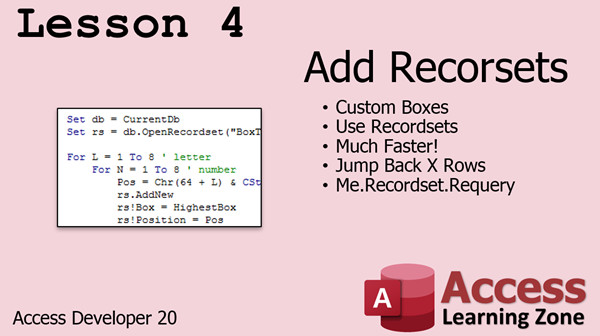
In Lesson 4, we will take the database from Lesson 3 and rewrite the code to use Recordsets. You will see how we can rebuild it... better... faster... stronger, and doesn't cost us 6 million dollars. (Any of my fellow nerds catch the reference? I'm kinda checking to see who actually reads this stuff.)
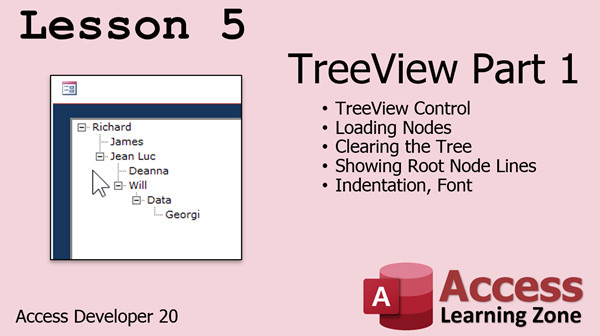
In Lesson 5, we will begin working with the TreeView control. We will learn how to load nodes (items) into the tree using a recordset loop, clear the tree, show root node lines, and adjust the font and indentation of each node.
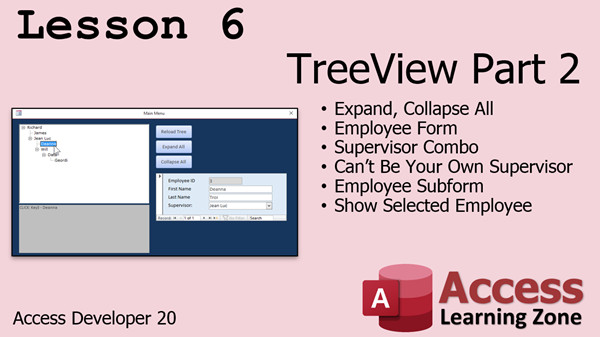
In Lesson 6, we will continue working with the TreeView control. We will learn how to make buttons to expand and collapse all of the nodes. We will create an employee form with a supervisor combo. We'll create some custom SQL so that you cannot select yourself as a supervisor (avoids endless loop problems in recordsets). We'll set that employee form as a subform and then use the TreeView to display the record for the currently selected employee.
Enroll TodayEnroll now so that you can watch these lessons, learn with us, post questions, and more.
Questions?Please feel free to post your questions or comments below. If you are not sure as to whether or not this product will meet your needs, I'd rather help you before you buy it. Remember, all sales are final. Thank you.
IntroIn this lesson, you will learn advanced techniques in Microsoft Access including how to connect recordsets to external databases using the OpenDatabase command, secure back-end Access databases with password protection, and send encrypted passwords in your connection string. We will cover adding records with different methods, work with custom naming using ASCII codes and the CHR function, and speed up record inserts using recordsets. We'll also set up and manage the tree view control in forms to display hierarchical data such as employees and supervisors, as well as handle tasks like preventing users from selecting themselves as supervisors. This is lesson 20.TranscriptWelcome to Access Developer Level 20, brought to you by AccessLearningZone.com. I am your instructor, Richard Rost.Today's class is going to cover recordsets to external databases, multiple nested loop recordsets, and working with the tree view control. You will learn how to use the OpenDatabase command so we can connect a recordset to an external database. This is handy because not only can you use it to connect to other databases on your network - maybe the accounting department has their own database or the sales department - but you can set up a password protected database that could even be in a shared folder somewhere that lots of people have access to. If you put a password on it, then you can open this database with your encrypted password that's stored in your VB so that others can't get hold of your encrypted data. I will show you how to send the password in the connect string, and that's a good way to secure your data in the back end without using a database server. Yes, a database server is better, like SQL Server, but this is pretty good. Lessons 2 through 4 have to do with adding records to your database using a couple of different methods. Lesson 2 is simply adding follow-ups in intervals of 5, 10, 30, and 90 days. Lesson 3 is actually a request that came from one of my students. He's got custom boxes with customized numbering, and he wants to be able to add those automatically. We'll do some custom work with his box naming conventions. I'll teach you about ASCII codes and the CHR function, and we'll work with some nested For loops. Lesson 4 is doing the same thing we did in Lesson 3, but we're going to use recordsets, which makes it much, much faster. Lessons 5 and 6 have to do with the tree view control. I'll show you how to set up the tree view control in a form so we can display hierarchical data. This would be, for example, employees with their supervisors - a self-join in the table - and we'll learn how to load up the nodes in a tree view using a recordset. We will do a lot more with that tree view in Lesson 6. We will expand and collapse all the nodes. We'll open up the employee form as a subform when you click on one of the nodes, one of the employees. We'll set up the combo box there for the supervisor, so you can't be your own supervisor. That's a common question I always get asked: how can I set it up so I can't pick myself as my own supervisor? There's a lot you can do with this tree view control. I am using Microsoft 365. I've got a subscription. If you are using Access 2019, that's the closest to the retail version. You should be okay going back all the way to about 2007, though. This version should work with all of those. Prerequisites: Of course, this is a developer level class. You should know VBA, of course, from my Developer Level 1 class. I strongly suggest you take the Beginner and Expert series first. Developer 13 is definitely recommended, and of course 16 and on for the introduction to recordsets. If you haven't taken Developer 16, 17, 18, and 19, you may be lost in today's class. Even if you just picked this up for the tree view lessons, you've got to know how to work with recordsets in order to load up that tree view. So now it's time to sit back, relax, and enjoy Access Developer Level 20. Thank you. QuizQ1. What does the OpenDatabase command allow you to do in Access?A. Connect a recordset to an external database B. Lock the database from external access C. Format Access forms automatically D. Generate database backups Q2. Why would you want to use a password-protected database in a shared folder? A. To prevent users from deleting the database B. To secure data in the back end without a database server C. To make the database run faster D. To allow only read-only access to all users Q3. In Lesson 2, what is the primary task covered? A. Adding records for employees' attendance B. Adding follow-ups in intervals of 5, 10, 30, and 90 days C. Deleting old follow-up records D. Customizing recordset navigation buttons Q4. What is the purpose of using the CHR function as discussed in Lesson 3? A. To create tables automatically B. To manage encrypted passwords C. To work with ASCII codes for custom naming D. To set up scheduled reports Q5. What advantage is described in Lesson 4 when using recordsets for adding records? A. It makes the process graphically appealing B. It is much faster than using manual or loop methods C. It requires no coding knowledge D. It allows you to avoid using external databases Q6. What is the tree view control primarily used for in this course? A. Calculating field values B. Displaying hierarchical data like employees and supervisors C. Creating pivot tables D. Importing Excel data Q7. What feature is included in Lesson 6 related to the tree view control? A. Color-coding nodes based on performance B. Expanding and collapsing all the nodes C. Exporting the tree view as a PDF D. Auto-generating employee reports Q8. Why is it important to restrict users from picking themselves as their own supervisor in the tree view control? A. To prevent duplicate records B. To maintain accurate hierarchical relationships C. To allow unlimited editing D. To speed up database queries Q9. Which version of Access is recommended as closest to what is used in the course? A. Access 2003 B. Access 2019 C. Access XP D. Access 2010 Q10. Which series or prior classes are strongly suggested before taking Developer Level 20? A. Only Beginner series B. Only Expert series C. Developer 1, 13, and 16+, Beginner and Expert series D. Only Advanced SQL series Q11. What basic skill must you understand to work with the tree view lessons in this course? A. Macros B. Recordsets C. Linked Tables D. ODBC connections Answers: 1-A; 2-B; 3-B; 4-C; 5-B; 6-B; 7-B; 8-B; 9-B; 10-C; 11-B DISCLAIMER: Quiz questions are AI generated. If you find any that are wrong, don't make sense, or aren't related to the video topic at hand, then please post a comment and let me know. Thanks. SummaryToday's video from Access Learning Zone covers a variety of advanced topics for Access developers. In this class, I will be discussing how to work with recordsets from external databases, how to use multiple nested loop recordsets, and how to utilize the tree view control in your forms. One of the main skills you'll learn is how to use the OpenDatabase command to connect a recordset to another database. This technique is particularly useful if you need to access databases from other departments in your organization, such as sales or accounting. You can even apply this approach with password-protected databases placed in shared folders, which adds a layer of security by encrypting the password in your VBA code. While using a dedicated database server like SQL Server would be the preferred method for maximum security, this method provides a strong alternative.The next group of lessons, specifically Lessons 2 through 4, are focused on adding records to your database using different approaches. In Lesson 2, I will walk you through how to add follow-up records at varying intervals, including 5, 10, 30, and 90 days. Lesson 3 takes on a challenge presented by a student who wanted to automate adding custom boxes with unique numbering conventions. We will dive into the use of ASCII codes, the CHR function, and nested For loops to handle his specific case. Lesson 4 builds on this by demonstrating how to achieve the same results using recordsets, which provides a much faster solution. In Lessons 5 and 6, our goal shifts to mastering the tree view control. I will show you how to configure a tree view in a form so that you can display hierarchical relationships, such as a list of employees along with their supervisors, using a self-join in the table. You will also learn how to load the nodes of the tree view with data from a recordset. Lesson 6 further expands on these concepts, where you will learn how to expand and collapse nodes efficiently. Clicking on an employee node will open their details in a subform, and we will also ensure that supervisors are assigned correctly with a combo box that prevents users from selecting themselves as their own supervisor - a question I frequently receive. For this class, I am using Microsoft 365, but if you are working with Access 2019 or even older versions dating back to 2007, you should be able to follow along without any significant issues. As this is a developer-level course, you should already be familiar with VBA, ideally from my Developer Level 1 class. I also highly recommend completing the Beginner and Expert series beforehand. Developer Level 13 is helpful, and Developer Levels 16 and higher cover key concepts related to recordsets, which are essential for today's lessons. If you have not completed Developer Levels 16, 17, 18, and 19, you may find some of the material challenging. Even if your main interest is in the tree view control, understanding how to handle recordsets is crucial. You can find a complete video tutorial with step-by-step instructions on everything discussed here on my website at the link below. Live long and prosper, my friends. Topic ListConnecting recordsets to external databases with OpenDatabaseUsing password protected external Access databases in VBA Sending passwords in the connect string for security Adding follow-up records at specified date intervals Automating custom box naming and numbering conventions Working with ASCII codes and the CHR function in VBA Implementing nested For loops for data entry automation Adding records using recordsets for improved performance Setting up the tree view control in Access forms Displaying hierarchical self-join data using tree view Loading tree view nodes dynamically from recordsets Expanding and collapsing all nodes in the tree view Opening related forms from tree view node clicks Preventing users from selecting themselves as their own supervisor in a combo box |
||||||||||||||
|
| |||
| Keywords: access developer 20 treeview Recordset ExternalDatabase OpenDatabase Encrypt Password ConnectString Add Followups GoToRecord DMAX SplitPrefixSuffix NestedFORLoops ASCII CHRFunction RecordSets Faster JumpRows TreeViewControl LoadingNodes RootNode Lines Ind Page Tag: whatsnew PermaLink Microsoft Access Developer 20 |