Tasks
By Richard Rost

 4 years ago
Task Management Database for Microsoft Access
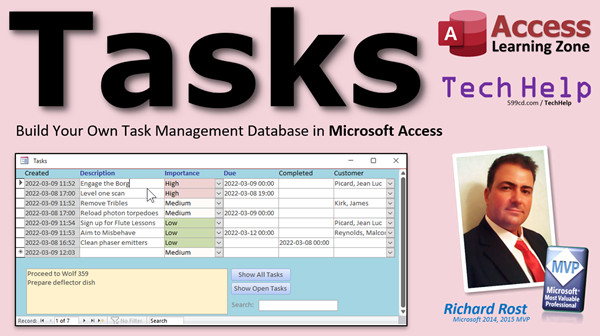
In this video, I'm going to teach you how to build your own task management database in Microsoft Access. We will add all of the standard fields: description, notes, date created, date due, date closed, priority, and what customer it's for. We'll make buttons to show all tasks vs. open tasks only.
Walter from Amarillo, Texas (a Platinum Member) asks: I would love it if you could show us how to build a task management database. I have a million things on my "to do" list. I need help organizing them based on priority, due date, what customer they're for, and that kind of stuff. If you could show me how to make buttons to show just the open tasks or ALL the tasks, that would be great too. Oh, and a search box! Thanks.
Members
Members will learn how to get rid of the queries and replace them with SQL directly in the button code. We'll also create buttons we can click on to sort by various fields: date due, priority, or description. We'll also make a search box that will look for keywords in the description or notes fields and filter the results accordingly.
Silver Members and up get access to view Extended Cut videos, when available. Gold Members can download the files from class plus get access to the Code Vault. If you're not a member, Join Today!
 Suggested Template Suggested Template
Links
Keywords
microsoft access, ms access, ms access tutorial, #msaccess, #microsoftaccess, #help, #howto, #tutorial, #learn, #lesson, #training, #database, task manager, task management, free task management template, Task Management Access Database template, task management database, task management database template, task tracker, to do list, todo list
 Subscribe to Tasks
Get notifications when this page is updated
Intro In this video, I will show you how to build a basic task management database in Microsoft Access. We will talk about creating tables for tasks and priorities, designing a continuous form with combo boxes and conditional formatting, and connecting tasks to customers. I will also show you how to set up queries to filter open and completed tasks, add buttons to switch between views, and walk through adding sample task records and using dropdowns for customer assignment. You will learn how to organize, prioritize, and track your tasks efficiently in Microsoft Access.Transcript Welcome to another TechHelp video brought to you by AccessLearningZone.com. I am your instructor, Richard Rost.
In today's video, I'm going to show you how to build your own task management database in Microsoft Access.
Today's question comes from Walter in Amarillo, Texas, one of my platinum members. Walter says, "I'd love it if you could show us how to build a task management database. I have a million things on my to-do list. I need help organizing them based on priority, due date, what customer they're for, and that kind of stuff. If you could show me how to make buttons to show just the open tasks or all the tasks, that would be great too. Oh, and a search box. Thanks."
Since you're a platinum member, I think I can handle this.
Now, before we get started, go watch my contact management video. It's absolutely free. It's on my website. There's the link. You'll also find the link down below in the description.
A lot of the techniques that I'm going to cover today, I've already covered in the customer contacts video, but like I always say, Access is like playing with Legos. It's all the same blocks; you just put them together differently. So, we're going to put the blocks together differently and make a task manager instead of a contact manager.
And yes, I am going to cover a couple of new things later on too, so it's not all the same stuff. You'll find some other prerequisites for that video too, like the default value, relationships, relational combo boxes, and conditional formatting. All the stuff you'll need today, you'll find in that video.
Here I am in the TechHelp free template. This is a free database you can download off my website. If you watched the contact management database video, you know exactly where to find this and how I built it. Here's all that stuff right: your customer list, your customer form, each customer having multiple contacts. Of course, there are orders too. If you haven't watched the invoicing video, go watch that too. You don't need that for today, but there's good stuff in there.
Let's start by creating our task table. It's always a good idea to build your tables first. So, there's a table. We'll start with the auto number: task ID. Always start off with an auto number—well, not always, but 99 percent of the time, you're going to start off with an auto number. There are some exceptions.
Customer ID will be next. That will be a number of type long integer. That's our foreign key pointing to our customer table, so we can optionally assign this task to a customer if we want to. Many tasks don't have to be assigned to a customer, but if you want to say this is associated with a particular customer, that's fine.
We'll have a description field—short text. We'll also have notes—long text. I like to have a little short text to tell you what it's about to show up in your lists, and then, of course, your notes field, which can contain as much as you want.
We'll have a couple of dates: date created (date/time value), and date due, which will be optional if you want to set a due date. I don't always put due dates on my tasks. A lot of stuff is just "do it when you do it," but if you want a due date for something urgent, set it. Then maybe a date completed—and that's how we'll know if a task is finished or not. If this is null, that means it's still open. Once it's done, we'll put a date completed in there.
For date created, I'm going to set the default value equal to Now(). So, every time I create a new record, it will automatically put the date created in there. If you haven't watched my default value video, go watch that.
Finally, I'm going to put an importance field on the end here. That will be a number. This is going to be one of those rare instances—I'll show you in a minute—where we're not going to use an auto number, but this will save a number value. I'm going to make another table for importance, where 1 is low, 2 is medium, and 3 is high. These are priorities. I'm going to set the default value to 2, so by default, all new tasks that get created will be medium priority. I can drop it to low if it's not that important, or increase it to high. You can add more levels if you want to, but I have found that more than three options tends to be distracting and confusing. Maybe an urgent option—maybe. But generally, low, medium, and high get me through.
If you want to add more fields, like the status of the task (as in whether you just started it or whatever) or percent completed, go ahead. I've seen a lot of other task management databases, especially when I was doing a little research for this video, and there's a million other fields you can add. These are the core ones that I feel are the most important. For your business, feel free to add more. If you want to have what employee it's assigned to or what the location is, go ahead.
I'm going to show you the basics in this video. Let's save this as TaskT (task table). Primary key defined? Yes, it will grab that auto number and make it the primary key. Now, let's go set up that importance table. It's an associated helper table. Create table design.
I'm going to have an ImportanceID, and this I'm going to make a number. Now, I always preach the benefits of auto numbers. And yes, most tables—99 percent of tables—you should use an auto number. But once in a while, I'll use a number that I control. I'm going to manually hit the primary key button. This is going to be the primary key. It's going to be a number, long integer, indexed with no duplicates. But I want to control the value: 1, 2, 3. I'll only do this for small lists—maybe three options, five max. I want to control what that number is. I don't want to accidentally delete medium and have to go through tricks to get number 2 back. That number is also going to control the sort. Yes, I could set up another field for the sort order, but this is fine.
I will only do this for little helper tables that are edited by the admin only. I will never do this with a table that your users can modify. I don't trust them—but me, I trust—so a regular number for this table is OK. It's only going to get three entries. I'm going to put the description here—short text. Save this as ImportanceT. We'll put some values right in here: 1 is low, 2 is medium (our default), and 3 is high. That's it.
I'm OK with using a normal number for this table. Those are the only records this table will probably ever see, but I have the flexibility to add more in the future if I want. A lot of times, building your database is trying to guess what your future needs are going to be, so you want to keep things flexible. That's why I wouldn't build this list, for example, straight into a value list combo box. If I want to change it and I've got that combo box in five different places in my database, it's a pain to change it. I have to go and modify five combo boxes. Putting even the simplest list like that in a table makes a lot more sense because I only have to update this list in one spot.
Now, my task manager is going to be a continuous form. I have a blank continuous form here that I created in the blank template. I'm going to copy that, paste, and call this TaskF, my task form. Let's open that up in design view. Let's set the colors. I like to put the colors down first. Let's go with that color there—looks good. I'll do the same thing in the center, but I'll make it a little bit lighter. Go to more colors, maybe drag this up to here. Looks good. Let's make these black so we can actually see them.
Let's set the form caption. I'll open up the properties, go into format, and set the caption to Task Manager, or whatever you want to call it.
Now, let's bind this form to the task table. Go to data, record source, drop this down, and pick TaskT (task table). Let's bring up our list of fields—form design, add existing fields. Here's a list of fields.
We don't need to put TaskID on this form. I don't care to see it—it's an auto number. We're going to need it for making relationships and stuff later on, but do we really need to see that on the task form? No, not really. The only reason you need to put the auto number on the form is if you want to read that value from somewhere else. If you have another related table and you have to read what the current TaskID is, then add it there. Usually, I'll add it but keep it hidden. I just put it up there for my beginner videos to teach people how auto numbers work and what they are, but as you get more advanced, I stop using them as far as putting them on my forms.
I'm going to set this first box here to the date created. Change the control source to DateCreated. Go to all, make sure you name it also DateCreated. We don't want "Text1." Change the format—I don't want just a date, I want to see date and time.
I have recently switched all my databases to the ISO date standard, which is yyyy-mm-dd, and I want the time here to be hh:nn (24 hour time format). If you want AM/PM, you can go "ampm" at the end. I personally don't. I'm getting used to 24 hour time, and I like the ISO date format because I have customers all around the world—Britain, Australia, France, wherever—and this is a nice, universal time format that everyone can agree on. I'll put a link below to my ISO date video—watch that if you're curious or want to learn more.
We'll probably have to give that a little more space because it's wider. I like to see the time on there too.
Let's save this, close it, and open it back up again. Let's see what we got.
OK, needs a little more room—just a smidge, right about there. I don't really like switching over to layout view—I hate layout view. I've had problems with layout view before; it has corrupted stuff, especially when you start dealing with VBA and your code. It mangles things.
I like to left-align everything. Now, let's see what it looks like. Save changes and take a peek. Looks pretty good—a little extra space on the end.
The second field here, I'll make the description field. The only reason I'm doing these manually is because they already have boxes here—we can use add existing fields if you want to and drag stuff over, which we'll do in a minute.
Double-click, change this to Description, and make sure you change the name as well. That can go right about there. Change the label to Description.
Next, I want my importance field, but Importance is going to be a combo box. That's the 1, 2, 3—high, medium, low. We don't have one of those yet, so let's build one. Combo box, drop it there.
We want the combo box to get values from another table or query—we're going to get our values from ImportanceT. Bring over both fields because this is the bound field, and this is the one we want to see.
Sort by the ID—1, 2, 3. Next, what do you want the column to look like? Hide the key column—we don't need to see that, but we need to save it. Next, now it's asking where to store the value—store it in Importance. Next. The label doesn't matter—we're going to delete it anyway. Finish.
That is building a relational combo box—a combo box that gets its values from a different table or query and stores them in this table. Delete that combo box label, slide it over to the left. It's just one of my pet peeves—it doesn't come in right on the grid. If you look at it closely, that's not on the grid. I hate that. We're going to select this, right click, Size to Grid. There we go.
Save this. Put a label on the top of it, of course—copy, paste, slide it over, and call this Importance, or Priority, or whatever you want.
Let's see what it looks like. Looks pretty good.
How about some conditional formatting in there? If you've never done conditional formatting, go watch my conditional formatting video—you'll find a link below. Format, Conditional Formatting. It's Combo4—I forgot to give the combo box a name. That's another one of my pet peeves with the combo box wizard. I love the combo box wizard—it's one of my favorite wizards—but it doesn't give you an option to name the combo box.
I'm going to put ImportanceCombo. I like to add "Combo" to my combo boxes just so I know what they are. Click, and click. Now, it's ImportanceCombo. Let's add a new rule: if the field value is equal to 1, make this guy green—a light green. New rule: if the field value is equal to 3 (high), make it red, but not a big bright red—maybe a lighter red so it doesn't scream at you. Leave 2 as white for medium. Hit Apply, hit OK, save it, close it, and open it again.
If I put a new task in here and change this to low, it goes green. If I change it to high, it goes red. That's pretty cool.
Again, conditional formatting—link below. When I say "down below," by the way, if you're on Youtube, everyone always misses this: there's "Show More." Click on that to see all the extra links and stuff. Youtube does a pretty good job of hiding that, so I like to point it out.
Another thing I don't want—when this form opens up, I don't want it starting on DateCreated, because you can't change that. We're going to right click, design view, open this up. I don't want the user to be able to edit that field, so we're going to lock it. Data, Lock: Yes. I don't want it to stop there on the tab stop, so Other, Tab Stop: No. Save, close, open it again. Notice now it starts on Description, and if I hit Tab, it ignores DateCreated, and if I click on it, I can't type in there—it's locked.
Let's go back to design view. Go to add existing fields: CustomerID (that's going to be a combo box—do that last), Description, Notes (I want to put down here on the bottom). I've already got a notes box built; let's go steal the notes box from somewhere else. Go to the customer form, and I have a nice notes box here—right click, design view, copy, and paste it here. If the field is named the same, I always keep my notes fields named "Notes" so I can reuse the pieces. Now, if you open it up and go to its properties, it's bound to Notes. Same field, two different tables, and that's OK—this will be bound to the Notes field in this table.
We can steal the customer combo box too. Go to the order form where we already have the customer combo box—right click, design view, copy, and paste to the task form. Click in the detail section for paste. Make room, move it up top, and make sure it's on the grid. There's Customer. I'll put the customer last, because for me personally, I don't usually put tasks in my database for customers. A lot of you want to, so I added it in, but I rarely do things for just one customer.
Now in this little space, let's put DateDue and DateCompleted. Drag those fields in, delete the labels, move them to the right width, and line them up. You may have to make Customer a little further to the right.
Highlight both of these, right click, Properties, find Format, and set the ISO format (yyyy-mm-dd hh:nn). If you just want date, you can put "short date" and it will use your system's format. Copy, paste labels for "Due" and "Completed," slide them up.
Fix the tab order, since new controls added to the form come last. Design, Tab Order, Auto—now it's set left to right. Open the form and tab through.
For dates and numbers, I prefer to left-align everything; that's just me. Accountants may like right alignment, but I prefer left.
Let's add some actual tasks. It's always easier to work on stuff with real data. For example:
- "Set up a level 1 scan," high priority, due today—use Ctrl+; to put today's date in. If you want to add the time, use Ctrl+Shift+; or type it in.
- "Engage the Borg," high, due now. Today's date. If you don't specify a time, default is midnight. To add a time: Shift+;, space, 5pm.
- "Reload the photon torpedoes," medium, assign to Kirk.
- "Aim to misbehave," low priority, due Saturday, assign to Malcolm Reynolds.
- "Sign up for flute lessons," low, maybe next week—just type in 3/19 (March 19) or use a date picker if you want.
You can select a customer from the drop-down. If you want to add Scotty, for example, open the customer form, add a new customer, and then he will appear on the list.
List Items Edit Form—there's a way to make a button to open the customer form while editing the combo box. I have a whole video on this, but the short version is: Data > List Items Edit Form, choose the customer form. Now you can add or edit customers from this combo box directly.
There's also a default value set for customer based on the open customer form (used in the invoicing video). The default value is "=Forms!CustomerF!CustomerID." I cover this in the invoicing video and in the "Value from a Form" video—link below.
The benefit: if you're on a customer already and press a button to open tasks, the new default value in the combo is the open customer.
Now, let's throw some buttons in here. On the main menu, design view, add a button to open tasks. If you've never done VBA before, watch my intro to VBA lesson; there's a link below.
Open visual basic editor (right click, build event), and type "DoCmd.OpenForm 'TaskF'"—that's it, one line of code. Ideally, name your button first ("TasksBtn"). Now, when you click on Tasks on the main menu, you get your whole task list.
On your customer form, you might want a button that opens tasks just for that customer. Copy a button, paste, label it "Tasks," name it "TasksBtn," and set code to:
DoCmd.OpenForm "TaskF", , , "CustomerID=" & CustomerID
This opens the tasks form with a filter for the current customer. Even if CustomerID isn't specifically a field on the form, it's part of the underlying table, so it still works.
Now, you'll see only that customer's tasks, and a new one for them by default.
The notes box at the bottom is bound to whichever record you're on. For example, for "Engage the Borg," add a note like "Proceed to Wolf 359," and for "Remove tribbles," add "Bring a can of Raid." When you switch records, the notes reflect the current record.
Wouldn't it be nice to have two buttons to show all tasks, or just the open ones (not completed)? For example, once "Engage the Borg" is completed, you can mark it complete by entering a date. That removes it from the open tasks.
I don't want to delete it—I want to keep a history. Save all your past tasks—don't delete them. Same with customers—mark them inactive, don't delete old customers. Same with orders—you need them for accounting. I have a video called "Don't Delete Data"—link below.
When I open this in the future, I don't necessarily want to see all completed tasks—unless I do. Rather than manually filter, I'd like a button that does it for me. Also, when I open tasks from the customer form, I want to see only open tasks, unless I choose otherwise.
Let's make two queries: one shows all tasks, the other only open tasks (not completed).
Create a query (Query Design) for TaskT. Bring in *, and sort by DateDue ascending (so stuff due soonest is on top). Note: records without a DateDue show up at the top—if you want them at the bottom, use a trick:
Add a field: DateDueIsNotNull: [DateDue] Is Not Null. This gives -1 for true and 0 for false. Sort by this field ascending, so tasks with no due date are last. Hide this field so you don't see duplicates. Save as TaskQ.
Copy and paste for another query: TaskNotCompletedQ. Add DateCompleted, hide it, and set criteria Is Null, so it only shows open tasks (not completed). Save.
Back to the form: by default, I want to only show open tasks, so change the record source to TaskNotCompletedQ. Now when you open the form, you see just open tasks, sorted.
Add a button at the bottom: "Show All Tasks." Cancel the wizard, label it. Name it ShowAllBtn. Code: Me.RecordSource = "TaskQ" (VBA). That changes the form's record source to show all tasks.
Add another button: "Show Open Tasks." Name it ShowOpenBtn. Code: Me.RecordSource = "TaskNotCompletedQ"
Now, by default you see only open tasks. Click "Show All" to see all; click "Show Open" to see just the open ones. Changing the record source automatically requeries the list. You can add more buttons and queries for different filters (e.g., only completed tasks by adding "Is Not Null" to DateCompleted in a query).
If you want to learn more, there's an extended cut for members: we'll replace those queries with actual SQL code in the buttons so we don't have extra queries, we'll add clickable sorting by label headers, and we'll add a search box that can search multiple fields.
Silver members and up get access to all extended cut videos (now over 150). Gold members can download these databases and access the code vault with VBA tips and tricks. Platinum gets all that, plus higher priority, access to beginner courses for every subject, and one free developer class each month after finishing the expert classes.
There's also a new diamond sponsor level where your name/company is listed on a sponsor's page shown in each video and linked in the description.
These free TechHelp videos will keep coming as long as you keep watching—I will keep making more, and they'll always be free.
How do you become a member? Click the join button below the video. After you click join, you'll see a list of membership levels with their perks. Silver members and up get access to all of my extended cut TechHelp videos, one free beginner class each month, and more. Gold members get downloads to all sample databases, the code vault, and one free expert class each month after finishing the beginner series. Platinum members get all previous perks plus even higher priority, and full beginner courses for all subjects, and one free developer class each month after the expert classes. I also teach Word, Excel, Visual Basic, and more.
You can become a diamond sponsor and have your name or company listed on a sponsors page shown in each video and linked below and on my website, plus a shoutout in the video.
Don't worry, the free TechHelp videos will keep coming. As long as you keep watching, I'll keep making more, and they'll always be free.
If you have questions, post down below. Thanks for watching! Hope you learned something, and we'll see you next time.Quiz Q1. What is the primary purpose of the database demonstrated in the video?
A. Managing customer invoices
B. Managing and organizing tasks with fields like priority, due date, and assigned customer
C. Tracking employee attendance
D. Generating sales reports
Q2. What is the recommended field type for storing the TaskID in the TaskT table?
A. Short Text
B. Date/Time
C. AutoNumber
D. Currency
Q3. Which field is used as a foreign key to optionally associate a task with a customer?
A. TaskID
B. Importance
C. CustomerID
D. Notes
Q4. What is the benefit of putting commonly used lists, like importance levels, into their own tables rather than using value lists in combo boxes?
A. It reduces the database file size
B. It allows for easier updates in one central location
C. It prevents users from seeing the options
D. It increases record input speed
Q5. How does the database determine if a task is still open?
A. The task's priority is set to low
B. The Description field is blank
C. The DateCompleted field is null
D. The CustomerID is missing
Q6. What is the default value set for the DateCreated field in the TaskT table?
A. 0
B. Now()
C. Current Date
D. "Unknown"
Q7. When creating an ImportanceT (importance table) for priority, what is special about the ID field?
A. It is a short text field populated automatically
B. It is an AutoNumber because users can add options
C. It is a number field controlled manually for small, admin-only lists
D. It is a Date/Time field for logging changes
Q8. Which field type is recommended for allowing rich, unlimited notes for a task?
A. AutoNumber
B. Currency
C. Long Text
D. Attachment
Q9. What formatting does Richard recommend for date-time fields to ensure universal compatibility?
A. Short Date (MM/DD/YYYY)
B. Long Date (Month, DD, YYYY)
C. ISO format (yyyy-mm-dd hh:nn, 24-hour time)
D. General Date (system default)
Q10. How are priorities (Importance) visually distinguished in the form?
A. By different fonts
B. By conditional formatting with different background colors
C. By icons next to each task
D. By hiding low-priority tasks
Q11. Why should historical tasks or old customer records not be deleted from the database?
A. They slow down the database if deleted
B. They are required for compliance only
C. Keeping them helps maintain history and for future reference
D. Deleting them increases database size
Q12. What is the benefit of creating queries like TaskQ and TaskNotCompletedQ for filtering tasks?
A. They allow users to view lists based on different criteria, like all tasks or only open ones
B. They prevent any task from being edited
C. They automatically assign tasks to customers
D. They limit user access to only their assigned tasks
Q13. How are buttons used on the form to toggle between viewing all tasks and only open tasks?
A. By linking to a new form each time
B. By changing the RecordSource property of the form to a different query in VBA
C. By closing and reopening the form
D. By exporting the tasks to Excel
Q14. What is the suggested method for assigning the current customer as the default when opening the tasks form from the customer form?
A. Using a macro to set the value
B. Using the default value property as "=Forms!CustomerF!CustomerID"
C. Manually typing the customer name each time
D. Linking the table relationships
Q15. What is a relational combo box as demonstrated in the video?
A. A combo box that only displays static value lists
B. A combo box that gets its values from another table and stores a reference in the current table
C. A combo box that generates random numbers
D. A combo box that can only be used in reports
Q16. Where does Richard recommend copying existing field controls from, such as the notes box, when designing the form?
A. From unrelated sample databases
B. From forms where similar fields already exist, like the customer form
C. Only from the property sheet
D. From web templates
Q17. What is the importance of correctly setting the tab order in Access forms?
A. It affects database security
B. It determines the order in which records are added
C. It controls the sequence fields are selected when tabbing through the form
D. It changes the form color scheme
Q18. What additional features does Richard mention are available in the extended cut for members?
A. Only more color themes
B. Direct email access to Richard for all viewers
C. Replacing queries with SQL code in buttons, clickable sorting headers, and a multi-field search box
D. Free computers for all members
Answers: 1-B; 2-C; 3-C; 4-B; 5-C; 6-B; 7-C; 8-C; 9-C; 10-B; 11-C; 12-A; 13-B; 14-B; 15-B; 16-B; 17-C; 18-C
DISCLAIMER: Quiz questions are AI generated. If you find any that are wrong, don't make sense, or aren't related to the video topic at hand, then please post a comment and let me know. Thanks.Summary Today's video from Access Learning Zone covers how to build your own task management database in Microsoft Access. I'll guide you step by step through designing a system that tracks your to-do items, allows you to organize tasks by customer, adjust their priority levels, filter for open or completed items, and more. This video was inspired by a request from one of my platinum members asking for an organized to-do list that could manage priorities, due dates, and customer associations, and also include buttons to filter open and all tasks, plus a handy search box.
Before starting, I recommend watching my free contact management video, which is available on my website. A lot of the concepts I'll discuss here are introduced there. Think of Access as a set of Lego blocks: the building pieces are similar but you arrange them differently depending on your project's requirements. So, while some content overlaps with the contacts video, today I'll show you how to assemble those blocks to create a robust task manager, and I'll introduce some new concepts as well. For background, you may also want to review videos on default values, relationships, combo boxes, and conditional formatting, as I reference those techniques here.
I'll start in the TechHelp Free Template, which you can download from my website. If you've already gone through the contact management tutorial, you'll be familiar with this template, as it features your customer list and includes the customer form, multiple contacts for each customer, and orders. If you're interested in the invoicing setup, I have a separate video on that, which can be helpful but isn't required for today's lesson.
The foundation of any database is its tables, so we'll begin there. Create your Task table, and start with an AutoNumber field called TaskID. While there are rare exceptions, most tables should begin with an AutoNumber as a primary key. Next, add a CustomerID field (as a Long Integer) so that you can tie tasks to customers if needed, although not every task must be linked to a customer.
Add a Description field (Short Text) for a brief summary, and a Notes field (Long Text) for extended details. Then, include DateCreated and DateDue fields (both Date/Time). DateDue can be left blank for tasks that aren't time-sensitive. You'll also want a DateCompleted field; if this is blank, the task is open, and if filled in, the task is done. For DateCreated, set its default value to Now() so new records automatically capture their creation timestamp.
Include an Importance field (Number) to categorize priority. Rather than an AutoNumber here, use a manual entry. Later, you'll make a related Importance table where 1 is low, 2 is medium, and 3 is high. Set the default to 2 for medium. I typically limit importance levels to three or four to keep selection simple and effective.
If your work requires, feel free to add more fields, like task status or percent completed. You could also track which employee is assigned or the task location. This basic structure should cover most needs, but the system is flexible so adjust as your requirements dictate.
After saving the Task table (TaskT), set up the helper table (ImportanceT) for task priorities. This table uses a manually set number as the primary key, not an AutoNumber, because for such small lists (low, medium, high) you want to maintain control and also sort them as needed. This is one of the very few situations where I recommend not using AutoNumber. Use this method only when only trusted users (like the database admin) will edit the table. Put the priority number and a Description (Short Text), and enter your importance levels: 1 for Low, 2 for Medium, 3 for High.
By placing even simple value lists like this in tables rather than embedded potential value lists in combo boxes, you make future updates easier. One change in the table automatically applies everywhere, without having to modify multiple form elements.
Next, I'll use a continuous form for the task manager. I start from a blank continuous form in our template and copy it to work with, naming it TaskF (Task Form). Appearance matters, so I set the layout and colors first to make the form visually organized and pleasant to use.
Set the form caption to something like "Task Manager," then bind the form to the TaskT table. Add fields as needed using the "Add Existing Fields" selector, though you can usually omit displaying TaskID, since it's an internal identifier. It's sometimes helpful for relationships or advanced features, and you can always keep it hidden if required.
For DateCreated, assign the control source and ensure it uses the ISO date format (yyyy-mm-dd hh:nn) for clarity and international usability. This format is especially helpful if your business involves customers in different countries.
Review the form's alignment and spacing for clarity. Double check the tab order so data entry flows logically from field to field. I recommend left-alignment for dates and numbers, but adjust according to your preferences.
Now, add in the Description field, and create the combo box for Importance. Set it to draw values from ImportanceT and store the selected value in the task's Importance field. You can hide the numeric column in the combo box so users only see "Low, Medium, High," though the number is what's saved behind the scenes.
Apply conditional formatting so tasks marked "Low" appear green and "High" appear red, with "Medium" left as white. This visual cue lets you spot urgent items immediately. Don't forget to name your combo box clearly for easier reference in code and formatting.
It's also good practice to lock non-editable fields like DateCreated, and remove them from the tab order so users can't accidentally try to change them.
Add the Notes field toward the bottom. If you already have a formatted notes box from another form (like a customer form), just copy and paste it. Consistency in field names across tables allows you to reuse form pieces quickly.
To allow users to select a customer for each task easily, bring in your Customer combo box from wherever you've already built it, such as the Orders form. Copy and adjust the layout as needed. I generally leave this field last, since most of my tasks aren't related to specific customers, but add it wherever it fits your workflow.
Then, add DateDue and DateCompleted fields. Adjust their formatting for ISO dates, and label them clearly as "Due" and "Completed."
Populate the form with a few sample tasks for realistic testing. For example, set up tasks with different importance levels, assigned due dates, and associate them with specific customers where relevant. Use keyboard shortcuts (like Ctrl+; for today's date and Ctrl+Shift+; for the current time) to make data entry faster.
The customer combo box can be set up for on-the-fly editing of customers via List Items Edit Form property, letting users add or modify customers directly from the tasks form.
You might also want to leverage related features shown in the invoicing video, such as defaulting the CustomerID based on the currently open customer form using a reference in the combo box's default value. This handy trick carries the open customer over as the default for new tasks entered via that route.
For navigation, add a button to the main menu so users can launch the tasks form directly. Writing the VBA code for this button is simple: just use the DoCmd.OpenForm method with the form name.
A similar concept applies to your customer form, where you may want a button that opens only that customer's tasks. Again, use the DoCmd.OpenForm method with a filter set to that customer's ID, so only their related tasks display.
The notes field at the bottom of the tasks form will always show details for the selected record, making it easy to log updates specific to each task.
Tasks should never be deleted simply because they're done. Instead, mark tasks as complete using the DateCompleted field. This preserves your task history, enables performance reviews, and protects your data like completed orders or inactive customers. I have an entire video about why data should not be deleted, which I recommend watching.
To streamline managing tasks, it's useful to have buttons to show all tasks or just the open ones. Once a task is completed, fill in the DateCompleted field, which automatically removes it from the list of open tasks without erasing it from your records.
The next step is to set up queries to power these buttons. One query (TaskQ) returns all tasks, sorted by due date so urgent items are at the top. For tasks without a due date, add a calculated field (DateDueIsNotNull) so records without a date appear last. Hide this helper column for UI neatness.
A second query (TaskNotCompletedQ) returns only open tasks — those where DateCompleted is null. This query becomes the default record source for your task form, so users always see their open items first.
Now, add buttons at the bottom of your form to toggle between showing all tasks and just open tasks. Each button, when clicked, simply changes the form's record source to the corresponding query using a little bit of VBA code. You can add further buttons or queries for more specific filters, like viewing only completed tasks.
If you want to explore more advanced techniques, today's Extended Cut covers replacing the saved queries with SQL statements directly in your button code (so you don't need separate saved queries), adding clickable headers to let users sort by column, and a search box that scans multiple fields at once.
If you are interested in viewing the full walkthrough, including these extended features, there is a complete video tutorial with step-by-step instructions for everything discussed here on my website at the link below.
Live long and prosper, my friends.Topic List Creating the task table with core fields
Setting default values for date fields
Using a helper table for task importance levels
Configuring and populating the importance table
Building a continuous form for tasks
Binding the task form to the task table
Formatting date fields with ISO date and 24-hour time
Adding and configuring combo boxes for relational data
Applying conditional formatting to the importance field
Locking and removing tab stop from non-editable fields
Copying and reusing controls from existing forms
Setting up the customer combo box using an existing form
Adding and formatting date due and completed fields
Adjusting form tab order for usability
Entering and testing sample tasks
Enabling editing customers from the combo box
Setting customer defaults from an open form
Adding buttons to open task forms from menus
Using VBA to open forms and apply filters
Filtering tasks by customer from a command button
Binding notes fields and displaying context-sensitive notes
Creating queries for all tasks and open tasks
Sorting tasks by due date, handling null due dates
Changing the task form's record source with VBA
Adding buttons to toggle between all and open tasks
Filtering for completed tasks using queries |


