Terms of Sale Text
By Richard Rost

 4 years ago
Select Terms of Sale Text for Invoices in Access
In this Microsoft Access tutorial, I'm going to show you how you can change the "terms of sale" text that goes on the bottom of your invoices in Microsoft Access. This way, hardware, service, and training sales can all have something different displayed.
Azul from Valencia, Spain (a Gold Member) asks: My company has three types of orders: hardware, service, and training. I'd like to be able to change the terms of sale, conditions, and disclosures that appear on the bottom of the printed invoice based on what kind of an order it is. How can I do this?
Members
Members will see how to add the terms of sale to the invoice automatically based on the type of products that were added to the order. Multiple terms will display, if necessary.
Silver Members and up get access to view Extended Cut videos, when available. Gold Members can download the files from class plus get access to the Code Vault. If you're not a member, Join Today!
 Links Links
Suggested Courses
Keywords
access 2016, access 2019, access 2021, access 365, microsoft access, ms access, ms access tutorial, #msaccess, #microsoftaccess, #help, #howto, #tutorial, #learn, #lesson, #training, #database, picking different contract terms, terms of sale, disclosures, order, invoice, dlookup, recordsets, based on product types, order type
Intro In this video, we will talk about how to add different Terms of Sale or conditions to the bottom of your invoices in Microsoft Access, based on the type of order. You will learn how to set up a terms table, add a combo box to your order form to select the appropriate terms, link it to your order using relationships, and display the correct terms on your printed invoice. We'll cover setting up fields, creating relationships, adjusting your queries, and formatting the report to show the terms for hardware, service, or training orders.Transcript Welcome to another TechHelp video brought to you by AccessLearningZone.com. I am your instructor, Richard Rost. In today's video, we're going to talk about Terms of Sale. How to add different Terms of Sale or conditions or disclosures or whatever you want to the bottom of your invoices, in Microsoft Access, based on the type of sale it is.
Azul from Valencia, Spain, one of my Gold members asks, My company has three types of orders: hardware, service, and training. I'd like to be able to change the terms of sale, conditions, and disclosures that appear on the bottom of the printed invoice based on what kind of an order it is. How can I do that?
Well Azul, provided each order is only one type, it's real easy to do. All we'll do is create a table to hold the terms of sale, then we'll put a combo box on the order form to pick it, and then we'll drop a text box on the invoice itself to display those terms. Let's see how it works.
First, there is some stuff you need to know before we continue with today's lesson. First off, you have to know relationships - how to relate two tables together because we have to relate together the order table and the terms table. You need to know relationships. Go watch this video. It's free. It's on my YouTube channel. It's on my website. There's a link right there. You can also click on the link down below in the description below the video window.
You should also know how to build relational combo boxes. Go watch this video too, so we can pick which terms we want. A minor prerequisite is you should know how to do an outer join. If you don't know what that is, go watch this video. I'll be using my blank template. Go watch this video. If you don't have a copy of my blank template already, this explains how I set up the database that we'll be using today. This video is next. It shows you how I put the contact system in it.
Finally, my invoicing video explains how I built the order entry part, which is what we're going to be doing.
Okay, so here I am in my TechHelp free template. This is a free download up on my website. If you want to go grab a copy, go right ahead. The first thing we have to do is make a table to hold our terms of sale. So let's go to create table design.
I'm going to call this term ID. This will be an autonumber. Then we'll have the description, a short text line so we can pick from something in the combo box, which can't put long text in there. Then we'll have the full text that's going to go on the invoice. That can be long text.
Now in the long text field, I'm going to come down here and I'm going to set this guy to rich text. Then we can put formatting and bold and colors and all kinds of stuff.
Save this as my term T. Yeah, I know it should be terms because there's more than one term, but I have a thing where I make all of my field names and my table names singular. Because then later on, if I'm writing code or I'm trying to remember the name of a field, I don't have to say to myself, is it term ID or terms ID? It always drives me nuts. So I just have a rule that I started recently: everything is singular.
Let's put some stuff in here for the different types of sales we have. What are our different types of sales? We have service, we have merchandise or hardware, and we have training. I'm just going to put this stuff right in the table. Usually, this is something that you only have to do rarely. The developer will set it up and I've got something I already typed in my other database. I'm just going to copy and paste. We're doing a database from Quarks Used Starship Parts Emporium, of course.
Paste the stuff in there. There's the merchandise and one for training. These will go on the bottom of the invoice based on the type of order it is.
Now we need to be able to put that term ID on the order itself. So go to the order table design view. Come down to the bottom. We'll put term ID in there. That's going to be a number of type long integer. That's our foreign key. Term ID is a primary key over in the term table. In this table, it's relating to that one, so it's a foreign key. Set the default value to one so that new orders as they're created will be, what was one? Service, I think.
Let's say most of our sales are service, or if it's merchandise, make it two, doesn't matter. It's just so you don't have to keep picking it for blank new orders. Obviously, you have to go in the system and set up one for anybody in here already. Go one, two, and three. Okay, for the three different orders we have in the system.
Now we need a way to pick that type on the order form. Let's make a combo box. Go to the orders. Design the order form. I'm just going to shrink up the notes real quick. Let's drop it right here. Go up to our toolbox, grab the combo box, drop it there. Look up the values from a table or query. Which table has our values? It's term T.
Next, what fields do you want? Need them both? Next, what do you want to sort by? Sort by description. Next, that's what it's going to look like. Our key column is hidden. We need that value to store it in the table, but I don't need to see it in the combo box. Next, we're going to store that value in the term ID on the order form or in the order table specifically. We're going to save that in the order T.
Next, what label do you want? I don't care. We're going to get rid of it anyway. Delete it, and then we'll just put out a nice little friendly combo box right here so we can pick that as we're making our orders up.
Save it. Close it. Open the order back up again. You can see there's a service order, merchandise, or training. This is a simple example. It assumes that all the stuff on here is one of these. If you want a more complicated one, in the extended cut for the members, we're going to make it so that you don't need to pick it here. It will just know based on the type of stuff that's on that order, and it could add multiple ones. If it's got both hardware and service on it, it'll put both terms and conditions. We'll do that in the extended cut.
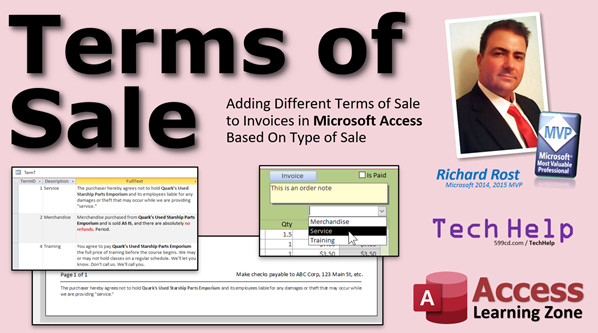
Now we've got to modify our invoice to put it right down here on the bottom of the invoice. To do that, we have to have that data from the term table. That long text from the term table - we have to have that and put it in here. So we've got to add it to the query that this thing is built on.
Design view. If you watch the video where I built this invoice, you'll know that it's order invoice Q, because I had to bring together data from multiple tables. We've got order T data. We've got order detail T data.
Go to the order invoice Q design view. Don't need the property sheet. What do I have to bring in here? I have to bring in that term table. Add tables. Go to the tables. Term T, put it there.
This is an inner join, which means you have to have matching records in both. Just in case we forget to put a term ID in there or someone deletes it, I'm going to set this join equal to an outer join. So we see all the records from order table and the matching records from term T. In other words, if someone doesn't have a term picked for their order, the order won't show up at all. So we want to make sure that we can see it, even if it doesn't have a term selected.
I'm going to add that full text to the query down here, but I don't want to call it full text. Let's call it something else. Let's call it terms of sale. So we're going to bring down full text, and then we're going to alias it. In other words, right in front of it, I'm going to type in terms of sale.
I know I just had that whole thing I told you about the singular/plural, but this is only going to be used in one spot, just on that report.
Save it, and let's take a peek at it real quick. There it is.
Now that it's in the query, I can add it to the report. Let's come down and find the order invoice report, design view. I like to maximize reports when I work on them. Scroll down here. You can either put it in the page footer or in the report footer. Either one, I'll put it in the report footer. The report footer shows up at the bottom of the entire report. The page footer shows up at the bottom of each page. Funny enough, the report footer displays above the first page footer on this one.
I'm going to copy this thing, then paste it, just to give it a blank line down here. There it is. Right there. Good. Go up to the Add Existing Fields box. There's terms of sale. Click, drag, drop. Get rid of that label.
Someone recently told me in the comments on one of my YouTube videos, someone taught me a new trick. You know how when you click and drag, you drop, you get that label. Watch this. He taught me this. I didn't know this. Hold down Control, click and drag, and it doesn't bring a label in. Isn't that neat? That's nifty. I've been using Access for almost 30 years and I never knew that. That's cool. I love when you guys share things with me that I don't know. I love it. If you want to question something that I've taught you, I welcome all that. I'm not one of these guys that think I know everything. It's taken me 30 years to know that I don't know everything, even with Microsoft Access, and that's the one thing I know the most about. I still learn new stuff every day. I learned something new. So if you've only been working with Access for a year or a couple of years or you're brand new with it, don't worry. It's a lifetime thing. It's one of those things where it's easy to get started and get going with it and build decent databases, but it'll take your lifetime to master this stuff.
Here's my terms of sale. Save it. Close it. Open it up. There it is. We have to get rid of that box around it, and it's got to be probably smaller print too. Smaller type. Let's do this. Click on that, go to format. Shape outline is transparent. I like to make the shape fill transparent too, in case you do change the background. This is 5 points, we'll set it to 9. These are for Rengue by the way. They will try to hide the terms in the small print. There you go. There's your terms.
If you do have a pretty big box of terms of sale, make sure your can grow and can shrink under format. Can grow and can shrink - make sure those are both set to yes. In your report footer section, there's also can grow/can shrink. I set those both to yes as well because if you reserve a big spot for this and there's nothing in there, you don't want it wasting space.
If you want this to be in the page footer instead of the report footer, that's easy to do too. Just make this bigger, cut this out and just paste it up here, or just click and drag it. The page footer will show up at the bottom of every page. If you've got a big giant paragraph of that, you might want to have it in the report footer so it just shows up once at the very end if you have multiple pages.
Coming up in the extended cut for the members, we are going to make it so that you can add all the terms that are applicable based on the items purchased. You could have multiple terms and conditions show up down here. We'll use the member database, which is a little more sophisticated. It's very sophisticated. We'll get that term off of the order where you pick it and instead put it in the product list right over here. So you can pick what each type of product is: training, hardware, service.
When you make the invoice, you don't have to put it in here, and the order will just know which ones it has to include. This one will have both merchandise and training in it. That is covered in the extended cut for the members.
Silver members and up get access to all of my extended cut videos. There are well over 200 now - we're approaching 300. Gold members get access to download these databases that I build, and you get the code vault, which is lots of cool VB code that I cover in my lessons. You don't have to type, just copy and paste.
I hope you learned something. We'll see you next time.
How do you become a member? Click on the join button below the video. After you click the join button, you'll see a list of all the different membership levels that are available, each with its own special perks.
Silver members and up will get access to all of my extended cut TechHelp videos, one free beginner class each month, and more. Gold members get access to download all of the sample databases that I build on my TechHelp videos plus my code vault where I keep tons of different functions that I use. You'll also get a higher priority if you decide to submit any TechHelp questions to me, and you'll get one free expert class each month after you finish the beginner series.
Platinum members get all the previous perks plus even higher priority for TechHelp questions, access to all of my full beginner courses for every subject, and one free developer class each month after you finish the expert classes. These are the full length courses found on my website, not just for Access. I also teach Word, Excel, Visual Basic, and lots more.
You can now become a diamond sponsor and have your name or company name listed on a sponsors page that will be shown in each video as long as you are a sponsor. You'll get a shout out in the video and a link to your website or product in the text below the video and on my website.
Don't worry, these free TechHelp videos are going to keep coming. As long as you keep watching them, I'll keep making more and they'll always be free.Quiz Q1. What is the primary purpose of adding terms of sale to the bottom of invoices in Microsoft Access, as discussed in the video?
A. To provide conditions and disclosures specific to the type of order
B. To increase the invoice total amount automatically
C. To summarize the quantities of products ordered
D. To automate the order approval process
Q2. What is the recommended method for allowing changing terms of sale based on order type?
A. Using a single fixed text field on the invoice
B. Creating a table to hold the terms and linking it to orders
C. Hardcoding the terms into the report layout
D. Using macros to display messages during printing
Q3. In the solution provided, how is the term type selected for an order?
A. By typing it manually into a text box
B. By selecting it from a combo box on the order form
C. By calculating it based on the total order price
D. By assigning it via a macro at runtime
Q4. Why is it important to understand table relationships before implementing the terms of sale feature?
A. To relate the orders table with the terms table using a foreign key
B. To ensure that reports are formatted correctly
C. To increase the speed of data entry in the form
D. To allow automatic email sending of invoices
Q5. Which data type is used for the primary key in the terms table?
A. Short Text
B. Date/Time
C. Autonumber
D. Currency
Q6. What field type is used for the main text of the terms of sale, and why?
A. Short Text, for ease of searching
B. Number, for faster processing
C. Long Text, to store large formatted content
D. Date/Time, to track last update
Q7. Why does the instructor prefer to use singular names for tables and fields?
A. He believes plural names confuse Access
B. To maintain consistency and avoid confusion in code
C. Microsoft Access does not support plural names
D. It increases query performance
Q8. When adding the terms of sale to the report, where did the instructor place the text field?
A. In the report footer
B. In the page header
C. In the group footer
D. In the order details section
Q9. What is the purpose of setting the Can Grow and Can Shrink properties to Yes for the terms of sale field on the report?
A. To make the text bold
B. To allow the text box and section to adjust dynamically to the amount of text
C. To make the report print faster
D. To enable editing of the terms on the report
Q10. What feature did the instructor learn that allowed him to drag and drop a text field into the report without its label?
A. Dragging while holding the Shift key
B. Dragging while holding the Control key
C. Using the right mouse button
D. Double-clicking the field first
Q11. What join type does the instructor recommend for the query to ensure all orders appear, even if a terms record is missing?
A. Inner Join
B. Self Join
C. Outer Join
D. Cross Join
Q12. In the extended member lesson, what enhanced feature is demonstrated related to order terms?
A. Allowing terms to be selected by an admin only
B. Adding multiple types of terms automatically based on items purchased
C. Sending terms directly to customers by email
D. Disallowing any changes to terms after invoice creation
Answers: 1-A; 2-B; 3-B; 4-A; 5-C; 6-C; 7-B; 8-A; 9-B; 10-B; 11-C; 12-B
DISCLAIMER: Quiz questions are AI generated. If you find any that are wrong, don't make sense, or aren't related to the video topic at hand, then please post a comment and let me know. Thanks.Summary Today's video from Access Learning Zone focuses on customizing the terms of sale that appear on your invoices in Microsoft Access, based on the specific type of order. Many businesses, like Azul's company, handle multiple order types such as hardware, service, or training, and need a way to automatically display the relevant terms or disclosures on each invoice.
If each order has only one type, the solution is straightforward. You'll start by creating a new table dedicated to storing different terms of sale. This table should include a field for a short description, which is easy to select from a combo box, and a long text field for the complete terms to be printed at the bottom of your invoice. Make sure to set the long text field to use rich text so you can apply formatting such as bold or color.
As you're working through this process, you should be comfortable with the basics of table relationships in Access, since you will need to relate your new terms table to your existing orders table. If you're not sure about table relationships, relational combo boxes, outer joins, or you haven't set up your blank template database, I recommend reviewing the relevant free tutorials on my website before proceeding.
Once your terms table is ready, populate it with the various terms for each type of sale your company handles. For example, you might have terms for service, hardware, and training orders. After setting up this reference table, head over to your orders table and add a TermID field, which should be a foreign key pointing to the primary key in your terms table. Setting a default value, such as the most common sales type, can help streamline order entry for new records.
The order entry form needs a combo box so the user can select the appropriate terms of sale for each order. Set up this combo box to pull its values from your terms table, displaying the description and storing the associated TermID in your orders table. This allows each order to specify which set of terms should appear on the invoice.
With the order and terms tables linked, and the order form updated, it's time to modify your invoice report. The goal is to display the correct terms of sale at the bottom of each invoice. Start by updating the query that the invoice report is based on. Add the terms table using an outer join, so all orders show up even if a corresponding term hasn't been specifically selected. Bring in the long text field from the terms table, and give it an alias such as "Terms of Sale" for clarity.
Next, open your invoice report in design view. Insert a text box into the report footer (so the terms appear at the bottom of the invoice) and bind it to the new "Terms of Sale" field from your query. Adjust the formatting as needed for readability and appearance; for example, set the outline and fill to transparent and adjust the font size as appropriate. If your terms of sale might be lengthy, make sure the "can grow" and "can shrink" properties are enabled for both the text box and the report footer section, to ensure the layout adapts properly.
If you prefer your terms to appear in the page footer (so they repeat on each page) instead of the report footer (once at the end), simply move the text box accordingly.
For those who need a more advanced setup, in today's Extended Cut, we cover how to display multiple sets of terms and conditions based on the various products included in an order. This allows for even more dynamic and detailed invoices, auto-selecting terms by product type without requiring manual selection on the order form. This setup is demonstrated using our more advanced member database, where terms can be assigned to individual products such as training, hardware, or service. The invoice then automatically includes all relevant terms for the items purchased.
Silver members and above get access to all Extended Cut videos, which now number over 200. Gold members can download the example databases I build in these videos, along with access to the code vault for various VBA functions. Platinum members receive all previous benefits, plus access to all full beginner and expert courses across all my teaching subjects, including Access, Word, Excel, and more.
Even though many lessons are unlocked for paying members, rest assured that the free TechHelp video series will continue as long as you keep watching.
You can find a complete video tutorial with step-by-step instructions on everything discussed here on my website at the link below.
Live long and prosper, my friends.Topic List Creating a terms of sale table in Access
Setting up the term ID field as autonumber
Adding description and long text fields for terms
Configuring long text as rich text for formatting
Populating the terms table with sales types
Adding a foreign key (term ID) to the order table
Setting default term ID for new orders
Creating a combo box on the order form to select terms
Binding the combo box to the term ID field
Adding the terms table to the invoice query
Changing the join to outer join between order and terms
Aliasing the full text field as "terms of sale" in the query
Adding the terms of sale field to the invoice report
Formatting the terms field on the report (font, outline)
Configuring can grow and can shrink for dynamic sizing
Choosing between page footer and report footer for display |


