Access Amortization Template v2
Microsoft Access Loan Amortization v2 Template
Introducing the updated version 2 of my very popular Access Loan Amortization Template. This new version includes greatly enhanced speed so that your schedules recalculate instantaneously. You can add an additional amount due to each payment, which you can use for taxes, insurance, or late fees. You can revise the loan schedule calculations and automatically reapply the payments. I've added date filters and lots of additional enhancements.
Videos
Updates
- Version 2.1 update (2024-09-12). Fixed the filter boxes so that if you pick "life of loan" and there is a payment made before the loan start date or after the last scheduled payment, it will still adjust accordingly. Also fixed the manual mode so it will not automatically change to the loan scheduled payment dates. If you've made extensive changes to your database, the only modifications I've made are in the GlobalMod, so you don't have to worry about updates to your forms or reports.
Sample Database
If you'd like to download a sample copy of the database template, you can do so here. This is a non-editable ACCDE version of the template which will let you see it work in action. You can enter/edit data, but you cannot access the design of the forms, reports, VBA, etc. The sample database requires 64-bit Access 2013 or higher. If you're still using 32-bit Office, read this. Be sure to watch the Introduction video (above) to see how to use it.

Free Sample Database (2.0)
Full Developer Database
Once you have purchased the full developer database template, come back to this page and click on the Download button below. This will give you access to the ZIP file containing the Template ACCDB file. The full version will run on 32-bit or 64-bit Access 2007 or higher. Be sure to watch the Integration Instructions video (above), and visit the Instructions page.
Full (Paid) Version 2.1
 Links Links

Features
- Calculate the monthly payment based on loan amount, interest rate, number of years
- Automatically adjust final payment to ensure there are no rounding errors
- Create full amortization schedule showing principal and interest for each month
- Track beginning and ending balance for each period
- Allow monthly payment overage to subtract from principal balance (optional)
- Recalculate monthly interest payments as data changes
- Monthly payments automatically stored and applied where needed
- Additional payment amounts can now be added (taxes, insurance, late fees, etc.)
The Loan Form is the main feature of this database. Here you can select a client, a loan provider, enter the terms of the loan, calculate the payments, generate a complete amortization schedule, and track client payments.

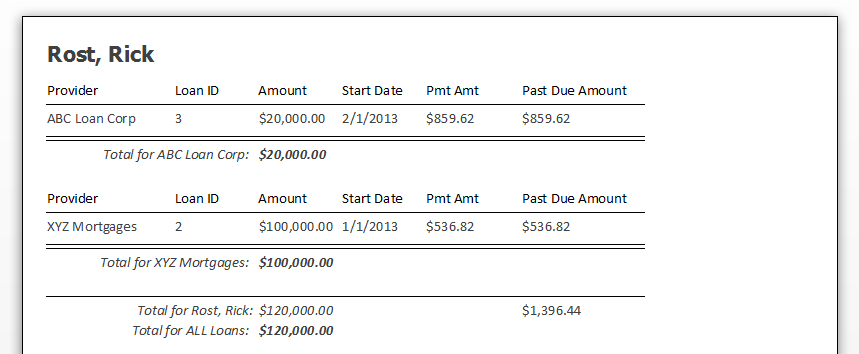
You can print a report showing the status of all loans per client.
To create a new loan, just select a client and a provider. Enter a description, the loan amound, the interest rate, and the start date. Select a frequency (monthly, weekly, etc.). Enter in the number of payments (or type in the number of Years and the database will calculate the number of payments for you). The database will automatically tell you what the payment should be. Now you're ready to generate the complete Amortization Schedule. Again, one click and Access does all the heavy lifting for you.
You can enter the client's payments as they come in. Access will assign them to "regular" payment amount and "extra" payment amount, if you wish to allow the client to pay down his balance early.
You can print this complete report out for the client.
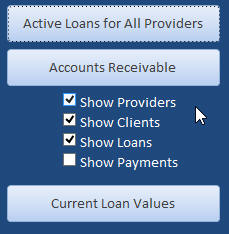
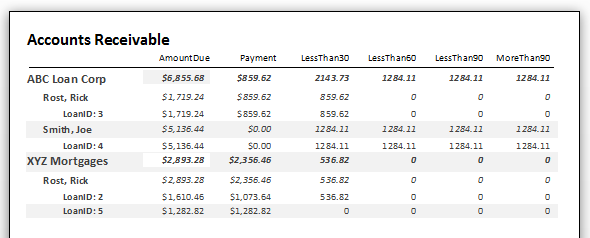
There are a couple of additional reports as well. You can generate a list of all active loans for all providers, a list of all current loan values (payoff amounts), and you can generate an aged accounts receivable, showing as much or as little detail as you want.
For example, this report shows the providers, clients, and loan info, but not all of the payment schedule details:
Please note that this is NOT a teaching database. If you want to learn how to build an earlier version of this database, with step-by-step instructions, the please purchase the Loan Amortization Seminar. I am not planning on releasing videos for this upgraded template. If you are interested, please post a comment below.
If you purchased the Loan Amortization Seminar or the Loan Amortization Template 1.0 after June 13th, 2021, you are entitled to a free upgrade to this template. If you purchased either of those items before that date, you will receive a 50% discount on the new version. Please contact me in either case.
Possible Future Upgrade Ideas
If you are interested in any of these, please post a comment below.
- Principal Only Payments
- Variable Interest Rate Loans
- Simple Late Fee Add-Ons
License
For internal use only. This template does NOT come with a royalty-free license. You may only customize the template for your business needs and for use within your organization at one location ONLY. You may not resell or distribute any form of this template to others without express written permission. Contact me for additional information on obtaining a license to distribute if you plan on including this template in a product you are reselling. Additional licenses are required if you plan on using this template with more than ten (10) employees or in multiple locations within your organization.
Not a Finished Product
Please keep in mind that most of my template databases are not designed to be finished products that are ready to go in a working environment. My templates are meant as starting points for you to customize for yourself so you don't have to reinvent the wheel. This requires that you have a basic understanding of Microsoft Access development. To work on most of my databases you should have completed my Access Beginner series and the first couple levels of my Expert series at a minimum. Most of my databases require knowledge of SQL and VBA as well. Keep in mind that most of my templates are not like off-the-shelf software. They're starting points for developers to be able to modify and use as their own. It really is going to be in your benefit to watch all of the prerequisite videos so you understand the database and how it works moving forward. This is not like QuickBooks where you just install it and use it. My templates are mostly designed for people who already have an understanding of how Microsoft Access works.
Customize For Your Needs
If you would like to discuss customizing this template for your needs, and integrating it into your current setup, please see my consulting page for details. While I no longer accept custom jobs that are specific to a single user, I may include your features in a future version of this template if they have mass appeal. If you are looking for custom enhancements made to this template just for you, visit my Developer Network.
Technical Support
Please note that technical support is NOT guaranteed for any of my courses, seminars, or templates. If you require help with modifying this template, you may post a question in the Forums, however an answer to your question is not guaranteed. If this template comes with an accompanying Seminar, then you should purchase that Seminar to see how the database was constructed. If not, then you should have taken the suggested courses. Most of my templates are designed on a Developer level and you should have a thorough understanding of SQL and VBA before attempting to modify them. If you have a problem with one of my databases, I will only support the unmodified database exactly as it's downloaded from my site. If you have modified it in any way, it may not be something I can help you with. You can post in the Forums, and I may be able to help you, but if the issue doesn't exist in my unmodified database, it's not something I can support.
Questions?
Got sales or customer service questions about this template? Feel free to contact me. If you have technical "how do I" questions about this template, you discover a bug, or want to suggest a new feature, then please post your comments below.
Keywords
microsoft access, ms access, ms access tutorial, #msaccess, #microsoftaccess, #help, #howto, #tutorial, #learn, #lesson, #training, #database, #template, microsoft access amortize, amortization, loan, payment, schedule, pmt, aged accounts receivable, Mortgage, Decreasing, Reducing, Calculator
Transcript Greetings. This is Richard Rost from AccessLearningZone.com. I just released version 2.0 of my very popular Access Amortization template. If you have a need to calculate loan amortizations, this template is for you. The purpose of this video is to give you a quick walkthrough of how to use all the features in this template.
The database has a list of clients. You can put all your clients in here. If you want to add a new client, click down here. There are so many in here, like Jim Kirk. Of course, for all the other fields you want to add information for, email, phone, address, all that stuff. You can mark clients as inactive or active. This way, you do not have to see them if you do not want to. Let's say you have a client who has finished paying off their loan and you do not want to see them in your list anymore. You can just mark them as inactive. The same thing happens with loans too. You can mark loans active or inactive.
Let's add a new loan here for Jim Kirk. Are you sure? Yes. There are a lot of "Are you sure?" prompts in this because I do not want people deleting important information.
This is the loan form that opens up. You have your client here. You can have your list of providers. I just put one provider in here, ABC Loans. If it is just you, just put your name in there. If you work with different providers, put them in there. Description goes here, for example "Home loan" or whatever. If you want to put notes in here, you can type as much as you want. It is a long text field—just double click here. That is why it is blue. Anything that is blue, you can double click on it and it will do something. Double click. That will bring up the zoom box.
Address. You can put the home address in here. Put whatever you want in the notes field.
I will do a simple loan first. Let's say you are doing a $100,000 loan. Interest rate is 5. Start date, let's say, is 7-1 of this year. Monthly frequency, of course, you can change this if you want to. Number of payments defaults to 360 months; that is a 30-year loan. If you want to change it, just come right over here. You can type in the number here if you want to. If you do not want to do math, type in 20 for the years and hit that button. It recalculates it for you, just to save you some time from doing the math. I will put it back to 30 years.
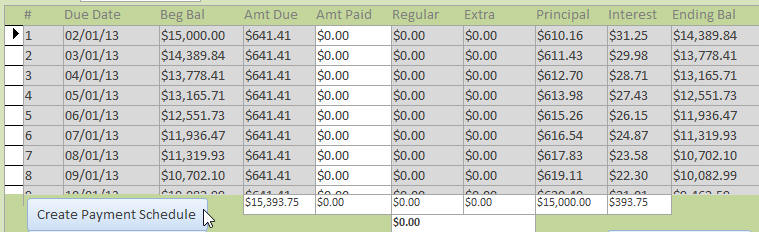
There you can see your payment amounts up here. Let's go ahead and click on calculate loan schedule. It will generate the schedule for your rate down there.
Let's take a step back. Let's say this was supposed to actually start in May. May 1, so we will change that date too. I am using the ISO date standard, which is year-month-day. It will display in whatever the short date format on your system is.
If I press Tab now, notice the calculate loan schedule button turned red. That means it says, hey, you made some changes. If you try to exit the form right now, it is going to say, wait a minute, you changed the terms of the loan condition. Are you sure you want to do that? I will say yes, and it will recalculate everything for me.
Now you will see that these are red. Why? Because these are past due. These are now past payments. They have not been paid yet, so they show up as red.
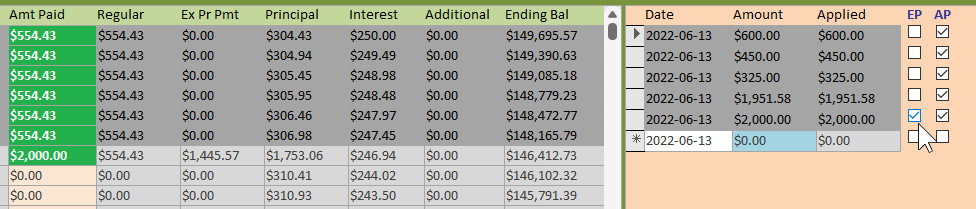
Let's put some payments in. Let's say they come in and they make a payment for what their amount due is here, $536.82. Let's say they come in and make a payment for $600.
When you put a payment in here, you will see over here there are two checkboxes. This checkbox means this payment has been applied. You are going to let the system do this for you when you click Apply Payments. This one is extra principal. In other words, do you want to put anything that is extra toward just principal only? It will be an extra principal payment. That will go in this column.
For now, let's just say it is a regular payment. I will hit Apply. The database puts the $536.82 toward that payment and carries over what is left to the next payment. It is still past due though.
Let's come over here and make that payment. If you double click on this field, it will default to whatever is either past due or the amount of their next payment. If I double click right now, it sets it to $473.64. Now I can apply that payment. There we go.
They come in, and they make their next payment. Just double click here, it puts in the default amount. Apply the payment. You can put in multiple payments if you want. Let's say for the next month, they give you $100, then they give you $150, then they send in $50. Then, we can apply those all at the same time. The database puts that money where it goes.
Now, let's say they did well at the casino and want to come in here and put a $10,000 payment down. They want to pay off some principal. What we will do is mark this as extra principal. In other words, it is going to make whatever regular payment is left, then it will put the rest toward extra principal. When I apply that, there you go.
You can see the total payment was $10,300 because they had already paid $300 toward that one. The regular was that amount, and that much was put toward extra principal. For this payment, that is how much they paid off in principal and in interest. It recalculates the rest of the schedule. As you can see, now they only have 291 payments left as opposed to the original 360. Their payoff amount is right down here at any given time. If you want to see what their payoff amount is as of today's date, there it is.
Normally, when you pay over like that, the default is not to put extra toward principal. The default is to carry it over to the next month. If they did come in normally and gave you $5,000, the default is to just carry that all the way down. If you want the default to be that extra goes to principal, just check that box. Any future payments—if you close this loan, for example, then come back into it—you will see the next default payment is going to be extra principal. That is how I like to do mine.
You cannot just delete these payments and have this automatically update. It is way too complex. If you want to delete a payment, if there is a payment that is a mistake, what you have to do is unapply that payment. It is not going to change the amortization schedule, but watch what you can do. Say yes. Now, this payment can be deleted or reapplied if you want to. Delete that payment. Now, what you are going to do is recalculate the loan schedule. Say yes. Then you can reapply all the remaining payments and it puts them where they belong. That is the easiest way to do that. It is too much of a nightmare to calculate if you do it any other way.
If you have a payment up here that has to be modified or deleted, just unapply it, or if you want to, you can delete all the payments. That will recalculate the loan for you, and then just put the payments back in, whichever you prefer. If you have got a modified payment in the middle somewhere, unapply it, delete it, recalculate the loan schedule, and just reapply the remaining payments. That is the easiest way to do it.
Now, talk about additional costs. Additional costs are things like taxes, insurance, the stuff that you have to add in every month. You could use this for late fees if you want to.
Let's say for the first year they have to pay their taxes and whatever. After that, you are going to recalculate it every year. You can just come in here under additional costs. Start period, end period. They have got an additional cost of, let's say, $150 a month for the entire life of the loan. You can just leave it like that. If that only applies to the first year, then just say starting with payment one, ending with payment 12, it is that. Then, let's say their taxes are included, maybe make it $5.50, then $13 to $360 is something else.
This does not check for overlap. Be careful; you have to be smart using this. If you want to put a late fee in there, for example, for month two, it just gets a little complicated. But watch. You can do one to one as $5.50 a month, two to two only as, let's say, $600 because they have that late fee. Then, three to twelve is back down to $5.50. See how you have to do this? If you close this and reopen, it will resort. This is where the extra payments can be added to the schedule.
Of course, you have to recalculate. Hit the recalculate button and it will put those in there. $5.50, $600, $5.50 again, and then down to $120. That is how you can change this additional payment there. They come in and they make their payment, double click, apply.
Now, look what happens. It was marked extra principal. That entire month, the extra got put to principal. You might not want to do that. Let's delete that. I am going to turn off the extra to principal. Now their past due amount is that. Now, when I make the payment and hit apply, it applies it properly to both months. So you have to be careful with that extra principal setting.
There are some different zooms here. You could change this. You could see from one year from the first unpaid period—that is, the first unpaid period forward one month or one year. You can go from one year from the start of this month. You can go current calendar year. You can go the entire life of the loan, which is the default setting. Or you can do current calendar year. These little plus and minus buttons will go to next year, back a year, back a year, and so on. Let's go to current calendar year.
There is a "Print this loan" button up here that will give you a nice little printout of everything that is in this loan. There is each month. You have yearly totals down here. And at the very end, you can see your totals here, and there is your payment history. Close that.
You could have multiple loans for each person in here. Just add another one, just click on that. Print all loans. Print all loans for this customer or this client. It will break it down by provider if they have got loans from different providers.
Back here on the main menu, here are your providers. You can change those. That is pretty simple. Here is where you can print all active loans for all providers. This shows you everything for everybody. There is an accounts receivable right here, which shows you what is due. Current loan values. And a delete all system data button. This is mostly for me, so I can clean the database of any sample data when I release this. But, if you are going to be using this in-house and you have got different agents, you can clear your system data so they are not getting copies of all your stuff and vice versa.
So that is your quick rundown of the Amortization 2.0 database. There is lots of new stuff in here that I have added. I do have an older loan amortization seminar. If you want to learn how to build a database like this from scratch, this seminar has lots of videos that will teach you exactly what I did to build the previous version of the database.
I am not doing a seminar for this one because I have added a lot of new stuff, mostly enhancements and some extra fields. Basically, this seminar will teach you everything that I did to build the first one. It is a few hours long, it walks you through everything—all the code, how I built stuff, the reports. This is 90 percent of it. The 2.0 database, I added some enhancements. I changed it to record sets, I added some extra bells and whistles, I added the additional costs. If you want to add in the taxes and insurance and late fees and stuff, but the seminar will teach you mostly how this was built and then the template for 2.0 has all the extra features in it for you to use.
So there you go. There is your Access Amortization template version 2. If you have any questions, please feel free to post them down below. Thanks, we will see you next time.Intro In this video, I will walk you through the new features and enhancements in version 2.0 of my Microsoft Access Amortization template. You will learn how to manage clients and loans, mark loans and clients as active or inactive, enter payments including extra principal, handle additional costs like taxes and fees, and print detailed loan reports. I will also show you how to use tools like the recalculation and unapply functions when modifying payment records, and explain the updated user interface to help you get the most out of this template.Quiz Q1. What is the main purpose of the Access Amortization template discussed in the video?
A. To manage employee payroll calculation
B. To calculate and manage loan amortizations
C. To design email marketing campaigns
D. To track inventory in a warehouse
Q2. How can you hide clients or loans that are no longer active in the database?
A. Delete them from the system
B. Move them to an archive folder
C. Mark them as inactive
D. Change their provider
Q3. What happens when you make changes to a loan, such as the start date or interest rate?
A. You are required to delete the loan and re-enter it
B. The calculate loan schedule button turns red indicating recalculation is needed
C. The payment schedule automatically updates in real-time
D. The system locks the loan until an administrator approves the changes
Q4. How are fields that have special functions, like the zoom box for notes, visually indicated in the template?
A. They are highlighted in green
B. They have bold fonts
C. They are shaded blue and can be double-clicked
D. They are underlined
Q5. What is the default behavior when a client pays more than the required monthly payment?
A. The extra amount is refunded
B. The extra is automatically applied as extra principal
C. The default is to carry the extra over to the next month
D. The payment is rejected
Q6. If a mistake is made when entering a payment, what is the recommended process to correct it?
A. Directly overwrite the payment record
B. Unapply the payment, delete it, recalculate the loan, then reapply remaining payments
C. Close and reopen the database
D. Ignore it, as the system will self-correct
Q7. What can be added under "Additional Costs" in the template?
A. Only principal payments
B. Items like taxes, insurance, and late fees
C. Loan provider information
D. Client addresses
Q8. How does the template handle overlapping additional costs periods?
A. It merges them automatically
B. It prevents you from entering overlapping periods
C. It does not check for overlap; the user must be careful
D. It flags overlapping periods as errors
Q9. What options are available for viewing the loan schedule in the template?
A. Only entire loan duration
B. Several zoom options like one year from first unpaid period, current calendar year, or the entire life of the loan
C. Only current month
D. Only by provider
Q10. What is the "Print this loan" button used for?
A. To print client contact information
B. To print a summary of the provider details
C. To print a detailed schedule and payment history for a specific loan
D. To print all database tables
Q11. If you want all extra future payments to always go toward principal, how can you set this preference?
A. Change it in the provider settings page
B. Select "extra to principal" checkbox as default for the loan
C. It is not possible to set a default
D. Assign it each time you enter a payment
Q12. What function does the "Delete all system data" button serve?
A. It resets the entire database including application settings
B. It clears out sample data for a fresh start or between different agents
C. It removes only inactive clients
D. It deletes all loan schedules
Q13. If you want to print information for all loans tied to a specific customer, what can you do?
A. Print the main menu
B. Use the "Print all loans for this customer" option
C. Export data to Excel first
D. Print each loan individually
Q14. According to the video, what is a main new feature of version 2.0 of the template?
A. Ability to send loan schedules via email
B. Addition of "Additional Costs" for handling taxes, insurance, and late fees
C. Support for international currencies
D. Built-in credit score analysis
Answers: 1-B; 2-C; 3-B; 4-C; 5-C; 6-B; 7-B; 8-C; 9-B; 10-C; 11-B; 12-B; 13-B; 14-B
DISCLAIMER: Quiz questions are AI generated. If you find any that are wrong, don't make sense, or aren't related to the video topic at hand, then please post a comment and let me know. Thanks.Summary Today's video from Access Learning Zone introduces the new version 2.0 of my Access Amortization template, an essential tool for anyone needing to calculate loan amortizations. In this walkthrough, I'll explain how to get the most out of all the features this template offers.
The database begins with a list of clients, where you can store all your client details. When adding a new client, you can enter information such as name, email, phone, and address. Clients can be marked as either active or inactive. This is useful if, for example, a client has finished repaying their loan and you no longer want them displayed in your active list. The same concept applies to individual loans; you can also mark them as active or inactive as needed.
To add a new loan for a client, you will encounter some confirmation prompts. These are in place to prevent accidental deletion of important data. Once you add a loan, the loan form will open. Here, you select the client, the loan provider (for example, ABC Loans or simply your own company if you are the provider), and enter a description such as "Home loan." There is a notes section available, which allows for unlimited text, and you can access a zoom box by double clicking if you need more space.
You can also enter the address related to the loan and include any relevant notes. Let me walk you through a simple example: suppose you are processing a $100,000 loan with a 5 percent interest rate, starting on July 1st of the current year. Monthly is the default payment frequency, but you can adjust this if necessary. The default number of payments is 360, representing a typical 30-year mortgage, but you can change the number, type in the desired number of years, and the system will do the conversion for you.
At the top, you will see the calculated payment amount. After you set all the loan terms, use the "calculate loan schedule" function to generate the full payment schedule.
If you need to change the start date, for example, to May 1st, simply update the date. The system uses the ISO date standard, displaying dates according to your system's short date format. If any loan terms are changed, the "calculate loan schedule" button will turn red to warn you that recalculation is needed. Attempting to close the form without recalculating will prompt a reminder, so you have an opportunity to update the loan details accordingly.
Once recalculated, if previous payments are overdue and have not yet been recorded, they will appear in red to highlight their status as past due.
To record payments, enter the amount paid. For example, if a client pays $600 when the actual amount due is $536.82, you enter this payment. There are two checkboxes next to each payment entry: one indicates if the payment has been applied, which the system manages for you; the second is for marking an extra principal payment. This allows you the flexibility to designate surplus payments as contributions directly toward loan principal, rather than just advancing future payments.
To apply a payment, select the appropriate entry, and the system will allocate the payment accordingly and adjust the schedule. For subsequent payments, a double click fills in the default amount due, making data entry quick and efficient. You can record multiple payments for a single period, and when you apply them, the system correctly distributes the amounts across the appropriate periods.
If, for instance, a client makes a large payment, such as $10,000 toward principal after coming into some extra money, you would mark this payment as extra principal, and the system will properly apply the regular payment amount and then allocate the overage to reducing the principal. The schedule is recalculated to reflect an updated payoff time, with the total number of payments reduced.
By default, surplus payments are carried over to the next scheduled period unless you specify otherwise. If you prefer the default behavior to be that all extra payments reduce the principal, you can change this setting. This way, any future payments will go directly toward principal by default.
It is important to note that deleting payments does not automatically update the loan schedule due to the complexity involved. If you need to remove a payment because of an error, first unapply the payment, which allows it to be deleted or reapplied. After making changes, recalculate the loan schedule and reapply any remaining payments to ensure everything is accurate.
The template also supports the addition of extra costs, such as taxes, insurance, or even late fees. You can specify these costs for any period of the loan. For example, you might enter a $150 monthly cost for the entire loan or for just one year. The tool gives you flexibility; for instance, you can add a one-time late fee for a specific month and regular fees for other periods. You just need to be careful with overlapping entries, since the system does not check for these automatically. After entering additional costs, always recalculate the loan schedule to have them correctly included.
When you make payments, be sure to check that the extra principal setting is enabled or disabled as needed, so payments are distributed as intended. If payments are marked as extra principal by mistake, you can delete and reenter them with the correct settings.
The template offers several ways to view the amortization schedule. You can focus on a single month, one year forward from the next unpaid period, the entire current calendar year, or the full loan term. Navigation buttons allow you to move easily between years.
A print function is available to provide a comprehensive printout of the loan details. This includes monthly breakdowns, yearly totals, and a complete payment history. If a client has multiple loans, you can print all loans associated with that client or print all outstanding loans across all providers in the database.
The main menu also contains areas where you can manage loan providers, print all active loans, or view accounts receivable to check current payments due. There is also a function to remove all system data, which is especially useful when deploying the template in multi-user environments to ensure no unwanted sample data is included.
This version 2.0 of the Access Amortization template features many new enhancements. I have an older seminar available that shows how to build a similar database from scratch. That seminar walks you through the development process step by step, including all the code and report design, based on the first version of the template.
While I am not creating a new seminar for version 2.0 due to the nature of the changes, the original seminar covers almost everything behind the original build, and you can use the updated template to take advantage of the latest features, like additional costs and the new enhancements.
If you have any questions, feel free to reach out. You can find a complete video tutorial with step-by-step instructions on everything discussed here on my website at the link below. Live long and prosper, my friends.Topic List Managing the client list in the database
Adding and editing client details
Marking clients as active or inactive
Creating new loans for clients
Marking loans as active or inactive
Using prompts to confirm deletion or changes
Navigating and completing the loan form
Assigning providers for loans
Entering descriptions and notes for loans
Setting the loan amount, interest rate, and start date
Selecting payment frequency and term length
Using buttons to calculate number of payments
Calculating and displaying payment amounts
Generating the loan payment schedule
Tracking past due payments and status indicators
Recording loan payments
Applying payments and handling partial payments
Applying extra payments toward principal
Carrying over overpayments to future installments
Setting default handling for extra principal payments
Unapplying and deleting payments
Reapplying payments and recalculating the schedule
Managing additional costs such as taxes and insurance
Applying fees or costs to specific payment periods
Recalculating the schedule to reflect additional costs
Using print features for individual loans and payment history
Managing multiple loans per client
Printing all loans for a client or all clients
Editing provider information
Printing active loans for all providers
Viewing accounts receivable and current loan values
Deleting all system data for a fresh startPrimary Topics Access database template, loan amortization, client management, loan setup, payment entry, payment application, additional costs, reportingSecondary Topics provider management, data deletion, late fees, tax/insurance handling, user interface behaviors |


