Edit Mode
By Richard Rost

 4 years ago
Prevent Accidental Edits and Deletes w Edit Mode
In this Microsoft Access tutorial, I'm going to show you how to create an Edit Mode button for your forms. This way users have to manually click Edit before they can make any changes or deletions.
Marcel from Brooklyn, New York (a Platinum Member) asks: Is there any way I can keep my users from accidentally editing a record? It happens all the time. People hit a key and change a name or some other value then they just scroll on by and don't even realize what they did. Can I force them to have to click an "Edit" button before they can make changes? It's not a matter of security. I trust everyone. They just make careless mistakes.
Members
Members will learn how to make Edit Mode look a little more fancy. We'll change the background color when the mode switches. We'll change the caption on the Edit button so it says "Save" when the user is done making changes. We'll also see how to deal with Subforms. They require a little extra love. We'll also make a Cancel button so users can cancel their edits.
Silver Members and up get access to view Extended Cut videos, when available. Gold Members can download the files from class plus get access to the Code Vault. If you're not a member, Join Today!
Pre-Requisites
Links
Up Next...
- Edit Mode, Part 2 - learn how to lock only specific fields on the form, not just the whole thing.
Recommended Courses
Keywords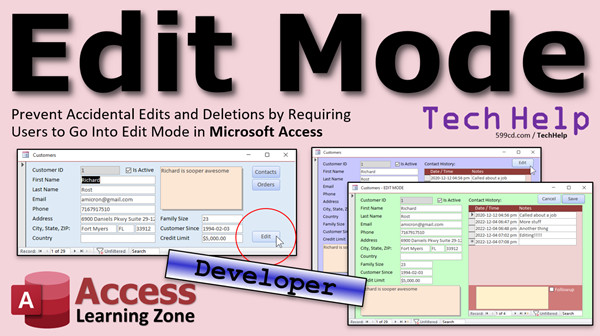
access 2016, access 2019, access 2021, access 365, microsoft access, ms access, ms access tutorial, #msaccess, #microsoftaccess, #help, #howto, #tutorial, #learn, #lesson, #training, #database, Allow Edits, Allow Deletions, Edit Mode, Caption, On Current Event, AllowEdits, AllowDeletions, OnCurrent, Undo, Cancel Button, Save Changes, Prevent Accidental Edits, Prevent Accidental Deletions
 Subscribe to Edit Mode
Get notifications when this page is updated
Transcript Welcome to another TechHelp video brought to you by AccessLearningZone.com. I am your instructor, Richard Rost.
In today's video, I'm going to show you how to make an edit mode for your Microsoft Access forms to prevent users from accidentally editing or deleting records.
Today's question comes from Marcel in Brooklyn, New York, one of my Platinum members.
Marcel asks, is there any way I can keep my users from accidentally editing a record? What happens all the time is that people hit a key and change a name or some other value, and they just scroll on by and don't even realize what they did. Can I force them to have to click an edit button before they can make changes?
It's not a matter of security. I trust everyone. They just make careless mistakes. I'm actually guilty of this myself all the time. I'm going through some customer records, doing whatever, I answer the phone. That's funny, I don't answer the phone. I do some other stuff, come back, and I'm not paying attention. I just hit a character, didn't realize it, and then moved to another record and guess what I just did. I just changed that customer's first name to D. I've done this a million times myself, and yes, I get asked this a lot by people.
What we can do is lock this form. There are properties in the form itself. If you go under the properties for the form right there and go to the Data tab, you've got Allow Additions, Allow Deletions, and Allow Edits. If you change these to No, then the user can't make any changes in here, or deletions, or additions.
Now, if you do that, you need a way to allow the user to be able to turn those things back on again. So for that, we need a teeny tiny bit of VBA programming. That's why, back here on the title slide, I have this marked as a developer lesson. Very, very tiny bit of VBA code.
If you've never done any VBA programming before, don't worry, don't panic, it's really easy. I'll show you everything you need to know. Go watch this video first. It's about 20 minutes long. It'll get you up to speed.
Also, while you're at it, go watch my Disallowed Editing Data video. This shows you about the Allow Edits, Allow Deletes, and Allow Additions properties that I just mentioned. I talk about them in more detail.
And go watch my On Current Event video. This is an event that fires when you open a form or when you move from record to record. We're going to use this to turn that edit mode back off.
All these videos are free. They're on my website and my YouTube channel. Go watch those first. You'll find links down below in the description under the video. Don't look underneath. You have to click on something to find it. Come back when you've watched those.
Here I am back at my TechHelp free template. This is a free database you can download from my website, by the way. Again, open up the customer form, go into the form properties, and turn the Allow Additions to No, Allow Deletions to No, Allow Edits to No, or whatever you want to do. If you want to still allow them to make additions, that's fine.
Usually, it's deletions and edits that people are worried about - accidental careless edits or deletions.
Now, close the properties. What we're going to do is create a button. I'm just going to copy one of these existing buttons that I have. Copy, paste, Ctrl-C, Ctrl-V. Put it down here at the bottom. I'm going to change the caption to Edit. I'm going to open up its properties and give it a good name, not Command30. Let's go to the All tab. We'll change the name to EditButton, EditBtn. I like to have all my buttons end in Btn, that's just me.
Now we're going to put a little teeny tiny bit of code in here. Right-click, go to Build Event, and that'll open up your code builder. The Visual Basic editor should appear. We're going to put a couple lines of code in here.
What we're basically going to do is turn those properties on and off: AllowEdits and AllowDeletions. Now, those are properties of the current form. We reference the current form by calling it Me. Me means whatever form you're on. Me. is a list of all the properties of this form.
We want AllowEdits - there it is - AllowEdits = True. When I click this button, I want to allow edits. Similarly, Me.AllowDeletions = True as well. Again, that's up to you.
Then we'll give the user some visual clue that they're now in edit mode. So, we're going to change the caption of the form. That's what appears up top here in the title bar. We'll say Me.Caption = whatever the form's normal caption is - let's say Customers - and then a dash, and then Edit Mode or whatever you want to have, real big like that. That'll appear up top.
Save it. Go back to your form. Let's close the form. Open it back up again.
If I try to make any changes, look, I'm clicking and clicking, typing on the keyboard, nothing's happening because AllowEdits is set to False. But now, when I click on my Edit button, now I can go, and I'm in edit mode. See the caption changed, and now I can come over here and click and type and do stuff. See that? That prevents the user from making any careless mistakes.
Now, we need a way to turn that back off. I think the easiest way is simply when the user closes the form, it's obviously going to revert back to its original state. But if they move from record to record, the On Current event will fire, so we can use that event to turn edit mode back off.
If they make changes to that record, great, but then if they leave that record, it puts them back into non-edit mode. Again, that's completely up to you. You can leave it on if you want.
Switch to Design View. Go to the form's properties, go to the Events for the form and find On Current. That's why I wanted you to watch that On Current video. This will run any time you move from record to record. Any time a record loads, basically, including the first record that loads when the form opens.
Now we can basically copy this code, paste it down here, and change these values to False. Then put the caption back to whatever you want to say. This will run whenever the form opens and when you move from record to record. So whatever you have set in the properties in the form itself doesn't matter because this code is going to overwrite that.
Save it. Close it. Save changes? Yes. Open it up. By default, tap, tap, tap, tap, nothing happening. Edit mode: now I can change my name. If I move to another record, look at that - edit mode goes off. Now I'm tapping and clicking, nothing happens until I click Edit again. There you go - edit mode. That's how you can turn it on and off.
Now, can you do something like ask for a password if they go into edit mode? Sure. You can require a password using an input box. I've got a separate video where I show you how to do that. It's very easy to implement.
Want to make it a little fancier? Check this out. We've got an edit button over here. Click, I change the background color, change the caption over here. I also have a cancel button. If I make some changes in here and decide I don't want those, I can click Cancel and those changes go away.
Plus, subforms have to be treated specially. There is some extra stuff you have to do with subforms if you have a subform on your form.
How do you do all that extra stuff? That is all covered in the extended cut for the members. Remember, as an UP (Unlimited Platinum) member you get access to all of my extended cut videos, well over 300 of them now. I'll show you how to change the background color between regular mode and edit mode. There is some extra stuff you have to do with subforms.
We'll change that edit button so it says Save after you click on it. So when they go to edit, that button now changes to Save. I know a lot of users look for that. It will also save the record like Access normally does if they close the form, but now they have a button they can click on that says Save so they don't have to worry about that. A lot of people who are used to Word and Excel want to be able to manually save stuff. They don't realize that Access automatically saves every record.
We'll make the Cancel button so they can just cancel any change if they're not happy with it.
So what are you waiting for? Join today. Again, Silver members and up get access to my entire library of extended cut videos. Gold members can download these databases.
That is your TechHelp video for today. I hope you learned something, and I'll see you next time.Intro In this video, I will show you how to set up an edit mode for your Microsoft Access forms that prevents users from accidentally editing or deleting records. You will learn how to use form properties like Allow Edits and Allow Deletions, create an Edit button with a small amount of VBA code, and use the On Current event to control when users can make changes. This approach helps minimize careless mistakes and keeps your data safe from unintentional changes.Quiz Q1. What is the main purpose of creating an edit mode for Microsoft Access forms as discussed in the video?
A. To improve the visual appearance of forms
B. To prevent users from accidentally editing or deleting records
C. To improve the performance of the database
D. To allow multiple users to edit the same record at once
Q2. Which form properties control whether users can add, delete, or edit records?
A. Data Source, Field Format, and Field Size
B. Allow Additions, Allow Deletions, and Allow Edits
C. Font, Color, and Border Style
D. Visible, Locked, and Enabled
Q3. What must be done after setting Allow Edits and Allow Deletions to No to allow users to make changes again?
A. Reopen the database
B. Add a button with VBA code to turn them back on
C. Change the field data types
D. Compact and repair the database
Q4. What does 'Me' refer to when used in VBA code in Access?
A. The current section of a report
B. The entire database
C. The current form object
D. The user who is logged in
Q5. What visual indication does the instructor provide to inform the user that they are in edit mode?
A. Changes the background color of the form
B. Displays a popup window
C. Changes the caption/title bar of the form to include 'Edit Mode'
D. Highlights all fields in yellow
Q6. What event is used to turn edit mode back off when the user moves from record to record?
A. On Open
B. On Format
C. On Current
D. On Close
Q7. What will happen if the user tries to make changes to the form when AllowEdits is set to False?
A. They can make changes as usual
B. They receive an error message
C. No changes will occur; inputs are ignored
D. The form automatically closes
Q8. According to the video, can you require a password to enter edit mode?
A. No, Access does not allow this
B. Yes, by using an input box in VBA code
C. Only in the database options
D. Only by purchasing a security add-in
Q9. What additional feature is shown in the extended cut video for members?
A. Changing button captions and using a cancel button
B. Creating custom tables
C. Exporting data to Excel
D. Adding drop-down lists to form fields
Q10. What happens to the Edit button after it is clicked and the form enters edit mode, as described in the extended cut?
A. It disappears from the form
B. It changes color but not text
C. It changes its caption to Save
D. It closes the form
Answers: 1-B; 2-B; 3-B; 4-C; 5-C; 6-C; 7-C; 8-B; 9-A; 10-C
DISCLAIMER: Quiz questions are AI generated. If you find any that are wrong, don't make sense, or aren't related to the video topic at hand, then please post a comment and let me know. Thanks.Summary Today's video from Access Learning Zone covers how to create an edit mode in Microsoft Access forms to help prevent users from accidentally editing or deleting records. This is a common issue, and many people—including myself—have found themselves inadvertently changing data without realizing it. For example, you might be navigating through customer records, get distracted for a moment, and accidentally type over a field without noticing. Later, you discover that an important value, like a customer's first name, has been changed to just one letter.
The main question here is whether there is a way to force users to click an edit button before they can make any changes to a record. It's not a problem of trust or security, but simply a way to reduce careless mistakes.
Access provides built-in properties on forms that allow you to control how users interact with your data. If you look at the form's property sheet and go to the Data tab, you'll see options like Allow Additions, Allow Deletions, and Allow Edits. Setting these properties to No prevents any editing, deleting, or adding of records through that form. However, users typically need a way to temporarily re-enable editing when they do need to make changes, so the interface must provide an option for that.
To accomplish this, we'll add a small amount of VBA code to the form. If you're new to VBA, don't worry; the code required here is minimal and straightforward. If you need a primer, I recommend watching my introductory VBA lesson, which explains the basics and will get you up to speed quickly. I also have additional free videos on my website and YouTube channel that go into more detail on the Allow Edits, Allow Deletes, and Allow Additions properties, as well as the On Current event, which plays a key role in this solution.
Using my TechHelp free template, which is available to download from my website, you can open the customer form, go to its properties, and configure Allow Additions, Allow Deletions, and Allow Edits however you like. Most people are primarily worried about accidental edits or deletions, so those are the ones usually set to No.
Once you have set the properties, the next step is to add an Edit button to the form. You can simply duplicate an existing button, move it to a good location, and update its caption and name so it is clear what it does. As a personal preference, I always end my button names with Btn for clarity.
Next, a brief VBA procedure ties everything together. The button's code enables AllowEdits and AllowDeletions for the current form, and also updates the form's caption to indicate that it is in edit mode. This visual cue helps users know when editing is enabled. When users are done editing, we want editing to be turned back off under certain conditions. For that, we use the On Current event, which triggers whenever the user navigates to a new record or when the form loads. In this event, the form reverts to non-edit mode by setting the properties back and resetting the caption.
With this setup, as soon as the form opens or the user moves to another record, edit mode is switched off. The user must therefore manually turn it on each time they want to make a change. This significantly reduces the chance of accidental edits because data entry is only possible after a deliberate action.
If you would like to add an extra layer of control, such as requiring a password before editing, you can easily integrate a simple input box to prompt for credentials. I have another video showing how to do that step by step.
For those who prefer a more advanced interface, it's possible to enhance this further. For example, you can update the button's caption and background color to clearly show when the user is in edit mode, or add a Cancel button that undoes changes if needed. Handling subforms requires some extra steps as well, since their editing permissions need to be managed separately when the parent form's mode changes. If you want a Save button that records changes manually—something users coming from Excel or Word often expect—you can modify the Edit button to switch to Save once editing starts. This way, the user knows they need to explicitly save their changes, even though Access typically saves records automatically.
All of these features—dynamic button captions, visual cues, canceling changes, subform management, and manual saving—are covered in detail in the Extended Cut of this lesson, which is available to Unlimited and Platinum members. These extended videos cover over 300 advanced topics, so if you want to learn how to implement these extra features, consider becoming a member. Gold members can also download the sample databases for their own use.
That wraps up this TechHelp video. I hope you found it useful. You can find a complete video tutorial with step-by-step instructions on everything discussed here on my website at the link below. Live long and prosper, my friends.Topic List Explaining Allow Edits, Allow Deletions, Allow Additions properties
Setting form properties to lock records
Creating an Edit button on an Access form
Adding VBA code to toggle AllowEdits and AllowDeletions
Providing visual cues for edit mode using form caption
Using the On Current event to reset edit mode
Referencing form properties using Me in VBA
Preventing accidental edits by default
Toggling edit mode when moving between recordsPrimary Topics
Access forms, edit mode, accidental edits prevention, Allow Edits property, Allow Deletions property, VBA code for forms, On Current event, form buttons
Secondary Topics
visual feedback for edit mode, password protection for edits, handling subforms, UI/UX design practices
|


