Followups 3
By Richard Rost

 4 years ago
Customer Followups in Microsoft Access, Part 3
In this Microsoft Access tutorial, we're continuing work on our Followup database. We will set the default value for whether or not a new record is a followup to Yes on the followup form. We will modify our query to not show future followups. We will then add a checkbox on the form so we can optionally see future followups or not. Then we'll make buttons to move followups ahead 1 day, 1 week, or 30 days.
Pre-Requisites
Links
Up Next
Recommended Courses
Keywords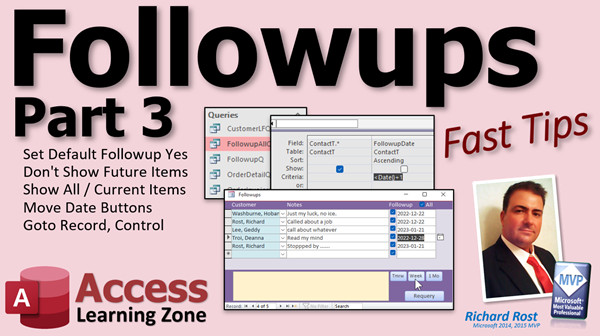
access 2016, access 2019, access 2021, access 365, microsoft access, ms access, ms access tutorial, #msaccess, #microsoftaccess, #help, #howto, #tutorial, #learn, #lesson, #training, #database, How To Create A Customer Follow-Up System, organize your database followups, Database Follow up, follow-up template, Sales Follow-up System, customer follow-up system, Creating an Effective Follow Up System, show only followups, button from main menu, customer combo, double-click to open, contact management, crm, Set default followup yes, don't show future items, show all/current items, move date buttons, goto record, goto control
 Subscribe to Followups 3
Get notifications when this page is updated
Intro In this video, you will learn how to enhance your Microsoft Access Follow Ups database by setting default values for new follow-ups, filtering out future items from your main list, and adding a checkbox to show all records if needed. I'll show you how to add buttons to quickly move follow-up dates ahead by a day, a week, or a month and update records efficiently using simple VBA code and form controls. We will also cover best practices for requerying data and managing button naming. This is part 3.Transcript Welcome to another Fast Tips video brought to you by AccessLearningZone.com. I am your instructor, Richard Rost.
Today, we're doing part three of my Follow Ups database. If you haven't watched parts one and two, what are you waiting for? Go watch them! You'll find links down below in the description. Click on them, go watch those, and come on back.
In today's video, we're going to make it so that by default, when you add new follow ups here in the Follow Up form, the default value is Yes for that. We'll also make it so that you don't see future items. If you have a follow up for next month, you don't necessarily want to see it on this list. We'll make a check box up here so you can see all. Normally, you'll only see the ones that are current and due right now, but if you check that box, you'll see all of them.
We'll also make little buttons here to move follow ups ahead so we can be more efficient in ignoring people. Procrastination, folks, it's an art form.
You can just go down the list and say, "Tomorrow, this one; next week, this one; next month," and so on. We learned about some GoTo control, GoTo records, and all kinds of cool stuff. Are you ready? Here we go.
And we are back for part three of the follow-up series. Hope you are enjoying it.
If you have a bunch of stuff in here (by the way, it is possible to add follow ups in here as well), you can pick the customer and type in, for example, "call about whatever." Just make sure you mark it as a follow up. In fact, in this form, it might be a good idea to make the default value for this checkbox "Yes," because then if you add stuff in here, it will automatically be marked as a follow up. Whereas, in the other form, it is not.
So, here we'll go to Data, we'll set Default Value to Yes. If you add them from the follow-ups form, then you want that to be a follow up by definition. If you go into the customer form, you might just be marking contacts in here when you add a new contact.
Now, we want to prevent seeing stuff in the future. I don't need to see stuff that I have scheduled for next week, like this is after the first of the year. That's easy to do. Let's go into our follow-up queue design view.
Down here for criteria, we're going to say "less than or equal to today's date." Remember, if you've got times in here, you have to remember that today's date is today's date at midnight. So, if you have today at 5 p.m. in here, then that's not going to be less than or equal to today's date.
You could also say "less than date plus one." That's going to be less than tomorrow at midnight. Assuming you don't have any midnight follow-ups, which most of us generally don't. Or, if you are using times, you could put "less than or equal to now" in here, and then you won't see a follow up that's scheduled an hour from now.
I think I am going to go with "less than date plus one." I want all the follow-ups from today to show, but not stuff from tomorrow or in the future.
Now, if I close this, save changes, and then open up the follow-ups, I am not seeing anybody in there. Now, what happened? I don't think I have any follow-ups in the past. Nope. These are all in the future. It's currently 12/21, so I don't have anything in the past.
Let's set this one to 12/20. Let's make this one 12/19, and I'll make this one 12/4.
Now, let's tickle. Much better. Close that.
I was wondering why I wasn't seeing anybody. Reopen it, and there we go. That brings to mind that we could throw a required button down here on the bottom. I like requery buttons, because a requery button says, "Oh, I made some changes to the records in here. Refresh this page now."
You can do it off the menu, you can hit F5, but a lot of times users need that button just to use now. I'm going to cancel the wizard, and I'm going to put in here "Requery," because this is one of those easy things that once you learn it, it's one line of code. Build event: Me.Requery.
Oh, I forgot to name the button, and I do this all the time. Alex yells at me. We don't want buttons called Command11_Click. Nope, get rid of that. Let's come back over here, rename the button: RequeryButton.
I used to not bother with that because I always figured I was never going to call the button somewhere else. Then you get into some code where you want to call the button somewhere else, change its caption, its color, or its visibility property, and then you have to go and rename your buttons. Name it RequeryButton, not just Requery.
That tells the form, "Hey, I made some changes. Requery this list of stuff." So, if I'm in here and I change this to the 27th, and let's fix the tab order too. Now, I hit Requery, and that 27th goes away and is in the future now. That's what Requery does.
As I mentioned earlier, it would be nice to also be able to see the follow-ups in the future. If I want to see, for example, tomorrow's follow-ups, it would be nice if we had a button, maybe up here, that says "Show All," or "Show Just the Ones That Are Current." In other words, current means up to today.
I'm going to show you two methods to do this. One is a simpler method for people who don't want to get heavy into VB and/or SQL, and it's going to involve using two queries. We have the follow-up queue right now, and the follow-up queue is just the stuff that's current.
We can make another one. Let's call this Control+C, Control+V. Let's call this one Follow-Up All Queue. We'll modify this guy in Design View, and we'll get rid of that follow-up date criteria, so it's basically the same thing. It's the same query, but we're not putting that date criteria on it. We'll see everything.
Now, what I'll do is put a checkbox here in Design View. Hang on, I accidentally typed something in that box so I had to escape to get out of it. In Design View, we're going to put a checkbox up top. We'll drop it right there and make the caption say "All." Let's use the Format Painter to make that white so we can actually read it. We'll name the checkbox ShowAll, and its default value is going to be No, so by default when we load this up, that'll be off and it will just be showing the current stuff.
Maybe move it over a little bit, line it up, and leave a little bit of space there, maybe a bit more space because that's a date field. I hate the fact that the little date box shows up there. It should show up over the field.
Save that, close it. We open this up, and it looks the same.
Now, if I click on this box, I want to change the query that this form is based on to Follow-Up All Queue. How do I do that? In Design View, come into this guy, Event, After Update (you could use On Click too, but I like After Update better). Now, here we're going to say:
If ShowAll, that means that they've checked the box on, then
Me.RecordSource = "Follow-Up All Queue"
So, we're changing the record source of the form (where it gets its data, table or query) to that Follow-Up All Queue. Otherwise, we're going to set it equal to the original one, just get rid of the "All."
This is the easy way. Save it, close it, open it back up again, and now I can click. Click, see that? It shows me all of them, or just the current one.
Now, the more complicated way for those of you who are familiar with SQL is to not use a second query. You could simply take the SQL out of here and put that in the VB as the record source. You can put a straight SQL statement. I'm not going to do it for the purposes of this class to keep things simple. If you want to learn more about swapping out that record source, I have a video on it.
And we also did an If Then statement in our VB code. Here's another video on that if you want to learn more about If Then.
Another popular feature at this point: a lot of times people like to go down this list and say, "Okay, this person, not today, I'm going to set it to next week." Then for this person, "Oh, he's out of town, I'm going to go next month." Instead of having to click on this guy here, you can use little buttons down on the bottom to simply move this to certain preset dates, like make one for tomorrow, next week, next month, something like that.
I've got another video that I did recently that covers this in a lot more detail. Go watch this video if you want to learn more. We'll just make a couple of simple ones real quick.
So, Design View. I'm going to move the Requery button down to the bottom like that, and we'll just do Tomorrow, Next Week, and then in 30 days. So, do plus one, plus seven, plus 30. I'm going to copy this: copy, paste, slide it up here.
Tomorrow: TMRW. We can make these guys smaller, too. Let's go nine point on that text, and we'll shrink that guy down like that. We'll copy this one, copy, paste, and we'll go "Week" and slide that up here. Then we'll paste it again and do "30 Days."
Let's say this one here is going to be called MoveTomorrowButton, MoveNextWeekButton, and Move30DaysButton.
If you know DateAdd, you can do it in the actual calendar month. For me, most of the time when it comes to things like follow-ups and stuff like that, 30 days is good enough. I'm going to call you roughly in a month. Now, if you need to make this an exact month, yeah, use DateAdd.
In fact, you know what? Okay, fine. We'll do one month. MoveOneMonth. Talked me into it.
Right-click on Tomorrow, Build Event: FollowUpDate = Date + 1. That's simple. It's up to you if you want to make it so that when you keep clicking on it, it goes up a day each time. I just like a tomorrow button: move it to tomorrow, that's it.
For the Week button, for example, if you want to make it so that you keep adding a week to it, that's up to you. Right-click, Build Event: FollowUpDate = Date + 7. Simple enough.
For the Month, right-click, Build Event: FollowUpDate = DateAdd("m", 1, FollowUpDate). There you go.
Want to learn more about DateAdd? There you go.
Save your work, close this, and open it back up again. Show me everybody.
Let's move you to tomorrow. You know what would be nice too is, after I click this button, it moves to the next record. That would be handy too.
Let's come in here, right after each one of these lines, and enter: DoCmd.GoToRecord. Now, the next two parameters we don't need, so go comma, comma, and then acNext. We're going to go to the next record. You can go to the first, last, a specific one, new record, previous; we want to go to the next record.
Copy that there, and there, and save it and close it. Now, when I click, it's going to go to tomorrow, and jump to the next record.
You can even have it jump to that field if you want to, if you want to have it go to that specific control. Watch this: DoCmd.GoToControl "FollowUpDate" like that. Copy that and put it there and there.
Now, these are starting to get to the point where I might make a single function or a single subroutine, but since they're small, that's close enough.
Now, I can go, "Next week, next month, tomorrow, tomorrow, next week," and so on. I'll just go right down it, and this makes you more efficient at ignoring and postponing your follow-ups.
See, but I can help.
There you go for today, folks. Show them all. Total month and someone. Easy peasy lemon squeezy.
There's your Fast Tip for today, folks. Hope you learned something. We'll see you back for part four.Quiz Q1. What is the main goal of setting the default value of the follow-up checkbox to Yes in the Follow Up form?
A. To ensure all new contacts are marked for deletion by default
B. To make sure newly added follow-ups are marked as follow-ups automatically
C. To prevent accidental data entry in the form
D. To keep the checkbox unchecked unless specified
Q2. Why does the video recommend not displaying future follow-ups by default on the list?
A. They are no longer needed and should be deleted
B. Users are only interested in currently due tasks, not those scheduled for the future
C. It would clutter the customer form
D. Access cannot display future records
Q3. How does Richard recommend configuring the query criteria to show only current follow-ups?
A. Date equals today only
B. Date greater than or equal to today
C. Date less than date plus one
D. Date equals tomorrow
Q4. What does the Requery button do in the Follow Ups form?
A. Adds a new follow-up record
B. Sorts the follow-up records alphabetically
C. Recalculates calculated fields in the form
D. Refreshes the form data to reflect recent changes
Q5. Why is naming buttons (like RequeryButton instead of Command11_Click) considered important?
A. It looks better on the form
B. It prevents accidental deletion
C. It makes the code easier to maintain and reference
D. It increases the performance of the database
Q6. What is the purpose of the Show All checkbox added to the form?
A. To filter by customer name
B. To show all follow-ups including ones scheduled for the future
C. To sort the list in descending order
D. To change the background color of the form
Q7. How does the form switch between viewing current and all follow-ups?
A. By toggling the Show All checkbox, which changes the form's data source
B. By refreshing the page in the browser
C. By entering a password
D. By restarting Access
Q8. What is the advantage of using specific "Tomorrow", "Next Week", and "One Month" buttons?
A. They allow users to quickly reschedule follow-ups without manually changing the date
B. They permanently delete records
C. They print a report
D. They export data to Excel automatically
Q9. What does the line DoCmd.GoToRecord , , acNext accomplish in VBA?
A. Deletes the current record
B. Jumps to the next record in the form
C. Adds a new follow-up record
D. Sorts the current records
Q10. How can you make the form jump to a specific field after moving to the next record?
A. By using DoCmd.RunSQL "JumpToField"
B. By closing and opening the form again
C. By using DoCmd.GoToControl with the control name
D. By clicking the background of the form
Q11. According to the video, when is it more appropriate to write a single function or subroutine instead of separate code for each button?
A. Only when debugging
B. When the code starts to repeat and increases in size
C. When working in the query designer
D. When designing reports
Answers: 1-B; 2-B; 3-C; 4-D; 5-C; 6-B; 7-A; 8-A; 9-B; 10-C; 11-B
DISCLAIMER: Quiz questions are AI generated. If you find any that are wrong, don't make sense, or aren't related to the video topic at hand, then please post a comment and let me know. Thanks.Summary Today's video from Access Learning Zone provides the third installment in my Follow Ups database series. If you missed the earlier videos, I recommend checking those out first to ensure you are following along. You will find the links to parts one and two on my website.
In this segment, I show how to set up a default value in the Follow Up form so that when new records are created, the follow-up flag is set to Yes automatically. This saves time and ensures consistency when you are entering new follow-ups. I explain the importance of this feature, especially compared to other forms where the follow-up status might already be handled differently.
Next, I cover a method for hiding future-dated follow-ups so that only those due now or in the past are visible. This keeps your workflow focused on current and overdue tasks rather than cluttering the list with upcoming reminders. However, I also explain how to add a checkbox labeled "All." By toggling this checkbox, you can choose whether to view just current follow-ups or include all, including those set for the future. By default, the form only shows due or past-due items, but enabling the checkbox reveals everything.
To achieve this, I show how to use two separate queries. One query filters follow-ups by date so that it returns only items due today or earlier. The other displays every record without filtering by date. The checkbox enables users to switch the form's record source between these two queries, offering a simple solution without needing advanced SQL or VBA skills.
For those who are comfortable with SQL or VBA, I mention that you could instead change the form's record source directly using an SQL statement within the code. This is a more advanced option, but for this demonstration, I stick with the easier dual-query approach.
Another practical addition to the form is a "Requery" button. When changes are made to the records, pressing this button refreshes the list, ensuring that updates such as adjusting dates or statuses appear immediately. I explain the importance of correctly naming buttons, which makes maintenance easier if you need to reference the button in code later.
To streamline workflow even further, I demonstrate how to add buttons that let you quickly move follow-up dates forward. For instance, you can click a button to roll a follow-up to tomorrow, next week, or one month ahead. After clicking one of these buttons, the form automatically jumps to the next record, helping you move through your follow-ups efficiently. I also show how you can have the form jump straight to the date field, making consecutive updates even smoother.
These feature improvements allow you to quickly process a list of follow-ups, adjusting schedules as needed without unnecessary clicks or manual date entries. Whether you need to postpone a call, check in with a client next month, or see only tasks that require your immediate attention, these tools make follow-up management far more practical and efficient.
That concludes part three of our Follow Ups database tutorial. You can find a complete video tutorial with step-by-step instructions on everything discussed here on my website at the link below. Live long and prosper, my friends.Topic List Setting the default value for a checkbox to Yes in a form
Filtering follow-up records to show only current items
Setting date criteria in a query to filter by today's date
Adding a requery button to refresh the form data
Renaming buttons for better code maintainability
Creating a checkbox to toggle between current and all follow-ups
Changing a form's record source dynamically with VBA
Using two queries to switch between filtered and unfiltered lists
Using After Update event to change record source based on a control
Adding buttons to move follow-up dates to tomorrow, next week, or next month
Using DateAdd function to increment follow-up dates by one month
Using VBA to move to the next record after updating a date
Using DoCmd.GoToControl to focus a specific control after an action |


