Group On Top
By Richard Rost

 3 years ago
Sorted Report w Specific Contacts Grouped On Top
In this Microsoft Access tutorial I will show you how to create a sorted report showing specific contacts of your choice up top. We will use a grouping level and a sorting level in a report.
Megan (not a member) asks: I have been asked to make a report (based off of a query) that lists my table contacts alphabetically by last name, however I've also been asked to list one specific contact first, and then the rest alphabetically. I have watched your beginner lesson 1 video on YouTube but I cannot figure out how to show one specific contact first. Are you able to help me with this please
Members
Members will learn how to add a little extra pizzazz to the report including bolding and changing the font size of the special people. Plus we'll talk about can grow / shrink some.
Silver Members and up get access to view Extended Cut videos, when available. Gold Members can download the files from class plus get access to the Code Vault. If you're not a member, Join Today!
Pre-Requisites
Links
Recommended Courses
Keywords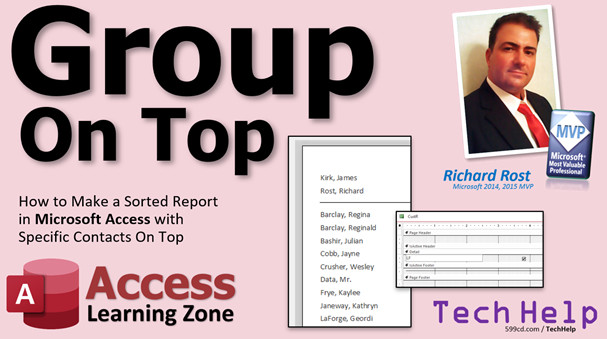
access 2016, access 2019, access 2021, access 365, microsoft access, ms access, ms access tutorial, #msaccess, #microsoftaccess, #help, #howto, #tutorial, #learn, #lesson, #training, #database, Report Grouping Levels, specific records on top, sort, can grow, can shrink, fontbold, fontsize
 Subscribe to Group On Top
Get notifications when this page is updated
Intro In this video, I will show you how to create a sorted report in Microsoft Access where you can display selected contacts at the top of the list, such as management or key personnel, before the rest are listed alphabetically. We will talk about adding a field to identify who should appear first, using grouping and sorting levels in your Access report, and making formatting adjustments for a cleaner look. If you need to control which records are prioritized in your reports, this tutorial will help you set it up.Transcript Welcome to another TechHelp video brought to you by AccessLearningZone.com. I am your instructor, Richard Rost.
In today's video, I'm going to show you how to group on top. What does that mean? Honestly, the longest part of this video was me figuring out what to title it. I'm going to show you how to make a sorted report in Microsoft Access with specific contacts on top. In other words, you want a sorted report by last name, first name, but you want to pick one or more people to show up on top of the list. Maybe management, or captain and the first officer. Whatever.
Today's question comes from Megan. I don't know where Megan is at. She's not a member. This just goes to prove that you don't have to be a member to get your question answered. Sometimes if I get a good email and someone is polite, that goes without saying. Doesn't matter if you're a member or not. If I like your question, I'll make a video about it.
Megan says, "I've been asked to make a report based off a query that lists my table Contacts alphabetically by last name. However, I've also been asked to list one specific contact first and then the rest alphabetically. I've watched your beginner lesson one video on YouTube, but I cannot figure out how to show one specific contact first. Are you able to help me with this?"
Yes, I'm able to help. Let's see how to do it.
Before we get started, in this video, we're going to use a grouping level in your Access report. If you haven't watched my grouping video, go watch that first and also make sure you know how to make calculated fields in queries. Go watch those too. These are both free videos. You'll find them on my YouTube channel and on my website. I'll put links down below that you can click on.
Here I am in my TechHelp free template. This is a free database. You can download a copy from my website if you want to. In here, I've got a customer table.
Now, what you need to do in order to make this grouping level to group on top is you need to have some kind of field in here to indicate which person or people you want to have on top of the list. You could make it a number if you want to have multiple groups - group one, group two, group three - but Megan just wants one person on top and then everybody else. I already have a field in here called Is Active. I'm going to use that. So just whoever you want on top, mark them as active. Let's do me and Jimmy Kirk here and mark everybody else as inactive. So I'll have two people on top.
Now, I already have a query that I built in a previous video, which I believe was my invoicing video. I'll put a link down at the bottom. You can click on that too if you want to go watch that. This is simply a query that has people put together with their ID and then last name, first name. It's a calculated field. That's why I wanted you to watch the calculated fields video. LF is last name and a comma and a first name.
Now, to this, I'm going to add Is Active. The nice thing about Yes/No fields in Microsoft Access is that Yes values are negative one (-1), not one. No values (false values) are zero. If we sort this, if I come in here and sort this ascending, you'll see those Yes values are on top. Which is backward from a lot of other database programs, like SQL server and a lot of programming languages where one is true and zero is false. Access uses negative one.
You don't have to sort this query because we're going to handle the sorting in our report. So save that. I've got my query all set: Is Active and then last name, first name.
You could do this sorting in the query, but I like to do my sorting in reports. So, let's create a report in design view. Let me turn this off for a minute. We don't need that just yet.
Let's go to the properties for the report. Let's set the data record source to the customer LFQ. Now I'm going to get rid of these Filter and Order By things that come in there. If you see those, just get rid of them. We don't need those right now.
I'm going to go to report design and add existing fields. Let's bring in just the LF field. We don't need all the rest of this stuff just yet. We're just making a simple list. If you want to have full numbers and all that other stuff in here, that's fine. That's up to you.
You can close this now. Come down here and grab the bottom of the detail section. This band that says Page Footer is the bottom of the detail section. Click and drag that up. Get rid of all this extra space we don't need in there like that.
Let's save this as CustomerGroupedR. Let's take a look at what we have so far. Right click, Print Preview.
There's everybody. Got a couple things to change. First, I do not like the alternating background color. And I do not like the borders around the text boxes. So, go to Design View. First, click on that, go to Format, Shape Outline, Transparent. Then double click on the detail section, go to Format and set this to No Color. That should be a little bit better.
Looks much nicer. That hasn't sorted at all. These guys are just showing up here because they're the first two records in the table.
Let me save this. Let's change that to Mr. Picard instead of Kirk. So, he just happens to be up top with me. Let's find Picard. There he is. Set Picard as the number two guy. Okay, so let's go back to that report now. CustomerGroupedR, Print Preview.
Now, let's add a grouping level so we can group up top the people that are active, and then we'll sort it based on our LF field. Right here under Report Design - Group and Sort - this is that thing I turned off a minute ago. We weren't ready for it yet. We're ready for it now.
We're going to add a group. Group on Is Active first. Now it gives us a header here. We really don't need that header, so over here click on More and select Without a Header Section, but I do want to add a Footer Section. Let's put a line underneath the group. That will look pretty cool, kind of like what I have going on here in the preview. We're going to put that line in the footer under that section.
After Is Active, we're going to add a sort, which will be the LF field. So it's going to group on Is Active, which also sorts, and then another sort under that based on last name, first name. We don't need a header or footer section for that.
Now save it and let's take a preview. There we go. Notice Picard is sorting on top of me. Inside each group, you're going to get sorted. Here we've got our group of active people and our group of not active people.
Now in this footer right here, let's drop a line in there. Right there like that. I can never get these things right the first time. There we go. Save it.
Let me turn this thing off now. Be careful when you turn off the grouping level. This deletes that group. This shuts that pane. So be careful you don't click this. I don't like this design. This and this are too similar to each other. Microsoft, you need to change that.
Close that and now Print Preview. There we go. Looks nice and pretty.
So Megan, that is how you do it. If you want to just do one person on top or six people on top, it doesn't matter. You make a manual field to pick who you want. Then you add a grouping level and a sorting level.
Want to have a little more fun? In the extended cut, we're going to do some VBA awesomeness and a little bit of programming. We'll take those people in that top group and we'll bold them and change the font size. We'll learn a little Can Grow, Can Shrink magic to make these guys look smaller and not waste a ton of space between them. See how there is more space up here than down here? And Megan, this is your chance to become a member - just hint, hint. We'll have some fun.
That is your TechHelp video for today. I hope you learned something. I'll see you next time.Quiz Q1. What is the main goal of the video tutorial?
A. To show how to generate a sorted report with specific contacts grouped on top in Microsoft Access
B. To teach how to use macros in Access
C. To demonstrate how to create new tables in Access
D. To explain how to build an SQL Server database
Q2. What field does Richard use in the example to identify which people should appear at the top of the report?
A. Last Name
B. Is Active
C. Date of Birth
D. Report Header
Q3. Why is it important to understand calculated fields for this lesson?
A. Because the sorting technique relies on calculated totals
B. Because you need to combine first and last names into one field for display
C. Because calculated fields are needed for setting report permissions
D. Because they are always required when using reports
Q4. In Microsoft Access, what value does a Yes/True value have for a Yes/No field?
A. 0
B. 1
C. -1
D. NULL
Q5. What is the recommended place to set sorting and grouping for the report in this tutorial?
A. In the query design
B. In the table design
C. In the report design
D. In the VBA editor
Q6. When adding a grouping level for "Is Active" in the report, what does the group header or footer allow you to do?
A. Show subtotals per group
B. Add decorative elements like lines to visually separate groups
C. Add a page break after each record
D. Prevent users from editing group data
Q7. What should you do if you want to feature more than one person at the top of the report?
A. Only select them in the query criteria
B. Mark them all in the "Is Active" field or a similar manual field
C. Change the report title
D. Create a separate report for each person
Q8. What additional formatting tip does Richard suggest for report appearance?
A. Adding background images to the detail section
B. Making text boxes' outlines transparent and removing alternating background color
C. Adding macros for color changes
D. Placing a chart below each group
Q9. What does turning off the grouping level pane in the report design do?
A. Switches the view to Print Preview
B. Deletes the group from the report
C. Saves the report automatically
D. Locks the design interface
Q10. What is mentioned as a possible enhancement in the extended cut of the tutorial?
A. Adding export to Excel options
B. Using VBA to bold and change the font size of the top group
C. Automatically emailing the report
D. Importing a CSV file into Access
Answers: 1-A; 2-B; 3-B; 4-C; 5-C; 6-B; 7-B; 8-B; 9-B; 10-B
DISCLAIMER: Quiz questions are AI generated. If you find any that are wrong, don't make sense, or aren't related to the video topic at hand, then please post a comment and let me know. Thanks.Summary Today's video from Access Learning Zone covers how to organize your Access reports to show specific records at the top, even when everything else is sorted alphabetically. This is a common scenario where, for example, you want certain people such as upper management or team leaders to appear first on a list, and then the rest of your contacts to appear in order by last name and first name.
This question came from someone who was asked to generate a report sorted by last name, but with one person appearing first before the rest of the list. This can be useful if you want to make sure that key individuals are always prominent in your reports.
To achieve this in Access, we will take advantage of grouping levels in reports. If you're not familiar with grouping in Access or working with calculated fields in queries, I recommend you check out my separate free videos on those topics. They're available both on my YouTube channel and website.
In my example database, which you can also download for free from my site, I have a basic customer table. The strategy here is to create a field that indicates which people you want to appear at the top of the report. This could be a numerical field if you want more than two groups, but for this example, we're just marking certain records as "active" using a Yes/No field. That way, anyone marked as active will appear first.
Let's say we want to put myself and another record, such as Picard, at the top. Those records are set as active, while everyone else is inactive. This is controlled by a Yes/No field called Is Active.
Within the query that the report will be based on, you want to include this Is Active field. It's important to note that in Access, a Yes value is actually represented internally by -1, and a No value is zero. When sorting, ascending order will put -1 (the Yes or "active" records) before the others, which works perfectly for our needs. You can sort in the query if you like, but for this method, do the sorting in the report itself.
When you create your report in design view, set the record source to your query. Bring in only the necessary fields, like the calculated LastName, FirstName field, for a simple list. Clean up the design by removing unwanted space and any alternating background formatting or borders you do not want.
Now, to get the sorting and grouping to work, add a grouping level for the Is Active field. You don't need to keep the header section, but it does help to include a footer where you can, for example, add a horizontal line to separate your "top group" from the rest. After grouping by Is Active, add a sort by your LastName, FirstName calculated field. This ensures everyone marked as active is listed first and, within those groups, each contact appears in alphabetical order.
You can preview your report to see the results. Only those marked as active appear on top, followed by the rest of the records, all sorted correctly. If you'd like to enhance the report further, you can make formatting tweaks, like adding bold fonts or lines to highlight the top group.
In the Extended Cut of today's lesson, I'll go into more detail with some VBA programming. We'll tweak the appearance of the top group by making names bold and adjusting font sizes. I'll also show you how to use the Can Grow and Can Shrink properties to make your report more space-efficient and visually appealing.
That's the lesson for today. You can find a complete video tutorial with step-by-step instructions on everything discussed here on my website at the link below. Live long and prosper, my friends.Topic List Indicating top contacts using a Yes/No field
Adding and configuring the Is Active field
Building a query with calculated fields for names
Including the Is Active field in the query
Understanding how Access sorts Yes/No fields
Creating a report in Design View
Setting the report record source
Adding fields to the report layout
Adjusting the report's detail section size
Removing alternating background color in reports
Removing text box borders in reports
Adding a grouping level based on Is Active
Configuring group headers and footers in reports
Adding a line to separate groups in the report footer
Sorting within groups by last name and first name
Previewing and fine-tuning report layout
Grouping and sorting contacts to list selected records on top |


