Multiple YN
By Richard Rost

 3 years ago
Replace Multiple Yes/No Fields w Relational Solution
In this Microsoft Access tutorial I'm going to teach you how to replace having multiple yes/no fields for a customer with a properly relational solution that involves a many-to-many relationship and a junction table. This will allow you to easily create additional options in the future without having to go through table and form redesign.
Bruce from Boston, Massachusetts (a Platinum Member) asks: I have about 15 different yes/no fields that I use to set options for my customers. For example, do we provide them with hardware, service, software? Are they on the mailing list? Do they have a warranty? Are they an active account? Things like this. I've heard you say several times that having 15 different fields and 15 different checkboxes on my form is not the best way to go about this. And yes, every time I want to add an option it's a pain. Can you show me the better way?
Members
Members will learn how to prevent duplicate options. We will also make a button you can click to add all of the options to a customer's account so then all you have to do is check the values you want to set to yes. We'll do it both with recordsets (the hard way) and a single line of SQL code (the easy way).
Silver Members and up get access to view Extended Cut videos, when available. Gold Members can download the files from class plus get access to the Code Vault. If you're not a member, Join Today!
Pre-Requisites
Links
Recommended Courses
Keywords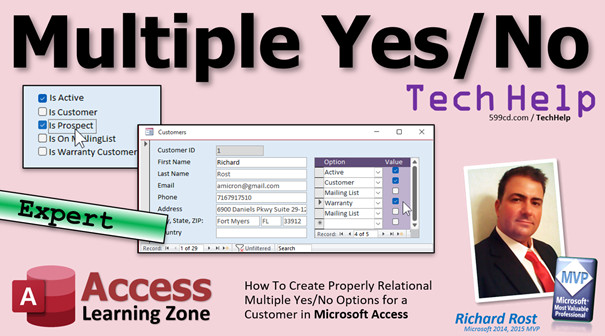
access 2016, access 2019, access 2021, access 365, microsoft access, ms access, ms access tutorial, #msaccess, #microsoftaccess, #help, #howto, #tutorial, #learn, #lesson, #training, #database, multiple check boxes in a subform, replacing several check boxes, form with many check boxes, multiple checkboxes, add several check boxes, multiple yes/no fields
 Subscribe to Multiple YN
Get notifications when this page is updated
More InformationTranscript Welcome to another TechHelp video brought to you by AccessLearningZone.com. I am your instructor Richard Rost.
In today's video, I'm going to teach you how to replace having multiple yes-no fields for a customer, or any other record for that matter, with a properly relational solution that involves a many-to-many relationship and a junction table. This will allow you to easily create additional options in the future without having to redesign your tables and all your forms.
This is an expert level video, which means it's past the basics.
We have a couple prerequisites - things you should know before watching this video:
- You should understand many-to-many relationships. This is the more complicated type of relationship. These involve three tables: table one, table two, and a junction table to bind them together. If you don't know how to do a many-to-many relationship, go watch this video first.
- You should know how to build sub-forms and continuous forms.
- You should know how to build relational combo boxes, where you can have a combo box and get its value from a different table.
If you don't know how to do any of these things, go watch those three videos first. They're absolutely free. They're on my website and my YouTube channel. Go watch those, then come on back.
Today's question comes from Bruce in Boston, Massachusetts. I've been asked this a couple of times by different people over the last week or two, so I figured it's time for a video.
Bruce says, I have about 15 different yes-no fields that I use to set options for my customers. For example, do we provide them with hardware, service, software? Are they on the mailing list? Do they have a warranty? Are they an active account? Things like this. I've heard you say several times that having 15 different fields and 15 different checkboxes on my form is not the best way to go about this. And yes, every time I want to add an option, it's a pain. Can you show me the better way?
Yes, Bruce. I will show you the light. Or as Gollum says, don't follow the lights.
Whenever you do something like this, like I show you here, you put 15 different yes-no fields in your customer table, and then you have 15 different checkboxes. Anytime you want to add an option in the future or change something, you have to modify the table. You also have to modify the form, or multiple forms if you have them.
What you want is a setup like this with a many-to-many relationship in a subform. This way, you have a table with these options in it, and you can easily add ones in the future without having to go through redesigning your database. Your users can work with these too. Your users can add options if you want to give them that ability - the "option for options."
The wrong way to build this: I'm not going to go through the whole thing, but the wrong way to build this would be to go into your design view of your customer table. In here, I've got "is active," "is customer," maybe one or two, a couple of different options, maybe five. But if you start getting into my rule of three - if you start getting three, four, five, six, seven, ten, fifteen options: is customer (yes/no), is on warranty (yes/no), and so on, then it's time to start moving that stuff to a separate table.
You don't want to have 15 different yes-no fields in here, and you don't want 15 different checkboxes on your customer form, like I did in that preview slide.
So what is the right way to do it?
First, we're going to create a table called our option table to store all of these options in it. So we're going to have an OptionID - that's our autonumber - and the OptionName. Remember, don't use just "Name" as a field name, it's a reserved word. "Name," "Date," things like that are reserved words.
Save this as my OptionT (option table), primary key: yes.
Let's put some options in here. You can put any kind of options you want. We've got the old "IsActive," "IsCustomer" (because they might no longer be a customer, they might just be a prospect), "IsProspect," "IsOnMailingList," "IsWarrantyCustomer," "IsTrekkie," "IsBrowncoat," whatever you want.
As you can see, it's very easy in the future to add options to this.
Now, here comes the many-to-many relationship part. There are our options. Here's our customer list: CustomerID, FirstName, LastName, whatever.
If this was just a one-to-many relationship, in other words, a customer could only have one option, then we wouldn't need a junction table. We would just save the OptionID in the customer table. We would go into CustomerT, add OptionID, make it a long integer, and then you would pick one.
But I want a many-to-many relationship. In other words, each of these can have many of these. I could be active, I could be a prospect, I could be a warranty customer, I could be a Trekkie and a Browncoat. Never make someone pick between being a Trekkie and a Browncoat. Trekkie or a Star Wars fan, maybe, but that's a different story.
And vice versa: each one of these can be assigned to multiple of these. You can have many customers, many Trekkies, and so on.
So we need a third table, a junction table in the middle here, to track that relationship back and forth.
For our junction table, create another table. I like to name my junction tables usually - not all the time, but usually - a combination of these names. So in this case, it's going to be CustomerXOptionT, and this will be the CustomerXOption junction table. That's the autonumber. Then we basically just need each one of those IDs: we need a CustomerID (number) to know which customer it belongs to, and the OptionID to know which option you're selecting.
Now, if that's all you wanted, if you just wanted to put someone in that group (in that option), then you're done. But we have a yes or no field we want to also have. So we'll call this the OptionValue and make that a yes/no field. Because you might want to specifically set someone to yes or no, and by removing them from the option, now you have a null value, so you don't know whether or not they are a Trekkie.
There's a yes or no, and then null means "I don't know," which you could also use a triple-state combo or triple-state checkbox for, but that's a whole different video.
Save this as CustomerXOptionT (the CustomerXOption junction table).
Now put in some sample data. I like to put sample data in whenever I'm getting started.
So, what does the data in here look like? Customer 1, Option 1: is active = yes. Customer 1, Option 2: is this person an actual customer? Sure, why not. Customer 1, Option 3: prospect - no, I'm done buying from them, I told them stop trying to sell to me. Customer 1, "is Trekkie": yes. "Browncoat": yes.
Now customer 2, Jimmy Kirk: Is prospect = yes, is he a Trekkie? Sure.
Remember that SNL skit - classic.
See how the junction table works here. This ID is basically irrelevant. We don't need this unless for some other reason we wanted to reference a specific item in here, so we're not going to need that most of the time. But you need the customer, which option you're picking, and what the value is.
You can do the same thing with other values, too. You could do this with numbers, you could do this with text, whatever type of field you want to have in here.
Now we're going to make a continuous form out of this and stick it in the customer form.
Let's make the continuous form. Let me close all the stuff down. Save changes, sure.
I have a continuous form right there which is part of my blank template. I'm just going to use this guy. Copy, paste (Ctrl+C, Ctrl+V), and I'm going to call this my CustomerXOptionF, my junction form (basically it's a subform).
In design view, we don't need the ID. We probably never will, so get rid of that. Don't worry about putting the CustomerID on here because the CustomerID is going to be set by the subform relationship.
The first thing we need is the OptionID, but I don't want the number here. I want to see the value, and I want to be able to pick from a list. So let's turn this into a combo box.
First of all, set the data source for the form. This guy has to be bound to the record source, which is our junction table. This form is bound to CustomerXOptionT. It gets its list of values from the junction table.
We don't need CustomerID on the form because that will be on the parent form. The relationship takes care of that.
You should always have an autonumber in a table. Not always, but 99 percent of the time.
But we do need to select the option, and then we will need a checkbox to set the values. So let's replace this with a combo box to pick the option.
Go to form design, find a combo box, drop it down here. Look up the values from a table or query. Where are you getting your list of options from that go in the box? That's the option table.
Next, what data do you want? Bring both fields over. Remember, the OptionID is what actually gets saved in the table; the OptionName is what we want to see in the box.
Sort by OptionName. That's what it's going to look like when you open the box up. The key column is hidden, but we need that ID there to save the value. Resize it if you want to.
Now, once the user picks a value, what do you want to do with it? You want to store it in the junction table for this record. So we're going to store it in the OptionID in the junction table.
What label do you want? Doesn't matter - we're going to delete it anyway, then finish.
Delete the label, slide this over here. This is my option. There's my combo box. Resize as needed.
Now, we just need the yes/no field over here. We can get there from the add existing fields since this form is bound to that table by the OptionValue. Click, drag, drop. There it is. Get rid of its label. Slide it right there.
You can copy this field. You can use my trick where you slide that out, then put a bunch of spaces in here, then type "Value." Why put 15 labels on there when one will do the trick just fine?
Grab the right side, slide it over. We don't need the form footer, so slide that up. Save it, close it, and let's take a peek at what we've got.
Looks good. There are all of the records for both customers, because we put records in here for two customers.
Now, when we make this a subform in our customer form, that relationship will get taken care of by the subform object.
I'm going to go into design view. Just for the purposes of class, I'm going to delete all this stuff over here. We don't need to see it. Then take that subform we just built, click, drag, drop. There it is. Delete that label. Slide this over here, drag the bottom down so you can see multiple options.
I should mention, I got a survey a little while ago from a student, and we laughed about it afterwards in an email. He said, "Your classes are really, really good. I enjoy them, but you should have more breaks in the class so I can go to the bathroom or get a drink." I emailed him back, and I said, "You realize this is a pre-recorded video. It's not live. You can pause it any time you want." He laughed, and I laughed, and we had fun with that one.
Save it, close it, open it back up again, and oh, look at that. Isn't it nice?
Go to Jimmy Kirk. He's got his options you put in there. Go to somebody else, Deanna Troy.
Customer: yes. Trekkie: no (she'll say she hates Trek). Warranty: sure. Same.
If you want to add another option, all you have to do is go back to the option table. What is your favorite option? Is Star Wars fan? They do not really have a name, and I just actually had to Google that because I have never heard of one. You get Trekkies for Star Trek (or Trekkers - I like Trekkie), browncoats for Firefly, of course. But there's no term for Star Wars fans.
Earlier I talked about triple-state checkboxes. You could make triple-state checkboxes in there that will basically let you have Yes, No, or Null. But after thinking about this, I think that just not having the option there is essentially a null value - you just do not know.
There are a couple issues that you might run into. First of all, someone could add the same option twice. How do you deal with that?
There are a couple different ways. I would make a composite key. A composite key will let you set it so that you can't have duplicate values across multiple fields. I show you how to do this so you can't have the same product on an order - so you couldn't put "phaser" on the order twice, for example. Same thing here: you could set up a composite key to prevent the same option for the same customer.
I will walk you through doing that in the extended cut. And in addition to that, we're going to do something very cool; we're going to make it so we can click a button right here and add all of the options to that customer's account. Just one click, they all show up. Then all you have to do is come in here and go "click, click, click" to the ones you want to set to Yes, and the other ones default to No. We'll do that with a little bit of VBA code.
Those will both be covered in the extended cut. Silver members and up get access to all of my extended cut videos. Gold members can download these databases and you get access to the code vault, which has lots of cool stuff.
That is your TechHelp video for today. I hope you learned something. Live long and prosper. I'll see you next time. Intro In this video, I will show you how to replace multiple yes-no fields in your Microsoft Access tables with a more efficient, relational design using a many-to-many relationship and a junction table. We will create an options table, build a junction table to connect customers and options, and set up a continuous subform to manage these selections easily. This approach makes it simple to add or modify options in the future without having to redesign your tables or forms. This video covers advanced concepts and assumes you are familiar with relational databases, subforms, and combo boxes in Microsoft Access. Quiz Q1. Why is using multiple yes-no fields in a customer table considered a poor design choice?
A. It makes it difficult to add new options and update forms in the future
B. It improves database speed dramatically
C. It ensures data integrity automatically
D. It reduces the number of database tables needed
Q2. What type of relationship does the improved solution use to manage customer options?
A. One-to-one relationship
B. Self-join relationship
C. Many-to-many relationship
D. One-to-many relationship
Q3. What is the purpose of the junction table in the many-to-many relationship?
A. To combine two tables into one
B. To store detailed customer addresses
C. To track which options are assigned to which customers
D. To enforce referential integrity between forms
Q4. Which fields should the Option table include?
A. CustomerID and OptionValue
B. OptionID and OptionName
C. OptionValue and OptionType
D. CustomerName and OptionDate
Q5. What is a recommended name for the junction table in this scenario?
A. OptionCustomerT
B. OptionXCustomerT
C. CustomerXOptionT
D. CustomerOptionsList
Q6. Why is an autonumber primary key typically included in tables?
A. It makes forms easier to design
B. It allows you to reference specific rows uniquely
C. It sorts records automatically
D. It is required for combo boxes
Q7. Why is it preferable to choose values using a combo box in the subform?
A. It allows you to enter new options directly
B. It displays only option IDs without names
C. It lets you pick from a list and saves the OptionID, but shows the user-friendly OptionName
D. It is the only way to enforce referential integrity
Q8. When adding the subform to the customer form, what field does not need to be shown?
A. OptionValue
B. OptionName
C. CustomerID
D. OptionID
Q9. What is the benefit of storing option definitions in their own Option table?
A. You can add options in the future without redesigning your database or forms
B. It increases data redundancy
C. It eliminates the need for forms
D. It makes searching options more difficult
Q10. What kind of key can you set up to prevent adding the same option to a customer more than once?
A. Simple key
B. Composite key
C. Foreign key only
D. Surrogate key
Q11. What does a null value in the OptionValue field indicate in this system?
A. The customer has selected every option
B. The option is intentionally set to Yes
C. You do not know if the customer has that option
D. The customer is not active
Q12. What is the advantage of handling customer options with this relational model?
A. You must redesign forms and tables whenever you add an option
B. Users can easily add or edit options, and the relationships are flexible and scalable
C. The form will only display one option at a time
D. You can only store Yes values, not No
Answers: 1-A; 2-C; 3-C; 4-B; 5-C; 6-B; 7-C; 8-C; 9-A; 10-B; 11-C; 12-B
DISCLAIMER: Quiz questions are AI generated. If you find any that are wrong, don't make sense, or aren't related to the video topic at hand, then please post a comment and let me know. Thanks. Summary Today's video from Access Learning Zone focuses on improving your database design by replacing multiple yes-no fields for customers with a more efficient, relational approach using many-to-many relationships and a junction table. This lesson is aimed at expert-level users, as it builds on several important prerequisites.
Before jumping in, let me mention the concepts you should be familiar with:
- Many-to-many relationships, which involve three tables: two primary tables and a junction table to connect them. If you're not comfortable with this idea, you should review my earlier video on many-to-many relationships first.
- Sub-forms and continuous forms, which are important for displaying related data.
- Relational combo boxes, which allow you to pull values from related tables.
If you're not sure about any of those topics, I recommend that you watch my introductory videos on the site or YouTube channel, then return to this lesson.
The question for today comes from Bruce. He, like several others recently, mentioned having a customer table with about 15 different yes-no fields to track different options. For example, fields might include: do we provide hardware, service, or software? Is the customer on the mailing list? Do they have a warranty? Are they an active account? Bruce has heard me point out that building a table with so many yes-no checkboxes is problematic, especially when you want to add a new option later. It requires altering your table structure, multiple forms, and can make your database cumbersome and inflexible.
Instead of having a separate field (and a separate checkbox on the form) for every possible option, the better approach is to build a many-to-many relationship between customers and options. This involves creating a table that holds all possible options. Then, by linking your customers to their selected options via a junction table, you avoid the need to constantly redesign forms and tables just to add or remove choices.
To start, you create an options table. This table stores every possible option your customers may have. Use fields like OptionID (an autonumber primary key) and OptionName (the name of the option). Be careful to avoid using reserved words like "Name" or "Date" as field names.
After setting up the options table, add some sample options like "IsActive," "IsCustomer," "IsProspect," "IsOnMailingList," "IsWarrantyCustomer," and any others you need. This setup makes it easy to expand your options list in the future. All you have to do is add another record in the options table.
Now comes the relational part. If your requirement was such that each customer could only have one option, you would just store the OptionID directly in the customer table. But most cases need customers to have multiple options and each option to apply to many customers. That's why you use a junction table.
The junction table typically combines the two main table names; for example, CustomerXOptionT. This table needs its own primary key (autonumber), along with fields for CustomerID (number), OptionID (number), and an OptionValue (yes-no) to track whether the customer actually has that option set.
This setup makes your database flexible. To assign options to customers, you only need to create records in the junction table, specifying which customer, which option, and the yes/no value. For example, Customer 1 might have "is active" set to yes, "is prospect" to no, and so on. Customer 2 could have a different set. The junction table holds all those combinations in a scalable way.
To make this practical for everyday use, you'll want a continuous form based on this junction table—essentially a subform. You don't need to display the main ID field, and CustomerID can be managed by the main form's link to the subform. The form should allow users to pick an option from a combo box (populated from the options table) and set its value (yes/no) with a checkbox.
Setting up the combo box involves sourcing its list from the options table, so users see option names while the form saves the corresponding IDs. The yes/no control can be added directly from the junction table's OptionValue field.
Once your form is ready, add it as a subform to the customer form. The link between the main form and subform ensures that records are automatically associated with the right customer. You can easily browse through customers and adjust their options using the subform.
If you want to add new options, it's as simple as adding a new record to the options table. There's no need to change the table structures or forms.
One issue to watch for is preventing users from adding the same option for the same customer more than once. This can be resolved by creating a composite key in your junction table based on CustomerID and OptionID. That will block duplicate entries.
In today's Extended Cut, I'll walk through how to set up this composite key to prevent duplicates. I'll also show you how to add a button that, with one click, assigns all available options to a customer so you can quickly toggle their values as needed. This part will involve some VBA programming.
That wraps up this expert-level lesson on building dynamic options for customers using a proper relational design in Microsoft Access. For step-by-step instructions and a full demonstration, visit my website at the link below.
Live long and prosper, my friends. Topic List Problems with multiple yes-no fields in a table
Designing an Option table for customer options
Adding options to the Option table
Understanding many-to-many relationships
Creating a junction table for customers and options
Setting up the CustomerXOption junction table
Including a yes-no (OptionValue) field in the junction table
Populating sample data in the junction table
Building a continuous form based on the junction table
Binding the continuous form to the junction table
Using a combo box to select options
Configuring the combo box to display OptionName
Adding and configuring a checkbox for OptionValue
Embedding the continuous subform in the customer form
How the subform relates to the main customer form
Adding new options by updating the Option table
Brief discussion of triple-state checkboxes and Null values
Mentioning the risk of adding duplicate options without constraints Primary Topics many-to-many relationships, junction tables, relational database design, customer options, table normalization, subforms, combo boxes in forms, Access form design
Secondary Topics composite keys, triple-state logic, VBA automation, form usability, user-driven options
|


