Company Logo
By Richard Rost

 3 years ago
Add A Clickable Company Logo To Your Main Menu
In this Microsoft Access tutorial I'm going to show you how to design a quick company logo, add it to your main menu as an image, and have it take people to your website when they click on it.
Members
Members will learn how to give the logo image a hover effect and a click effect. When the user hovers over it, the border changes and when they click, it pushes down and up like a button.
Silver Members and up get access to view Extended Cut videos, when available. Gold Members can download the files from class plus get access to the Code Vault. If you're not a member, Join Today!
Pre-Requisites
Links
Recommended Courses
Keywords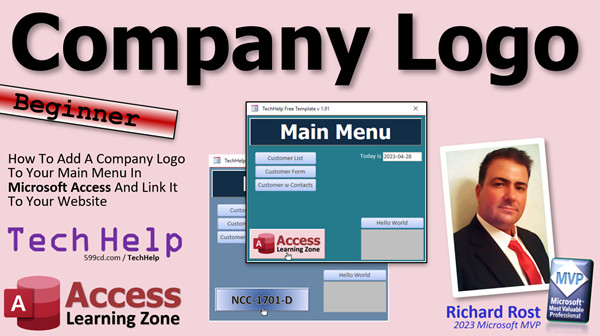
access 2016, access 2019, access 2021, access 365, microsoft access, ms access, ms access tutorial, #msaccess, #microsoftaccess, #help, #howto, #tutorial, #learn, #lesson, #training, #database, Logo, image, hyperlink, button, wordart, border style, sunken, raised, special effect, specialeffect, top, left, move object, hover effect, push button effect, mouse move, mousemove, mouse up, mouseup, mouse down, mousedown, twip
 Subscribe to Company Logo
Get notifications when this page is updated
Transcript Welcome to another TechHelp video brought to you by AccessLearningZone.com. I am your instructor Richard Rost.
In today's video, I'm going to show you how to add a company logo to your main menu and link it to your website. So when someone clicks on it, it takes them to your website.
Lots of people have asked me how I got the AccessLearningZone logo on the main menu in the TechHelp free template. This guy right here. How did I put that there? I'm not exactly sure that I showed how to do this in one of the TechHelp videos.
Now I know I showed you how to make the main menu form in the blank template, which is the first video of the series. Then the second video was the contact management one. Again, I quickly went through this and I did not see the main menu logo in that one. In the third video, the invoicing video, it just magically appears about three minutes in. Boom. There it is.
I remember putting it in there, but I do not think I put it in there on camera. I just dropped it in there. So I'm going to show you what I did. I searched my website and I can't find it, so if you can find it in another one of my videos, let me know.
This is literally just an image and I set a hyperlink property on it. Now I know in lots of my previous videos, I say not to store images in your database, and that is generally true. What I mean is do not store images in your tables. Do not store images for employees, like their employee photo, customer photos, or product photos. Those should all be external files and you just store their path and filename in the database.
But that does not apply to images that you want to use in the design of the database itself in your forms and reports. A company logo, for example, is perfectly fine to store in the database because usually there are only a few of these. You are not going to have tons of them.
Lots of people have also emailed me saying, how did I design this? Honestly, I just use PowerPoint or Word to put something like this together. Obviously, I grabbed the Access logo off of one of Microsoft's sites. I just use Word, outer text, whatever to put that on a rectangle.
I'm going to show you how to do it real quick. I cover this in a lot more detail in my Microsoft Word class. I show you how to put together images like this, but I'm just going to run through it real fast. If you know Photoshop or something with a lot more advanced parts, and if you're a graphic designer, then you can skip this. This is how I quickly throw together a logo like that.
Just open up Word, and if you have Access, chances are you have Word too. Go to a blank document. Insert a shape, pick a rectangle. It's the easiest thing to make a button out of. Whatever size you want your logo to be. You can change the background by using Shape Fill. You can put a picture in it. I like using gradients for buttons and logos and stuff. Maybe something like that. If you want to customize it, right click, go down to Format Shape. You can change the fill and the line. Maybe come over here and change one of the gradients. Stop and make this darker if you want to. That kind of stuff. This will change how much the gradient is between. Lots of cool stuff in here. I could spend hours going over all this stuff. In fact, I do in my Word classes.
To add text here, you can either right click and go to Add Text, or if you want fancier text, you can insert some Word Art. Go to Insert, and then right over here under the text section is Word Art. There is all kinds of fancy cool stuff in here. You can pick one of these, I'll pick that guy. I'm not overlaying it, but we are going to put in here the NX01. Then you can move this, resize it, make the text bigger. Select it, make it larger, whatever you want to do. Change the color, change the fill, all the same things you probably know how to do already. Like this.
I'm not going to spend a ton of time going over all this stuff, but you get the point. If you want to put a little image over here, you can screen capture it off somewhere else. In fact, that's how we are going to get this into Access is just use a screen capture tool. I personally use Hypersnap, but there is the Snip & Sketch that comes with Windows. I have a whole separate video on how to do this, but I like Hypersnap.
I'm going to hit my Hypersnap key and I'm going to just pick the corners. Come down here. And that's snipped into my clipboard. I'm going to flip back over to Access, right click, design view. I'm just going to delete the one that's in here right now. Goodbye. Then I'm going to click on the background and hit paste.
Now, when this comes in, if it's not the right size, I recommend not resizing it in Access. You can do that, but it will set the clip right now. There's clip, stretch, and zoom. You're never going to be happy with any of these options.
So what I suggest is resize it either in your Snip & Sketch tool or just resize it in Word and take another screenshot. Delete that, come back over to Word, and just zoom out. Zoom out until that's about the size that you want. This is going to look the best. It's about the size I want the button in Access. You can flip over here and take a peek. Yeah, that's good.
Now again, do your screen capture. You can use the keys with Hypersnap. You can use the keys to move back and forth. Put it right about where you want it with the mouse and then use the arrow keys. Perfect. Come back over here, paste it in, and look at that. That looks perfect. Put it right down here.
I'm not a graphic artist. I can make simple buttons and simple logos and stuff. If you have seen my PowerPoint slides, that's about the limit of my artistic ability when it comes to stuff like this. I know enough to get the job done.
Over here, I'm going to change the special effect from sunken to raised because then I think it looks more like a button just the way that it appears. This visually looks like a button.
Let's give it a good name. It's OLE Unbound 17 right now. Let's change this to TrekButton, TrekBTN.
To make it so it jumps to your website, all you have to do is come down here and find the hyperlink address. There is a sub-address and target too. I almost never use those. That's if you want it to jump to a specific spot on the page. I'm just going to come in here, and in the hyperlink address, type in where you want it to go. https://599CD.com. Save it. Close it. Open it. Look at that. You're over the button now. See that? Then just click. My shiny face appears. See, look at that. Wee.
That's it. That's all you really have to do to put a button anywhere on your form or a logo, picture, whatever you want.
Now, it's kind of boring just having that little logo sitting there. Wouldn't it be nice if when you moved your mouse over it, it changed? Look at that. Little hover effect. See that? Wouldn't that be cool? Also when you click on it, if the button went down, like you are pushing a button. You see that little thing right there when I clicked on it? I clicked, it went down and back up again.
If you want to learn how to do that, I will show you how to do both of those things in the extended cut for the members. Silver members and up gain access to all of my extended cut videos. There are hundreds of folks, hundreds of them. I do little hover effects, and when we hover over the image, it changes a little bit. We'll have the border change, and then the push button effect with push down and back up again.
Now that will unfortunately require a little programming, but not a lot, like maybe six lines of code. It's not tough.
If you want to learn more about this stuff, I cover a lot more with the custom main menu and adding logos and all that kind of stuff in my Access Beginner Level 7 class. Check it out. I'll put a link down below.
That will be your TechHelp video for today. I hope you learned something. Live long and prosper, my friends. I'll see you next time.Intro In this video, I will show you how to add a company logo to your main menu in Microsoft Access and set it up as a clickable link to your website. We will talk about the best way to create and format your logo using Microsoft Word, capture it for use in Access, and properly insert it into your form. I will also explain when it is appropriate to store images in your database and share tips for getting your logo sized and positioned just right.Quiz Q1. Why is it generally NOT recommended to store images like employee photos directly in your Access tables?
A. It can lead to excessive database sizes and performance issues.
B. Access cannot display images in forms or reports.
C. Images will become corrupted in the table.
D. Storing images in tables is not supported by Access.
Q2. When is it considered acceptable to store an image, such as a company logo, directly in the database?
A. When it is used for the design of forms and reports and there are only a few images.
B. When you want every record in a table to have its own unique logo.
C. When images are too large to keep as files.
D. When you must upload images to a web server.
Q3. According to the video, what is the recommended way to include product or customer photos in your database?
A. Store just the path and filename of the image in the table.
B. Store the entire image file in an Attachment field.
C. Paste each image directly onto the main form.
D. Use an OLE object field for each image.
Q4. Why did the instructor suggest making and copying a logo using Word or PowerPoint rather than a more advanced graphic program?
A. These programs are simple and accessible and many users already have them.
B. Advanced programs cannot export the required image format.
C. Word and PowerPoint produce higher quality images.
D. Only Word or PowerPoint can add gradients and effects.
Q5. What is the preferred method for resizing the logo image before pasting it into Access?
A. Resize it in Word and use screen capture again to get the correct size.
B. Always resize it directly in Access using its handles.
C. Use Access's stretch and zoom options to adjust proportions.
D. E-mail the image to yourself and open it on a different device.
Q6. After pasting your logo image into Access, what property is set to make clicking the logo open your website?
A. Hyperlink Address
B. Record Source
C. ControlTip Text
D. Tab Index
Q7. What visual effect did the instructor recommend changing to make the logo look like a button?
A. Change the Special Effect property from sunken to raised.
B. Increase the width of the control's border.
C. Make the background color red.
D. Set the visible property to false.
Q8. When naming your newly created logo button control, what naming convention did the instructor use?
A. Used a descriptive name like TrekButton or TrekBTN.
B. Left the default name (OLE Unbound <number>).
C. Used only numbers for the control name.
D. Named it after the company only.
Q9. What additional visual effects were demonstrated for extended users, beyond simply linking the logo?
A. Adding hover and push-down button effects with a little coding.
B. Changing the database theme colors automatically.
C. Playing a sound when the button is clicked.
D. Opening multiple websites with one click.
Q10. If you want advanced graphics effects or hover button features in Access, what is typically required?
A. Some programming (e.g., a few lines of VBA code).
B. Only changing the form's caption property.
C. Installing a special add-in.
D. Setting the Control Source property.
Answers: 1-A; 2-A; 3-A; 4-A; 5-A; 6-A; 7-A; 8-A; 9-A; 10-A.
DISCLAIMER: Quiz questions are AI generated. If you find any that are wrong, don't make sense, or aren't related to the video topic at hand, then please post a comment and let me know. Thanks.Summary Today's TechHelp tutorial from Access Learning Zone is focused on adding a company logo to your Access main menu and linking it to your website so users can click on the logo and be taken directly to your site.
Many people have asked how I placed the Access Learning Zone logo on the main menu in the TechHelp free template. This is a common question because, in the video series that goes over building the main menu, the logo simply appears partway through without much explanation. While I did show how to create the main menu form in the blank template in the first video, and the contact management example in the second video, I never explicitly demonstrated adding the logo. In the invoicing video, the logo just shows up a few minutes in, and I realized I never actually talked through putting it there on camera.
So to clarify this process, I want to go through how this was done. First, let me mention that the logo is simply an image with a hyperlink property set in Access. I often advise against storing images directly in your database tables, especially for things like employee photos, customer images, or product pictures. For those, you should store just the file path in your database and save the images as external files. However, that advice does not apply to images you use for your database design itself, such as for your forms and reports. If you only have a few images, like company logos, it is perfectly fine to store them in your database.
People have also asked how I created the logo design. Honestly, I usually rely on PowerPoint or Word for that. For example, I grabbed the Access logo from Microsoft's official resources, then used Word to add text onto a rectangle shape. If you are proficient with more advanced graphic design software, you can of course use those tools. But for most people, assembling a simple logo in Word is quick and effective.
Let me explain how you can put together a basic logo in Word. Start by opening a new blank document, then insert a rectangle shape and adjust its size to match your needs. Customize the background using Shape Fill to pick a color or apply a gradient for visual appeal. If you want to get more detailed, right click on the rectangle and use the Format Shape menu to fine tune the fill and borders, or to introduce more complex gradients.
To add text, either right click the shape and select Add Text, or use Word Art from the Insert menu if you want fancier effects. Insert your desired text, reposition it, and adjust the size and colors as needed to match the visual style you like.
Once your logo is designed in Word, save it by taking a screen capture. I use Hypersnap myself, but you can use any screen capture tool, including Snip & Sketch, which comes with Windows. Just select the portion you want to use and copy it to your clipboard.
Now, switch to Access. Open your main menu form in Design View and delete any old image if needed. Paste the new logo in by right clicking and selecting Paste. Check to see if it is the right size. If not, I recommend resizing the logo in Word and taking another screenshot, rather than using Access's stretch or zoom options, which rarely give good results. Paste it in again, and position it on your form as desired.
For appearances, you can set the special effect of the image to Raised instead of Sunken; this makes it look more like a clickable button. Also, assign an easy-to-remember name to your image control, like TrekBTN.
To make the image link to your website, find the Hyperlink Address property for your image control and enter your desired website address. That is all you need to do. Now, when users click the logo on your main menu, it will open the specified website.
While this adds a functional logo to your form, you might want to add a little style, such as a hover effect when the mouse moves over the logo or a pressed effect when it is clicked. These features, which make your logo feel more like a button, can be created with a small amount of programming. I cover all of the techniques for hover and push-button effects in the Extended Cut for members. Silver members and above have access to these enhanced tutorials, where I walk through everything such as changing the border on mouseover and making the button appear pressed on click.
If you are interested in building a more customized main menu or want more detail about adding graphics and logos, I go into greater detail about these topics in my Access Beginner Level 7 class. You will find a link to that class below.
To review the full video tutorial with step-by-step instructions on everything discussed here, visit my website at the link below.
Live long and prosper, my friends.Topic List Adding a company logo to an Access main menu
Linking a logo image to a website in Access
Designing a simple logo using Microsoft Word
Inserting rectangles and shapes in Word for logos
Customizing shape fill, gradients, and outline in Word
Adding and editing Word Art for logo text
Using screen capture tools to grab an image
Pasting an image onto an Access form
Deleting and replacing form images in Access
Sizing images correctly for Access forms
Renaming image controls in Access
Setting the hyperlink property for images in Access
Changing the special effect property to mimic a buttonPrimary Topics Access forms, logo insertion, hyperlinking images, form design, user interface customization
Secondary Topics image editing with Word, Snip & Sketch, button aesthetics
|


