Calculator 2
By Richard Rost

 3 years ago
Build an On-Screen Calculator in Access - Part 2
This is part 2 of my Microsoft Access on-screen calculator tutorial. We are continuing to build the calculator that we started in part 1. In today's video we're going to learn error handling, how to use an if-then statement, and how to change the background color of a text box.
Members
There is no extended cut, but here is the database file:
Silver Members and up get access to view Extended Cut videos, when available. Gold Members can download the files from class plus get access to the Code Vault. If you're not a member, Join Today!
Prerequisites
Next Video
Links
Recommended Courses
Keywords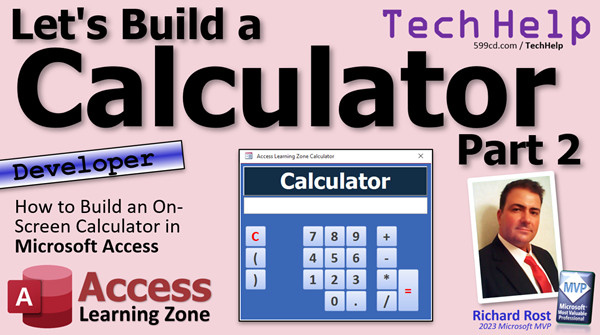
access 2016, access 2019, access 2021, access 365, microsoft access, ms access, ms access tutorial, #msaccess, #microsoftaccess, #help, #howto, #tutorial, #learn, #lesson, #training, #database, Onscreen calculator, calculator, on-screen calculator, error handling, on error resume next, on error goto, vbwhite, vbred, colors, backcolor
 Subscribe to Calculator 2
Get notifications when this page is updated
Intro In this video, we'll continue building our calculator project in Microsoft Access by adding essential error handling features to make it more user-friendly. I'll show you how to handle invalid expressions, display error messages in the calculator window, and use VBA techniques like On Error GoTo and custom subroutines to manage errors and clear them efficiently. We'll also improve the user interface by changing the calculator display color when an error occurs. This is part 2.Transcript Welcome to another TechHelp video brought to you by AccessLearningZone.com. I am your instructor Richard Rost.
We're building the calculator, folks. This is part two of my "Let's Build a Calculator" series. In part one, we got all the basics down. So if you haven't watched part one yet, there is a link down below. Go click on it and go watch part one, because part two is going to be kind of confusing if you don't watch part one. That's kind of how parts work.
In part one, we got the basics of the calculator built. We got our little buttons built: add, subtract, multiply, divide, equals, clear, parentheses. All that is pretty simple and straightforward. We did this with a minimal amount of programming. You don't have to write a ton of code as long as you write good code. All of our code so far is just that.
We've got our AddToCalc function, which is in most of the buttons as an event. AddToCalc adds the data up into here. We've got our clear button. We've got the evaluate button. We've got the equals button, which literally just uses the Eval function. That's three lines of code so far for this entire project. That's not too bad.
Today we're going to focus on making this thing a little bit smarter with a little error handling. For example, if I type in 56 minus dot dot dot and press enter, the expression contains invalid syntax. If I hit debug, it takes me to this line. Eval by itself is just going to throw an error if you send it something that's not a valid mathematical expression or that it can't evaluate. So we're going to add a little error handling to this.
If you want a leg up, go watch my video on error handling. It covers this topic in more detail. I'm going to go over the basics right now, but if you want to learn more about error handling, go watch that video.
The easiest way to get around an error is to use "On Error Resume Next." This works in some situations, but basically, it says, "Hey, if you encounter an error, just ignore it and move on to the next line." That's what "On Error Resume Next" means.
If I save that and come back out here and do the same thing and hit equals, nothing happens, which isn't extremely user-friendly. So instead of that, what we're going to do is say: if you encounter an error, I want you to put the word "ERROR" in here, like that, so the user knows—or maybe even beep. It's up to you. That's what most calculators do. If you type in some garbage, it gives you "ERROR."
So instead of "On Error Resume Next," we're going to say "On Error GoTo" and then some label that we're going to create. We'll call it "MyError." This basically says when you encounter an error, go to a spot called "MyError." Where's that? We're going to make it right now. Right down here: "MyError:" (put a colon after it, that's a label). It's a labeled location in your subroutine.
Back in the old days, you could line-number stuff, like 10 do this, 20 do that, 30 that. In Visual Basic, we can put little labels to indicate spots to jump to in the code. This is the preferred way to handle any errors.
So if you encounter an error, what are we going to do? I want to put the word "ERROR" up in the calc box, so calc = "ERROR," like that. Maybe beep, too. When you are done handling the error, you have to continue. You have to resume somehow. Resume Next.
Then up here, the next thing after that line is just going to be simply Exit Sub. You don't necessarily technically need that Resume Next down here; it'll drop out of the sub. But I've found that in the past it causes problems if you don't resume out of an error handling loop. Just trust me.
You can also resume to another labeled location. If you've got other stuff that you want to go on in here, you could put another label, like "MyResume," and then you could "Resume" to that location there. I cover error handling in a lot more detail in my advanced classes.
If an error is not encountered here, you still want to Exit Sub at this point because if not, it'll continue down to here and give you the error. Basically, this line gets evaluated. If there is an error, it jumps down here, puts "ERROR" in the window, beeps, resumes next (which exits sub). If there is no error, then it evaluates and then exits the sub. If you're new to this, it's a little weird, but that's just how you have to do it.
Now if I come over here, let me clear this, right? I put in 5 minus 2, enter, everything's good. If I put 3 stars—or dot dot dot, right-parenthesis, enter—I get the error and the beep. That's pretty straightforward.
At this point, our other buttons need to know about that error. If I hit 9 and want to continue doing stuff now, it's just adding onto the end. We need to make it so that our function that adds stuff up here looks to see if there's an error in the window. If there's an error there, we need to clear it and continue on.
To do this, we're going to use an If-Then statement. If something happens, then do something else. If you want to learn more about If-Then, go watch this video.
So, what is the code that puts stuff up here? Let's go back to our code editor. It's this guy, right? The AddToCalc. So right here, we're going to check and see if that window says "ERROR." We're going to say: If calc = "ERROR" Then calc = null (basically blank it). Not "blanket" like you're going to wear a blanket because you're cold, but blank it.
Save it once in a while. Give yourself a Debug - Compile just to make sure. Debug - Compile. Everything's good, no compile errors.
So now that says "ERROR." If I press 5, it erases it and continues on. 5 times 3 divided by 0.05, enter. Minus 5 equals, okay, good. Minus minus minus plus plus plus plus plus. Error. Zero two five. See, we're good: now it knows how to handle that error.
If you want to get fancy and add a little color, maybe watch this. Come back out here. If we encounter an error, we're going to say "calc.BackColor = vbRed." And when we're clearing it up here, we're going to say—now we need two statements to go with this Then: "calc = null" and then "calc.BackColor = vbWhite." If you've got a multiple-line If statement, you need the End If on the end. I cover that in the If-Then video.
If we've got an error, we're going to beep and turn red, and then the next action will reset that. We're going to put that in our clear, too.
In fact, what we could do, since I've got these two commands I want to repeat twice, is make another custom function to clear the calculator box. Let's make this Private. This can be a subroutine: ClearCalc. ClearCalc is going to say this (copy this, put it here). So that's ClearCalc now. Then ClearCalc can go here, and now we don't need all these statements here either. We can go back to just one thing and that one thing will be ClearCalc. We don't want to have duplicate code in multiple places. As soon as it gets to two, three, or four lines, you want to make it its own subroutine or its own function if it's returning a value. In this case, this isn't returning a value, it's being used in an event handler.
That's what ClearCalc does. Now let's save it (Control-S) and back out here. Times 3, point, divided, equals, all that's an error, goes red. Continue on, 2, 5, see it cleared it, point 3, clear. Three minus minus plus. Fine.
If you want to learn more about playing with colors in Access VBA, go watch this video. There's actually a function called RGB that you can use to get the exact color that you want. There are some constants for some colors that are used a lot, like vbWhite, vbBlue, vbGreen, vbRed. But if you want a shade of green, use the RGB function.
Now what I'm going to do so you don't get confused is, with every class, I'm going to slightly change the background color of this guy so that for the next screen cap, it's a little bit different. Let's make it green now. Yeah, let's go to green. That looks good.
Let's make this guy dark. There we go. Now the next class, the screenshot will look like that. It'll look a little different. We'll put an error in there too. How does that look?
There you go. There's your error handling. That's part two. I know I should probably update this and then we're good. It'll be the one from the last class.
I hope you learned something. I hope error handling was fun. I cover error handling in a lot more detail in that video that I pointed you to earlier, my error handling video. I also cover it in my Access Developer 2 and 15 class. That's where we go into detail on how to handle error handling, but this video will give you more of the basics.
I hope you're enjoying the calculator. Live long and prosper, my friends. I'll see you tomorrow.Quiz Q1. What is the primary new feature added to the calculator in this video?
A. Adding new mathematical operations
B. Implementing error handling
C. Creating a new user interface
D. Adding a history function
Q2. What does the "On Error Resume Next" statement do in VBA?
A. Stops the code from executing on error
B. Jumps to a specific line on error
C. Ignores the error and moves to the next line
D. Shows a detailed error dialog to the user
Q3. Why is simply using "On Error Resume Next" not very user-friendly in this calculator project?
A. It crashes the program when an error occurs
B. It shows an error message box every time
C. Nothing happens and the user is not informed about the error
D. It restarts the calculator automatically
Q4. How does "On Error GoTo MyError" improve error handling in this context?
A. It automatically corrects all errors in expressions
B. It restarts the program after an error
C. It directs the code to a labeled section for custom error handling
D. It prevents any further code from running
Q5. What is the purpose of the label "MyError:" in the VBA code?
A. It marks the end of the subroutine
B. It serves as a jump location for error handling
C. It is a placeholder for variables
D. It stores the last error message
Q6. What does the calculator display when an error is encountered after error handling is implemented?
A. The application closes
B. A message box pops up
C. The calculation result is shown anyway
D. The word "ERROR" appears in the calculator window
Q7. Which function is used to add entries to the calculator display in this project?
A. AddButton
B. AppendEntry
C. AddToCalc
D. InputCalc
Q8. Why is it necessary to check if the calculator display says "ERROR" before allowing the user to continue?
A. To avoid overwriting valid results
B. To prevent repeated errors
C. To ensure that entering new data starts with a clear display
D. To reset the calculator automatically every time
Q9. What programming construct is introduced to check and clear the "ERROR" message before adding new input?
A. For-Loop
B. Case Statement
C. If-Then Statement
D. Select Case
Q10. What does the ClearCalc subroutine do?
A. Adds entries to the calculator
B. Changes the calculator's background color at random
C. Clears the display and resets the background color to white
D. Returns the result of a calculation
Q11. Why is it better to move repetitive code into a subroutine like ClearCalc?
A. It makes the code run faster
B. It makes debugging more difficult
C. It avoids duplicating code in multiple places and simplifies maintenance
D. It increases the complexity of the code
Q12. When is it recommended to create a subroutine or function in your code?
A. When the code will be used more than once or is more than two or three lines
B. Only for mathematical calculations
C. Only if required by the compiler
D. When you want to make your code more confusing
Q13. Which VBA color constant is NOT mentioned as commonly used in the video?
A. vbWhite
B. vbBlue
C. vbRed
D. vbYellow
Q14. What function can be used to get a custom color in VBA?
A. SetColor
B. RGB
C. ColorPicker
D. HexColor
Q15. How does the calculator interface visually indicate that an error has occurred?
A. By shaking the window
B. By minimizing the application
C. By changing the background color to red
D. By flashing the screen
Answers: 1-B; 2-C; 3-C; 4-C; 5-B; 6-D; 7-C; 8-C; 9-C; 10-C; 11-C; 12-A; 13-D; 14-B; 15-C
DISCLAIMER: Quiz questions are AI generated. If you find any that are wrong, don't make sense, or aren't related to the video topic at hand, then please post a comment and let me know. Thanks.Summary Today's TechHelp tutorial from Access Learning Zone focuses on making our Access-based calculator a bit smarter by adding error handling features. We are continuing from part one of my "Let's Build a Calculator" series. If you missed that first lesson, I highly recommend checking it out before moving forward, since this second part builds directly on everything covered there.
In the previous video, we constructed the basic framework for our calculator. We added essential buttons like add, subtract, multiply, divide, equals, clear, and parentheses, all with fairly straightforward programming. Most of these buttons call a common function called AddToCalc, which handles collecting and displaying the input, while some buttons trigger actions like clearing the calculator or evaluating the entered expression. We kept things simple, using just a few lines of code, including the Eval function for calculations.
The focus now shifts to handling errors in the calculator. For example, suppose you enter an invalid expression, like "56 minus dot dot dot," and attempt to evaluate the result. Without proper error handling, Access generates a runtime error, taking you directly to the problematic line in the VBA editor. The goal is to make the calculator respond more gracefully, behaving as a typical calculator would when an input is invalid.
The most basic form of error handling in VBA is the statement "On Error Resume Next," which instructs VBA to ignore errors and continue executing the next line of code. However, this approach simply skips over errors and leaves users without any meaningful feedback. Instead, we want our calculator to display a clear message—like "ERROR"—and alert the user in some way, such as with a beep.
A better technique uses "On Error GoTo" followed by a label, which acts as a jump point in the code if an error occurs. By creating a labeled section (for example, "MyError:"), we can direct the program to that spot, display "ERROR" in the calculator window, and offer feedback. After handling the error, we can end the procedure or resume normal operations as needed. It's important to make sure the procedure exits cleanly after handling the error to avoid complications.
With this approach, normal calculations like "5 minus 2" execute as expected. If you input something invalid, such as "3 stars" or unrelated symbols, the calculator will display "ERROR" and provide immediate feedback. This makes the user experience much more intuitive.
We also need to consider how the calculator behaves after an error has occurred. If the display shows "ERROR" and a user tries to enter additional numbers, those should not be tacked onto the end of the error message. To handle this, I added a check in the AddToCalc function that determines if the display currently shows "ERROR." If so, the code clears the box before accepting new input. This makes for more natural usability, letting users simply start a new calculation after an error.
As always, I encourage saving your work often and running Debug - Compile in the VBA editor to check for any mistakes.
To provide more visual feedback, we can also change the calculator's background color when an error occurs—for instance, turning the box red. Resetting it to its normal color (for example, white) happens when the error is cleared, either by entering a new value or pressing the clear button. If you use multiple lines in your If-Then statements, remember that you'll need to close them properly with "End If." For convenience, common tasks like clearing the calculator box and resetting its color can be moved into their own subroutine, such as ClearCalc. This keeps the code cleaner and avoids repetition.
If you're interested in learning more about how colors work in Access VBA, including how to use the RGB function and built-in color constants like vbWhite and vbRed, I have a separate video covering those details.
Moving forward, I plan to change the background color of the calculator in each lesson just for clarity when I share screenshots or continue the series. For example, the next lesson might show the calculator with a green background.
You now have a smart error-handling calculator that provides helpful feedback to the user when something goes wrong and makes it easy to recover from mistakes. If you want to dig deeper into error handling, I also cover it in greater detail in my other classes, including Access Developer 2 and Access Developer 15, as well as in my dedicated video on error handling.
You can find a complete video tutorial with step-by-step instructions on everything discussed here on my website at the link below.
Live long and prosper, my friends.Topic List Adding error handling to calculator code
Using On Error Resume Next in VBA
Using On Error GoTo with labeled error handling
Displaying "ERROR" message in calculator display
Using Beep for error notification
Clearing calculator display after error
Using If Then statements to check for error state
Resetting display background color on error
Changing display color back when cleared
Creating a ClearCalc subroutine
Using subroutines to avoid duplicate code
Applying color constants like vbRed and vbWhite |


