Calculator 7
By Richard Rost

 3 years ago
Build an On-Screen Calculator in Access - Part 7
This is the 7th and final part of my Microsoft Access on-screen calculator tutorial. We are continuing to build the calculator that we started in part 1. In today's video we're going to talk about a bug that I discovered from part 6. We're going to go over some of your feedback from the last couple of lessons. We're going to add some trigonometry buttons to the calculator (sin, cos, pi, etc.) We're going make a copy button to copy the result to your clipboard.
Members
Members will learn how to make a button you can click on to bring the result back to a form field. We'll put a calculator button on the Quick Access Toolbar up top so you can use it with any field in the database, and we're going to make an adding machine history tape.
Silver Members and up get access to view Extended Cut videos, when available. Gold Members can download the files from class plus get access to the Code Vault. If you're not a member, Join Today!
Prerequisites
Links
Member Links
Recommended Courses
Keywords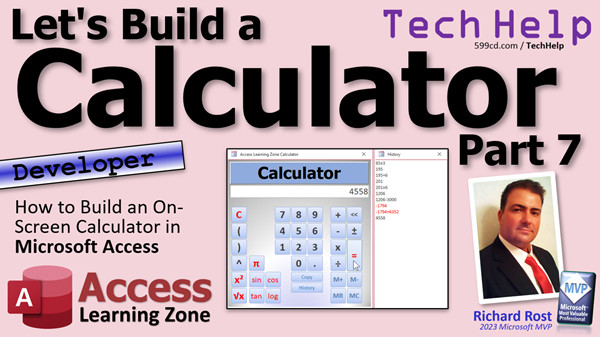
access 2016, access 2019, access 2021, access 365, microsoft access, ms access, ms access tutorial, #msaccess, #microsoftaccess, #help, #howto, #tutorial, #learn, #lesson, #training, #database, Onscreen calculator, calculator, on-screen calculator, trig, trigonometry, sin, cos, tan, pi, log, logarithm, copy to clipboard, return value to a form, quick access toolbar, register tape, adding machine tape, history
 Subscribe to Calculator 7
Get notifications when this page is updated
Transcript Welcome to another TechHelp video brought to you by AccessLearningZone.com. I am your instructor, Richard Rost.
Welcome to Part 7, the final part in our Let's Build a Calculator series, where we're building an on-screen calculator. There is a lot to do in today's video. We are going to talk about a bug that I discovered from Part 6. We are going to go over some of your feedback from the last couple of lessons. We are going to add some trigonometry buttons down here: Sine, Cosine, Tangent, Pi, and all that stuff. We are going to make a Copy button to copy the result to your clipboard.
A little bit later on, in the extended cut for the members, we are going to make a button you can click on to bring the result back to a form field. We will put a Calculator button on the Quick Access Toolbar up top, so you can use it with any field in the database. And we are going to make this adding machine history tape right here.
Are you ready for Part 7? Here we go.
First up, we have a bug. I realized this after I had finished and posted the last class. When you open up the database, look what happens. Err. You have the expression, "I'm loading you," entered as an event property setting, produced the following error: "Object or class does not support the set of events."
What does that mean? When it loads and you click on stuff, you still get the same error message. What is happening there? If we take a look inside the code in the on-load event, you will find where we are adding memory val equals tempvars.memoryval.value.
Now, this doesn't have a problem as long as tempvars.memoryval has a value. But if that's null, then this has an issue.
There are a couple of ways we can get around it. We can check for null here, or we can just bandaid it with "On Error Resume Next." Again, in this particular case, there is nothing wrong with that. If you want to check for null, that is fine too. Save it, close it, open it back up again, and we are good.
So, a little bug that I did not discover until after the video had already been posted, and it had been online for a few days already, so I wasn't going to go back and change it. Hopefully, those of you who found it were able to fix it. And that is why we are here, to learn how to do this stuff.
I thought we'd go over some of the feedback, some of the comments I have gotten about this calculator. We have lots and lots of comments over the past six videos here.
NFA Toys says you should not be adding parentheses automatically. If you want six plus three squared, then you are giving me six plus three, squared after that. My answer would just be to write it like you want it: six plus three, then the caret two, instead of using the square button. It's all about how you define how this is going to work.
I've got it set so that, as we have talked about in previous videos, any of the red buttons, when you hit the red button, it executes whatever is in the box. So, if I put in here (six plus two) squared, then I get what you want. But, if I type in six plus two, and then square it, then I get that. So, it's all how you want to go about it.
Some of the other comments, which you will see in a minute, have talked about it when you hit any of the operation buttons. Some calculators then execute the command immediately. So, as soon as you type in six, or three times, and then hit the second operation, it processes that. Again, it is all how you want to build it. If you want to build your calculator to mimic those desktop calculators, go for it. I am building it the way that I want it to work, so it is up to you.
A couple of people made the comment that you need the comma instead of the decimal place. I have mentioned this in a ton of my videos: I am English speaking. I use the US standards. For us, it is decimal points. If you are in Europe, some places use commas, so you will have to replace them accordingly. I have zero experience with working with other language versions of anything, so that is my one limitation. I do not know that stuff. That is on you.
That is one of the reasons why I like to stick to the ISO date format, so there is no confusion in dates. If you do not know what that is, I will put a video link down below - go watch that.
Ariel says, "Wouldn't it be nice to just remove any of the non-mathematical characters before processing it with the Eval?" That is great. I mentioned that I would put it on a list for a future video, but I am not going to include it in the calculator because I have already done it. I have already made a video on filtering characters out, so go watch this video. Literally, just filter out anything other than numbers, periods, whatever else you want in your formula, leave the parentheses, leave the caret, leave whatever you want in there, filter everything else out, and then run the Eval. That will take care of that. Good thinking.
John says, "Wouldn't it be nice to be able to have this calculator open up when you are in a numeric button where you want to do calculations and then have that value returned to that field?" Yes, we are going to be doing that in an extended cut coming up very soon for the members.
That was just a small bit of the feedback I got. I received tons and tons of feedback on this one, which is great. But let's continue.
I believe in this video, we are going to work on the trig buttons first. Let's make buttons for sine, cosine, tangent, and log. So, I'll go to design view. I am going to make these red buttons; they are going to fire off immediately. So copy and paste. Whoops. I'm down here. That's okay. We'll stick them right there. Copy, paste, and then paste. Paste. Okay, put them right down.
This will be Sine. This will be Cosine. This will be Tangent. And this will be Log. Let's make these a little smaller and not bold. Adjust the text size so we can see a little more.
Give names: BTN_Sine, BTN_Cosine, BTN_Tangent, and finally, BTN_Log.
Since these are going to run right away, all we have to do is take whatever is in the calc box, wrap that inside of the function we want to use, and then do calc. Just like we did with squaring and with square roots. So, calc equals Sine of whatever is in calc in parentheses, do calc. That is it. That is how it is going to be for all of these buttons. Nice and simple.
Copy that. Back over here, we will do Cosine. These are all functions that are built into VBA. We do not have to worry about doing anything fancy. And finally, Log.
Save it. Bring that back up. And let's do it. Give me the cosine of one. There you go. Sine, tangent, log. That allows us to use these functions. There they are.
By the way, if you want to make a pi button, you can make a pi button. It is really easy to do. Watch this. Take this guy, copy, paste, right up here. Pi is ASCII 227, so hold down the Alt key, 227. There is your pi button.
Hey, when you have an image in the background like that, sometimes it's harder to click on those foreground images. Let's make this figure so we can see it. Let's make this guy. Point of. Hold that. Pi. This will be Button_Pi, BTN_Pi.
Now, there are two ways you can put the value in there. You can do it mathematically, or you can just put a value in there. It depends on how exact of pi you want. If you want 3.14, fine. About 3.14159, fine. You can do four times the arctangent of one, if you want to get really specific. But that is up to you.
I will just borrow a function from over here. We will just do the end of the panel. You see we cannot do the act of control that caption here. Let's get one of these guys, copy that, and then equals that. And we will just put our value right inside: 3.14159. That is good enough for me.
Save it, and then we have pi, however much detail pi you want.
Another thing I wanted to do is, every time a character is sent up there, I want the focus to move right up here at the end of the box. I want to be able to just clear that. Let's say I am typing, I have 5 times 3, and at this point, I want to add something manually. If I start typing, like plus whatever, I cannot type on the keyboard, because the focus is still sitting here on this button.
So what I am going to do is, every time I issue AddToCalc, let's find AddToCalc up here. Every time I issue that command, I want to set the focus on this box. So, come in here: calc.SetFocus. That will move the focus of the cursor to the calc box.
So now, if I go plus, 6 minus 8. But I still have a problem. The focus moved up here, but all this stuff is selected. If I type, it is going to overwrite all of it. I do not want that.
What I want to do is set the focus up top here, but I want to put the cursor at the end. Every time, I want to put the cursor right at the end there. To do that, there is a property called SelectionStart. That is called SelStart. Where the SelectionStart is, is any position inside this string. So here we have one, two, three, four, five characters here. We could put the SelectionStart anywhere we want to. I am going to put it at the end.
So, right here, I am going to say calc.SelStart equals the length of calc. However long that string is, put the cursor at the end of it. And now, when I come in here and start typing, times three plus, see how the cursor is still at the end the whole time?
Now I can also add stuff, typing on the keyboard. That is simple. That is how you move the selection around.
Last thing for today: we are going to make a Copy button. So we can take whatever is up here. Let's put a bunch of stuff in here: five times three plus nine. I want to be able to copy that so I can then paste it in some other form.
So we are going to learn the command to copy some stuff. I will make another button. Copy, paste, put it right here. Let's make this one double wide. I want to just put the word Copy in there and unbold it. Let's take it, hold, and make it small.
This will be our Button_Copy, and we do not want to add to calc, so get rid of that. Go to All, go to Button_Copy. What is the code going to look like? Right-click, Build Event. We are going to do something in there.
If IsNull(calc), then Exit Sub. We are going to calc.SetFocus so the focus goes up to the calculator field, then we are going to do Command.RunCommand acCmdCopy. That will copy whatever is selected to the clipboard. Maybe beep to let the user know it has been copied.
Save that. Let's throw in a quick Debug Compile, close it, open it, type in some stuff, whatever. Let's copy that to the clipboard. Copy. Let's open up Notepad. Get ready, Ctrl+V, paste. There it is, copied whatever was there into your Notepad, or wherever you want to paste it. You can go to a different form in your database, custom or form, whatever. Paste it in. That is all you have to do.
Now, in the extended cut for the members, we are going to actually make it so that when this form closes, whatever this value is in here gets sent back to the form that opened it.
Here is what is coming up in the extended cut: First, we are going to make a button. If you want to link the calculator to any particular field, we will make a button, you click on it, it opens up the calculator, you do your calculation, and it brings that value right back to where you left it.
I put a button here in the main menu. Click the little calculator button, type in your stuff, hit equals, and as soon as that closes, that value is brought right back here. You can put a button next to any field you want to. I put it right here next to Family Size. Same thing, type a value in, so as that closes, it comes right back there.
That is the first thing we are going to do. Then we are going to get a little more complicated. I am going to show you how to make a calculator button right up top on your Quick Access Toolbar that can be used anywhere in your database, whether you want to put a little calculator button next to it or not.
Let's say you are in the order form, and you are right here. Let's say you want to put a value in that field. Hit your calculator button, type in what you want to type in, close it, and it puts that value right back there. It does not matter what kind of field it is - could be a note field, could be down here, could be anywhere, wherever you want it.
Finally, we are going to make a little adding machine tape, a little history right there. When you open up the calculator, you hit a little history button, you get this guy. Six times three equals, and it goes right there with the result. Times five equals, right. Minus three thousand equals, oh, it is red, it goes negative. See that? Times three. That is your history tape. Pretty cool.
That is all covered in the extended cut for the members. Silver members and up get access to all of my extended cut videos. There are hundreds of them. Gold members can download these databases, and you have access to the Code Vault, free lessons, and lots more. Check it out.
That is going to be your Let's Build a Calculator series. Part 7 is going to be the last part, unless you all come together and say, hey, we want to see how to do this or that. For now, we are going to put this calculator series on the shelf.
If there are more functions that you want to see, post a comment down below. If enough of you are interested in something specific, maybe I'll make a Part 8. As of right now, we are going to put the cap on this one.
I hope you had some fun. I hope you learned something. Live long and prosper, my friends. I will see you next time.Intro In this video, we will wrap up our Microsoft Access on-screen calculator project by addressing a bug discovered in Part 6, reviewing viewer feedback, and making several improvements. I will show you how to add trigonometry buttons for sine, cosine, tangent, and logarithm, as well as a Pi button, and we will create a Copy button to copy results to the clipboard. You will also learn how to set the input focus and cursor position for smoother usability. This is part 7.Quiz Q1. What was the primary focus of Part 7 in the Let's Build a Calculator series?
A. Improving the calculator's color scheme
B. Adding trigonometry functions, a Copy button, and addressing a bug
C. Creating advanced statistical functions
D. Integrating the calculator with external data sources
Q2. What bug did Richard discover related to TempVars in the calculator's code?
A. The calculator would crash when dividing by zero
B. The code failed if TempVars.memoryval was null
C. The memory button did not retain values correctly
D. The calculator could not handle negative numbers
Q3. What are two suggested approaches to fix the TempVars bug mentioned in the video?
A. Use a For loop or ignore the error
B. Check for null or use "On Error Resume Next"
C. Remove all variables or restart the app
D. Convert null to zero or reset the calculator form
Q4. When discussing calculator behavior, what point did NFA Toys make in their feedback?
A. Calculators should use commas instead of decimal points
B. Parentheses should be added automatically to expressions
C. Calculators should not add parentheses automatically
D. The calculator should save results to a database
Q5. What customization regarding number formatting was mentioned in the video?
A. The calculator automatically detects user locale
B. Users in the US use decimal points, European users may prefer commas
C. All users should use commas for decimals
D. The calculator includes currency conversion for all users
Q6. How are the sine, cosine, tangent, and log buttons designed to work in the calculator?
A. They queue for execution after pressing equals
B. They immediately execute the function on the current input
C. They only work if another operator is active
D. They require user confirmation before calculating
Q7. How is the value of pi added to the calculator according to the video?
A. By using the built-in VBA constant for pi
B. By entering an image of the pi symbol
C. By assigning a value such as 3.14159 or using 4 times arctangent of 1
D. By importing it from an external spreadsheet
Q8. What does the AddToCalc method do after an update in this video?
A. Clears the calculator history
B. Changes the background color
C. Sets the focus to the calc box and moves the cursor to the end
D. Automatically copies the value to the clipboard
Q9. What is the purpose of the calc.SelStart property as used in this lesson?
A. To sort entries by number size
B. To clear the input box
C. To position the cursor at the end of the input text
D. To select the whole text field for editing
Q10. What functionality does the Copy button provide in the calculator?
A. Copies the calculator form to another database
B. Copies the current value in the calculator to the clipboard
C. Saves results to a history log
D. Prints the current equation
Q11. According to the video, what happens in the extended cut for members?
A. The calculator becomes available on mobile devices
B. Values from the calculator can be returned to a specific form field
C. The calculator supports exporting to Excel
D. The calculator gains multitouch support
Q12. What new user interface integration is described for the calculator in the extended cut?
A. Adding a calculator button to the Home tab
B. Placing a calculator button on the Quick Access Toolbar
C. Embedding the calculator in an Excel sheet
D. Allowing drag-and-drop functionality to the desktop
Q13. What is the purpose of the adding machine tape (history) feature shown for members?
A. To save backup files of calculations
B. To keep a visual, running log of calculations and results
C. To allow networked calculations between users
D. To print all prior equations
Q14. What does Richard advise users who need other localizations, like changing decimal points to commas?
A. They should consult their database administrator
B. They have to make such changes themselves as he uses US standards
C. The calculator automatically applies local standards
D. There is a built-in language selector in the calculator
Q15. What should you do if you want to see more functions added to the calculator, according to the end of the video?
A. Wait for automatic updates
B. Post a comment suggesting new features
C. Download updates from the website
D. Purchase an extension pack
Answers: 1-B; 2-B; 3-B; 4-C; 5-B; 6-B; 7-C; 8-C; 9-C; 10-B; 11-B; 12-B; 13-B; 14-B; 15-B
DISCLAIMER: Quiz questions are AI generated. If you find any that are wrong, don't make sense, or aren't related to the video topic at hand, then please post a comment and let me know. Thanks.Summary Today's TechHelp tutorial from Access Learning Zone focuses on the final lesson in our Let's Build a Calculator series, where we've been constructing an on-screen calculator in Microsoft Access. This is Part 7, wrapping up the project with a range of enhancements and addressing some outstanding issues.
To start off, I want to address a bug I discovered after finishing and sharing Part 6. When opening the database, an error message appears that says "Object or class does not support the set of events." This issue is tied to the on-load event for the calculator form. Specifically, the problem happens when the code tries to read from tempvars.memoryval.value if that tempvar hasn't been set. If tempvars.memoryval is null, the code fails. You have a couple of ways to resolve this; you can add a null check in your code, or apply "On Error Resume Next" to bypass the error if it happens. In this situation, either approach is acceptable, and after applying the fix, the error is gone when you open your calculator form. If you encountered this bug earlier, that's the reason for it, and fixing it should get things working smoothly again.
Next, I wanted to go over some of the feedback and comments I received about the calculator. Many viewers had thoughts on the implementation, especially about how operations like squaring and the use of parentheses function. Some people thought parentheses should not be inserted automatically for certain types of calculations. My response is that it's important to design your calculator to operate how you like. For example, if you want to calculate six plus three squared, simply write it using the caret symbol for exponents, rather than relying on a square button that might change the meaning. My setup treats red buttons as immediate actions, so if you want the squared value of an expression, you need to write the full expression in parentheses before squaring it. If you prefer the behavior of desktop calculators that execute operations as you enter them, you can adjust your calculator to work that way. This flexibility is part of creating your own tool.
There were also comments related to decimal points and commas. In the US, we use a decimal point, but in some European countries, a comma is used. If you're working outside the US, you will have to replace decimal points with commas as appropriate. I lack experience with localized language and formatting versions, so that's something you will need to handle if necessary. For date formats, I always use ISO standards to avoid confusion.
One viewer suggested filtering out any non-mathematical characters from the input string before evaluating it. I've already covered that in other lessons, so if you want to see how to filter out everything except numbers, periods, parentheses, and the like, I have another video on the site that demonstrates this.
Another suggestion was to have a way to bring the calculator up from any numeric field and send the result back to that field when finished. I will show you how to set this up in today's Extended Cut for members, so you can use the calculator across multiple forms and have it return calculated values directly to your field.
Now, let's proceed with adding some new features to the calculator. First, we'll include trigonometric functions. I'll add buttons for sine, cosine, tangent, and logarithm on the calculator form. I set their names accordingly and format them so they're clear and easy to use. These buttons are red, meaning they act immediately. Each one wraps the current value in the calculator box with the appropriate function and evaluates it. Because VBA already has these functions built-in, this enhancement only requires a small edit to the event code for each button.
If you want a button for Pi, that's easy to create too. You just need to add a button, label it with the Pi symbol or the word, and set its value to 3.14159 or whatever degree of precision you require. You can use the "Alt+227" key combination to insert the Pi symbol if you want.
Another improvement is managing the focus of the calculator's input box. I want to make sure that every time a value or symbol is entered, the focus returns to the text box and puts the cursor at the end of the existing entry. This way, if you type or click on a button, you won't accidentally overwrite your input, and you can keep building your equation smoothly. To make this possible, I use the SetFocus method and set the selection start position to the length of the current string, so the cursor lands at the end.
The final addition for this part is a Copy button, allowing you to copy the current content of the calculator box to the clipboard. All you have to do is create a new button labeled "Copy," and set up its event so that it places the cursor in the input field and copies the value if present. This way, you can quickly paste your result elsewhere, such as in Notepad or another form field as needed.
Looking ahead to the extended content for members, I will cover several additional advanced features. You'll learn how to make the calculator behave like a picker or helper for any field in your database. You will also see how to add a calculator button to the Quick Access Toolbar at the top of Access, so it becomes universally available wherever you need it. If you're editing a record and want to calculate a value, just hit the calculator button, perform your calculation, and the result pops right back into your field when you close the calculator. Another feature included in the extended cut is an adding machine tape or history, so you can view and track your recent calculations right on the calculator form.
This wraps up the Let's Build a Calculator series, at least for now. If there are other features you'd like to see, let me know in the comments. If there's enough interest in a particular function, I might continue the series with additional parts.
Remember, if you want access to the extended cut of this and hundreds of other lessons, or if you want to download database files and see even more examples, check out the membership options on my website.
You can find a complete video tutorial with step-by-step instructions on everything discussed here on my website at the link below. Live long and prosper, my friends.Topic List Fixing bug related to TempVars in the OnLoad event
Implementing null checking or On Error Resume Next
Adding sine cosine tangent and log buttons
Assigning VBA function code to trig and log buttons
Creating and naming a Pi button
Setting value of Pi using various methods
Setting focus to input box when typing
Using SelStart to position cursor at the end
Creating a Copy button to copy calculator results
VBA code for copying text to the clipboardPrimary Topics Access form calculator, trigonometric functions, VBA event handling, user feedback review, copy to clipboard, Pi function, UI focus handling, bug fixes
Secondary Topics localization considerations, character filtering, selection management, extended cut features
|


