Account Balances 1
By Richard Rost

 3 years ago
Track Account Balances & Transactions, Part 1
In this Microsoft Excel tutorial series, I'm going to teach you how to track your account balances and daily transactions. We'll be using basic formulas, math equations, conditional formatting, tables, and the SUMIFS function.
This is a sheet to keep a rough track of what all of my accounts are doing. Once a month I download my transactions and keep them all in my accounting database, but on a daily basis, I like to keep track of my account balances, credit card payments, etc. So one of the first things I do every morning is log on to my bank's website, and the two credit cards I use the most and check their balances and new transactions.
Prerequisites
Dedication
- Dedicated to my fiance, Lauren ❤️🐧
Links
Recommended Courses
Next Video
Want More Excel?
Most of what I do is Microsoft Access, so if if you want to see me post more Excel videos, make sure to comment below: "I want more Excel!"
Keywords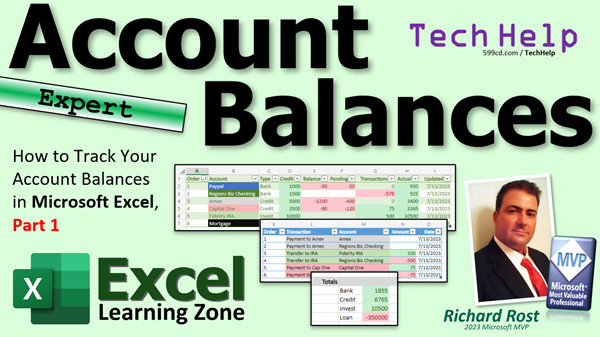
excel 2021, excel 2016, excel 2019, excel 365, microsoft excel, ms excel, ms excel tutorial, #msexcel, #microsoftexcel, #help, #howto, #tutorial, #learn, #lesson, #training, #database, #techhelp, track microsoft excel account balances, personal finances, daily spending transactions, track finances, balance chart, credit and debit, banking activity, credit card balances
Intro In this video, I will show you how to set up a Microsoft Excel spreadsheet to track account balances and daily transactions for your bank accounts, credit cards, loans, and investments. You will learn how to organize your accounts with custom sorting, create columns for different balance types, and use formulas like SUMIFS to calculate real-time account totals. I will also demonstrate how to format your sheet for easier data entry and link transactions to their respective accounts. All of this can be done in the free Excel Online version. This is part one.Transcript In today's video, we're going to see how to track your account balances and your daily transactions for your different bank accounts and credit cards and all that cool stuff in Microsoft Excel.
This is part one of, I don't know how many parts. We'll find out when we're done. So today's project is going to be how to set up a sheet to track what all of your account balances are doing, what they should be.
Now this isn't a substitute for reconciling all of your transactions with your monthly statement. That's a whole separate ball of wax.
What I like to do is, on a daily basis, log in to the credit cards that I use on a regular basis, my important bank accounts, and check what my balances are and see what transactions have gone through. I log on to my Amex account, my Capital One (not a paid endorsement), and these are just the accounts that I use, or at my local bank account, Regions, and I see what has changed in the last day or two. I want to keep track of what my balances should be, what the bank thinks I have and what other transactions they don't know about yet.
By doing this, you can keep a close look at what's happening in your accounts.
Everything that I show you today will work in the free Excel Online, so you don't actually have to have the paid version of Excel. If you don't know how to get a free copy of Excel, go watch this video and I'll walk you through it with an online Office 365 subscription that's absolutely free. I'll put a link to this down below and you can click on it and go watch that.
This video is dedicated to my fiance Lauren because she wants to see how to do this stuff, and I know I can't sit down and show her how to do it one on one. There's just something weird about teaching friends, family, loved ones. I can do it with perfect strangers and she can watch my videos. But if we sit down and try to do it one on one at the computer, we butt heads. So that's just how it always is.
It's also like when you're trying to shoot hoops and you're by yourself, you can make them, and then someone else is watching you and you're like, "Oh, watch this," and you miss like five in a row. Same thing. I goof up, too. So that's why I'm recording this video.
Before we get started, I am going to consider this an expert-level video. Now I'm going to show you exactly what you have to do for this particular project. However, some of these topics that you need are covered in my expert-level classes, like tables and the SUMIF function. If you want to learn more about these things, then I'm going to recommend you go watch these classes.
But again, today I'm going to show you exactly what you have to do to accomplish what we need to get done. We're also going to cover conditional formatting.
It would be very helpful if you watch my free Excel Beginner 1 class. It's on my website and on my YouTube channel. Again, I'll put a link to that down below. If you watch that first before watching this one, you'll have a leg up. So just a recommendation, but again, I'm going to show you exactly what you need to do.
So I'm going to head over to office.com and I'm going to create a new Excel workbook. We're going to go right here, blank workbook. Add a little bit up this guy. There's Excel. This functions very similarly to the desktop version of Excel. So regardless of which one you're working on, it should be the same for everything I'm going to cover in today's video.
First, let's start with our header row. I'm going to put in order first because I like to have a custom sort order. I like to be able to customize the arrangement of my accounts. I put the most popular ones that I use most often up top, and then the ones I barely use at all on the bottom. Sometimes I want to re-sort this, maybe by the account name or by the balance, so I want to be able to go back to a custom sort order. I'll just number these one, two, three, four, five in whatever order I want them in. That's just something I do.
Then of course the account name - just "Account" is fine. Then we're going to do the type. That's so we can track bank accounts, credit card accounts, loan accounts, investment accounts differently and get different totals for each on the very bottom, which we'll do last.
Now I got three or four different terms here that I use that have meaning to me. I know this is not exact accounting speak because I've had some accountants send me some emails before saying, "Hey, you're using the word wrong." Well, it's just what I call it. So I'll give you my definition of what it is.
We're going to start off with credit. Now for your credit card accounts, that's going to represent your credit limit, your max credit limit. For bank accounts and investment accounts, that's going to be your posted balance. So whatever you've got in the bank that the bank reports. So if your bank account balance is $3,500, that's what goes there.
Most of this is for tracking credit card accounts for me.
The next column is going to be balance. Now for credit card accounts, that's going to be your posted balance - what the credit card company tells you that you owe them, all the transactions that have posted and are no longer pending. For bank accounts, I almost never use that column unless I use my debit card, which I never do. I try never to use my debit card. I always try to use a credit card, especially for online transactions, because you've got much better protections. But that's a topic for a whole different video.
Next we have pending. For that column, again, generally for credit card accounts, it shows transactions that you've made that haven't actually posted to your account yet. If you have a credit card account, you know what I'm talking about. You have your balance (the stuff that's posted), your pending (something that hasn't posted yet).
Finally, I'm going to make a transactions column. This is where transactions that haven't even hit your account yet that you've made will be put. For example, if you pay your credit card bill, you'll put something in your transactions column for your bank account, because a bank account doesn't even know about it yet. So it's not going to show up in your balance, not going to show up in your pending, and as soon as the credit card company processes that, your bank will know about it. We'll move it over to pending.
Then we got your actual balance. That is going to be a mathematical calculation of all of these things. We're just going to add them all up. That's what actually will be in your account when all of these things go through. So if you have a credit card, you have a thousand dollar max limit, you have a balance of 100, you have 100 pending, you have 100 transactions they don't even know about yet, you actually have $700 in there.
So those are my terms. I use them. This is a quick summary sheet.
Another thing accounts are going to help me about is I don't bother with pennies. This is just for my daily summary. I don't bother putting $127.43. I just put 127 in there. Again, that's me. For my actual month-end reconciliation, where I download all the transactions and put them in my database, yes, of course I care about pennies there.
So let's put in a couple of accounts. I'm going to start off with number one. This will be my PayPal account. All of my credit card transactions and stuff that process on my website come in through PayPal. I'm going to call that a bank account though, because it acts more like a bank account than anything else. Let's say I got $1,000 in there and let's say there's $20 pending that I charge for something. We'll skip transactions for now.
So the actual balance here is going to be the credit minus all the other things. We're going to add those all together because I'm going to be entering in transactions that cost me money as negative values. So put negative 20 in there if that money's coming out of that account, if you're debiting that account.
So this is going to be =D2+E2+F2+V2, and then enter. Yes, for those of you who know the SUM function, you can use the SUM function there if you want to. Trying to keep this as simple as possible.
Next one, let's do number two. This will be my Regions checking. Now notice this spilled over in the column C. We're going to come right here. You can either click and drag or you can double-click on that spot. That will resize that column as wide as it needs to be to fit that data. Regions checking will also be a bank account. Let's say I got 1500 in there. Now let's say there are no transactions, but I still want to use that calculation there. I don't have to type that all in again. I can just use AutoFill. Click on this little dot right there in that bottom corner. Notice how my mouse changed from a white plus to a black plus. Click and drag down. Like this. There you go. I just copied that column down two rows. Yes, you can also double-click on the AutoFill handle.
Another thing that's also nice is to keep track of the date that these transactions or this account was last updated. So I just put in here "Date." Now to put today's date in here, you don't have to keep typing it. Just press control-semicolon on your keyboard. Control-semicolon. Every time you update that information, now you'll know the last date that you updated it was that right there.
For those of you advanced Excel users, I have another video called "Timestamp" where I show you how to automatically update that date any time this column is updated. So you can have it in your VBA code. There's a sample right there. You can apply that technique here so that any time any of these are updated, this date will change. That requires some programming, so I'm going to put it in here for advanced, and I don't think you can do it in the free Excel Online. You need the actual full version of Excel for that one.
Let's add a couple more items. I'm going to put a three in here, tab, and it says, "Oh, fill cells with this formula. We created a formula for you that might be helpful. Let's show the formula." It says equals row minus one. In other words, Excel is trying to put an automatic numbering system in there, which is the row minus one. I don't want that. I'm going to ignore that. I want actual numbers in here because later on if I re-sort this some other way by account name, I want to be able to put it back in that original order. If I use that formula, then this will always be numbered one through whatever, and I don't want that. So ignore that. Sometimes these suggestions, you have to make sure you read them before you just say, "Oh, okay, go ahead."
Let's put in here, Amex. That will be a credit account. Here you put your maximum credit line. Let's say $5,000. Let's say you have a balance of 1200, so minus 1200. Let's say there's $400 pending that you've charged that hasn't posted yet. Ignore transactions for now. We're going to get to that. So there's your actual. Then of course update your date. Enter.
Home to go back to column A. Let's go for Capital One, credit. Notice here, if I just type in CR, it looks at the data above it and says, "Oh, you typed in credit before, do you want that?" If that's the case, just press tab. It puts it in there for you.
So your maximum line's $3,500. You have 90 outstanding. Maybe you have 50 that you've paid that hasn't posted yet. That wouldn't be 150 then. Let's say you have 50 that you've paid that hasn't posted yet. Your actual, we have to bring this down again. I'm going to show you a trick later on where you don't have to keep doing this. Double-click there, that brings it down. Put in your date.
We'll do two more. Let's do a Fidelity IRA. That will be an investment account. Maybe you have 10 grand in that. The actual again, we'll copy that in a minute.
One more, let's say you have a mortgage. That will be a loan account. Let's say you owe 350,000 on it. So nothing goes in the credit column. Your balance is 350,000. I like to just see numbers here. I don't like to actually use currency values, the dollar signs and all that. Just show me the numbers. I don't need all that crazy stuff. Bring this down. Put another date in there.
That's good enough for now. There's my accounts that I want to track right there. Of course, you type in all the ones that you have. If you have multiple accounts, like I have multiple Regions accounts, put in the names of each. If you have multiple Amex cards or Capital One cards, put in their names. I'm just keeping this simple for now.
Let's spruce this up a little bit. Let's add a little color. I'm going to select this row up here, not the whole row, just those cells. Let's change the background to maybe green. I am going to left-align this guy here. Drop that down, go left text alignment. All of this stuff, I want right text aligned, so we're going to come over here and pick that. There we go. So everybody lines up over there. Actually, values, numbers and dates tend to line up to the right, text values tend to line up to the left. But I like this one over here on the left as well, because it just kind of matches those ones.
Now for transactions, we're going to come over here. Normally I like to put this stuff in a separate sheet. Whenever I'm working on a sheet with different stuff, I like to put the different stuff in different sheets down here. With the exception of this, I like to see all this stuff on the same screen at the same time. I like to see my balances over here and my transactions over here. We're going to make them two separate tables toward the end of the class. For now, we're just going to put them as two separate side by side sections of the sheet.
Same thing, we're going to put in the order, the transaction, which is just a description of what you want to call it, like payment to Amex or whatever, the account that the money is going into or coming out of, what's the amount, and again a date.
Usually, but not always, you're going to have two entries for each transaction. If you're paying your Amex, for example, $200 goes into your Amex account and $200 comes out of your Regions checking account. Usually, not always; some things are instant. Sometimes, like I have a PayPal credit card, if I pay that, it instantly comes out of my PayPal account, but it doesn't get instantly posted onto my PayPal credit account. So I don't need two transactions for that, just the one. So I know it's coming. This is stuff that you know is coming.
Give this a spritz of color up here too. Let's go with, I don't know, orange is fine.
Same kind of thing over here. Ready, one. Let's do payment to Amex. Let me make this a little wider. Now, the account - this account should exactly match this account. Why? Because we're going to use it to calculate the transaction total. It's got to match exactly. So I suggest copy and paste it. So copy "Amex" and paste it over here. Yes, for you advanced users, you can use a dropdown list for this. I do cover that in my Excel Expert Level 10 class. You can make a little dropdown list here to pick your account type instead of having to copy it. But to keep things simple, today we're just going to copy and paste it.
So what's the amount? So you're paying Amex, let's say you're paying them 200 bucks. And today's date. What's the flip side transaction? Well, payment to Amex can go here, that's fine. What account is it coming out of? That's my Regions checking, copy that, paste it there. That's going to be negative 200. Format as a table. We're going to get to this later on, not now. We are going to format these tables later on. Put your date in there.
These dates are handy too, because if this transaction hasn't shown up, and it's now 7/20 and you're like, "Well, what's going on? Where did that transaction go? What happened?" You know to look into it.
This is also handy over here, because if you have transactions that you do on a regular basis, like me, I pay my Amex bill a couple of times a week. I don't like the balance getting really high. I will leave this here and when this transaction posts, instead of deleting this row, I'll just zero that out. I'll either put zero here or just delete the value altogether. But for now, we'll leave it in there. I'll leave the ones that I do on a regular basis on the sheet. If it's a one-off, something random like I wrote a check to the florist for Mother's Day, then I'll put that one in there and delete it when it's done.
Now comes the cool stuff. Now it's time to put this transaction stuff in here, because Amex should have $200 coming in and Regions checking has $200 going out that we need to know about here in this column, because this column shows me what actually will be in that account when all is said and done.
To do that, we're going to use the SUMIFS function. Again, I'm going to show you right now what you need to know to do this, but if you want to learn more about SUMIF and SUMIFS, I cover them in my Excel Expert Level 5 class. SUMIFS basically says, "I want to sum up all of the stuff in one column where some other column equals this value over here." For example, right here, I'm going to sum up everything from column N, where column M equals Amex. See how that works? It's a very powerful and versatile function, and I go over lots of examples in my full class, but this is how this works here.
Are you ready? We're going to start at the top. Even though I haven't had any PayPal transactions over here, it doesn't matter. This guy is going to be equal to SUMIFS(N:N, M:M, B2), and I get a zero there, and that's fine because there are no PayPal transactions over here. But watch what happens when I auto-fill this down. Double-click right here. Look at that. I get negative 200 in my Regions, plus 200 in my Amex, and that is exactly what I should see over here. That is the beauty and the power of the SUMIFS function.
Let's do another one over here, three. How about transfer to IRA? Now what account is it going to? That's going to be my Fidelity IRA. Copy, control-C, paste. Let's say I'm moving 500 bucks. Today's date.
Now, don't fill with formula, ignore that. I usually turn those off, but I leave them on for class so I can show you. Transfer to IRA is fine. Where is it coming out of? Again, Regions checking, you can copy it from here, copy, paste, and then put your negative 500 there. Yes, in the extended cut for that other video that I mentioned earlier to do that timestamp thing, I show how to automatically put the negative on the next row down. That also requires some programming.
Now look what happened over here. Fidelity's got 500 going into it, and now Regions says negative 700 because SUMIFS added up both of those things. Isn't that cool?
Now what's going to happen is a couple of days later, you may see the Amex post right away, which it usually does, so you can just delete that. Then, a day after that, you'll see the money come out of your Regions checking account - you can delete that. Watch your balance update, and now it shows 500 in there. I'll leave these here because that's a regular transaction that I always do.
That's going to do it for part one. Coming up in part two tomorrow, we're going to do some color coding. I like to see my accounts in different colors, so I try to use the colors that that company has, like PayPal is blue, Regions is green, and so on. Then we'll do some format painter action. We're going to have to use the format painter. We're going to learn how to use conditional formatting, so that all of our positive values show up as green and our negatives show up as red.
That's actually very helpful because if you're thinking of typing in a transaction - let's say you wrote a check and you just type in 50, and you'll just see that it went green, and you'll be like, "Wait a minute, that's supposed to be negative 50," and so just that color there, you get used to it and you want to see it. So I like using that conditional formatting.
Then we're going to see how to format each section of that sheet, the account balances and the transactions as separate tables. Tables have a lot of benefits. I'm going to explain a couple of them in the next video.
We're going to calculate some totals at the bottom, so we can see what all of our bank balances are, what all of our available credit is, what our investment accounts add up to, what your loans are worth, that kind of stuff. That will be again using the SUMIFS function.
Then when we're all done with that, I'm going to show you how to do all of this stuff in Microsoft Access. If you don't know, Access is actually my specialty. I do most of my stuff in Microsoft Access. If you are one of my Access viewers, just stay tuned, because the Excel stuff is for most people who don't want to be database professionals. I get it. Excel works great for 99 percent of things like that.
If you're an Access person like me, or if you're thinking about moving up to Access, we'll be doing the same thing in Access after part two. That's going to be cool.
There you go. There's your TechHelp video for today. I hope you learned something. Live long and prosper, my friends. I hope to see you for part two tomorrow, and I'll see you there.
Howdy, become a member. Click the Join button below the video. After you click the Join button, you'll see a list of all the different membership levels that are available, each with its own special perks.
Silver members and up will get access to all of my extended cut TechHelp videos, live video and chat sessions, and other perks. Gold members get access to download all of the sample spreadsheets that I build in my TechHelp videos, plus my code vault, where I keep tons of different functions that I use, and more.
Platinum members get access to all the previous perks, plus all of my beginner full courses, and one new expert course every week. These are the full-length courses found on my website and not just for Excel. I also teach Word, Access, Visual Basic, ASP, and lots more.
Now, when you do sign up to become a member, I need you to email me and tell me, "I want more Excel." The vast majority of my videos are for Microsoft Access because that's been my focus for the past few years. However, I'm happy to add more Excel videos if I get more Excel members. Make your voice heard and I'll make lots more TechHelp lessons for Excel.
But don't worry, these free TechHelp videos are going to keep coming. As long as you keep watching them, I'll keep making more, and they'll always be free.Quiz Q1. What is the main goal of the Excel project described in the video?
A. To reconcile all account transactions with monthly statements
B. To automatically import bank transactions into Excel
C. To track daily account balances and pending transactions for various accounts
D. To create a monthly budget template
Q2. Which of the following is NOT recommended by the instructor before watching this video?
A. Watching the Excel Beginner 1 class
B. Using the free version of Excel Online
C. Having an Office 365 subscription
D. Installing Microsoft Access
Q3. According to the video, why is a custom sort order column added at the beginning of the account table?
A. To assign priorities for automatic transaction processing
B. To allow easy rearrangement and sorting of accounts as desired
C. To track monthly statement reconciliation order
D. To match transaction IDs from the bank
Q4. What does the 'Credit' column represent for credit card accounts in this tracking spreadsheet?
A. Current outstanding balance on the card
B. Credit limit or maximum credit line of the card
C. Pending transactions not yet posted
D. Approved credit applications
Q5. In the context provided, what does the 'Pending' column track?
A. Transactions already posted to the account
B. Transactions that have not yet been shown to the bank or card company
C. Transactions initiated by other people
D. Transactions that may be fraudulent
Q6. To get the actual balance in an account, what formula approach was described?
A. Multiply credit by balance by pending by transactions
B. Add credit plus balance plus pending plus transactions (using negative values where appropriate)
C. Subtract pending from credit only
D. Use the MAX function on all columns
Q7. Why does the instructor recommend not worrying about cents (pennies) in the account balances?
A. Excel cannot handle decimals easily
B. It is only for a quick daily summary, not for detailed reconciliations
C. The bank only reports whole numbers
D. It makes conditional formatting easier
Q8. Why does the instructor suggest copying and pasting account names into the transactions table?
A. To save time from typing
B. To ensure transaction accounts exactly match the accounts in the main balances sheet
C. To enable automatic currency formatting
D. To help Excel spellcheck the names
Q9. What Excel function is used to sum up transactions for a specific account in the balances table?
A. SUMIF
B. VLOOKUP
C. SUMIFS
D. COUNTIF
Q10. When creating a new transaction (such as a payment), why are two entries often created in the transactions table?
A. To track both a deposit and a withdrawal associated with the transaction in different accounts
B. To double-check transaction accuracy
C. To match up transactions with monthly statements
D. To enter both the original and processed amounts
Q11. What benefit does conditional formatting provide in this context, according to the video?
A. Automatically sorts accounts by balance
B. Makes positive values show up in green and negatives in red, helping prevent entry errors
C. Adds drop-down lists to selection columns
D. Prevents duplicate transactions from being entered
Q12. What feature is NOT demonstrated in this part one video but is mentioned for future lessons?
A. Using tables for balances and transactions
B. Performing monthly account reconciliation
C. Applying color coding based on company brand
D. Grouping all accounts by account type and calculating totals with SUMIFS
Q13. Why does the instructor prefer to see all account balances and transactions on the same Excel sheet, at least initially?
A. Because it is impossible to use multiple sheets in Excel Online
B. To make copying cells easier for beginners
C. To view all related data on one screen for convenience
D. To avoid creating a table accidentally
Q14. What advanced Excel feature does the instructor mention for recording automatic timestamps on updates?
A. Running macros with shortcut keys
B. Using Excel formulas only
C. Writing VBA code that updates the date column automatically
D. Creating pivot tables
Q15. For what type of transactions does the instructor keep old transaction rows in the sheet and possibly zero them out after posting?
A. Rare one-off payments
B. Regular recurring transactions like credit card payments
C. Bank errors needing investigation
D. Deposits from unknown sources
Answers: 1-C; 2-D; 3-B; 4-B; 5-B; 6-B; 7-B; 8-B; 9-C; 10-A; 11-B; 12-B; 13-C; 14-C; 15-B
DISCLAIMER: Quiz questions are AI generated. If you find any that are wrong, don't make sense, or aren't related to the video topic at hand, then please post a comment and let me know. Thanks.Summary Today's video from the Excel Learning Zone focuses on how to monitor your account balances and track daily transactions across your various bank accounts, credit cards, and similar financial instruments using Microsoft Excel.
This is the first video in what will be a multi-part series. In today's lesson, I'm going to show you how to set up a spreadsheet that helps you keep an eye on all your account balances and see what they should be based on recent activity. Keep in mind that this system is not a substitute for reconciling your monthly statements but is useful for keeping tabs on your finances on a day-to-day basis.
My approach involves logging into my main credit card and bank accounts each day to check current balances and recent transactions. For example, I regularly review my American Express, Capital One, and my account at Regions Bank. I want to know not only what the banks and card companies report as my balances but also which transactions are still outstanding and haven't been processed yet. Doing this helps me stay on top of my finances and spot any unexpected activity quickly.
All of today's instructions can be followed using the free version of Excel Online. You do not need a paid Excel subscription. If you're unsure how to access Excel Online for free, you'll find a step-by-step video tutorial about signing up for a free Office 365 subscription on my website.
This video is inspired by my fiancee, Lauren, who wanted to learn how to organize and keep track of her accounts. I've found from experience that it's often easier to teach these topics to a larger audience than one-on-one with friends or family. That way, she can watch the video at her own pace.
I do consider today's video to be at the expert level, though I'll be walking you through everything you need for this specific project. Some of the underlying concepts, like tables and the SUMIFS function, are covered in more detail in my expert-level Excel courses. If you need more background on those topics, I recommend checking out those classes as well. We will also touch on conditional formatting in this lesson.
For those who are just getting started with Excel, it would be beneficial to watch my free Excel Beginner 1 class, which is available on both my website and YouTube channel. Watching that introduction will give you a helpful foundation before starting this project, though I'll still go through each necessary step in the video today.
Let me walk you through setting up the spreadsheet. I'll be using office.com to create a new blank Excel workbook, and everything I demonstrate should function the same whether you're using Excel Online or the desktop version.
To begin, I set up a header row in the sheet. I include "Order" because I prefer to maintain a custom sort order for my accounts, arranging them based on how frequently I use them. This lets me reorder the accounts manually or sort them by name or balance, and then be able to return to my preferred order. Numbering each account row accordingly allows me to keep this control.
Next, I add a column for the account name, simply labeled "Account," and then a column for "Type." Categorizing accounts allows me to group bank accounts, credit cards, loans, and investment accounts differently and later aggregate totals for each type at the bottom of the sheet.
Now, I use a few business terms here that might differ from what accountants would use, but I'll explain my definitions. For "Credit," in the context of credit cards, this is your credit limit, or for bank accounts and investment accounts, this represents the posted balance available to you - essentially, the bank-reported amount. For my purposes, most of the tracking centers around credit card accounts.
The next column is "Balance," which for credit cards is your posted balance - the amount that has officially gone through and is no longer pending. For bank accounts, this column is typically less relevant for me as I avoid using debit cards and stick to credit cards for most transactions, especially online due to better protections.
Following that, there's a "Pending" column, which shows purchases that have been made but haven't yet posted to the account. For credit cards, pending means exactly this.
After that, I have a "Transactions" column. This is for items you know about but the bank or institution hasn't recorded yet. For instance, after paying your credit card bill, the outgoing payment from your bank account will sit in "Transactions" until it's acknowledged by the bank, at which point it moves to "Pending" or "Balance" depending on processing status.
Finally, there's the "Actual" column. This one does a calculation: we sum up credit, balance, pending, and transaction values. For spending accounts, I use negative numbers to represent debits, so new transactions that haven't yet cleared get subtracted out. The "Actual" value tells you what your balance will look like after all outstanding and pending items have cleared.
I should mention, for the purpose of this daily summary, I ignore cents and just use whole numbers. I still reconcile to the penny at month's end using my actual statements and records, but this sheet is for quick daily tracking.
Next, I enter some example accounts. For instance, my PayPal account (which works like a bank account for the business) is listed first, with a credit or balance and perhaps some pending funds. The calculation for "Actual" simply adds or subtracts these figures.
Then I enter another, like my Regions checking account, similarly entering the balance and using Excel's AutoFill to copy the calculation formulas down the columns.
To keep record of when each account was last reviewed, I include a "Date" column. You can use the keyboard shortcut Control+semicolon to enter the current date easily each time you update the sheet. For those who are advanced users, I have another tutorial on how to automate date stamping using VBA, but for most users, doing this manually is sufficient.
I continue adding more accounts like Amex, Capital One, a Fidelity IRA, and a mortgage account, following the same structure. I enter the correct type for each, set the appropriate credit limits and balances (using negative values for liabilities), and update the formula accordingly.
At this stage, it is helpful to apply some simple formatting to make the sheet easier to read: coloring the header row, adjusting alignment (text left, numbers right), and resizing columns as needed.
For tracking transactions, I add a section right next to the accounts table on the same sheet, as I like to see both my balances and my transaction list at once. The transactions table includes columns for order, description, the affected account, amount, and date.
When recording individual transactions (such as a payment to a credit card), I usually enter two entries - one for the account paying out and one for the account receiving the funds. There are exceptions, such as instant transactions that clear immediately, but generally, this dual-entry approach ensures accuracy.
You need to make sure that the account name in your transactions matches exactly the names used in your account table, preferably by using copy and paste. More advanced users might leverage dropdown lists created with data validation, but that's beyond the scope of today's lesson.
When entering amounts, ensure the inflows and outflows offset properly: for example, positive for a payment received and negative for the account paying out. Again, you will use the date for tracking purposes.
Now, to connect transactions to the account balances, you'll want to aggregate the relevant transactions for each account. Here we use the SUMIFS function. This function adds up all amounts in your transactions table for each specific account. So, for your Amex account, SUMIFS sums all transactions marked for Amex. When you copy this formula down, each account gets a running transaction total that automatically updates as you enter new activity.
For example, when you make a payment to Amex from your checking account, your transaction table reflects both the incoming and outgoing side, and the SUMIFS in each account balance row updates accordingly.
Occasionally you'll want to delete transactions from your list after they've fully cleared and been reflected in your posted balances. For recurring transactions, I sometimes leave them in and simply zero them out after they process.
That covers the foundation for part one. In the next lesson, we'll dive into color-coding the spreadsheet to make it even more visually intuitive, taking advantage of Excel's format painter and conditional formatting features. We'll configure the positive values to display in green and negative values in red, helping quickly identify whether transactions represent incoming or outgoing funds.
We'll also explore how to set up each main section - account balances and transactions - as formatted tables. Tables provide several advantages in Excel, making it easier to manage, filter, and summarize your data. Additionally, I'll show you how to calculate totals for your different account types (banks, credit, investments, loans, etc.) using SUMIFS at the bottom of your tables.
Once all of that is done, I'll demonstrate how to accomplish this same account tracking system in Microsoft Access. Since Access is my main area of expertise, if you're interested in moving up from spreadsheets to a full database, you'll want to pay special attention to that segment.
That wraps up today's TechHelp video. I hope you learned something useful and are ready to track your accounts more effectively. Remember, you can find a complete video tutorial with step-by-step instructions on everything discussed here on my website at the link below.
Live long and prosper, my friends.Topic List Setting up an account balance tracking sheet in Excel
Creating header rows for account tracking
Organizing accounts by custom sort order
Defining and using columns: account, type, credit, balance, pending, transactions, actual
Entering and managing multiple bank accounts and credit cards
Using negative and positive values for transactions
Calculating actual balances using cell formulas
Using AutoFill to copy formulas and values
Tracking the last updated date with keyboard shortcuts
Managing Excel's autofill suggestions for numbering
Formatting columns for text and numerical alignment
Adding and formatting new accounts including investments and loans
Color-coding header rows for visual clarity
Arranging account balances and transaction lists side by side
Designing a transaction entry table with account matching
Using positive and negative amounts for transfers and payments
Copying account names for accuracy in transaction tracking
Applying the SUMIFS function to link transactions to accounts
Auto-filling SUMIFS formulas to update balances
Organizing repeat and one-off transactions
Deleting or updating transaction rows after posting
Previewing color formatting and conditional formatting in Excel
Preparing for separate table formatting in future videos |