Expense Tracker
By Richard Rost

 3 years ago
How to Track Recurring Expenses in Excel
In this Microsoft Excel tutorial, I'll demonstrate how to create a straightforward spreadsheet for managing your recurring expenses. We'll record the last payment date for each expense, establish the frequency of each payment, and from this data, calculate the next due date. Additionally, we'll implement conditional formatting so that upcoming expenses are clearly highlighted in red, making it easier for you to plan and prioritize.
Prerequisites
Links
Recommended Courses
Next Video
Want More Excel?
Most of what I do is Microsoft Access, so if if you want to see me post more Excel videos, make sure to comment below: "I want more Excel!"
Keywords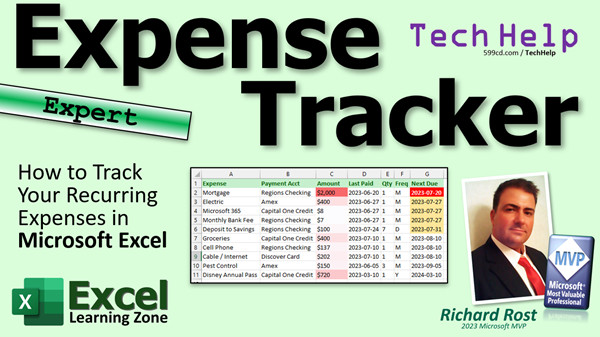
excel 2021, excel 2016, excel 2019, excel 365, microsoft excel, ms excel, ms excel tutorial, #msexcel, #microsoftexcel, #help, #howto, #tutorial, #learn, #lesson, #training, #database, #techhelp, recurring expense tracker, monthly expenses, annual expenses, weekly expenses, EDATE Function, DATE Function, YEAR Function, MONTH Function, DAY Function, IF Function, TODAY Function, Nested IF
Intro In this video, I will show you how to set up a recurring expense tracker in Microsoft Excel. We will build a worksheet to record expenses, payment accounts, amounts, last paid dates, and payment frequency. You will learn how to use date functions like DATE, EDATE, EOMONTH, and DAY, as well as the IF function, to calculate the next due date automatically. I will also demonstrate how to apply conditional formatting to highlight upcoming and past due payments, and how to quickly update your tracker when payments are made.Transcript Welcome to another TechHelp video brought to you by Excel LearningZone.com. I'm your instructor, Richard Rost.
In today's video, I'm going to show you how to track your recurring expenses in Microsoft Excel. Today, we're going to build a simple sheet to show all of your recurring expenses. Those are things you have to pay every week, every quarter, every month, whatever. Your rent, your mortgage, your electric bill, whatever. We're going to enter the last paid date and how often it recurs. What's the frequency? Weekly, monthly, quarterly, that kind of thing. Then Excel will calculate the next due date automatically.
Now, this is an expert level video. What does expert mean? Well, it's beyond the beginner. It's beyond the learning stage, but we're not quite going to do any programming today. So you don't need to worry about VBA. You definitely should have taken my free Excel Beginner 1 course. It's free. It's on my YouTube channel and on my website. Go watch it if you have not yet. I'll put a link down below so you have all the basics under your belt.
We're going to be using conditional formatting, some functions, and specifically, we're going to be using the date functions DATE, EDATE, EOMONTH, and DAY. Also, the IF function. Here are the classes that I cover them in. Again, you'll find links down below. If you want to learn more about these things, I will cover everything you need in this video, but if you want to learn more, here's where you can go to check out the different classes that I cover these in.
Of course, when we're done building this in Excel, you know what I do. Ninety percent of what I do is Microsoft Access. In an upcoming video very soon, we're going to do the same thing in Microsoft Access. So look forward to that, too.
Here I am in Microsoft Excel. Let's start out by typing in our list of expenses. Expenses: we've got our mortgage, our electric bill, and so on. I've got a list already typed up. I'm just going to copy and paste it and not make you watch me type it all in. There it is. I'm going to widen that column out so everything fits in there. There's my list of expenses.
Next is, what payment account does this money come out of? This is especially handy if you've got auto pay on stuff like your credit cards. If you've got something coming out, you want to know it's coming out tomorrow. What account is the payment account? You have your checking, your Amex, your Capital One, and so on. We'll just mix and match these. We'll do a couple of Amex, copy and paste. And a couple Capital One, and maybe a checking account out here. How's that? There are your payment accounts.
Next up is the amount. Maybe your mortgage is 2000, your electric 400. I live in South Florida; it's usually 400. If you've got your $8 Microsoft 365 subscription, your bank fee, you do a weekly deposit into your savings account for your retirement or whatever. Groceries, 400 bucks; cell phone, 130; cable internet, 200, and so on. Let's say 150, and 720 for your Disney annual pass. Again, I live in Florida.
Next up here, we've got our last paid date. If it's a new account, you're going to have to cheat. If it's a monthly account, just put a date a month before today. Let's put the date we last paid these accounts in here. I'm going to say June 20. Now I like to format my dates as the ISO date standard. So I'm going to drop this down, and I'm going to come over here and pick a date, short date. There we go. That's the ISO date standard right there. It's unambiguous, no matter where you are in the world. If you want to learn more about it, I've got several separate videos on why it's great and everyone should use it. It's my quest for my life to get everyone switched over to the ISO date format. So go watch this video.
Let's put some more dates in here. Let's go 6/27/24. 6/27. Let's do a couple of those; copy, paste, paste. Let's do a few 7/10s, copy, paste, paste. Let's do this as 6/5 and 3/10. You'll see why in a minute.
Next up, we need to calculate when the next due date is based on this date, but we have to know how often you pay this bill. So let's do a quantity and a frequency column. The frequency is going to be M for monthly. That will be M, that will be M, that will be M. Let's say you do your deposit to savings weekly, but I don't want to bother with a weekly. I'm going to make this daily and make the frequency 7. See what I did there? It just makes the calculations easier. Because days, you can just add days: 3 days, 8 days, 30 days.
Monthly needs a special condition for me because if you add one month, the date can move. It's not always the same number of days. Same thing for a year. If you're doing a quarter, you do three months. So let's say our pest control down here is three months (quarterly). See what I'm doing? These will be monthly, monthly, monthly. Let's say the annual pass is yearly; you can put a Y or an A in there, it doesn't matter. Our formula is going to look for either D, M, or anything else. It'll assume it's a year.
So here, let's fill these in: 1, 1, 1, 1 (that's seven days). 1, 1, 1, 1. We've got three months there, and then one year.
Our next due is going to be where our function goes. Do that calculation. Before we do that, let's pretty this up a little bit. I like to have everything left aligned. That's me. I know accountants like everything right aligned if it's numbers and dates, but I like left. That's just me. I'm going to highlight this, and let's make this green so the header row stands out.
Now, what's my function going to look like here? We've got three separate instances. We have to look for a D for a day, an M for a month, or anything else we'll assume is a year. You could put a separate condition for year, but we'll just say if it's not an M or a D, assume it's a year. This is going to be a nested IF function. We have an IF function inside another IF function.
We're going to type in =IF(. What's our first condition? If the frequency is a D, where's frequency? Frequency is right there. So, IF(F2="D", value_if_true, value_if_false). If this is days, then we're going to take the last paid date and add this many days to it. Remember, in Excel and in Access, if you take a date and add a number to it, that's the number of days you're adding to it. Real simple date math.
Now, if it's not a D, what are we going to do? Now we have to check to see if it's a month (an M). So, we need another IF function. This is where the nesting comes in: IF( . Now let's say, IF(F2="M", value_if_true, value_if_false). If it's a month, then we're going to add this many months to that date. There's a function to add months called EDATE. Why they named it EDATE, I have no idea. It's just EDATE. It's been around since the 80s.
EDATE(start_date, months). Start date is what we have, number of months: same quantity right there. Else, now here's the else condition. If it's not a D, and it's not an M, we're going to assume it's a Y. What do you do to add a year? We use the DATE function and add to the year component.
So, it's going to be DATE(year(D2)+E2, month(D2), day(D2)). Close it. Close it. Close it. Close it. There's your function. Press Enter.
You'll see numbers like 45120. What does that mean? We have to format because it's returning a numeric value. Highlight that. Come up here. Pick short date. There's your date one month after that one. Now just autofill this down.
There you go: one month, one month, one month, seven days (looks about right), one month, three months, perfect, one year, perfect. That's how you calculate your next due date. I know it's a long, crazy function. That's the easiest way I can think of to do it in Excel. I've got an easier method in Access. You'll like the one in Access better.
Next up, let's do some conditional formatting. I like to highlight these amounts with some conditional formatting. I like to make it so that the stuff that's more expensive shows up at darker reds. We're going to use conditional formatting, color scales, and then use that one. Two thousand is the most expensive thing on here. You really see when the stuff that's coming up is important; that's big bills coming up.
For the due dates, I like to use conditional formatting and set it so that if something is late, like the date is less than today's date, it shows up red so I know it's past due. If it's less than a week from now (seven days in the future), then I want it to show up in yellow so I know it's coming up soon. Beyond that, it can be green so I know we have some time.
Go to Conditional Formatting - Highlight Cell Rules - Less Than. Type =TODAY(), hit OK. Now you'll see every date on here less than today's date (currently July 27th), is showing up in red. That's past due.
Let's do the yellow ones if they're coming up within the next week. Select the same range again, Conditional Formatting - Highlight Cell Rules - Less Than. Type =TODAY()+7. If the date in the field is less than seven days in the future, change this to yellow and hit OK.
Now they've all gone to yellow. What happened there? What happens is, take a look at the rules here. Select this range, go to Manage Rules, and see what happens. The rules are applied in the order shown. This one hits and then it's not getting to the other one, so just move this one up. Go here, click up. Then you can select "Stop if true", so if that's true, do that and then stop. We're going to do the same thing with this one, because we're going to put one more on here. Hit OK. There you go. It does the red one and stops.
Add one more for the greens. Conditional Formatting - Highlight Cell Rules - Less Than, =TODAY()+14 and make this one green. Hit OK. Do the same thing again: Manage Rules, move that one to the bottom, and check "Stop if true". There you go. It would have to be one day less to fall into that range. Let's change this guy to 7/9. Now it fits—none of these fit in that two week range; that's why we didn't see it. The ones that are past that are all white, you don't have to worry about them for a while.
Now if you want to sort these by what's coming up, just click over here, sort ascending. You pay one of them, just go to last paid and use your keystroke to enter the payment date. Ctrl+semicolon puts today's date in there. Press Enter and now you don't have to worry about that one for a while. Paid the mortgage today: Ctrl+semicolon, then Enter. Now you don't have to worry about that one for a while. Sort them again and they move where they belong.
There you go. There's your expense tracker.
As I said, next up, we're going to be doing the same thing in Access. I don't have any screenshots for you to put on the slide here because I haven't done it yet, but it's coming very soon. It's going to be very similar to this, because a lot of that's going to be automatic and the calculation is actually a lot easier.
If you want to learn more about any of the stuff that I covered in this video—conditional formatting, functions, those date functions—I didn't put TODAY on this. Let's just put TODAY on a list. Yeah, this is PowerPoint. There. I didn't format this properly as a table, it's just for on-screen. Give me a break.
Of course, my favorite, the IF function—very versatile. If you want to learn more about all this stuff, check out my website. You'll find links to everything down below.
That's it. There is your Excel TechHelp video for today. I hope you learned something, my friends. Live long and prosper. I'll see you next time. Don't forget, if you want more Excel videos, comment down below: I want more Excel. I know it sounds rude, but that's what I want. I want more Excel. Damn it. We'll see you next time.
How do you become a member? Click the Join button below the video. After you click the Join button, you'll see a list of all the different membership levels that are available, each with its own special perks. Silver members and up will get access to all of my extended cut TechHelp videos, live video and chat sessions, and other perks. Gold members get access to download all of the sample spreadsheets that I build in my TechHelp videos, plus my code vault where I keep tons of different functions that I use and more. Platinum members get access to all the previous perks plus all of my beginner full courses and one new expert course every week. These are the full-length courses found on my website and not just for Excel. I also teach Word, Access, Visual Basic, ASP, and lots more.
When you sign up to become a member, I need you to email me and tell me you want more Excel. The vast majority of my videos are for Microsoft Access because that's been my focus for the past few years. However, I'm happy to add more Excel videos if I get more Excel members. So make your voice heard and I'll make lots more TechHelp lessons for Excel. But don't worry, these free TechHelp videos are going to keep coming. As long as you keep watching them, I'll keep making more and they'll always be free.Quiz Q1. What is the primary purpose of the Excel sheet created in the video?
A. To track recurring expenses and calculate their next due dates automatically
B. To create a simple inventory list for household items
C. To record non-recurring one-time payments
D. To manage project deadlines and milestones
Q2. What information is NOT directly entered for each expense?
A. The frequency of payment
B. The payment account
C. The payment processor's customer support number
D. The amount of each expense
Q3. Which date format does the instructor prefer for entering paid dates?
A. United States MM/DD/YYYY format
B. Textual month, day, year (e.g., July 1, 2024)
C. ISO date standard (YYYY-MM-DD)
D. European DD/MM/YYYY format
Q4. What Excel functions are specifically mentioned in the video to help calculate next due dates?
A. COUNTIF, SUM, AVERAGE, and TODAY
B. DATE, EDATE, EOMONTH, DAY, and IF
C. LEFT, RIGHT, MID, and CONCATENATE
D. VLOOKUP, HLOOKUP, MATCH, and INDEX
Q5. In the method shown, what three basic frequencies does the function check for in the frequency column?
A. D, W, Y
B. D, M, any other value (assumed as year)
C. Daily, Weekly, Yearly
D. Q, M, Y
Q6. Why does the instructor suggest using "D" for daily frequency and the quantity as "7" for weekly payments?
A. Because there is no month option in Excel
B. Because adding days to a date is simple, and weeks can be input as 7 days
C. Because it prevents calculation errors
D. Because Excel cannot handle months or years
Q7. Which function is used to add months to a date in Excel?
A. DATEADD
B. ADDMONTHS
C. EDATE
D. EOMONTH
Q8. How is a new year added to a date in the formula shown in the video?
A. By adding 365 to the original date
B. With the YEARFRAC function
C. Using the DATE function and increasing the year component
D. Using the EDATE function with 12 months
Q9. What happens if you do not format the calculated next due dates column as dates?
A. Excel shows error messages
B. Values display as numbers (serial date values)
C. Nothing, it stays as dates
D. The cells automatically convert themselves
Q10. What is the main use for conditional formatting in the context of amounts?
A. To display negative values in red only
B. To highlight larger amounts with darker colors to emphasize significant expenses
C. To automatically sum all amounts
D. To make the list alphabetical
Q11. How does the instructor use conditional formatting for due dates?
A. Past due dates are red, near due dates are yellow, and distant due dates are green
B. All past due items are bold
C. Only near due dates are highlighted in blue
D. There is no conditional formatting for dates
Q12. If the due date is less than today's date, what color will conditional formatting display it as?
A. Blue
B. Green
C. Red
D. Yellow
Q13. What is the shortcut mentioned for quickly entering today's date in Excel?
A. Alt+D
B. Ctrl+semicolon
C. Shift+T
D. F2
Q14. What is the way to see which expenses are due soonest?
A. By coloring the rows manually
B. By sorting the due date column in ascending order
C. By using the FIND function
D. By hiding all but the first five rows
Q15. What does the instructor say about doing the same thing in Microsoft Access?
A. It cannot be done in Access
B. The process is identical with no differences
C. It is easier in Access and will be covered in an upcoming video
D. It requires complex programming in Access
Answers: 1-A; 2-C; 3-C; 4-B; 5-B; 6-B; 7-C; 8-C; 9-B; 10-B; 11-A; 12-C; 13-B; 14-B; 15-C
DISCLAIMER: Quiz questions are AI generated. If you find any that are wrong, don't make sense, or aren't related to the video topic at hand, then please post a comment and let me know. Thanks.Summary Today's video from Excel Learning Zone will show you how to track your recurring expenses using Microsoft Excel. Many of us have expenses that repeat on a regular basis: rent, mortgage, electric bills, subscriptions, and more. In this lesson, I walk through the process of setting up a worksheet where you can enter each recurring expense, specify the last date it was paid, and record how often it is due. Excel will take care of calculating the next due date for you automatically.
This is considered an expert-level tutorial. While we are not doing any programming or using VBA in this one, you should already be comfortable with the basics of Excel. If you haven't taken my free Excel Beginner 1 course yet, I strongly recommend watching that first. It is available for free on both my YouTube channel and my website. That will ensure you are familiar with the essential features we'll be using.
In this project, we work with conditional formatting, several functions, and especially some handy date functions: DATE, EDATE, EOMONTH, and DAY. We also use the IF function, and I mention which classes cover these topics in greater detail if you want to go even further.
Once we finish building this in Excel, I plan to offer a similar lesson for Microsoft Access, which is the platform I spend most of my time with. Watch for that coming soon.
We begin in Excel by laying out a basic table of our expenses. For each expense such as the mortgage or electric bill, we indicate the account it is paid from, which is useful for tracking auto-payments from credit cards, bank accounts, and so on. After listing the payment accounts, you fill in the payment amount for each item. For dates, I suggest using the ISO date format, which avoids confusion no matter where you are in the world. If you want more background on why the ISO date format is beneficial, I have separate videos available on that topic.
Next, you want to specify the last date each expense was paid. For a new expense, just pick a date prior to today, according to how often the bill comes due. The worksheet also needs to include columns for the frequency with which each expense recurs, as well as a quantity column for specifying the number of days, months, or years.
When dealing with the frequency, I recommend entering a letter for the type of interval: D for days, M for months, or Y (or any other letter besides D or M) for years. The calculations are simplest when working entirely in days, but we include the ability to handle monthly and yearly expenses by taking advantage of Excel's date functions.
To determine the date of the next payment, we use a nested IF function. This function checks whether the interval is daily, monthly, or anything else (assumed to be yearly). For daily expenses, you just add the number of days to the last paid date. For monthly expenses, use the EDATE function to correctly handle the varying lengths of months. For yearly expenses, the DATE function helps you increment the year while keeping the original month and day.
Once you have set up the formula for the next due date, don't forget to apply the correct date format to those cells so they display as readable dates instead of numbers.
With your list of expenses and next due dates ready, the next step is to make your worksheet visually helpful. Conditional formatting can highlight which expenses are the most costly by using color scales, drawing your attention to the larger bills.
For dates, it's helpful to use conditional formatting to alert you to which payments are past due, which are due soon, and which are not urgent. Dates before today's date show up in red, those coming up in the next week appear yellow, and expenses due later stay green or as default. If you need help with the order in which conditional formatting rules are applied, check the "Manage Rules" panel to adjust their order and set up "Stop if true" options.
If you want to quickly see which bills are coming up next, you can sort your table by the next due date. After making any payments, simply update the "last paid" date with the current date using the Ctrl+semicolon keystroke and the worksheet will automatically push that expense further down the list until it is due again.
This worksheet provides a practical way to manage your recurring bills and helps you stay ahead of upcoming due dates. As mentioned, I'll soon release a similar tutorial using Microsoft Access, where some of these calculations can actually be done more easily with built-in features.
If you wish to learn more about the functions and formatting used here, you can find detailed lessons and related content on my website. Let me know if you're interested in more Excel videos. The majority of my tutorials cover Access, but I'll consider making more Excel-focused content if enough people ask for it. Remember, all of my free TechHelp videos will keep coming as long as you keep watching.
You can find a complete video tutorial with step-by-step instructions on everything discussed here on my website at the link below. Live long and prosper, my friends.Topic List Creating a list of recurring expenses in Excel
Adding payment account information for each expense
Entering and formatting the amount for each expense
Recording the last paid date and using ISO date formatting
Setting up payment frequency with quantity and unit columns
Handling different recurrence types: daily, monthly, quarterly, yearly
Constructing a nested IF formula to calculate the next due date
Using the EDATE and DATE functions for date calculations
Formatting next due dates as dates in Excel
Applying color scale conditional formatting to amounts
Using conditional formatting to highlight due and overdue dates
Setting up conditional formatting rules for due in 7 and 14 days
Managing and prioritizing multiple conditional formatting rules
Sorting expenses by next due date
Updating payment information with keyboard shortcuts (Ctrl+semicolon)
Resorting data after updating payments |