Custom MsgBox 7
By Richard Rost

 3 years ago
Custom MsgBox in Access. Part 7: Format Properties
In this Microsoft Access tutorial series, we focus on creating a custom message box using VBA, enhancing the standard MsgBox function.
In Part 7, we will learn how to set various properties, such as the form background color, the prompt foreground color, and the prompt font and font size. Additionally, we will cover type conversion and the HexToRGB function.
Members
There is no extended cut, but here is the database download:
Silver Members and up get access to view Extended Cut videos, when available. Gold Members can download the files from class plus get access to the Code Vault. If you're not a member, Join Today!
Prerequisites
Links
Recommended Courses
Coming Up
Keywords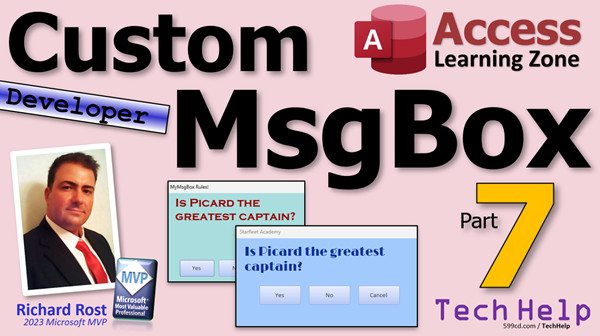
TechHelp Access 2016, Access 2019, Access 2021, Access 365, Microsoft Access, MS Access, MS Access Tutorial, #msaccess, #microsoftaccess, #help, #howto, #tutorial, #learn, #lesson, #training, #database, Custom Dynamic MsgBox, Custom MsgBox in Access, default button, cancel button, default button 1, default button 2, default button 3, me.controls collection, me.controls("field") notation
Transcript In today's video, we are continuing with our custom message box. This is part 7. We're going to set some more options for our box, including the form's background color, the prompt's color, the font color, the font size, and the font name.
We're going to learn about type conversion, use the hex to RGB function, and lots more today. And of course, this is part 7 of the series.
So what does that mean? If you haven't watched parts 1 through 6, what are you doing here? Go watch those and then come on back.
We've got a lot going on with this box, but the number one thing is let's change the colors and stuff. We don't want just the same old bland boxes. Why are we making our own custom box in the first place? So we can change all the attributes, including some colors.
Let's start with the form's background color and the font color of the prompt. Those are the two biggies. Let's go into the function first. Bring up your code editor. Go into the global module, find our function. We're going to add it here.
We've got optional form back color as a string equals. Now, what do you want the default background color to be? I like to use hex colors, and you can go into actual form design. We can take a look at what the color is in here right now by bringing up the properties for the detail section. You can see the background color says accent five lighter 60. What does that mean? That means I picked a theme color.
Normally, I try to avoid the theme colors because these can change if the user changes the theme. I try to stick to the standard colors because if you pick a standard color, you get that. You get a hex color there. So try to pick a basic color that you want. You can go with basic gray if you want, just like a regular one. But let's go with the background color of, I don't know, let's go with that guy. No, I don't like that one either. Alright, we'll pick this one.
OK, D6DFC, just copy that. You don't need the pound sign in front of it. We'll make that our default form background color.
Alright, comma. And optional. Whoops. Optional. We're going to go with the font color for the prompt as a string equals. I'll just go with black, which is 000000.
For those of you who don't know how hex colors work, there are three components to it. There's the R, the G, and the B, green blue, and this is a value from 00 to FF. It's hexadecimal. I'm not going to spend a million hours going over it now. But 00 is black, FF is white, everything in the middle, you get the point.
If you want to learn more about that, go watch this "Colors and Access VBA" video. I'll explain how to use the RGB function there.
Now we got it here in the function because we can set it down here now. I'm just going to copy one of these guys. Copy, paste, paste. And again, it's just a matter of this going there and there, and this going there and there, building our arg string.
Alright, save it. Now we have to tell the form how to read this stuff. Go to the form's code, find this stuff here. Case. We've got the form back color.
Now, as you noticed a second ago, there is no back color property for the form itself. If you're looking at a form, there is no back color property up here. Under Format, the sections have background colors. There's a background color there for the detail section, and for our message box that's the only section we have.
You can either call it section AC detail, it's a special Access constant, or you can call it section 0, whichever you want. Or if you're a Star Trek nerd, you can call it section 31. I'm just kidding. There's no section 31. It doesn't exist in Access or in the Federation.
So here, if form back color is the option, we're going to say Me.Section(acDetail) or zero, which would be preferred, .BackColor equals. Now, here's the problem. This has been a problem for years. The hex colors are everywhere now. So you think you could just do like this, right?
Unfortunately, since day one, Access uses these silly numbers. They're long integers. We have to convert that value to Access's numeric value. We use a function called hex to RGB to do that now.
hex to RGB is not a built-in function. So where am I to ask, can I get this beautiful function? Well, that's what my Code Vault is for. Here it is, the hex to RGB function that you can use to convert this into the Access long integer color value.
If you are a Gold Member or above, you can go right to the Code Vault. I'll put a link down below. If not, get typing. I'll blow it up a little bit for you so you can see it. Pause the video. Type that out. The rest of us members can just click that copy button.
I'm going to go over to my global module and paste that in here somewhere. We'll paste it right there. There it is. That's the hex to RGB. Takes a string in, gives you back the long integer that Access wants for its color value.
Now I can say right here hex to RGB CStr(nameValue(1)), which is the value, and then we should be all set. Same thing for the other one, case font color. We're going to say prompt, that's the name of the text box, or the label, excuse me, .ForeColor equals hex to RGB CStr(nameValue(1)).
OK, save it. Now give it a Debug, Compile. You get a ByRef argument type mismatch. What? Well, a type mismatch basically means you're not sending this function the type of value it's expecting.
If you remember way back from lesson one, nameValue is an array of type variant. You can't send a variant to a function that's expecting a string. So we have to do a little bit of type conversion here. We have to take this, even though it is a valid string, we have to take this and manually convert it to a string.
That's called type casting. We're going to say CStr(nameValue(1)). What that does is it takes that variant, it casts it or it converts it over to a string value. Now it will work. Hang on, got to do the same thing here. My bad. There's two of them. But now notice, we got past this one.
There are a whole bunch of type conversion functions. There's CStr, CBool, CLng, CInt, CDbl, CCur, a whole bunch of them. Want to learn more about type conversion? I got a video for it. Go watch this, the free one, there's a link right there. I'll put it down below.
Now that we compile, we should be able to use it. Let's go to our main menu and let's change these options here. Let's continue on the next line after this one.
What do we add? We're at form back color. So we're going to put the back color in here as, let's go with like a dark gray. I'll go light gray, AAAAAA. Then we'll go with prompt color of red, so we'll go 990000, RGB. If the first one has, if they're all even, it's going to be a shade of gray. Zero is black, F is white. Everything in the middle is going to be shades of gray.
This is going to be red, and it's going to be dark red because the rest of it's zeros. Save it. And by the way, there are tons of websites that have these color wheels. You can also just go into Access design view. Just click on anything in here and go to this guy, and go to More Colors. You'll get the RGB values, they're right here on the custom screen.
I'll cover this in my beginner classes. There's a standard wheel there, but go to Custom, and you can change these and pick these and all kinds of stuff.
There's also a website that I recommend that has all kinds of cool stuff on here. It's got a big color wheel like this. You can pick parts of a palette. So you can say, I want to base it on this green here. It gives you different options down below for things that are complementary for that color. If you want to set up your own theme, you can. It's got stuff on color pickers and color harmonies and all kinds of stuff. I'll put a link to this down below. It's a really cool tool.
Save it. Debug, file, come back out here. Close it. Open up. There we go. There's a gray with red text. That's pretty cool. A bit too dark of a gray for you? Lighten it up. DDDDDD. Now try it. Boom. There you go.
Want to change the font and the font size too? That's easy to do as well. Again, it's going to be repeating the same series of steps. Start with the function. Add the options here.
What are we going to put in here? We're going to put font name. Optional. Remember, if you start with optional, everything after that has to be optional, as a string. What do you want your default to be? I'm going to do Calibri.
We'll do optional font size as a long equals, let's say, 16 point. OK. Add those down here. Same thing. We've got font name and font size.
Now go to the form and add them down here.
Right in here, case font name, you're going to say prompt.FontName = nameValue(1). Case font size, prompt.FontSize = nameValue(1). You can add whatever other things you want. Bold, italics, just keep going. I'm not going to do all of them. Whatever ones you want to change, whatever legal as you want in your database, you put them in there.
Again, I'm not putting checks in here. I'm not testing for valid, you know, which fonts are installed on the system. I'm not going through all that. You could find a list of fonts that are on your system. Just come in here, pick this thing, and go to Format and change it. Let's say you want Arial Black. Now go over here, find the font setting. That's the text you want right there. That's the exact text you want to use. If you change it to something else, whatever this is, that's the text you want to use.
I only have the fonts that are installed on my system that came with Windows and Office, so I would suggest sticking to those. If you've installed any third-party fonts, they may not be on your user's machines. So I try to stick with the default fonts. There's enough of them to keep most people happy.
Let's go with Limelight. So find the font name, Limelight, right there. Copy that to your clipboard. I'm going to put this back to the default, which was Calibri. Where's Calibri? Come here. Calibri, there.
That's the default. In my function call, let's go to the main menu. I'm going to make this guy now be where font name is Limelight. Then we're going to go 22 point.
Save it, and let's see what we got. Save it, close it, close it, open it. Bam. Custom color, custom font, custom font size, custom font color.
Now we're getting a really cool custom box here, aren't we? It's starting to look pretty good. And of course, Picard is the greatest captain.
I think that color is a little bit, that looks cool. And yes, I use the color picker tool. That looks neat.
It wouldn't be hard if you wanted to make the background actually flash. If you want to have it go from blue to yellow, blue to yellow, so it's in their face, maybe even play beep or play a sound too. I've got this video which shows you how to make flashing text. It basically changes the background color, flashes on and off from white to red, white to red. You can do the same thing with your message box. You can change the background color that we just set. It basically uses a timer event. Go watch this video for full details. I'm not going to do it in this class, because I've pretty much already done it.
If you guys want to see me do it with this, let me know. We can make it an option. Post a comment down below if you want to see that. I'll run through it.
That's going to do it for part seven. Stick around. Part eight's coming up. What's today? Today's Friday. So Monday will have part eight. That's going to be your TechHelp video for today. Hope you learned something.
Live long and prosper, my friends. I'll see you Monday.Intro In this video, we continue building our custom message box in Microsoft Access by adding new customization options, including setting the form's background color, the prompt's color, font color, font size, and font name. I will show you how to use hex to RGB conversion for color values, cover the basics of type conversion functions like CStr for handling data types in VBA, and demonstrate how to update your code to allow flexible message box formatting. This is part 7.Quiz Q1. What is the main advantage of creating a custom message box instead of using the default one in Access?
A. To allow changing attributes like colors, fonts, and layout as desired
B. To display longer messages than the default message box allows
C. To speed up the performance of forms
D. To automatically generate code for other forms
Q2. Why should standard colors be preferred over theme colors in Access when setting form backgrounds?
A. Theme colors depend on the user's selected theme and can change
B. Standard colors look better on every computer
C. Theme colors are slower to load
D. Theme colors are always converted to grayscale
Q3. In the example, what is the preferred way to reference the detail section of a form in VBA?
A. Me.Section(acDetail)
B. Me.Section(acHeader)
C. Me.Section(31)
D. Me.Section(acFooter)
Q4. Why is it necessary to convert a hex color code to a long integer value in Access VBA?
A. Access stores color properties as long integer values, not hex strings
B. Hex color codes are limited to only certain colors in Access
C. Color conversion improves program speed
D. Hex codes use a different color space than Access supports
Q5. What does the hex to RGB function described in the video do?
A. Converts a hex color code string into an Access color integer value
B. Changes RGB values to hex color codes
C. Adds RGB values together
D. Detects invalid color codes in forms
Q6. What must be done if a function expects a string but is passed a value of type variant in VBA?
A. Use CStr to convert the variant to a string
B. Use CLng to convert the variant to a long integer
C. Use CDbl to convert the variant to a double
D. No conversion is needed, as variants are always accepted
Q7. What are some of the type conversion functions mentioned in the video?
A. CStr, CBool, CLng, CInt, CDbl, CCur
B. ConvertString, ConvertInteger, ConvertDouble, ConvertCurrency
C. StrConvert, BoolConvert, IntegerConvert, DoubleConvert
D. CVar, CLst, CChr, CText
Q8. If you want to find out exactly which font name to use in your code for a custom box, what is the recommended method?
A. Go into form design view and copy the font name from the property sheet
B. Guess the font name and hope it works
C. Type the name as you remember it
D. Only use "Arial" as it is the default font
Q9. Why is it best to stick with default system fonts when setting custom fonts in your message box?
A. Third-party fonts may not be available on other users' computers
B. Default fonts load faster
C. Access only supports default system fonts
D. Using third-party fonts causes security issues
Q10. How does changing the six-digit hex value (like "AAAAAA" or "990000") affect the appearance of the message box?
A. It modifies the background or font color depending on where it is applied
B. It changes the size of the message box
C. It sets the border thickness of the message box
D. It determines the message box's position on the screen
Q11. What happens if you attempt to set a property with a value of the wrong data type in VBA?
A. You will get a type mismatch error
B. The value is automatically converted for you
C. The property is ignored without error
D. The form will switch to design view
Q12. What VBA keyword allows you to specify that certain parameters to a function do not need to be provided?
A. Optional
B. Variant
C. ParamArray
D. Static
Q13. How would you add the option to change the font style (such as bold or italic) to your custom message box?
A. Add new optional parameters and handle them in the form code like with font size and name
B. Change the color parameter to bold or italic
C. Font style cannot be changed programmatically in Access
D. Use themes instead of individual settings
Q14. What is a recommended way to preview and pick custom colors for your form elements in Access?
A. Use More Colors in the property dialog's custom tab, or a color picker website
B. Use only the colors listed in the standard palette
C. Use the font property dialog instead
D. Open the VBA immediate window and type the color code
Q15. What function would you use to convert a number stored as a string into a numeric value in VBA?
A. CLng or CInt, depending on which numeric type you want
B. CStr
C. CDte
D. CString
Answers: 1-A; 2-A; 3-A; 4-A; 5-A; 6-A; 7-A; 8-A; 9-A; 10-A; 11-A; 12-A; 13-A; 14-A; 15-A
DISCLAIMER: Quiz questions are AI generated. If you find any that are wrong, don't make sense, or aren't related to the video topic at hand, then please post a comment and let me know. Thanks.Summary Today's TechHelp tutorial from Access Learning Zone continues our project of building a custom message box in Microsoft Access, and we are now on part seven of the series. Today, I will show you how to give your custom box more personality by letting you control options like the background color of the form, the color of the prompt text, the font style, the font size, and the font name.
If you have not yet worked through parts one through six in this series, I recommend stopping here and reviewing those lessons first so you do not miss any important steps so far.
The main advantage of building your own message box is to move beyond the bland, standard look and have complete control over its appearance. Being able to change various colors is a huge benefit, so we will focus on how to do that today.
I will begin by discussing how to set the background color of the form and the font color for your prompt message, which are probably the two most noticeable style elements. In the code, I will add optional parameters for the form's background color and for the prompt's font color. These are set as strings, for example, "D6DFC6" for a light gray or "000000" for black. I prefer using hex color codes because they are easy to adjust and understand.
Hex color codes are made up of red, green, and blue components in hexadecimal notation, with two characters for each. So for example, "000000" is black, "FFFFFF" is white, and various combinations give you all sorts of color shades.
Remember, when picking a color in Access, you should try to use a standard color, rather than a theme color. Standard colors are more consistent and will not change if the user picks a different theme later.
Once you have added the optional color parameters to your function, you need to make sure the form itself knows how to apply these colors. In Access, the form does not have a back color property itself; instead, the detail section of the form is what gets the background color. This section is referenced in VBA as section 0, or using the Access constant "acDetail." Only the form's sections have background colors, not the form container itself.
When you go to apply the color code, there is a small challenge. Access expects a long integer to represent a color, not a string with a hex value. So you cannot just assign "FF0000" and expect Access to interpret it as red. You need a helper function to translate the hex string into a value Access will understand. I use a function called "HexToRGB" for this purpose. It takes a string as input and returns the appropriate long integer value you need in Access.
This helper function is not built into Access. I keep it in my Code Vault, and Gold members have access to it there. If you are not a member, you can type it into your database yourself.
Now, there is a common technical point that comes up here. The HexToRGB function expects a string as input, but the code we wrote earlier passes an array element of type variant. That causes a type mismatch error. To correct this, we explicitly convert the value to a string using the CStr function. This process is called "type casting" or "type conversion." There are similar functions for other data types, such as CBool for Booleans, CLng for long integers, and so on.
Once you have that code updated and compiled successfully, you can adjust your message box settings in your main menu to set the background and font colors directly. Just supply the codes you want, for example, "AAAAAA" for light gray and "990000" for a dark red prompt.
If you need help finding suitable hex color codes, there are plenty of online tools and websites with color pickers, wheels, and harmony generators. You can also find the RGB values inside Access by using the More Colors option in the property sheet while designing forms.
After saving and reopening your form, the custom colors should appear as you specified. If the gray is too dark, just pick a lighter color code. Experiment until you get something you like.
Adding support for font name and font size is just as easy. All you need to do is add more optional parameters to your function for font name and font size. Set your preferred defaults, such as "Calibri" for the name and 16 for the size. In your code, update the handling so that when the appropriate setting is supplied, the prompt control will have these properties set accordingly.
There is no need to check which fonts are installed on the user's system for basic use, but I do suggest sticking with common system fonts to avoid problems on other computers.
To get the exact name of a font as Access expects it, just set a control to that font in design view and see the name in the property sheet.
You can now call the message box function from your main menu with your desired font and size values, for example, "Limelight" at 22 points. After saving, you will see your custom box with the specified colors, font, and size.
You can expand on this further if you like. If you want your background color to flash, for example, you can have the code alternate colors on a timer, or play a sound. I have separate tutorials explaining techniques for flashing text and timer events, which you may find useful if you are interested in that effect.
That covers part seven of the custom message box series. Part eight will be released soon, so watch for it if you want to keep building out this tool.
You can find a complete video tutorial with step-by-step instructions on everything discussed here on my website at the link below.
Live long and prosper, my friends.Topic List Setting default background color using hex values
Setting prompt font color using hex values
Adding optional parameters for colors in the VBA function
Using hex to RGB function for color conversion
Pasting and using the hex to RGB function in VBA
Modifying the form's detail section background color
Applying font color to the prompt control
Converting variants to strings with CStr for function arguments
Troubleshooting type mismatch errors in VBA
Using type conversion functions like CStr
Customizing and testing message box color options
Setting font name as an optional parameter
Setting font size as an optional parameter
Assigning font name to the prompt control
Assigning font size to the prompt control
Selecting and copying font names from form properties
Testing with different color and font combinationsPrimary Topics Access VBA, custom message box, form background color, prompt text color, hex color codes, hex to RGB conversion, font name, font size, type conversionSecondary Topics color picker tools, Access form sections, font availability, debugging type errors |


