List Box Move Item
By Richard Rost

 2 years ago
Move Items Up and Down. Part 1: Unbound List Box In this Microsoft Access tutorial, I'm going to teach you how to move items up and down in an unbound list box using little up and down buttons. Then we'll take the data as it's sorted and save it in the Customer Notes field. MembersThere is no extended cut, but here is the database download: Silver Members and up get access to view Extended Cut videos, when available. Gold Members can download the files from class plus get access to the Code Vault. If you're not a member, Join Today!
PrerequisitesLinksRecommended CoursesUp Next
Keywords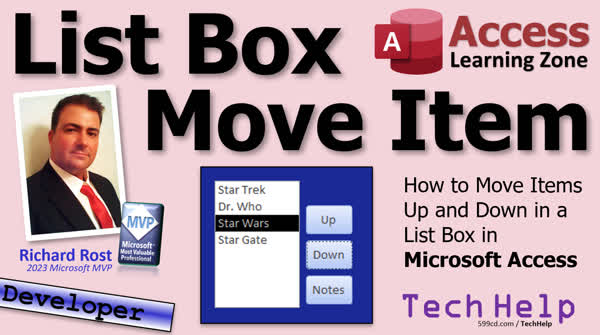 TechHelp Access, list box item movement, Access VBA list box, unbound list box, custom sorting Access, VBA item move code, save sorted items Access, up down button list Access, reordering list items VBA, value list list box, myList list box, addItem method, removeItem method, list index zero-based, saving list box data, Access form list box integration, Access list box tutorial, manipulate list box items, dynamic list sorting Access
Transcript Welcome to another Tech Help video brought to you by AccessLearningZone.com. I'm your instructor, Richard Rost. In today's video, I'm going to show you how to move items up and down in a list box using little buttons. Click the button, it moves up. Click the button, it moves down. And then we'll do something else with it. This is a question I get asked lots of times. It involves having a list box where you want to be able to move items up and down in it. For example, here's your science fiction shows. What's your preference? Put them in the order that you like. So, Star Wars, let's move it below Star Trek. We'll put Doctor Who down one. Stargate can go up, okay? And so on. And yeah, I know Stargate's one word. My bad, okay? Now, this is an unbound list box where there's just items in there. This is a bound list box. We'll do this in part two. These are actually stored in an employee table. Okay, there's the table. You put a sort order field in there, okay? And then, this one's going to involve some SQL to move these guys up and down and change their order in the table, whereas this one's just a list of items. So, we're going to do this in part one and this one later on in part two. Okay, so let's start with the easy one.
Now, this is a developer level lesson. What that means is we're going to be doing some VBA programming, not too much today, maybe like six lines of code for each button. But if you've never done any VBA programming before and you want to learn, go watch this video first. There's a link down here. You'll find a link down in the description below the video you can click on or scan this little thingy here with your phone. Go watch this and then come on back, okay?
Here, I am in my Tech Help free template. This is a free database. You can download a copy off my website if you want to. And we will start off by creating a value list list box. If you've never created a value list box before, list boxes and combo boxes are pretty much the same thing functionally, okay? A combo box is just something you can open up, whereas a list box is always open. So, go watch this if you've never made a value list box before. And a value list box is just simply a box that's not bound to anything. It's not bound to a table or query. So the data just exists inside the box.
Alright, so let's make this a little bigger. In fact, I'm going to... yeah, we can delete this stuff. We're not going to use it today. Alright, let's go up to our toolbox, find the list box control, this guy right there. Click and drag. This will start up the wizard. Alright, I'm going to type in the values that I want. That defines what a value list box is. Versus getting the data from a table or query. That makes it a relational or a bound box.
Alright, next, what do you want? Let's say we want our customers to pick, like I said before, their favorite science fiction shows in order. Okay, Star Trek. Of course, Star Trek is the best one, so we'll put that up top. Star... Stargate, which yes, is one word, I know. Uh... and we'll put Doctor Who and whatever else you want to put in there. Right next, label the one for "Doesn't Matter" and delete anyways. There is a letter and now we got a nice little box. Uh... save it, close it, re-open the main menu. For those of you who don't know, I've got a main menu here form, but I got a button up here on my quick launch toolbar, so there they are.
Now I want to make two little buttons, right? An up and a down button so I can pick one of these, and then click the button to move it up or down. If you don't want your user to be able to change the items that are in here, turn off that list items edit form thingy. Actually, while we're in here, let's give this a name. Let's call this MyList. And under data, we're going to set it to allow value list edits is no. That way they can only use the stuff in your box; they can't change it. Alright. There we go. We don't have that little box in there anymore. Alright, let's make a couple of buttons. Come back in here, find the button tool. There it is. Drop it. We're going to cancel the wizard because the wizard doesn't do this. We'll call this the up button. And maybe resize it a little bit like that, and we'll copy-paste. This will be the down button.
And let's give them names. So Alex doesn't yell at us. Alright, come over here. This will be the UpButtonBtn and this will be the DownButtonBtn. And if you don't know who Alex is, you haven't watched enough of my videos. Alright, so let's put some code in here. Alright, right-click, build event, that will bring up our code builder. We're not going to need the explorer over here, so I'll turn that off for today. Alright, I'm in my up button click, let's put a couple of blank lines down here. I hate when I'm at the very bottom of the window, alright?
Alright, the first thing we have to do is check to see if the user has made a selection in the box, and if not, the box's value will be null. So, if IsNull(MyList) then beep, colon, exit sub. A little colon trick is you see you put two commands on the same line instead of having to - you know, then, Enter, Beep, Enter, Exit Sub, Enter, and If. This lets you get away with it on one line. I've covered that in a couple of videos. Alright, so if we save it and come back out here, let's close the form, open it back up again. If I don't make a selection, there's my beep. Okay, easy enough. Alright.
Now the next thing we're going to do is we're going to save the information about the currently selected item because the way we're going to do this, the algorithm we're going to have here, the easiest way to do this with an unbound box is to remember the item that the user has selected, delete it from the box, and then add it again in its new location. That's the easiest way to do this instead of trying to move things around. So we'll need two variables, one to hold the location, which is called the list index, and the second one to hold the value itself, which is a string. So, dim L as Long, and S as String. L will be the index, and S will be its value. Okay, so L equals MyList.ListIndex. That's the item that's selected; it's the list index. Now, the important thing to remember here is that the list index is zero-based. So the first item in the list is zero. Right? If you've got four items, it's going to be 0, 1, 2, and 3. So L is set to the index of the item that's currently selected.
Now, we're trying to move that item up. Higher in the list, which means a lower list index; zero's on top. So, if the user's on the first item and he's trying to move it up again, that's not allowed. So, if L is less than or equal to zero, it shouldn't ever be less than zero, but this just checks both situations, then beep, exit sub. In other words, if you're on the first item, you can't go any higher. So save it, come back out here, let's test it. Click up. I'm getting my beep. If I click on the lower one, I don't get the beep. Nothing happens yet because we haven't programmed it yet, but we know that we can't move the top item up any higher.
So we've got a valid item, and it's okay to move it up. So now let's get the value of that item, which is a string, and save it in S. So S equals MyList. MyList is the value of the item that's selected, which in this case is a string. It's the word. We don't have an index to deal with like we do with a bound box. It'll have an ID in there. And we'll deal with that in part two. Alright, so I know which item I need to remove. I know where it needs to go, and I've got its value. So now I can say MyList.RemoveItem(L), remove the selected item from the box, and then we're going to add it back in one layer higher, one level higher. So MyList.AddItem(S, L - 1). Move it in one item higher than we are right now. Okay, save it. Back over here, right, click on Stargate, move it up. Look at that. It's swapped places with Star Wars because we removed it and then we added it one level higher. Do it again. Look at that. Pretty cool. And now we can't move it any higher because it's at the top.
Alright, now down is very similar, with a couple of minor modifications. Alright, so again, build event. I'm just going to copy this and paste it in here. It's similar, but it's not similar enough to where we don't want to duplicate the code. Alright, so same thing though. Check to see if it's null. Alright, get it, save it into the list index, alright, into L. Now, instead of checking to see if it's less than or equal to zero, we have to make sure that it's less than or equal to the current list count, which is the number of items, minus one. Okay? So, if L is greater than or equal to MyList.ListCount - 1 because remember the list count is going to be four for four items, okay, but we got to subtract one because the list index is zero based. I know it's tricky.
Alright, just remember the index is based on zero, whereas the count is an actual count. So if it's greater than or equal to that, that means we're on the last item. You can't go any higher. Beep, exit sub. We're going to do the same thing here, same thing here, but instead, we're going to add it plus 1 to where we want to put it in the list. Save it. Always throw in a debug compile from time to time. Oh, look at that. Okay. This is older code. Remember I deleted some objects at the beginning of the video? I deleted the status box. So, let's just take this out of here. Good. That's always why it's good to throw in a debug compile from time to time because you get remnants. See? I got another, someone in here calling status. Let's get rid of that. Get rid of all the rest of the stuff in here. Debug compile. Okay, we're good. Alright.
Ready? Close it. Open it. Stargate up, up, can't go up, let's go down, down, down, and go down. Alright, so Star Trek's on top where it should be. Let's put Stargate second. Let's put Doctor Who third. And we'll put Star Wars at the bottom. Yes, I do love Star Wars, but most of the movies are meh. Empire Strikes Back is one of my favorite movies of all time, but we're not going to go there. Alright, so now you've got this box sorted the way you want. What do you do with it? That's tough because this is an unbound box; this data literally just exists in this box. So if you want to do something with it, then you've got to code what you want to do with it. Uh... Let's say you want to save this preference to the customer's record in the customer form. Let's say you want to just drop it in their notes field, alright? So what we'll do is let's come back over here. Let's go and make another button, and we'll just call this "Notes." So you might've seen this in my title slide. Alright. Notes button. And I will start off by saying this is not the best way to save this data, but it's easy. If this is something that you don't do that often, and you don't want to go to the setting up a table you should make a table for this and set that to make relationship blah blah blah if you literally just want to take this and drop it in those fields, that's okay. So what we're doing here is for ship, I'm going to put a code in here to check to make sure the customer form is open. I'm not going to get into that. Go to my website and search for "IsLoaded," and I've got a function for that. But for right now, I'm just going to assume it's open, alright?
So, dim L as Long. And what we're going to do is we're going to loop through the items in the box and just add them to the notes field. So, for L equals 0, remember list boxes are 0 based, to MyList.ListCount - 1. So, the count of the items minus 1, so 0, 1, 2, 3. Okay, and then, Next. And in here we're going to say Forms!CustomerF!Notes = Forms!CustomerF!Notes + ";" + MyList.ItemData(L) + ";". And then we'll put a semicolon after it so they don't all smash together, okay? So, take whatever's in the notes field, add it back to itself, and then put the current item from the list box that's L, our index in that box. Alright? Save it. Debug compile as always. Come back out. Yeah. Close this. Let's leave this open for now. And then, arrange these the way you want them, and then hit notes.
There they go. Now they're in here in the order that they're in here. And again, that's just a quick, cheesy, simple way to take what's in an unbound list box and drop it in here. In part two, I'm going to show you how to deal with a bound list box that actually has data that's saved in a table, okay? But this is a quickie to get you started. If you like learning this stuff and you want to learn more VBA stuff in Access with me, check out my developer lessons. I do spend a lot of time on combo boxes and list boxes. We work with them a lot, and we'll do crazy things with recordsets and moving items between multiple list boxes and resorting them, and all kinds of stuff. So check it out. If you have any questions, feel free to drop them down below, or to contact me on my website. But there you go, there is your Tech Help video for today. I hope you learned something. Live long and prosper, my friends. Today is Friday, January 19th, 2024, so we'll see you Monday, the 22nd, for part 2. Take care. Have a great weekend.
Intro In this video, I will show you how to move items up and down in an unbound list box using buttons in Microsoft Access with a simple VBA example. We'll cover how to create a value list list box, add up and down buttons, write the VBA code needed to swap the order of items, and discuss how to quickly transfer your sorted list into a notes field. This is a developer-level lesson designed for those familiar with basic VBA programming. If you've ever wanted to let users re-order items in a Microsoft Access list box, this tutorial will walk you through the process step by step.Quiz Q1. What is the primary purpose of the video tutorial described in the transcript?
A. To design a user login form in Microsoft Access
B. To demonstrate how to move items up and down in a list box using buttons
C. To create a relational database schema
D. To perform calculations using VBA
Q2. What is the main difference between a value list list box and a bound list box as described in the video?
A. Value list boxes hold numeric data only, bound list boxes hold text data only
B. Value list boxes are linked to queries while bound list boxes are not
C. Value list boxes are unbound and store items only in the control, while bound list boxes get data from a table or query
D. Value list boxes sort items automatically, while bound list boxes do not
Q3. In the context of this video, why is the list index important when moving items up or down?
A. It determines the width of the list box
B. It specifies the position of the selected item within the list, allowing you to know where to remove and re-insert items
C. It controls user permissions on the form
D. It tracks the number of users interacting with the list box
Q4. What programming language is used to implement the up and down movement logic in the video?
A. Python
B. JavaScript
C. VBA (Visual Basic for Applications)
D. SQL
Q5. Why does the code check if the selected item's list index is less than or equal to zero before moving an item up?
A. To verify that the list box has at least two items
B. To prevent the user from moving the top item higher in the list, which would be invalid
C. To clear all data from the list box
D. To reset the entire form
Q6. When moving an item down in the list, what condition is checked to prevent an error?
A. If L is less than zero
B. If L is greater than or equal to the list box's ListCount minus one
C. If L equals zero
D. If L is equal to the number of fields in the table
Q7. What is the reason for using a semicolon when saving the list box contents to the notes field?
A. To indicate bold text
B. To separate the items in the notes field so they do not run together
C. To convert the data to uppercase
D. To mark the start of a new paragraph
Q8. What would be a more robust way to handle saving the order of items from the list box to the database, as suggested by the instructor?
A. Store the value in a single text field
B. Create a related table and properly store each item and its order
C. Use a combo box instead of a list box
D. Email the list to the administrator
Q9. Why is it important to use Debug Compile when developing VBA code as shown in the video?
A. It optimizes the code for faster execution
B. It checks for and highlights syntax or reference errors in the code
C. It automatically documents your code
D. It creates a backup of your database
Q10. What happens if the user tries to click the Up button without selecting an item in the list box?
A. The form closes automatically
B. The database is cleared
C. A beep sound is made and the subroutine exits without making changes
D. The item moves to the bottom of the list
Q11. What feature should be turned off to prevent users from editing the items in the value list list box directly?
A. Data Entry
B. Allow Value List Edits
C. Control Source
D. List Count
Q12. Why is the list index considered "zero-based" in the context of VBA list boxes?
A. Because the first item starts at one
B. Because all programming languages use zero-based indexes
C. Because the first item is always given an index of zero, so a four-item list has indices 0, 1, 2, and 3
D. Because the last item is always zero
Answers: 1-B; 2-C; 3-B; 4-C; 5-B; 6-B; 7-B; 8-B; 9-B; 10-C; 11-B; 12-C
DISCLAIMER: Quiz questions are AI generated. If you find any that are wrong, don't make sense, or aren't related to the video topic at hand, then please post a comment and let me know. Thanks.Summary Today's TechHelp tutorial from Access Learning Zone focuses on how you can move list items up and down in a Microsoft Access list box, using VBA buttons. As your instructor, I'll walk you through this process and explain each step so you can easily apply it to your own database projects.
This is a common request: you have a list box in your database, and you want users to have the ability to manually re-order the items. For example, imagine a scenario where you list your favorite science fiction shows and want to set them in your preferred order. Maybe you want to put Star Trek at the top, move Star Wars down a notch, or shift Doctor Who a bit further down. I show you how to accomplish this for both unbound and, in part two, for bound list boxes.
For part one of this tutorial, we start with an unbound list box. An unbound list box contains static items that are not tied to any table or query. The arrangement is simply held in the control itself. Later on, in part two, we will look at a bound list box, where items are stored in a table and you use a sort order field to manage their arrangement, which requires a bit of SQL. For now, we'll keep it simple.
Let me mention that this is a developer-level lesson, which means we'll be writing a little bit of VBA code. For each button - one to move items up, one to move them down - you'll need about six lines of code. If you haven't done any VBA programming before, I'd recommend watching my introductory VBA lesson, which is available on my website. That will give you the background to follow the examples here.
Working with my free Tech Help template database, the first step is to create a value list list box. List boxes and combo boxes in Access are similar, but a list box is always visible whereas a combo box only expands when clicked. A value list list box is not bound to any table or query; it just stores its data internally.
We'll add the list box control to the form and define the initial items: Star Trek, Stargate, Doctor Who, and any others you wish. This lays out the box for the user to interact with, listing, for example, their favorite science fiction shows in any order they prefer.
To add reordering functionality, we need to provide two buttons: one to move the selected item up and another to move it down. To prevent users from editing or adding choices directly in the box, I recommend disabling the value list edit option in the control's properties.
After laying out the up and down buttons alongside the list box, it's a good habit to assign meaningful names to your controls. This keeps your project organized and makes the VBA code clearer.
The code itself is straightforward. For each button, I check that the user has selected an item before allowing any action. In Access, list indexes start at zero, so always keep that in mind when manipulating list positions. To move an item up, you can only do so if it is not already the first item; otherwise, you simply exit the procedure. I handle this with an If statement that produces a beep if the user tries to move the top item higher. The logic for moving down is very similar, except you need to check if the item is already at the bottom of the list.
The process for moving an item is to store the current item's value and index, remove it from the list, and then re-add it at the new desired position. This gives the appearance of moving items up and down.
Once you have reordered the list to your liking, you may want to do something with the new arrangement. Since this box is unbound, any data is only held in the control and not saved elsewhere. If you want to store this order, for example by adding it to a notes field on a customer's record, you need to write code to loop through the items in the list and transfer them wherever you choose. I demonstrate a quick method to concatenate all list items into a single string and append them to a notes field as a simple example. This is not the ideal method for storing such data long-term, but it suffices for situations where you need a quick solution without having to set up additional tables and relationships.
In summary, this approach allows users to visually and interactively reorder items in a list box using up/down buttons with just a modest amount of VBA coding. The list box remains unbound, so you are responsible for managing what happens to the contents once you close the form or want to save the user's preferences.
In part two, I'll go over how to perform similar operations with a bound list box where the order is stored in a table, making the changes persistent and easier to work with for long-term data management.
If you enjoyed this lesson and want to learn more about using VBA in Access, I offer a variety of developer-level courses that go into detail on list boxes, combo boxes, recordsets, and advanced interface techniques. Feel free to ask any questions in the comments or contact me through my website.
You can find a complete video tutorial with step-by-step instructions on everything discussed here on my website at the link below. Live long and prosper, my friends.Topic List Creating an unbound value list list box
Populating a list box with custom items
Disabling list edits in a value list box
Adding up and down buttons for item movement
Naming list box and command button controls
Writing VBA code to move selected item up
Handling boundary conditions at top of list
VBA logic to remove and re-insert items
Using ListIndex and ListCount properties
Writing VBA code to move selected item down
Preventing movement past bottom of list
Looping through list box items in VBA
Appending all list box items to a notes field
Concatenating values with separators in VBAPrimary Topics Microsoft Access, list box controls, value list boxes, unbound controls, VBA programming, user interface, item reorderingSecondary Topics combo boxes, debugging, form design best practices |


