Students & Grades 3
By Richard Rost

 2 years ago
Grades in MS Access: Data Entry & Crosstab View Part 3 In this Microsoft Access tutorial, I will show you how to create a spreadsheet-like view for student grades using crosstab queries. We will go through setting up the crosstab query, adding student and assignment names, and making the view more user-friendly. This is part 3. MembersIn the extended cut, I will show you how to make an editable crosstab form using VBA, temporary tables, and additional SQL. This allows for interactive data entry directly within the crosstab view, despite its usual read-only limitation. Silver Members and up get access to view Extended Cut videos, when available. Gold Members can download the files from class plus get access to the Code Vault. If you're not a member, Join Today!
PrerequisitesLinksRecommended Courses
Keywords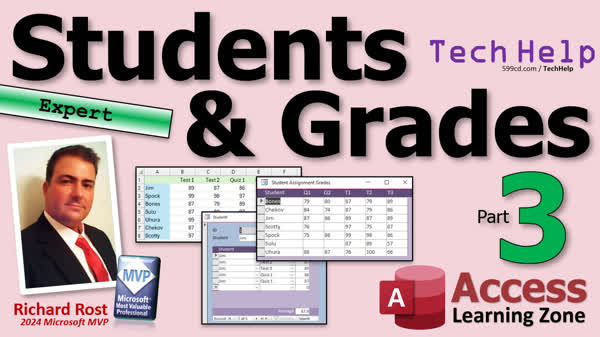 TechHelp Access, Editable Crosstab Form, Student Grades in Microsoft Access, Data Entry in Access, Spreadsheet View in Access, Creating Crosstab Queries, Access Crosstab Query Tutorial, Microsoft Access Gradebook, Joining Tables in Access, Assignment Grades in Access, Automated Grade Tracking Access, Student Form Navigation, Access Junction Table
More InformationTranscript Welcome to another TechHelp video brought to you by AccessLearningZone.com. I'm your instructor Richard Rost. Today is part three of my students and grades series. If you haven't watched parts one and two yet, you know what to do. Go watch those first and then come on back. You'll find links down below.
Alright, so we've got our student form all set so we can look at students. We've got our assignment form set so we can look at assignments. But I want to look at all of this stuff together so it kind of looks like a spreadsheet. Alright, that's our goal. We want to see it like this.
Okay, so to do that, we're going to use a crosstab query. Now this is one of those things I told you to watch first as one of the prerequisites before video one. It was how to make a crosstab query. So let's go ahead and create a crosstab query. Let's make the crosstab query based on the table where our data is located, which is the student's assignment, the junction table.
So this is one of the only query wizards I ever use. Because you don't want to set this up by hand. It really is a pain setting it up by hand. So I will use the crosstab query wizard this time. It's okay. Now which query contains a field you want for the crosstab query results? Well, we're going to get it from our function table. Next, which fields have the row headings? That's this stuff, the row headings. That's going to be our student. And we'll bring it over and then next. And now who's got the column headings? The column is the assignment. And then next. Now what's the intersection? The data in here. That's going to be the grade.
Now you got to pick a function. I always just pick sum, but it's only going to be a single bit of data because we literally have that index in place, that composite key to prevent there being multiple intersections here. Right? You can't have a student assignment twice. So this will never happen no matter which one of these you pick. It should always be the same. I just stick with sum because it's okay. Do you want the row sums? Now I usually turn that off. I just want to see the raw data. That's just me. But if you want to see the row sums and stuff, that's fine too. Alright, next. Here's what it's going to save it as. I'm going to change the name just slightly to that to keep my naming conventions. I like to end all of my queries in Q. I don't like using underscores. You can use underscores. I usually reserve underscores for special things, but that's up to you. Alright, view the query finish. Okay. Alright, not too bad, but I'm seeing all the IDs here. When I really want to see the values there. The student's name and the assignment's name. Okay.
Alright, so we'll keep this. Hang on to that. In order to bring that stuff together where you can actually see the names as well, we're going to need to make another query. We're going to have to take this table and then join in these two tables that have the data in them so we can bring the names in as well. Okay. So let's create query design this time. I'm going to bring in the junction table, the student table, and the assignment table, just like that. Okay, notice how they're joined. You shouldn't have to worry about your join types here because if it's got a record in this table, it should have a matching record in the other tables. I can't see any reason why it wouldn't. So I'm going to bring in the star from here and then I'm also going to bring in student name and assignment name. And then we're going to save this as my student X assignment Q. Okay, and that's just going to basically look like that. It's got all the same information that the table has, but we've added the student name and the assignment name so we can see them in the crosstab query.
Okay. Alright. Save it. Close it. Let's make another crosstab query. So create. Query wizard. Crosstab query wizard. It's okay. Alright. Who's got the data this time? This time we're going to go to queries and pick that guy. Not the original crosstab query. Pick this one. That's the one we just made. Alright. Next. Who's got the row headings this time? I'm going to put student name in there. If you want to also bring in the ID you can, but usually for something like this, I don't care to see that. Next. Column headings is the assignment name. Next, the data is still grade. I pick sum and turn that off. Next. And again, we're going to go like this and we'll call this with name Q like that. And then we'll hit finish and there it is. Hey, it looks a lot better. There's your students and your quizzes across the top. Obviously, if there are students that are missing data, they're not going to show up in here.
Now, if you don't want to see this as a query, I like to make sure that my end users work with just forms. You can build a form out of this. However, your form is going to be stuck with these as field names. Okay, if you build a form, that's one of the limitations of crosstab queries. And this is not editable. Okay. Again, one of the limitations of crosstab queries is that they're read-only. Can you make it so that this is editable? Kind of not the way it is now, but it is possible. And I will show how to do that in the extended cut.
Yes, it does involve a significant amount of programming. There's going to be a lot of VBA involved, some temporary tables, some additional SQL, but you can make it work. Here it is, in fact. There it is. You can come in here. You can click on here, change these. Use the arrow keys up and down, put a grade in. Say you could change what's up here if you want to drop this down, put test one in there again. I don't care. But seriously, though, this way, if you come in here and let's add another assignment. Let's add quiz three. Alright, save that.
Now if we come back into the editor, you'll see quiz three over here. And now you just come in here and put in the grades 65, 72, right, and so on. So this is definitely possible. There's a ton of code behind this, though. So I will cover it and go over all the code in the extended cut for the members. Silver members and up get access to all the extended cut videos. Gold members can download these databases that I build in the extended cuts. And all members get some kind of free lessons every month and all kinds of cool stuff. So check it out. You'll find a link down below for more information on becoming a member.
Alright, but wait now. We're not done with today's video. I just inserted that as like a little teaser. But I'm going to show you one more thing. Remember how I told you there's going to be no VBA programming while I lied. I'm going to do just a little tiny bit of programming to show you something cool. These are the kind of things I normally cover in my developer classes. Alright. So let's say you got the student form up here. Alright, here's Scotty. Right. Let's say, okay, I want to see. Here's test one. How did everybody else do on test one? How about if I double click on test one? Look at that. It opens up the assignment form with everybody's test one scores. Oh, and that's neat. Oh, okay. How did Sulu do? Let's double click on Sulu. It brings it over here back to Sulu. See, we can double click on these guys to open up either that student form or that assignment form.
How do we do that? Well, first of all, I've got to switch this from expert to developer now. So now we're doing developer stuff. What does that mean? That means we're going to use a teeny tiny bit of VBA code. Literally one line of code will do it. But you got to know the right spot to put it in. But if you've never done any VBA programming before and you want to see how easy it is, go watch this video first about 20 minutes long. It'll teach you everything you need to know to get started and you come on back to this spot and we'll continue on right here.
Alright. So let's open up that subform. Okay. This guy and this guy, we're going to put a double-click event in each of those. First thing I like to do is give them some colors. So I'm going to click and then shift click on that one. And let's go to format and make them a light blue. This is something that I do in my databases that just visually tells the user, hey, if it's that light color blue, I can double-click on it and something's going to happen. Okay. It's just a training thing. Okay. So let's start with this guy. Alright. Double-click to bring up the properties, go to events and find on double-click right there. This guy. Okay. Hit the dot dot dot button, the builder button.
Now I have my database program to always open up this code builder. If you get a little window, the pops up that says what builder would you like? Just pick the code builder and this thing will pop up. Alright. This is the visual basic editor. And we are in the student combo double-click event, which means when you double-click on the student combo, something's going to happen. What do we want to happen? I want to open up the student form to whatever value is in the student combo. So it's going to be do command, do cmd.openform. We're opening the student F, comma, comma, comma. Alright, the where condition is going to be where the student ID on that form equals ampersand student combo. Alright. What this says is the student ID equals and then it puts whatever values in the student combo box. Three, six, two, whatever. Right. So it's going to be student, student ID equals two. That is the where condition.
Alright. That goes to this guy. Basically, you know, open the student form where the student ID is two or whatever. Alright. Save it. Come back over here. Let's close this. Now open up. Let's open up the assignment form. Okay. Double-click on bones. Boom. And look at that. Now they overlap each other. Right. I'm going to move assignments over here. I'm going to put the students there. Save it. Control S. I'm going to move this guy here. Save it. Control S. Now it should remember its positions. Alright. So if I close that and reopen uhura. Boom. There's uhura. Stop. Okay. Looks good so far. Let's do the same thing for the assignment.
Alright. So come back into here. The subform design view. Assignment on double-click. Dot dot dot. And then we're right above the other one. It's very similar. It's going to be do command open form. Assignment. Assignment F, comma, comma, comma. Where the assignment. ID equals whatever is in the assignment combo. That's it. Let's see two lines of code. And look at this functionality you're getting for just two lines of code. Alright. Open up the student form. Let's take a look at quiz one. There's everybody for quiz one. There are not a lot of people who took quiz one. Let's go to test one. There's everybody's test one scores. Oh, let's see what Jim or Bones has been doing. Double-click. See you jump back and forth between them.
And that neat. That's pretty cool. Right. And see how much of a time saver that is instead of having a form to the list and open them up. You just jump back and forth between these. This is the kind of stuff that I teach in my developer classes. It's super easy. This is it's not hard. You learn a little bit of VBA and you can go a long way with it. So if you're curious, you want to learn more about developing with Access VBA, check it out. I've got lots of developer lessons on my website.
If you want to learn more about crosstab queries, which is what we used today to create that spreadsheet-like view, I covered them in Access Expert 17 and Expert 18. We cover lots with crosstab queries as well. Put links to those down below. I also have this video available to teach you how to sort your crosstab queries based on the column headers. So you can check that out too.
And of course, don't forget to check out the extended cut where I show you how to make an editable crosstab form. This is pretty cool. It took me most of a day to put this together. So it's some good stuff. Alright, so that's going to do it. Folks, that's the end of the students in grades series for now. That's going to be your TechHelp video for today. I hope you learned something. Live long and prosper, my friends. I'll see you next time and members. I'll see you in the extended cut.
TOPICS:
Creating a crosstab query
Using the crosstab query wizard
Setting row headings for crosstab query
Setting column headings for crosstab query
Selecting a function for crosstab query data
Building an additional query to join tables
Creating a crosstab query with joined table data
Making a form from a crosstab query
Understanding limitations of crosstab queries
Adding a double-click event in a form
Writing VBA code for double-click events
Opening related forms using VBA
Building an editable crosstab form in extended tutorial
Understanding VBA Code for navigating forms
Creating custom assignment and student views
COMMERCIAL:
In today's video, I'll show you how to create a student-grade spreadsheet view using crosstab queries in Access. We'll start by setting up a crosstab query to format our data from a junction table, then join it with student and assignment tables to display names instead of IDs. Next, I'll demonstrate building dynamic forms and adding functionality with just a bit of VBA code, like double-clicking to open related records directly. It's a hands-on guide with practical steps to enhance your Access database skills. You'll find the complete video on my YouTube channel and on my website at the link shown. Live long and prosper my friends. Intro In this video, I will show you how to create a spreadsheet-like student grades view in Microsoft Access using crosstab queries. We will start by building a crosstab query with the query wizard, join in the student and assignment tables to display their names, and then make a user-friendly form based on the query. I will also demonstrate how to use a small amount of VBA to add double-click events that open related records, making it easy to navigate between students and assignments. This is part 3. Quiz Q1. What is the purpose of using a crosstab query in this tutorial?
A. To create a junction table
B. To view data in a spreadsheet-like format
C. To export data to an Excel file
D. To generate summary reports
Q2. Which field is used as the row heading in the crosstab query?
A. Assignment name
B. Student ID
C. Grade
D. Student name
Q3. What function does Richard Rost suggest using in the crosstab query for the intersection data?
A. Average
B. Count
C. Max
D. Sum
Q4. Why does Richard prefer to turn off the "row sums" option in the crosstab query?
A. To save query processing time
B. To reduce data redundancy
C. To simplify the output to show only raw data
D. To highlight the header rows
Q5. What is necessary to view student names and assignment names in the crosstab query results?
A. Modifying the original crosstab query
B. Creating separate queries for names and IDs
C. Joining relevant tables in a new query
D. Exporting the crosstab query to a report
Q6. What limitation of crosstab queries is highlighted in the tutorial?
A. They cannot be exported
B. They are read-only and not editable
C. They require advanced programming skills to create
D. They only work with numeric data
Q7. In the tutorial, what visual cue does Richard add to the form to indicate an interactive element?
A. Bold text
B. Light blue background color
C. Animated icons
D. Border highlighting
Q8. What does the `DoCmd.OpenForm` VBA command do in the tutorial?
A. Opens the form in read-only mode
B. Exports the form data to a new table
C. Opens a specified form based on a condition
D. Deletes the specified record from the form
Q9. Why does Richard use VBA code in this tutorial?
A. To automate the creation of tables
B. To demonstrate form navigation via double-click events
C. To generate new queries automatically
D. To update the database schema
Q10. Where can viewers find additional information and extended resources related to this tutorial?
A. The comments section of the video
B. AccessLearningZone.com website
C. Social media pages
D. Email newsletters
Answers: 1-B; 2-D; 3-D; 4-C; 5-C; 6-B; 7-B; 8-C; 9-B; 10-B
DISCLAIMER: Quiz questions are AI generated. If you find any that are wrong, don't make sense, or aren't related to the video topic at hand, then please post a comment and let me know. Thanks. Summary Today's TechHelp tutorial from Access Learning Zone delves into part three of our students and grades series. If you haven't watched parts one and two yet, please check those out first. Today, we'll bring together our student and assignment data to resemble a spreadsheet using a crosstab query.
We've already set up forms to view students and assignments separately, but our goal today is to see everything in a unified, spreadsheet-like view. To achieve this, we'll need to create a crosstab query. For those unfamiliar with crosstab queries, it's advisable to review the prerequisite tutorial on how to create one before proceeding.
We'll start by making a crosstab query based on our junction table, which contains the student assignments. I generally avoid using query wizards, but the crosstab query wizard makes this specific task easier.
First, we select the query containing the fields we'll use. We'll pull our data from the function table. For the row headings, we'll use the student field. For the column headings, we'll use the assignment field. The intersection, which holds our data, will be the grades. In choosing a function, I prefer using "sum", though any function should yield the same result given our data integrity constraints.
Typically, I turn off row sums to focus on raw data. Once we've set this up, we name the query according to our naming conventions and view the query.
The initial result might show IDs instead of names. To address this, we need to join our data with the appropriate tables that contain the names. We create another query that brings together the junction table, the student table, and the assignment table. This ensures we can see both student names and assignment names in our crosstab query.
Next, we make another crosstab query, this time using the query we just created as the data source. We set the row headings to student names and the column headings to assignment names. The core data remains the grades, and we again choose "sum" and ensure our naming conventions. Our new crosstab query should now display names instead of IDs, making it more user-friendly.
Viewing this as a query is useful, but it's often beneficial to present data to end users through forms. However, forms derived from crosstab queries inherit certain limitations: they use static field names and are read-only.
If an editable crosstab form is needed, it's possible but requires extensive VBA programming, temporary tables, and additional SQL. This is covered in my extended tutorial available for members.
To illustrate a bit of VBA programming, let's create interactive forms. For example, double-clicking on a test in a student form can open up an assignment form showing all students' scores for that test. Conversely, double-clicking on a student in the assignment form will bring up that student's details.
To implement this, we'll use a bit of VBA. First, we design the subform to highlight fields that can be interacted with. This visual cue is achieved by changing the background color of these fields. We then add a double-click event to these fields.
In the VBA code for the double-click event, we'll use the "DoCmd.OpenForm" function to open the appropriate form filtered by the selected student or assignment ID.
This interactive functionality is especially useful and demonstrates how a small amount of VBA can greatly enhance user experience. For those interested in developing further with Access VBA, I offer comprehensive developer lessons on my website.
If you're keen to learn more about crosstab queries, check out my Access Expert tutorials, specifically Expert 17 and 18. Additionally, there's a video available on sorting crosstab queries by column headers.
For a complete video tutorial with step-by-step instructions on everything discussed here, visit my website at the link below.
Live long and prosper, my friends. Topic List Creating a crosstab query
Using the crosstab query wizard
Setting row headings for crosstab query
Setting column headings for crosstab query
Selecting a function for crosstab query data
Building an additional query to join tables
Creating a crosstab query with joined table data
Making a form from a crosstab query
Understanding limitations of crosstab queries
Adding a double-click event in a form
Writing VBA code for double-click events
Opening related forms using VBA
Building an editable crosstab form in extended tutorial
Understanding VBA Code for navigating forms
Creating custom assignment and student views Primary Topics crosstab queries, query wizard, junction tables, table joins, creating forms, VBA events, Access user interface
Secondary Topics form formatting, query naming conventions, developer skills
|


