Employee Training 5
By Richard Rost

 2 years ago
Employee Training Tracking in Microsoft Access Part 5 In this Microsoft Access tutorial, we'll learn how to track employee courses, including managing enrollment, deadlines, completion dates, and course statuses like in progress and completed. We'll also explore creating a subform to organize this information and using combo boxes for status sorting. This is part 5. MembersThere is no extended cut, but here is the database download: Silver Members and up get access to view Extended Cut videos, when available. Gold Members can download the files from class plus get access to the Code Vault. If you're not a member, Join Today!
PrerequisitesRecommended CoursesUp Next
Keywords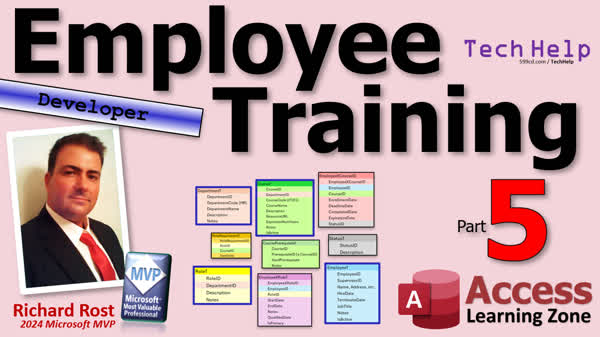 TechHelp Access, Employee training tracking, certification tracking, employee roles, employee courses, employee course subform, course status ID, status tracking, role requirement table, course enrollment dates, form design Access, combo box custom sort, Access subform creation, Access form alignment, Access VBA code debug.
Transcript Today's part five of employee training. Retraining employees and tracking what they're doing and learning what they know and all that stuff. Okay, what do we have to do today? Alright, so in part four we covered this one. Employee X role T so we could change our border. Let's change that. There we go. That one's done. Today we're going to do the Employee X course T so we know what courses they've taken. Oh yeah, if you haven't watched parts one through four, go watch those. I shouldn't have to tell you this by now.
Alright, so we have our employees with their roles. Now we're going to do the same thing with courses. Now I think we already have a subform we can kind of use. We've got the role requirements for now. This thing's got a list of courses and it's based on the role requirement table. We can kind of use this form. So let's copy this guy, copy paste. This is going to be the employee course sub F. Now this is going to be one here where we're going to have will do it very similar to the other one. We've got a subform for all these different important dates on it. But this last bit down here the status ID. I think that would be important to see on the sub form. You'll have the course and then you'll have the status and the status will be things like in progress, completed, failed.
So we've got two tables to build real quick. I'll build the employee x course ID and the status T real quick. Alright, here it is employee x course IDs are auto number are two foreign keys. Employee ID course ID a bunch of dates enrollment deadline completed exploration status ID. That's going to be referring to the status table. And then of course notes. Alright. And here's our basic status T status ID description notes. Let's throw some data in here. Alright, we've got in progress. Let's do caps in progress. Let's do completed failed or expired now. Or you want to handle this expired is up to you. I'm envisioning some kind of either an event or a weekly. Something that runs or maybe when you open up the employees form, it can quickly check and mark any other courses expired. We'll figure out some way to do that. Maybe even when the database loads change statuses to any expired courses. Right? That could be either when anyone opens a database or just you open the database or whatever. Alright, so keeping this in mind for now, we'll just set it equal to completed for two for me right now.
So let's put in some sample data in the employee ex course. Alright, employee one. I need a couple HR courses. So where's the courses? Let's see. I need courses one, two, and three. Let's see. I got. Of course, one, two, and three. Let's set my IDs over here. And the status ID will be two default status of zero. Yeah, I would leave the default status zero because zero would just mean I've got no status on it. Right? Okay, now it's time for that subform. So let's go back to the subform we started right here.
Where are you? Employee course sub F. First thing we're going to do is bind this guy to the different table. Employee ex course T. Okay. Now we got the course ID over here and I didn't name it and the other one is just combo 63. That's fine. I normally don't worry too much about that until I get to the point where I'm going to be doing something with that box. Like put in a double click event in it or you know refer to it from somewhere else. It's not going to hurt anything if it's called combo 63 right here. But when I do notice it, I fix it. Of course, combo here. We got to fix it in the other one too. In role requirement. Can you use the same form that's very similar to what you can? But that's just asking for trouble unless you really know what you're doing. I've reused some stuff like this before and just made little changes like in this particular case. These are going to be nearly identical except this is getting swapped out with that status. So yes, you could put them both on here and then just make one visible or the other. But then you got to worry about where it's bound to. What records it's pulling out? It's just it's easier. Nine times out of ten to just have multiple forms.
Alright, we need a status combo box in here. So we'll make another combo. Where are you? Drop it down stick it in here. Getting your values from the status table. This is something I'm thinking I might want to have. A custom sort order in it. Yeah, let's do that. Let's cancel. Cancel cancel. Sorry, I keep going back, but like I said, I did not pre build this database. Usually for my quick, you know, one off videos, I'll just make the database real quick. But for these more complicated things, we're doing it together. So now that I'm looking at it, the status combo you might want to have these in a particular order. Right? So I'm going to go like this and I'm going to add in here a sort order. And I always put notes last for some reason. Again, just personal preference. Okay. Now we can say I want the sort order to be one, two, three, four. That's why you can always rearrange these later in the way that they appear in the box.
Okay. Alright. Now let's make that again. Form design. Combo box. Drop it there. Get the values from the table. Vari. Vari's. Oh, no, tables. I was thinking ahead. Status. Now here's another one of those little quirks. Something I don't really like that the wizard does. If you just bring over the status ID in the description without the sort order, it doesn't give you an option to sort on that. So Sammy, add that to the list. You should still be able to sort based on any field in the table, even though it's not in the combo box. Because you can later do this. In fact, I'm going to show you a watch. I'm bringing over just status ID and description. I'm not bringing over a sort order. Alright. Next. Don't sort it by anything. Actually, let's sort it by the status ID because it'll put the order by in there. Next. This is what it's going to look like, and that's fine. Next. Store that value in status ID. Next. Label. I'm going to delete it. Okay. So there it is. And there's the status ID combo box. Okay.
Now, if you look at the row source for this thing, well, first let's fix this status combo. If you look at the data, here's the SQL statement that it puts together. Okay. You can just come in here. We can clean this up first of all. Since it's only based on one table, we don't need all this status ID nonsense. And we don't need all these brackets since we're good little access developers, and we don't put spaces in our names. Alright. Right here. Right here instead of order by status ID, we can order by sort order. There's no reason that you can't have that field in the combo box wizard. Just because it's not in the box doesn't mean you can't sort by it, which you can. Save it. Close it. Open it back up again. And there we go. And they're in the custom sort order, which just happens to be the same as the other order. I know. Okay.
Get rid of that extra space. Save it. Close it. Let's drop it in here. I'm going to make a little more room. We don't need this note box to be quite that big. Do that. Slide these guys up here. And put our subform in down here. I didn't take the time to pretty this up right last time. Okay. Where are you? Click. Drag. Drop. Delete. Make it bigger. Come on. Come on. There. Make it bigger. Save it. Close it. Open it. And there we go.
Alright. Let's make the single form for this. We'll do the same thing we did with this guy. Right? First of all, let's, um, now let's copy and paste it. Copy. Paste. Employee. Course. F. Design view. Let me make this bigger. Let's take this and put it up here. Which means we don't need this to be that. Go away. Okay. We got the course. We got the status. We'll bring over the other fields in just a minute. That existing fields. What else we got? Enrollment date. All this stuff here. Did he drop that there? Make this the flag so you can see it. And you can pretty these up on your own. Make it so they fit. We need some labels. I'm just going to delete these two. Copy paste. And then I'm going to cut and paste. Yeah, it's not going on there. Yeah, these things are quirky sometimes too. If you take one like this and you copy it and you click on here and you paste, see sometimes it goes and sometimes it doesn't. It's very quirky and it's very strange. Usually what you have to do is take this guy, copy it and paste it as an independent label. Then you can cut it, click and paste it. And see now it's not even coming in. See? That's weird. Copy. Paste. Okay, there it goes. See? Sammy add it to the list. The label copy and paste when you're trying to paste an attached label. It's very quirky. Status. And I think I lost a combo box. I didn't know. Don't let's be behind it. Okay, that's the status box. And this is the course box. Copy. Paste. There it goes. So how's it working? Of course. And I think we can get rid of date off of each of these. We're going to do the date. You're going to date.
Okay. Now here's what we're going to do. Watch this. We're going to select all of these. We're going to right-click. Align. Left. That aligns them all up to the left. That I'm going to, let's make them all a little bit shorter like that. Maybe right about there. And then right-click. Size. To widest. Okay? Now they're all nicely lined up like that. We'll do the same thing with the text boxes. And the combo box is ready. Select those. Right-click. Align. Left. Right-click. Size. To widest. Like that. Now they're all the same size. See how pretty. And you can select all these. You can grab the left side and do that. Grab the right side and do that. And that's how you can pretty up your forms. And just a matter of seconds. I don't like the wizard. It's just like that. I like to do it myself. And also we're going to select everybody and go format align left. Because that's how I like to see it. Alright. Save. Close it. Close it. Now we need our little teeny tiny bit of code to bring it, bring us from here over to there.
So. For a subform design view, again we can get rid of the notes out of there. We don't need that anymore. Look on that. Find that same color blue, which is, I believe. This one, I think so. Yeah. Alright. Double click. Event on double click is right there. It's going to be the employee ex course ID is what we're looking for. So it's do command open form. What's the form name employee course F the single form? Comma, comma, comma, come alien. Where the employee ex course ID equals employee ex course ID on this form. Save it. Debug compile once and allow. Whoa. Whoa. Okay. This is a button that's left over. Actually, this is, oh, this is the employee F. Oh, okay. Okay. So you can tell I haven't done a debug compile in quite a while. I cracked myself up. But this is the employee form, which is this guy. And it's got buttons here that are based on the customer ID, which no longer exists. Right. And I told you it doesn't update the code. So the contact form is still going to use it. We're going to just change this to employee ID. Right. Employee ID is employee ID is employee ID. What else we got to do debug compile? I think that was the only one. I do know there's another form that's not working though. That, which is this thing. This code isn't working. The customer F debug. This is going to be employee EF. Where employee ID equals employee ID. Okay. That should have fixed everything. Oh, okay. Okay. Okay. Alright. Open the employee form where the employee ID equals employee ID. Employee ID doesn't exist on this form. Why? We talked about this a couple of videos ago. It changed what this field is bound to, but it did not change the name of the box itself. It's still called customer ID. So those little changes like that. You still have to make even though access auto renames a lot of things for you. Oh, and it'll break your code too. Even though it fixed the code. If you rename a box, it breaks the link to the code until you come over here and do this. Even though it says event procedure there. Now it should be okay. I see an open customer because it was customer ID double click. And now it's employee ID double click. There we go. And we can get rid of that. It's just these little things. The only way I always say once you've got your object names, you might not want to go around renaming stuff. It's good, but it's not perfect. Yeah, see very well not to find employee ID. Save. Alright. One more time. I see some of these. The compiler doesn't even catch. There we go. Okay. There's my roles. There's my courses. Double click on HR 102. And there's the details on that. Okay. We're getting there. We're getting there.
Now, obviously sales level two. Ooh, you know what would be nice too. We could make a link going from this one to the role requirements. Right. So we can come over here and that'll open up this. And we could see what the requirements are. If we go to SR level two. Oh yeah, we'll do that. We'll do that the next. That's already running over time. We got that. And we also now can do another thingy. Maybe over here that says what are you missing? Okay. Alright. So tune into. Oh, wait, wait. Today's Friday, isn't it? Alright. Alright. There I fixed it. Turn it into Monday. Same bat time. Same bat channel. Have a good weekend. Everybody. Oh, members. I want to also mention. If you remember, obviously, of course, you can watch now. But I know that I haven't done an extended cut for this yet. And I haven't done it in a little bit. But you're going to have a nice big long extended cut at the end of the series. Alright. So don't worry. I got a whole list of extended cut things we're going to be doing. It'll be cool. Don't want any complaints. And I haven't done an extended cut in a while. Alright. I want to get mostly through this series first. And I got several items we're going to extend and cuts for. Okay.
Alright. So that's going to do it for your TechHelp video for today. Hope you learned something. Live long and prosper, my friends. I will see you on Monday for part six. A special thank you and shout out to our diamond sponsors.First, we have Juan Soto with Access Experts Software Solutions, Manufacturing Experts, specializing in Access and SQL Server. Juan is a 13-time Microsoft Access MVP. You can check them out at accessexperts.com.
Another shout-out to Sammy Shama from Shama Consultancy. Sammy is a certified Microsoft Office specialist. He not only offers Access Application Development, but he also provides one-on-one tutoring services. So if you need someone to hold your hand and help you with your Access project, Sammy is your guide. Check them out at shamaconsultancy.com.
TOPICS:
Creating Employee Courses Subform
Building Employee x Course Table
Building Status Table
Adding Data to Status Table
Sample Data for Employee x Course
Binding Subform to Employee x Course Table
Creating Status Combo Box
Custom Sort Order for Combo Box
SQL Statement for Sort Order
Adjusting Form Layouts
Aligning and Resizing Form Controls
Creating Single Form for Employee Courses
Aligning Form Controls with Code
Adding Subform Navigation Code
Debugging Form Code Issues
Finalizing Employee Course Details Form
COMMERCIAL:
In today's video, we're continuing with part five of employee training. We'll explore how to manage Employee X course tracking by creating subforms to track employees' course status like in-progress, completed, or failed. We'll set up tables for employee courses and status, and design combo boxes with a custom sort order. You'll learn how to align and size fields, handle quirks in Access, and use VBA code to link forms, allowing easy navigation between course details and requirements. Don't forget to check out parts one through four if you're catching up. You'll find the complete video on my YouTube channel and on my website at the link shown. Live long and prosper, my friends.Intro In this video, we continue building the employee training database in Microsoft Access by focusing on tracking which courses each employee has taken. I'll show you how to create and set up the Employee X Course table, build a Status table to track course progress, and design subforms for logging course data. We'll also create a combo box with a custom sort order, organize and align form controls, and add navigation code to link course records to detailed views. If you haven't watched the earlier parts, be sure to check out parts one through four first. This is part 5.Quiz Q1. What is the purpose of creating an "Employee X Course T" table?
A. To track employee roles and responsibilities within the company
B. To store employee salary and compensation information
C. To manage and track courses employees have taken, including their status
D. To organize employee work shifts and schedules
Q2. Which fields are included in the "Employee X Course ID" table?
A. Employee First Name, Employee Last Name, Course Title
B. Course ID, Employee Feedback, Instructor Name
C. Employee ID, Course ID, Enrollment Date, Status ID
D. Role Requirement, Supervisor Approval, Course Grade
Q3. What does the "Status T" table represent?
A. The completion and grading criteria for each course
B. The progress status of employees in their respective courses
C. The list of trainers available for each course
D. The location and timing of each course session
Q4. What possible statuses can be included in the "Status T" table according to the video?
A. Pending, Approved, Rejected
B. Enrolled, Dropped, On Hold
C. In Progress, Completed, Failed, Expired
D. Registered, Passed, Certified, Disqualified
Q5. Why does the instructor suggest creating multiple forms instead of reusing one form for slightly different purposes?
A. It helps to minimize coding errors and simplifies the setup for different records
B. It reduces the overall size of the database
C. It enhances the graphical interface of the user forms
D. It simplifies the renaming of the form elements
Q6. How does the instructor suggest handling course expirations in the database?
A. Manually update each course status monthly
B. Create an automated process that updates the course status based on expiration criteria
C. Change the course end date manually to reflect the new status
D. Notify the employee through email to update the status
Q7. What did the instructor demonstrate regarding sorting the "Status Combo Box"?
A. Sorting is unnecessary as all entries are automatically ordered
B. Sorting is done based on the alphabetical order of the status description
C. Include a custom sort order to arrange statuses as per the desired sequence
D. Sorting is locked to the numerical order of the status ID
Q8. What coding issue did the instructor address when updating the form's field name?
A. The field values were not displaying correctly because the syntax was incorrect
B. The form crashed due to improper data type assignment
C. The database link needed manual updates after renaming fields to maintain correct event procedures
D. The buttons on the form were assigned to the wrong event handlers
Q9. What was a highlighted design strategy for aligning form elements in the tutorial?
A. Use of manual adjustments for precise control over element positioning
B. Utilizing automated access templates for standard formatting
C. Applying left alignment and sizing to ensure uniform appearance
D. Relying on default form wizard placement for efficiency
Answers: 1-C; 2-C; 3-B; 4-C; 5-A; 6-B; 7-C; 8-C; 9-C
DISCLAIMER: Quiz questions are AI generated. If you find any that are wrong, don't make sense, or aren't related to the video topic at hand, then please post a comment and let me know. Thanks.Summary Today's TechHelp tutorial from Access Learning Zone continues our journey into employee training and tracking with part five. We're focusing on managing courses that employees have completed. In previous parts, we looked at roles assigned to employees, and now we want to similarly track course completion.
We already have a form structure related to role requirements, so we'll adapt this existing subform for employee courses. This involves listing courses and the corresponding status, whether in progress, completed, or failed.
To implement this, we need two tables: one for the employee-course relationship and another for course status. The employee-course table will include several fields: an auto-number ID, foreign keys for employee and course IDs, various dates such as enrollment and deadline dates, and a status ID referencing the status table.
In our status table, we will fill it with possible statuses like in progress, completed, failed, or expired. How to manage expired statuses will depend on future decisions, but could involve periodic checks when the database is accessed.
Next, we input sample data for employees who need to take specific courses, setting a default status for those not yet started. We then revisit our subform and bind it to our employee-course table. Though field names might remain the default, I advise renaming them when you need to refer back to these fields for events or logic.
We incorporate a combo box for status selection, using our status table as the data source. Adjustments are made for custom sorting options by adding a sort order to the table.
When designing this form, we take time to align and size fields consistently, enhancing readability and usability, and adhere to layout best practices for form design in Access.
In revamping our form, we ensure controls are named correctly and any redundant code is updated or removed. This preparation catches possible errors when compiling VBA code.
Finally, we consider adding navigation features such as links to role requirements from our course list, improving overall usability.
This concludes today's tutorial. A detailed video covering these processes, with step-by-step guidance, can be found on my website. Live long and prosper, my friends.Topic List Creating Employee Courses Subform
Building Employee x Course Table
Building Status Table
Adding Data to Status Table
Sample Data for Employee x Course
Binding Subform to Employee x Course Table
Creating Status Combo Box
Custom Sort Order for Combo Box
SQL Statement for Sort Order
Adjusting Form Layouts
Aligning and Resizing Form Controls
Creating Single Form for Employee Courses
Aligning Form Controls with Code
Adding Subform Navigation Code
Debugging Form Code Issues
Finalizing Employee Course Details FormPrimary Topics employee course tracking, Access tables, subforms, status management, combo box sort order, form design, relational structures, VBA form navigationSecondary Topics debugging code, Access UI quirks, data entry conventions |


