Tag Property
By Richard Rost

 15 months ago
Microsoft Access: Using the Tag Property for Info In this Microsoft Access tutorial I will show you how to use the tag property in your database forms to display custom instructions for users as they move from field to field, making use of Got Focus and Lost Focus events, storing instructions in each control's tag, using simple VBA functions, and handling form opening with a timer event for smooth display. MembersThere is no extended cut, but here is the file download: Silver Members and up get access to view Extended Cut videos, when available. Gold Members can download the files from class plus get access to the Code Vault. If you're not a member, Join Today!
PrerequisitesLinksRecommended Courses
Keywords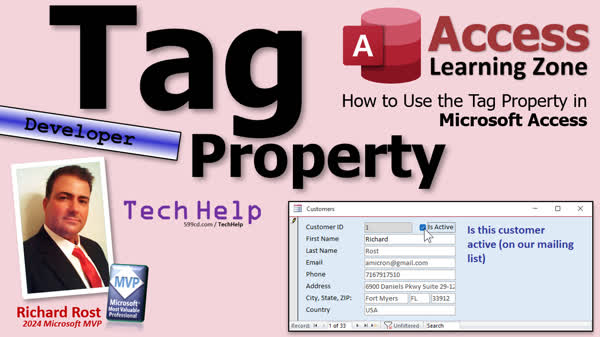 TechHelp Access, tag property, tag property example, store extra data in forms, instruction label, show instructions in forms, got focus event, lost focus event, event handler function, Screen.ActiveControl, On Timer event, timer interval trick, dynamic field instructions, lock fields with tag property, loop controls with tag property
 Subscribe to Tag Property
Get notifications when this page is updated
Transcript Today we are going to talk about a seldom-used and seldom-known property called the tag property. We are going to see one way you can use it in your Microsoft Access database.
One little property that most people do not know about is this thing called the tag property. It is on the "Other" tab, and it is down here called "Tag." It just says "Extra data to be stored with the object." They do not really tell you much about what it is used for, but you can do some pretty cool stuff with this little guy.
Lots of things have a tag property - text boxes, check boxes, forms themselves have a tag property. It is just a place where you can store little extra bits of information, basically for yourself to do something with.
Let me give you one simple example, and then tomorrow we are going to go over a more detailed example. Let us say you want to give the user some instructions when they go from field to field. There are a couple of ways you can already do this.
You could use the control tip text, which is little text that pops up when they hover over a field. That is kind of boring. You can use status bar text, which is the little text that appears down here. I have got videos that cover both of these, but these are kind of boring too.
Let us say you want to make yourself a nice big instructions label over here. As the user moves from field to field, you want to display big instruction information in there for them, like I did right here. When they click on "Is Active" or tab to it, it says, "Is this customer active on our mailing list?" It explains what that field is all about. This is nice and big, and as you move from field to field, this can change.
We can store that text in the tag property of each of those controls. Then, as we change focus using our got focus and lost focus events, we can update this text.
Now, you are probably saying, Rick, why do not I just put that in the on got focus event itself, put the extra text in there? Well, this is just a better way to do it. It is easier. You do not have to have a separate event for each one of these controls. I am going to show you a nice, cool, easy way to do it.
First, we have some prerequisites. I was not just going to let you off easy. I am going to show you some neat new stuff.
First, start off with Intro to VBA. If you have never done any VBA programming before, go watch this course. It will teach you everything you need to know in about 20 minutes.
We are going to use the Screen.ActiveControl so we know what control we are sitting on and we can grab its tag property. We are going to use the On Got Focus event. In this On Got Focus event video, it is a fast tip, so it is short. I did do something very similar, but I did not use the tag property. So we literally hard-coded it into each field's events, which we are going to avoid doing in this video. But go watch this one - it is a good background.
Today, we are going to do something much cooler. We are going to use an event handler function so we can just put this in the event. We can just make a little function. We do not have to send it any information because the data will be stored in the tag property.
So today, think of today like the On Got Focus fast tip on steroids.
This is my TechHelp free template. You can grab a copy of this database if you want to from my website.
Now for the purposes of class, we are just going to delete all of this stuff over here. We do not need it. I am going to copy one of these labels, Control+C, and then Control+V, and then we are going to bring that guy over here. This will be our instructions label. This is where the instructions will show up, right there. We will format it, make the text bigger, maybe 18 point, make it blue, and bold it. The user cannot miss it.
Now you are going to go to each property where you want to have instructions in it, like the customer ID here, and go to the tag property. It is on the Other tab. This is the customer ID. You cannot change it. Then we will go to the Is Active text box. Is the customer on our mailing list or not? Stuff like that.
First name. The. Last name. We will put in here just "Last". Some of these are self-explanatory. Last name. Primary email address. Phone number. I am just putting this up in here now so it shows up. Address you might want to have "Street address only," that kind of stuff.
Country, that kind of stuff. So you put all your tags in here. Save it. All that data is stored in form design. You do not have to go into your VBA if you want to change it. It is much, much easier for you as a developer, too.
Now we are going to use a little function that is going to say, "Hey, what field is the user on? Which field has focus?" We are going to get that tag and put the tag in the instruction label.
We have to name this guy. I forgot to name it. Let us call this "Instructions." Let us call it "InstructionLabel." The initial caption can be blank. You can make it blank over here, though. Do not blank it in here because it will resize and get all messed up. Always change the caption property over here.
InstructionLabel. We are going to put the tag from here in the InstructionLabel caption.
Let us go to our VBA editor. I put a little button up here on my control tip so I can hit View Code. It brings me right into the VBA editor. If you do not have that, then you can just go to any one of these controls here. Just go to events, pick any event, and it will drop you in here. Then I am just going to delete that event.
Let us go up top. We are going to make two little functions. They have to be functions for event handlers.
Private Function ShowTip like that.
InstructionLabel.Caption = Screen.ActiveControl.Tag
So give me the tag property of the active control and put that in the instruction label's caption. If I move off of that, everything should camel case. We are good. That is it. One line of code.
Then we are going to make a HideTip function.
Private Function HideTip. And this literally is just empty string.
Debug Compile. Save it. Close it. Close it. Close it. Open it.
Now, it is not working yet. Why? We have to specify those functions in the On Got Focus and On Lost Focus events for these different text boxes.
This is where it comes in handy. Open up the properties. Now just pick all of the fields individually. Click on one, hold down the shift key, click on the other ones, or you can draw a box that touches them. Make sure you get just the text boxes, not the labels at all.
I have all of the text boxes selected. Now go to On Got Focus and set it to =ShowTip, like that. That sets that for all of those controls.
For Lost Focus, =HideTip.
If you do not have any controls on here that do not have tips in them, you do not even need the HideTip because if you tab from one field to the other, if they all have tips in them, then ShowTip will just show the next tip. But I have got a couple down here that do not have tips. You probably do not need tips in first name, last name, and so on like that. Those are pretty self-explanatory.
Save it. Close it. Open it. See? And that is nice.
Now you probably noticed when the form opened, it did not run. We also have to fire that event when the form opens. But here is the problem. When the form opens, Screen.ActiveControl does not have a value yet.
Watch this here. Design view. Let's go into either On Load or On Open, or I know some of you were thinking On Current, right? All three of those run when the form first opens. But at that point, Screen.ActiveControl does not have a value.
So what do you think? How would you solve this problem? How would you get this to run the first time without having to hard-code the text? How would you get it to get that tag property when the form opens? Pause the video and see if you can figure it out and put your comments down below if you think you have got it solved. Watch the rest of the video. I will give you the solution in just a second.
The key is to use a timer event with a very, very short pause. I have covered this in a couple of videos. What we are going to do is in the form's properties - let me get rid of this On Load that I put in here. Hold on. Get rid of you. Goodbye.
In the form's properties, we are going to find the timer interval and set that to something really short, like 500. That is half a second. These are milliseconds. And for the On Timer event, we are going to come in here and say ShowTip and then Me.TimerInterval = 0. That effectively turns the timer off.
So the form will open, Screen.ActiveControl will get its value because you will have focus on a field now, ShowTip will run, and then the timer gets turned off.
We are going to debug compile once in a while. Close it, close it, open it, and there it is. See, it takes a second, but it shows up. You can make that timer interval really short. Half a second might even be too long. Let us try 200 in here. Do not go too short, though. Oh, yeah, there it is. Now it just runs.
I covered that timer interval trick in this Load Faster video. This is a great and awesome trick to do if you have got stuff that calculates, like you have got a form that opens like a dashboard form and it has got sales it has to calculate. What you do is you load the form first so all the fields and everything displays, and then you have that timer event kick off the calculations. So the form displays, the user sees something, and then you can have this show up while it is actually calculating.
Otherwise, if you have got those all in functions bound in your text boxes like that, the user sees nothing while the calculations are going on in the background.
Coming up tomorrow, we are going to do something else with the tag property. We are going to loop through all of the fields on a form. What we are going to do is, in this Edit Mode video (go watch this before tomorrow), basically, when we open up a form, it is locked. Every field in here is locked so people do not accidentally make changes. If you want to edit the data, you click Edit Mode and then it flips over to where you can edit it. In this video, we are using the Allow Edits property, which affects every field on the form.
So, using the tag property, what we can do is lock whichever fields we want to be locked but leave some of them open, like maybe you want to leave notes open or something like that. With the tag property, just mark the fields you want locked. Then when they go into Edit Mode, we can loop through all of the controls on the form and only lock the ones that are supposed to be locked.
We will do that tomorrow in our TechHelp video.
Of course, if you like this stuff, if you like learning with me, if you enjoy my programming lessons, go check out my developer lessons on my website. I have lots of them. I am up to like 50 now. So if you want to learn VBA programming and Access, this is the place to do it.
That is going to do it for today. Folks, that is your TechHelp video. I hope you learned something. Live long and prosper, my friends. I will see you tomorrow.
TOPICS:
Introduction to the Tag property in Access controls
Using the Tag property to store field instructions
Setting up an instructions label on a form
Formatting a label for user instructions
Populating the Tag property for different controls
Using the On Got Focus and On Lost Focus events
Writing a ShowTip function to update the label
Writing a HideTip function to clear the label
Assigning event handler functions using properties
Selecting multiple controls to assign events
Updating instructions label dynamically on focus change
Handling form open when Screen.ActiveControl is not set
Using the Timer Interval and On Timer event
Triggering ShowTip on form open with a timer
Disabling the timer after the ShowTip runs
Adjusting Timer Interval for optimal delay
COMMERCIAL:
In today's video, we are learning about the seldom-used tag property in Microsoft Access and how you can use it to store custom instruction text for each field on your forms. I will show you step-by-step how to set up an instructions label that automatically updates as users move from one field to another using the tag property and simple VBA functions, all without the need for separate events for every control. You will also see a cool trick using the form's timer event to display your instructions right when the form loads. Tomorrow, we will continue working with the tag property, so be sure to check back for that. You will find the complete video on my YouTube channel and on my website at the link shown. Live long and prosper my friends.Intro In this video, we will talk about the seldom-used tag property in Microsoft Access and see how you can use it to store custom instructions for each field on your forms. I will show you step-by-step how to set up and format an instructions label that updates as users move from field to field, using the tag property and simple VBA functions. We will cover assigning event handlers to multiple controls, handling form openings with a timer event, and making sure your instructions appear automatically when the form loads.Quiz Q1. What is the main purpose of the tag property in Microsoft Access controls?
A. To store extra information for use by the developer
B. To control formatting of the control
C. To set the default value of a field
D. To provide a tooltip for the user
Q2. Which of the following objects in Microsoft Access can have a tag property?
A. Only text boxes
B. Only forms
C. Only check boxes
D. Text boxes, check boxes, and forms
Q3. Where is the tag property typically found in the property sheet of a control?
A. On the Data tab
B. On the Format tab
C. On the Other tab
D. On the Event tab
Q4. What is the advantage of storing instruction text in the tag property instead of hard-coding it in event handlers?
A. It allows easier updates without changing VBA code
B. It improves the performance of the database significantly
C. It prevents any chance of errors in input
D. It automatically creates tooltips
Q5. What VBA function is used to determine which control currently has focus on a form?
A. Me.ActiveControl
B. CurrentControl
C. Screen.ActiveControl
D. Application.ActiveObject
Q6. What does the ShowTip function in the video do?
A. Sets the control's tooltip to the tag value
B. Sets the InstructionLabel caption to the tag value of the active control
C. Sets the status bar to display the tag value
D. Hard-codes the instruction text into the event
Q7. Why is the HideTip function used?
A. To hide the current control from the form
B. To erase the InstructionLabel caption when a control loses focus
C. To lock the current field from editing
D. To reset the form to its default view
Q8. Why is it not sufficient to just run ShowTip in the On Load or On Open event when the form opens?
A. The tag property cannot be accessed at that point
B. The label is not visible yet
C. Screen.ActiveControl does not have a value yet
D. Event handlers cannot be triggered automatically
Q9. What is the solution given in the video for displaying the correct instruction when the form first opens?
A. Use the On Load event to run ShowTip
B. Trigger ShowTip with a form-level flag variable
C. Use the timer event to run ShowTip after a brief delay
D. Hard-code the first instruction label caption
Q10. What is the risk if the timer interval for the form's On Timer event is set too short?
A. The form will not load at all
B. The tag property will not be read correctly
C. The event may run too frequently, causing performance issues
D. The database will close automatically
Q11. How does using the tag property help when you want to lock only certain fields in Edit Mode?
A. You can visually indicate locked fields to users
B. You can loop through controls and lock only those with a specific tag value
C. You can change the control type automatically
D. You must hard-code which fields to lock
Q12. What is a common mistake to avoid when selecting controls to apply the Got Focus and Lost Focus events?
A. Selecting only the labels
B. Selecting fields that do not need instructions
C. Selecting both the text boxes and their labels
D. Selecting check boxes instead of text boxes
Q13. What is one benefit for developers of putting instruction text into the tag property rather than in code?
A. Instructions can be translated automatically
B. Instruction updates can be done in design view without editing VBA code
C. There is no need to use event handlers
D. The tag value shows up as default text in the control
Q14. Which event property would you set to =ShowTip for each input control in this example?
A. On Change
B. On Got Focus
C. On Click
D. On Double Click
Q15. According to the video, if every field has a tag instruction, what can you skip?
A. Setting the Timer Interval
B. The HideTip function
C. Naming the InstructionLabel
D. Using the On Load event
Answers: 1-A; 2-D; 3-C; 4-A; 5-C; 6-B; 7-B; 8-C; 9-C; 10-C; 11-B; 12-C; 13-B; 14-B; 15-B
DISCLAIMER: Quiz questions are AI generated. If you find any that are wrong, don't make sense, or aren't related to the video topic at hand, then please post a comment and let me know. Thanks.Summary Today's TechHelp tutorial from Access Learning Zone focuses on a rarely used but very useful feature in Microsoft Access called the Tag property. Many users are not familiar with the Tag property, but it can add significant flexibility to your database applications.
The Tag property is available on the "Other" tab of many controls, such as text boxes, check boxes, and even the form itself. The official documentation simply describes it as "extra data to be stored with the object," but it does not elaborate on practical uses. Think of it as a hidden spot where you can store any tidbits of information related to that object, which you can then reference in your code.
Let me walk you through a basic example today, and in a future lesson we will build on this idea with a more advanced application. One common task is providing users with instructions as they move from field to field on a form. Traditional options include the Control Tip Text, which displays small pop-up text when hovering over a control, and the Status Bar Text that shows at the bottom of the window. While these methods work, they are often overlooked by users and can be limiting.
A better option, and what I will show you today, is creating a prominent instruction label on your form. As users move between controls, this label will display clear instructions related to each field. For example, if the user moves to the "Is Active" field, the label might display a message such as, "Is this customer active on our mailing list?" This approach provides greater visibility and flexibility since you can tailor the message for each field and update it easily.
The trick is to store these instructional messages in the Tag property of the appropriate controls. Then, when a control receives focus, we retrieve its Tag property and display that value in the instruction label. This approach eliminates the need to create individual event handlers specifying different text for each control; instead, the information is maintained right alongside the control's design properties. It makes management and updates far easier.
Before you can implement this, there are a couple of prerequisites. If you are new to VBA in Access, I recommend watching my Intro to VBA course, which will get you up to speed quickly. We will be using Screen.ActiveControl to determine which control the user is interacting with so we can read its Tag property. We will also use the On Got Focus event to trigger our code when a control becomes active.
In a previous tutorial, I demonstrated a similar concept, but the instructions were hard-coded into each control's event. Today, I will show you a cleaner and more efficient method using a generic event handler and the Tag property.
Let me describe the setup. I am working with my TechHelp free template database, which you can download from my website if you want to follow along. For this example, I have created a large label on the form that will serve as our instruction area. I gave it an obvious look – increased the font size, set the color to blue, and made it bold so it could not be missed.
For every field where you want to display instructions, open the property sheet and enter the relevant message into that field's Tag property. For example, for Customer ID, you might note "This is the customer's unique identifier." For address fields, you could specify "Street address only," and so on. Save your form after entering all the Tag values. The beauty here is that you do not need to modify any VBA code to update instructions in the future – just edit the Tag property in the form design.
Next, we need to set up our code to display these instructions. The instruction label needs a name, so I called it InstructionLabel and left its default caption blank. Always adjust the caption property in the property sheet, not directly on the label, to avoid formatting issues.
In the VBA editor, we create two simple functions: ShowTip and HideTip. The ShowTip function sets the label's caption to whatever is in the Tag property of the currently active control, making use of Screen.ActiveControl.Tag. HideTip simply clears the label's caption.
Once these functions are in place, the next step is to assign them to the appropriate events. Select all the fields that should trigger the instructions and set their On Got Focus event property to call ShowTip. Set their On Lost Focus property to call HideTip. If every field on your form will always display a tip, you may not need the HideTip function, but it is there in case you have fields without instructional tags.
Once everything is set up, open your form and test it. As you navigate from control to control, the instruction label updates based on the Tag property of each field. However, you might notice that nothing appears in the label when the form first loads. This happens because Screen.ActiveControl does not yet have a value when the form opens, so the event does not fire.
To handle this, we use a clever trick. Assign a very short timer interval to the form's Timer Interval property (for example, 500 milliseconds), and in the On Timer event, call ShowTip and immediately set the Timer Interval back to zero. This turns the timer off after it runs once. This approach ensures that the instruction label properly updates to the current active control when the form first opens.
You can experiment with different timer intervals to get the desired effect. A brief pause, such as 200 milliseconds, works well and feels almost instant to the user.
I should mention that I have covered the timer interval technique in detail in my separate Load Faster video, which shows how you can improve form performance and user experience with this approach, especially when you have forms that perform complex calculations on startup.
In our next lesson, I will show you how the Tag property can help manage field locking. For example, you might want to keep certain fields editable while locking others when the form first opens. By marking fields with a specific value in their Tag property, you can loop through all controls on the form and selectively lock or unlock them based on that value. This is a powerful technique for fine-tuning user access and workflow.
If you enjoy learning about Access and VBA programming, be sure to check out my developer lessons on the website. There are plenty available, covering a wide variety of topics.
That covers today's lesson on the Tag property in Access and how you can use it to display context-specific instructions to your users. You can find a complete video tutorial with step-by-step instructions on everything discussed here on my website at the link below.
Live long and prosper, my friends.Topic List Introduction to the Tag property in Access controls
Using the Tag property to store field instructions
Setting up an instructions label on a form
Formatting a label for user instructions
Populating the Tag property for different controls
Using the On Got Focus and On Lost Focus events
Writing a ShowTip function to update the label
Writing a HideTip function to clear the label
Assigning event handler functions using properties
Selecting multiple controls to assign events
Updating instructions label dynamically on focus change
Handling form open when Screen.ActiveControl is not set
Using the Timer Interval and On Timer event
Triggering ShowTip on form open with a timer
Disabling the timer after the ShowTip runs
Adjusting Timer Interval for optimal delayPrimary Topics tag property, Access forms, VBA event handling, user instructions, dynamic labels, On Got Focus, On Lost Focus, Timer event Secondary Topics form design, timer interval workaround, multi-control selection, UI/UX in forms |


