Edit Mode 2
By Richard Rost

 15 months ago
Lock Fields with Tag Property in Access In this Microsoft Access tutorial I will show you how to create an edit mode that locks most fields on your form by default, but keeps specific fields like search combo boxes or notes unlocked and always editable. We will use the Tag property to mark which controls should be locked, and then loop through the form's controls in VBA to manage their Locked and BackColor properties efficiently, reducing the amount of manual coding needed in large forms. I will also show you how to use simple error handling for control types that don't have certain properties. Ken from Rancho Cordova, California (a Gold Member) asks: I'm interested in having my form be read-only by default with an Edit button to make it writable. I just saw your videos about Edit Mode. In my case, I have a combo box in the header that selects a record, but it becomes frozen if I set the form's Allow Edits property to False. The only workaround I found is to set the Locked property for all the individual controls, but that's a lot of VBA if the form has many controls. Is this the best way to do it, or is there a better approach? MembersThere is no extended cut, but here is the file download: Silver Members and up get access to view Extended Cut videos, when available. Gold Members can download the files from class plus get access to the Code Vault. If you're not a member, Join Today!
PrerequisitesLinksRecommended Courses
Keywords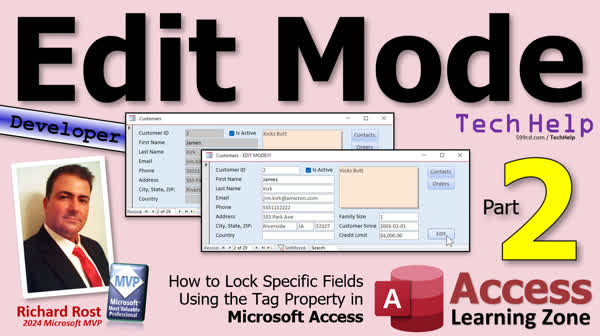 TechHelp Access, edit mode button, lock form fields, AllowEdits property, combo box locked workaround, loop through controls, Tag property usage, lock/unlock specific fields, LockFields subroutine, VBA For Each loop, control Locked property, subroutine for locking fields, dynamic form locking, gray out locked fields, BackColor property, On Error Resume Next VBA, debug immediate window, runtime error trapping, toggle edit mode, save button implementation, preventing accidental edits, user-friendly form security
 Subscribe to Edit Mode 2
Get notifications when this page is updated
Transcript Today we're doing a follow-up to a video I made about three years ago that allows you to create an edit mode for your databases, where normally the user can just view what's on the form.
If they want to edit it, they have to click an edit button, and this prevents accidental changes and things like that.
One downside of the method that I used in that video is that it locks everything on the form, all of the fields.
What if you want to leave certain fields unlocked so that you can edit them regardless? Well, that's what we're going to talk about today.
Today's question comes from Ken in Rancho Cordova, California. That just sounds cool, Rancho Cordova. One of my Gold Members.
Ken says, I am interested in having my form be read only by default with an edit button to make it writeable. I just saw your videos about edit mode. In my case, I have a combo box in the header that selects a record, but it becomes frozen if I set the form's Allow Edits property to False. The only workaround I found is to set the Locked property for all the individual controls, but that's a lot of VBA if the form has many controls. Is this the best way to do it or is there a better approach?
Yes, that is the best way to do it, but you're right. If you have a lot of controls, that's a lot of work. Not only is it a lot of work to write in the first place, but it's a lot of work to maintain it if you add fields or delete fields. You have to constantly update your code.
The best way to do it is to simply loop through all of the controls on your form and lock the ones you've specified. I'm going to show you how to do that today.
But first, this is part two. If you haven't watched part one yet, here's the original video. Go watch this first. This is very helpful, and it includes all the other prerequisites you should know before today, like basic VBA and stuff like that. So go watch this video first, for sure.
We're also going to use the Tag property today. I just released this video yesterday, so go watch this.
We are going to use a For Each loop to loop through all of the controls on our form. We are not going to create a function today, but we are going to create a subroutine today. It's very similar to this. The team just doesn't return a value like a function does, but go watch this so you understand how to create your own procedures, subroutines, and functions.
These are all free videos. They're on my website. They're on my YouTube channel. You will find the links down below. Go watch those, and then come back.
OK, here I am in the TechHelp Free template. This is an older version that I built three years ago that I used for the original video. And in here, you can see that if I try typing, I can't. I'm trying to type right now. All these fields are locked. Everything's locked. I have to hit the Edit Mode button, and it goes into Edit Mode. It says right here.
In the extended cut, I show you how to do cool stuff like change the colors and all that. That's not a big deal. But now I can come in here and I can edit stuff.
Now the problem that Ken is having is that he's got a search combo box across the top of the form, and that will also get locked with this method. I have a video on how to do that where you can put a combo box up here, and it will search for records based on the data in your form. But this will become locked, which means you can't change its value. And why is that? Well, it's what we used to lock this form.
If you go into the Edit Mode button, you will see it's right here. Me.AllowEdits = True, Me.AllowDeletions = True. Otherwise, it's False. We set that in the Form Current event. Once you set AllowEdits to False, that means all of the fields are locked. The user can't change anything, even on unbound fields.
So what we're going to do instead is use the Locked property of each individual control.
Now, to do them all would be time consuming because you would have to say FirstName.Locked = True (if I could spell Locked). This is the Form Current event. LastName.Locked = True. And so on through all of them. That becomes a nightmare of updating all of your forms. You would have to type them all out here once for every single control on here that you want to lock. But if you add stuff, if you delete stuff, you have to come in here and change your code, which I hate to do.
So what we're going to do instead is use the Tag property. We're going to tag the fields that we want to lock. Then we are going to loop through all of the fields on the form and lock the ones that have that tag.
Come back in over here. We're going to go into the properties. Remember from yesterday's video, we have this Tag property on here. It's just sitting there waiting for you to do something with it. We're going to do something cool with it right now.
I want you to click and then hold down the Shift key and click on all of the controls in here, the text boxes that you want to lock when this routine runs. Let's also lock this checkbox. We're going to leave Notes unlocked, so no matter what, the user can come in here and change the Notes. They don't have to go into edit mode. We will leave this guy unlocked just to show that this works.
Now over here in the Tag property, we're going to put something unique so that when our code runs, it knows which fields to lock. I'm just going to put in lock me. One word, lock me. We're going to look for that in our loop.
Let's save changes. That should be applied to all of those fields now. They should all have lock me. If you click on any one individually, it will say lock me. Lock me. Lock me.
Back into our code. Now I'm going to call this code twice. I'm going to call it here and I'm going to call it here. I'm just going to flip the value whether we're locking it or not. So we're going to make that our own sub routine up here.
This will be a Private Sub. We're going to call it LockFields. And we're going to send into it a value: are we locking or not locking? Are we locking or unlocking? We'll call it DoLock. That will be a Boolean, yes/no, a true/false value.
How do we loop through all of the fields on a form? Well, those fields are actually called controls.
We're going to Dim ctl As Control. So ctl is now a variable that is of type Control. What's a control? All of these things are controls. The labels are controls. These buttons are controls. These are all controls.
We're going to loop through all of them. How do you loop through all of them? We're going to say For Each ctl In Me.Controls ... Next. That's a For Each loop.
Now, inside this loop, we can access each one of those controls. It's going to loop through every control on the form. We're going to say if ctl.Tag, if the Tag property of the current control says lock me (that's the text in the tag), if that's the case, then ctl.Locked equals either True or False. We're sending that value in here as DoLock. So DoLock. End If. That's the end of our loop.
That's it. That's how you loop through all of the controls on the current form. Me is the current form, whatever form you're on. In each loop, the ctl value gets set to whatever control we're on. FirstName, LastName, all the labels, combo box, all the stuff.
If we see lock me in its Tag property, basically don't put lock me in the Tag property of any type of control that can't be locked. Otherwise, you'll get an error.
Now down here in our Form Current event, we're going to say LockFields True. As we move through the records and open up the first one, we're going to lock all the fields. Then in here, we'll get rid of this. Now we'll say LockFields False when they click on the Edit button. We're going to unlock everything.
Debug Compile once in a while. Come back out here. Save it. Close it. Open it. Oh, locked. Locked. I'm trying to type. Locked. This is unlocked. Oh, wait a minute. Oh, wait. Hold on. I can't type in here. What's going on?
I'm glad this came up because in the original database, remember what we did is set all the properties in here for the form to AllowEdits: No, AllowDeletions: No. Those are the default properties for the form itself, so we have to turn those back on to Yes.
Otherwise, you can't make changes. Remember, our code before would switch those values.
Glad that came up because in case you're using the same database, you'll be scratching your head just like I was for about three seconds. I'm like, wait a minute. What happened?
Save it. Close it. Open it. Now we should be able to not edit here, and we can edit here. Good.
Can't edit there. Hit the Edit button. Boop. We're in edit mode now. Now these fields are all unlocked. If I move to the next record, they should get locked again, which they did. Beautiful. Perfect.
One more thing. Bonus time. It's bonus time. Are you ready for some bonus? Bonus time. Excellent.
I was thinking about throwing this in an extended cut, but it's too short to make an extended cut out of, so I figured I'd just make it a bonus.
Are you ready? How about we gray out all the fields when they're locked? That way the user can visually see that they're locked. Come back in here.
We're going to say if DoLock, then ctl.BackColor = ... What do you want to make it? I'm going to use gray, and I like to control the colors with the RGB function. I'm going to go 200, 200, 200. That's a dark gray. Otherwise ctl.BackColor = vbWhite. There is a constant for that. We can use that.
Of course, I have a video on RGB and how to use all the colors if you want to learn more.
So if we're locking, set these colors to gray. If not, set them to white. Debug Compile.
Now, something interesting is about to happen. Watch this. Save it. Close it. Close it. Open it.
Oh, object doesn't support this property or method. What's going on? Debug. ctl.BackColor. What does that mean? You can't see what the control is. If you want to do a little troubleshooting, if you can't figure it out, you could come in. Look at those. That's interesting. Look at that. It's got some of them gray, but it didn't for others. I'll explain why in a second.
If you want to know what the control is, watch this. Just for some troubleshooting in here, I'm going to go Debug.Print ctl.Name. What does Debug.Print do? It prints down here in the Immediate Window, which you can't see right now. Turn on the Immediate Window. That's a little window down here. That's where all your debug messages go. I have a whole separate video on the Immediate Window. Here it is. I'll put a link down below.
But what this will do is it will let you see the name of the control before it throws that error. Save it. Debug Compile.
Notice some errors will get through the compiler. There are no compile errors here. This is what's called a runtime error.
Now, let's do this again. Open her up. Oh. Okay. Look at this. Object doesn't support this method. Debug. So what is control name? It's isactive. See, the last one down here is isactive. What is isactive? Let's stop the compiler. Isactive is the checkbox. Checkbox doesn't have a BackColor property. That's what is throwing the error message.
There are a couple of ways you can handle this. We can turn this off. Now we can get rid of this.
There are a couple of ways you can handle it. First, you could check to see what the type of control is and if it has a BackColor property. That's a lot of work, but you can do that. The other thing you could do is use some basic error handling.
Before the stuff that you know is going to throw an error, say On Error Resume Next. And then after it, say On Error GoTo 0. That will turn error handling back off. Because you want to know if this is going to throw an error message. That's important.
But for this, you know it's going to throw an error message. Sometimes that's OK. We'll just ignore errors right now and then turn it back on. This is done. I do this all the time.
There is no shame in using On Error Resume Next as long as you use it responsibly. It's like there's no shame in having a glass of wine with your steak. Just drink responsibly.
Of course, I have a video on error handling. Go watch this if you want to learn more.
Now Debug Compile and then close it. Save changes. Yes. Close it. Close it. Save it. Open it. Ready. Go. No errors and everything is properly grayed out. They can't click on that. Can't change that. It's a little change here. Let's go into edit mode. Click. Oh, look at that. Isn't that pretty?
Can you make this a toggle button? Sure, you can make it toggle so you could toggle back and forth between edit and not edit. I figured once you're into edit mode, it's pretty much done. You could change this to a Save button.
I have another video that I cover on how to do that, how to make a Save button. A lot of people, especially people who are coming from Excel, are used to having to save their work when they're done with it. They don't realize that if you just close this, Access saves that data for you.
Here is that video. Just make a Save button. Turn that Edit button into a Save button. Just change the caption on it.And then all you have to do is read the properties of one of the fields or read the caption if it says edit mode. Then you could just switch it back and lock all the fields again, or close the form, or whatever you want to do.
My job is just to show you all the Legos. You put them together however you want.
Speaking of the Legos, if you like this stuff, if you like learning VBA programming with me, if you are enjoying it, and if you want to make your databases go to a whole new level, check out my developer lessons.
My developer lessons do not jump around like the TechHelp videos do. The TechHelp videos, I have to say, well, we are going to do this, I am going to do that. It is pieces and parts from different videos.
The developer lessons are designed step by step from the beginning to cover stuff in order, the way you should learn it. So it is all one continuous thing.
And yes, I have lots and lots of videos. If you like my style, come and check them out. You will find a link down below.
But that is going to do it, folks. That is your TechHelp video for today. I hope you learned something.
Live long and prosper, my friends. I will see you next time.
TOPICS:
Creating an edit mode while selectively locking controls
Using the Tag property to identify controls to lock
Looping through all controls with a For Each loop
Writing a subroutine that receives a Boolean for lock state
Applying the Locked property based on the Tag value
Applying conditional formatting by changing BackColor
Handling runtime errors for controls without BackColor
Using On Error Resume Next and On Error GoTo 0 for error handling
Ensuring form properties like AllowEdits and AllowDeletions are set correctly
Calling the lock routine from Form Current and Edit button events
COMMERCIAL:
In today's video, we're continuing with the edit mode technique from a previous lesson. You'll learn how to let users keep certain fields on an Access form unlocked while locking the rest, so you can always edit ones you need, like a search box, while protecting others from accidental changes. I will show you how to tag fields you want to lock, write a VBA subroutine to loop through all form controls, lock only the tagged ones, and even use the Tag property and For Each loop in VBA. As a bonus, I'll show you how to gray out locked fields and use simple error handling in your code. You'll find the complete video on my YouTube channel and on my website at the link shown. Live long and prosper my friends.Intro In this video, I will show you how to enhance edit mode in your Microsoft Access forms by selectively locking certain controls while allowing others, like a search combo box, to remain editable. You'll learn how to use the Tag property to identify which fields to lock, write a VBA subroutine that loops through all controls on the form, and apply the Locked property based on tag values. I'll also cover how to visually gray out locked fields and handle runtime errors when controls do not support the BackColor property, making your forms more user-friendly and easier to manage. This is part 2.Quiz Q1. What is the main advantage of having an 'edit mode' in a database form?
A. It allows users to automatically update records without confirmation
B. It prevents accidental changes by requiring users to explicitly enter edit mode
C. It hides sensitive data from all users
D. It automatically backs up the database
Q2. What is the downside of setting the form's AllowEdits property to False to create a read-only mode?
A. It deletes all data from the form
B. It locks all controls, including those you may want to remain editable
C. It hides all controls except buttons
D. It prevents the form from opening
Q3. What was Ken's issue with the original edit mode technique?
A. The combo box in the header used for record selection became locked and unusable
B. The form would not display any records
C. The database would corrupt on entering edit mode
D. The buttons would disappear
Q4. What is the suggested solution for locking only specific controls on a form?
A. Set AllowEdits property to False for the form
B. Use the Locked property of each individual control you want to secure
C. Delete all unwanted controls
D. Place all controls in subforms
Q5. What is the main drawback of manually setting the Locked property for each individual control in code?
A. The code does not work for checkboxes
B. It requires hardcoding and is difficult to maintain as fields are added or removed
C. It prevents the form from opening
D. It significantly slows down form loading
Q6. What property is recommended for identifying which controls should be locked in the subroutine?
A. Name property
B. ControlSource property
C. Tag property
D. Visible property
Q7. How does the recommended subroutine determine which controls to lock?
A. By checking if the control's Tag property matches a specific value
B. By checking if the control is visible
C. By checking the label caption
D. By looping through only textboxes
Q8. When creating the code to lock fields, what type of argument is passed to indicate whether to lock or unlock the controls?
A. String
B. Integer
C. Boolean
D. Currency
Q9. In the For Each loop for controls, what variable type is used for the control variable?
A. Variant
B. Control
C. Object
D. Collection
Q10. What should you be cautious about when using the BackColor property in the lock/unlock routine?
A. Only textboxes and combo boxes support BackColor, not all control types
B. It changes the font color instead
C. It can cause the database to close
D. It deletes existing data
Q11. What technique is demonstrated to prevent runtime errors when changing properties that some controls do not have?
A. Using Stop statement
B. On Error Resume Next to skip errors for unsupported controls
C. Using If statements for every control property
D. Deleting all unsupported controls
Q12. What is the role of Debug.Print in the code example?
A. It prints values to an external file
B. It displays the value in the Immediate Window for troubleshooting
C. It highlights errors in the Current event
D. It changes the value of the control
Q13. Why is it important to turn AllowEdits back to Yes for the form when switching to the new lock/unlock strategy?
A. The new approach depends on the form's AllowEdits property to allow any control to be edited
B. AllowEdits must be set to No for code to function
C. Locking properties of controls only work with AllowEdits set to No
D. It prevents users from printing the form
Q14. Why is it helpful to visually gray out locked fields?
A. It prevents users from seeing the data
B. It provides a visual cue that the field is read-only
C. It reduces eye strain
D. It speeds up data entry
Q15. What is the correct statement about error handling with On Error Resume Next in this context?
A. It should always be used in all procedures
B. It can hide important bugs if not used carefully
C. It is only allowed in public procedures
D. It only works in Access 2007 and later
Q16. What is the main difference between a subroutine and a function in VBA, as discussed in the video?
A. A subroutine can return multiple values
B. A subroutine does not return a value, unlike a function
C. A subroutine can only be used for mathematical calculations
D. A subroutine cannot execute code
Answers: 1-B; 2-B; 3-A; 4-B; 5-B; 6-C; 7-A; 8-C; 9-B; 10-A; 11-B; 12-B; 13-A; 14-B; 15-B; 16-B
DISCLAIMER: Quiz questions are AI generated. If you find any that are wrong, don't make sense, or aren't related to the video topic at hand, then please post a comment and let me know. Thanks.Summary Today's TechHelp tutorial from Access Learning Zone covers an enhancement to the edit mode feature for Microsoft Access forms. In the past, I showed you how to create a read-only mode on your forms by default, allowing users to view records without making accidental changes. You could activate editing only by clicking an Edit button. While this method is effective in preventing unwanted edits, it came with a limitation: it locks every field on the form, which might not be what you want if you still need some fields to remain editable.
This lesson addresses a common situation. Say you have a combo box in the form header that lets you search for or select records. When you set the form's AllowEdits property to False, this combo box (or any other unbound control) becomes locked as well, so users cannot interact with it, even though it does not directly edit records. You could manually set the Locked property for every single control you want to prevent editing, but with many fields, that quickly becomes a maintenance nightmare. Any time you add or remove fields, you have to update your code as well.
The best solution is to use a loop in VBA to cycle through all the controls on a form and lock only those you want. Instead of hardcoding the names of each field into your VBA, you assign a special tag value to the controls you want to lock or unlock, then loop through all controls and check if their Tag matches. In this way, the process stays manageable even as your form grows or changes.
Before getting started, be sure you are familiar with the concepts from part one of this series, and also make sure you understand how the Tag property works and how subroutines and loops are built in VBA. If you need a refresher, I have free videos covering all of these available on my website and YouTube channel. Links to these resources are provided at the end of this article.
In my demonstration, I use the TechHelp Free template from the earlier video to illustrate. These examples begin with all fields locked so users cannot type into them until Edit Mode is activated. The challenge arises when you want a combo box, placed for record selection, to always be available, even while everything else is locked down. The issue is that when AllowEdits is switched off for the form, all controls, including the combo box, are uneditable.
The solution is to stop using the form's AllowEdits property and instead control locking at the individual control level. Normally, you would have to set the Locked property for every control manually, which is tedious and error-prone. The more efficient way is to use the Tag property. By entering a consistent string such as lock me in the Tag for all fields you wish to lock, your VBA can simply check for this tag as it loops through the controls.
You choose which fields to lock by selecting them in design view (hold Shift to select multiples), then entering lock me under the Tag property. Fields without this tag, such as your Notes box or the search combo box, will stay unlocked, so they remain usable regardless of the toggle state for editing.
The subroutine you create will accept a Boolean value to determine whether to lock or unlock tagged controls. Using a For Each loop, it checks each control. When it finds one with the designated lock me tag, it sets the Locked property according to the parameter you passed. This approach is efficient and easy to maintain. Add or remove tagged fields as needed, and the code works without further modification.
A quick warning: If you set AllowEdits and AllowDeletions properties of the form itself to No, you need to revert them to Yes, or your locking routine will not allow any changes even when you want it to. Be sure to double-check these settings if something is not behaving as expected.
For a visual queue, you might want to change the background color of fields that are locked, for instance, making them gray. This is done by setting the BackColor property inside your loop. However, not all controls support BackColor, so if you try to apply it to, say, a checkbox, you'll get an error. There are two ways around this: One is to check the control type before altering its appearance, and the other is to use simple error handling. By wrapping the color-changing lines in On Error Resume Next and resetting error handling with On Error GoTo 0, you can bypass errors for non-applicable controls with minimal fuss.
If you want to provide a toggle—switching back and forth between edit and view modes—it is possible. Alternatively, you can convert the Edit Mode button to a Save button to mimic the workflow familiar to many Excel users. Access saves data automatically as changes are made, but if you want to give users a Save action, I have additional tutorials to walk you through setting that up.
As always, my goal is to provide you with building blocks—methods and techniques you can combine in different ways to suit your project requirements. If you are enjoying these lessons and want a more structured, comprehensive experience, consider exploring my developer courses. Unlike TechHelp tutorials, which often focus on individual solutions, my Developer series provides a step-by-step path through Access development in an organized way.
You can find a complete video tutorial with step-by-step instructions on everything discussed here on my website at the link below. Live long and prosper, my friends.Topic List Creating an edit mode while selectively locking controls
Using the Tag property to identify controls to lock
Looping through all controls with a For Each loop
Writing a subroutine that receives a Boolean for lock state
Applying the Locked property based on the Tag value
Applying conditional formatting by changing BackColor
Handling runtime errors for controls without BackColor
Using On Error Resume Next and On Error GoTo 0 for error handling
Ensuring form properties like AllowEdits and AllowDeletions are set correctly
Calling the lock routine from Form Current and Edit button eventsPrimary Topics Microsoft Access forms, selective field locking, VBA subroutine, Tag property usage, looping through controls, locked property, error handling, UI feedback with BackColor
Secondary Topics runtime errors, debugging, user interface usability, record navigation
|


