Popup Over Control 2
By Richard Rost

 13 months ago
Popup Form Over Active Control, Return Value, Part 2
In this Microsoft Access tutorial I will show you how to pass values back from a modal popup form to the original control using TempVars, set up event handling for reusable popup functions, and make it easy to add popups to multiple fields and forms by using a public function for the On Click event. This is part 2.
Members
In the extended cut, we will cover how to work with subforms, including detecting if a control is on a subform, figuring out subform coordinates inside the main form, and determining which row you are on. I will show you how to handle pop-up over controls on subforms, which involves more advanced coding than with standard forms.
Silver Members and up get access to view Extended Cut videos, when available. Gold Members can download the files from class plus get access to the Code Vault. If you're not a member, Join Today!
Prerequisites
Links
Recommended Courses
Keywords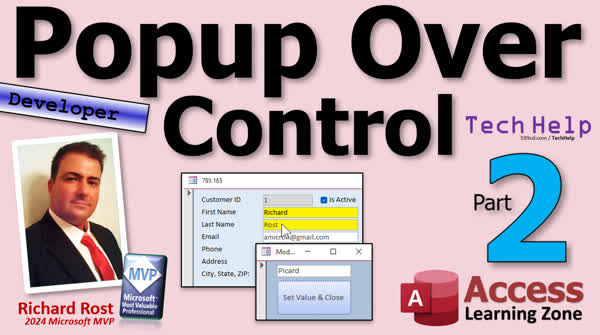
TechHelp Access, pop-up over control, modal form value return, tempvars usage, passing values between forms, vba on click event, global module function, public function event handler, control name referencing, forms collection, subform value return, dynamic default button, form object manipulation, extended cut tutorial
Intro In this video, we continue with part 2 of the pop-up over control series in Microsoft Access. I will show you how to use TempVars to store the calling form and control names so you can return values from a modal pop-up form to the right place. We'll cover coding the close button to send data back, updating object variables, making the button the default for Enter key activation, and converting the code into a global public function for easy use across multiple forms. You'll also see how to assign this function to on click events and apply it to other fields and forms. This is part 2.Transcript Today's part two of my pop-up over control series. If you haven't watched part one yet, you should go watch part one first and then come back.
Yesterday we figured out how to get our active control, active form, set the coordinates, open up the modal form there, and send the value to it. Now when I click over here, I get it over there, puts the value. Now we just have to code this button so that when I change this value and hit this, it closes this form and puts the value there.
Now the problem is that when I open up this form, it no longer knows what the active control and active form were that opened it. We have to tell it or store that information in a temporary variable. I like using tempvars. Let's use tempvars so we can tell this form where it has to send its value back to. We can do that right here.
We can say tempvars and let's give it a name like calling control, the control that called it. Equals, active, active, control, dot name. We also need the form name tempvars because you could have a control on a different form with the same name. Calling form equals active form dot name. Now we know where that value has to go back to.
We just have to go over to the other form, the modal form, this guy. Click design view. Go into the button's code build event. I don't want to call it command four because then Alex will yell at me. So let's go give our button a name. I always forget that until I get into the VBA editor and realize I need to rename the button. Command four, I hate that. We'll just call it the close return button.
Now we can right-click build event and in here, we'll put our code. We're going to dim some variables first. We have dim formName as a string and controlName as a string. Those are the actual names. Then we're going to need some objects to work with. So dim frm as a form and ctl as a control.
When the calling form ran its function, it set those tempvars with the form name and the control name so that this form knows where to put them back to. For formName, we're just getting those tempvars: tempvars("calling form"). And controlName equals tempvars("calling control").
I really can't type today. I think I have not had enough coffee yet. My typing speed and accuracy improve in direct proportion to the amount of caffeine in my system.
Now that we've got the names, let's set objects to those variables. So set frm equals forms(formName). That's the forms collection. It's a collection of all the forms in the system. Which form do we want? formName. You could put forms("customerf") in quotes, forms("orderf") in quotes or if it's already a string variable, it's just forms(formName).
Now that we have a form object, we can use the controls object, which is a collection of all the controls on a form, to point to the specific control we need. So set ctl equals frm(controlName), just like that. You could say frm.controls("controlName") if it makes more sense to you, but that's a shorthand notation. It's frm, a form object, and then controlName like that.
And remember, when you set it, you got to forget it. So set frm = nothing, set ctl = nothing, just to clean up your memory.
So we've got the form, we've got the control, we know where the value has to go, let's set its value. ctl.value equals whatever that return value is. That is a field on this form. Send that back to wherever you came from.
Now we're basically done. DoCommand.Close acForm, Me.Name, which is the name of the current form. I always like to throw in there acSaveYes. That is just for you, the developer, that says, if you close this form, it's just going to save any changes you made. If you don't put that, it's going to prompt you, which is annoying. You're almost never going to say acSaveNo because your users don't have access to change forms. You've locked them down. They're using an ACCDE file. So I just want to find any changes, so yeah, go ahead and save them.
That's it. Save it. Debug Compile once in a while. Close it. Close everybody. Open it. Click. I'm going to type in Picard. Get my closed form and return value and boom, Picard goes right there.
Isn't that nice? Isn't that special? And the form's dirty, so you can still hit Escape if you don't like the change. Close that.
Because modal forms will force that navigation pane to close, your users don't have access to that anyway. When you click on it here, it's nice and smooth. Canada.
Let's make this the default button. So when this guy opens up, right-click, design view, and we're going to make this be the default button. When the user presses Enter, it pushes it. Save it. Close it. Click it. USA. Enter. And it goes right back there. Click. Rick. Enter. And it goes right back there.
Isn't that cute? One more little enhancement we're going to make. Now every time you want to put this in a field, you have to click on it, go to events, add it in the on click event. Wouldn't it be nice if this was a function we could just use everywhere because there is nothing in here that relates to the customer form? I wrote it that way intentionally.
Yeah, we're referring to modal form, but that's the same form that we're opening. You could even change that if you wanted to. You could put a form name in here. If you had different forms like for text picker, a different one for date picker, or whatever, you could specify what you wanted in here or even look at the data type of the field that you're opening. That's a whole different story.
This is just the only thing in here that's unique to the form. We could take this whole thing, cut it out, go over to a global module like this guy, a global system module, and paste that in here.
Now we're going to change this to Public. Now everybody can use it. I'm going to change this to Function. Now we can use it as an event handler. If you don't know what an event handler function is: if you make it a public function, you can just refer to it as a function. Go watch this video for more information.
So now I could say PopUpOverControl pretty much anywhere in the entire database. Watch this. This guy and this guy, I held down the shift key, selected them both, their on click event is going to be equals. You have to start off with the equal sign, PopUpOverControl. See, it shows up in the IntelliSense now. Then I put my empty parentheses at the end of it.
I'll zoom in so you can see it better. My pop up box got huge. When I'm working with it on my own for my database stuff, I make it much bigger. That's what's in there.
Save it. Close it. Open it. And watch this. Click. See. Now watch how easy it is to add it to a different field. All I have to do is come in here, put that in as the on click event. Just like that.
Of course, you want to change that color with a little format painter. See? Now every field you want can be clicked.
You could go to other forms. You could go to the customer list form. Right-click. I think this one's read-only. Let me see. Oh no, it's not. You can do it here too. Right-click. Design view. Let's take last name. I'll make it blue. I'll put the on click event as that. Save it. Close it. Open it. I'll pick Reynolds. Change it to XXX. And there you go.
We can go to the order form. Design view. Let's change the starship parts, the description here. Again, we'll do format, make it blue. On click, done. Save it. Close it. And there you go.
Now here's where a problem comes in. Subforms. Subforms are a whole different ball of beans, ball of wax, bag of beans, whatever you want to call them. Subforms require a lot more coding because you have to figure out if it's a subform first. Then you have to figure out the subform's coordinates inside the main form. Then you have to figure out which row you're on. It's a lot.
But, I've already done it, and I will be showing how to do it, or how it's done, in the extended cut. Silver members and up get access to all of my extended cut videos. Not just this one, all of them. There are hundreds of them now.
Gold members can download these databases and you get access to my code vault where I have lots of code, including this stuff. Everybody gets some free training, so check it out.
Here's my sample database; I used yellow in mine when I was building it and I did not put the send the value in. This is my prototype database. I was playing around with it for about an hour or so. That's a standard post that's something in the forums, trying to do this, and I thought I needed to figure it out.
I knew how to do it with a regular form. When you're working with a subform, there's a lot more involved. There are different sections in here. You have to figure out if it's in the footer, what row you're on. It's a bit of a pain, but I figured it out. So we'll be doing that in the extended cut.
In Access Developer 51, I'm going to teach you how to take all of this stuff and turn it into a class module. But that, my friends, is a tale for another day.
That is going to be your TechHelp video for today. I hope you learned something. Live long and prosper, my friends. I'll see you next time, and members, I'll see you in the extended cut.
TOPICS:
Storing calling form and control names using TempVars
Setting TempVars from the calling form
Using TempVars to identify return targets
Renaming the command button for clarity
Building the button click event code
Declaring and using variables for form and control objects
Retrieving TempVars values in the modal form
Setting form and control objects dynamically
Assigning values to controls on another form
Cleaning up object variables after use
Closing modal forms and saving changes automatically
Making a button the default for Enter key activation
Converting code to a public global function
Using a public function as an event handler
Assigning a global function in the On Click event
Applying the function to multiple fields and forms
Using Format Painter to standardize field appearance
COMMERCIAL:
In today's video, we are continuing with Part 2 of our pop-up over control series in Microsoft Access. You will learn how to store the calling form and control names in TempVars so data can be returned easily from a modal pop-up form. I will show you how to find your target control using form and control objects, set values, and make the close button save changes and return data with ease. You will also see how to turn this code into a public reusable function so you can add pop-ups to other forms and fields fast. And in today's Extended Cut, we will cover handling pop-ups inside subforms which takes a bit more advanced coding. You'll find the complete video on my YouTube channel and on my website at the link shown. Live long and prosper my friends.Quiz Q1. What is the primary purpose of using TempVars in the pop-up over control implementation described in the video?
A. To permanently store user preferences across sessions
B. To pass information between forms about which control and form initiated the pop-up
C. To store database connection strings securely
D. To track how many times a button is clicked
Q2. What two pieces of information are saved to TempVars when opening the modal form?
A. The current date and user name
B. The calling control's name and the calling form's name
C. The list of all open forms and the selected record ID
D. The database file path and the Access version
Q3. Why is it important to clear object variables like frm and ctl by setting them to Nothing after use?
A. To speed up the execution of code significantly
B. To refresh the user interface automatically
C. To free up memory and avoid potential references lingering
D. To reset all form fields to their default values
Q4. What does the line DoCommand.Close acForm, Me.Name, acSaveYes do in the context of the modal form?
A. Closes all open forms without saving
B. Prompts the user to save before closing the form
C. Closes the current form and automatically saves any changes
D. Deletes the form from the database
Q5. How does making the button the "default button" on the modal form improve user experience?
A. It allows the user to close the form by pressing Tab
B. It prevents accidental data entry in other fields
C. It triggers the button's action when the user presses Enter
D. It disables all other command buttons on the form
Q6. Why is the PopUpOverControl function moved to a global module and made Public?
A. To restrict its usage to certain forms only
B. To add additional security for user logins
C. To make the function accessible from anywhere in the database
D. To force the use of only one pop-up at a time
Q7. What is a key advantage of using a public event handler function like PopUpOverControl in Access?
A. It automatically runs on every form load
B. It can be assigned easily as an event handler for many controls
C. It disables editing in all other forms
D. It generates SQL queries for data manipulation
Q8. What must you type in the On Click event property to run the PopUpOverControl public function?
A. Call PopUpOverControl
B. PopUpOverControl()
C. =PopUpOverControl()
D. OnClickPopUpOverControl
Q9. What challenge is mentioned with implementing this solution on subforms compared to regular forms?
A. Subforms do not support events
B. Identifying the correct row and calculating coordinates is more complex
C. Subforms cannot call public functions
D. Subforms always lock the database
Q10. In the solution described, which of the following is NOT a unique element specific to the original form that opens the pop-up?
A. The modal form's name in the function call
B. The value being sent to the modal form
C. The function itself, as it is designed to be generic
D. The use of TempVars to pass the calling control and form names
Answers: 1-B; 2-B; 3-C; 4-C; 5-C; 6-C; 7-B; 8-C; 9-B; 10-C
DISCLAIMER: Quiz questions are AI generated. If you find any that are wrong, don't make sense, or aren't related to the video topic at hand, then please post a comment and let me know. Thanks.Summary Today's TechHelp tutorial from Access Learning Zone continues my series on pop-up over controls in Microsoft Access. If you have not yet watched part one, I recommend checking that out first before moving on with this lesson.
Previously, we worked out how to identify the active control and form, determine the coordinates and position the modal pop-up form right above it, and pass the value from the original control to the pop-up. Now, when I select a control and open the pop-up, the value is transferred as expected. The next step is to program the button on the pop-up so that when a value is changed and confirmed, that value is transferred back to the original control, and the modal closes.
There is a challenge here: once the modal form is open, it no longer retains information about which control or form triggered it. To address this, we need to explicitly store that information before opening the pop-up. I like to use temporary variables, or tempvars, for situations like this. Tempvars allow us to identify where the pop-up was launched from so that we know where the returned value should go.
To do this, I store the names of both the calling control and the calling form into tempvars right before opening the modal form. Naming conventions like "calling control" and "calling form" work well. This way, the pop-up always knows exactly where to send the updated value, even if there are controls with similar names on different forms.
Now, shifting attention to the modal pop-up itself, I head into design view to ensure the button is appropriately named; good naming habits are important, as default names like "Command4" are not helpful. I rename the button to something like "close return button" so the purpose is clear, especially when jumping into the VBA editor.
Inside the button's code, we start by setting up variables to capture the form and control names from tempvars, and define objects to reference the corresponding form and control directly. Once we have those, we can retrieve the values from tempvars for both form and control. With these, we can reference the correct form and control objects in the database. Setting objects like this allows us to alter the value of the targeted control from within the modal form.
After updating the target control with the selected value from the pop-up, the form closes. I use the DoCommand.Close statement to shut the modal, specifying the current form's name and urging Access to save any changes automatically by including the acSaveYes argument. This approach prevents unnecessary prompts and ensures changes are secured. Given that most users work with compiled ACCDE files, they don't have the ability to alter forms anyway, so saving is low-risk.
Testing the setup, if I enter a new value, like "Picard," and close the pop-up, the value seamlessly updates in the originating control. The form remains "dirty" after the change, so you still have the option to hit Escape if you need to undo it.
Modal forms in Access automatically restrict navigation pane access, further streamlining the user experience. Everything stays smooth as you interact with the controls.
For added usability, I set the confirmation button in the modal to be the default, so pressing Enter will activate it. This makes the process faster for the user: type a value, press Enter, and the result immediately returns to the correct field.
To make the solution more flexible, I package everything into a global module and convert the pop-up launch routine into a public function. This allows you to trigger the pop-up from virtually any control across your database by simply referencing the public function in the control's on click event. This modular approach means nothing in the code is tied to a specific form, so you can reuse it wherever you like without re-writing anything.
As a demonstration, I show how easy it is to apply this to other fields and forms in the database. By inserting the function call into a control's on click event and optionally formatting that control, you enable pop-up functionality in just a few seconds, whether you are working on customer forms, list forms, or even order forms.
However, when it comes to subforms, additional complexity arises. Handling subforms involves more intricate coding: you must determine if a control exists on a subform, identify its coordinates relative to the parent form, and identify the current row. This is a more advanced topic and will be covered in detail in the extended cut of this lesson. Silver members and up will have access to all extended cut videos, which now number in the hundreds.
Gold members also gain access to my downloadable databases and the full code vault, where you'll find all kinds of useful code samples, including the techniques and routines shown in this tutorial. Of course, I have plenty of free training material available as well, so explore my site for more resources.
While working on my own, I built a prototype database to experiment with this pop-up over control technique by using temporary values and navigation. The process is straightforward with regular forms, but managing this in subforms requires special logic for different sections, such as footers or continuous rows, which I cover in the extended materials.
Looking ahead, I will show how to turn this functionality into a class module in Access Developer 51.
That wraps up today's TechHelp tutorial. If you want to follow a complete video walkthrough with all the hands-on VBA steps and demonstrations, you will find it on my website at the link below.
Live long and prosper, my friends.Topic List Storing calling form and control names using TempVars
Setting TempVars from the calling form
Using TempVars to identify return targets
Renaming the command button for clarity
Building the button click event code
Declaring and using variables for form and control objects
Retrieving TempVars values in the modal form
Setting form and control objects dynamically
Assigning values to controls on another form
Cleaning up object variables after use
Closing modal forms and saving changes automatically
Making a button the default for Enter key activation
Converting code to a public global function
Using a public function as an event handler
Assigning a global function in the On Click event
Applying the function to multiple fields and forms
Using Format Painter to standardize field appearance |


