Recycle Bin
By Richard Rost

 14 months ago
Send Records to a Recycle Bin in Microsoft Access
In this Microsoft Access tutorial I will show you how to create a recycle bin feature for your database, similar to Windows, so deleted records are easily restorable. You will learn how to prevent direct deletions in forms, add a recycled records button with user confirmation, and use VBA to read record data and store it in a separate table. This class covers working with recordsets, looping through fields, basic SQL, and message boxes for user interaction. This is part 1.
Prerequisites
Links
Recommended Courses
Up Next
Keywords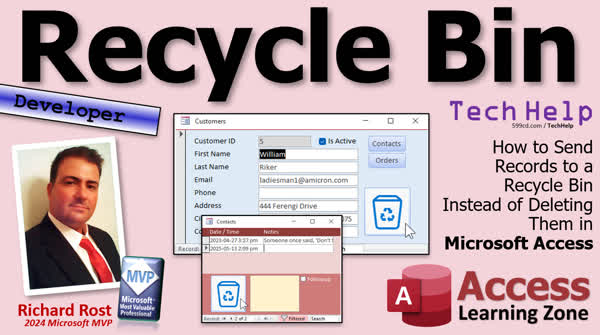
TechHelp Access, recycle bin, soft delete, isdeleted field, restore deleted records, inactive records, database trash, undo delete, vba recycle bin, vba recordset, vba message box, suppress deletions, user confirmation, archive deleted data, multi-table recycle bin, record field loop
 Subscribe to Recycle Bin
Get notifications when this page is updated
Transcript Welcome to another TechHelp video brought to you by AccessLearningZone.com. I'm your instructor, Richard Rost.
Today we're gonna build a recycle bin just like Windows has, so when you delete a file, it's not gone gone. It just is in the recycle bin, and then you can go in there and find stuff that you deleted. If you need it, well, the data's right there. You can go and then recreate the record, and that's what we're gonna talk about today.
I've done several different videos, including this one, on why you shouldn't delete important data. You could delete temp data, sure, but if it's a customer or an order or product information, don't delete it. Mark it inactive or something because that data might be important in the future.
Now I know a lot of you might have databases that you've built, and like some like mine, my database is 20 years old, and it would be difficult to go through if I wanted to add an "IsActive" or an "IsDeleted" field. It'd be difficult to go through my entire database and have all of the other forms, queries, and reports recognize that field. I would literally have to update hundreds of different objects.
So with that being said, if you've got an older database you've been working with for a while, and you want to make it so that you don't have to retroactively try to fit that in, you can make a recycle bin. A recycle bin basically will just be a table that'll hold whatever information you want to throw in it. If you want to delete a customer, you just throw it in the recycle bin. It'll be tagged as a customer. That way you've got its information.
So if a year from now, someone says, "Hey, you know that customer that died last year, where's his information?" you can go into your recycle bin and at least find it. It's not gone. You don't have to go restore from a backup from last year to try to find his information.
So a recycle bin keeps everything tidy. Plus, with one recycle bin, you could throw any kind of records in there you want. You could throw orders in there, customers in there, contact information, products, whatever you want. Throw it in the recycle bin, and if you happen to need it later, it's there. It's like the spaghetti sauce. What is it, Prego, Ragu, one of those? It's in there. So it's just a spot to throw your garbage.
Every couple of years, you can delete the oldest stuff out of there if you're approaching that two-gigabyte limit and you're confident you're not gonna need this anymore. You can go ahead and either back it up and dump it somewhere else or do whatever you want with it.
Today I'm gonna show you how to make a recycle bin. I'm gonna show you how to make it so it works for any form in your database. You just drop a recycle bin button on it and a couple little edits to the code and there you go. There's your recycle bin.
Now, this is gonna be a developer level class. So what does that mean? Well, if you're new to VBA and want to get started, here is a video to start with. It's about 20 minutes long. It'll teach you whatever you need to know to get started, and I know I said started like four times.
Today's video is gonna be a little more advanced, though. We got some other stuff I want you to learn.
Make sure you know how to use message boxes to get a yes or no value. Make sure you know how to create your own subs and functions. Make sure you know how to use a record set. We're gonna use some basic SQL. We're gonna use a For Each loop. And we might throw in some basic error handling. I haven't decided yet. If I like you guys maybe we'll do this. I'm just kidding.
These are all free videos. They're on my website. They're on my YouTube channel. Go watch these at a minimum first, and then come on back; today's gonna be a little more advanced lesson. There might be a couple other ones I'll throw in from time to time as we get to it, but that should get you started.
Here I am in my TechHelp free template. This is a free database. You can grab a copy off my website if you want to. Let's start with the customer form.
Just for the purposes of this class, I'm gonna make this a little bit smaller so we've got some room to work with here. We don't need all these fields.
The first thing we're gonna do is disable the user's ability to delete data themselves. Open up the form properties, go to Allow Deletions, and make that No. They can't delete records themselves. We want them to use our recycle bin button.
Next, we'll need a button that'll act as our recycle bin. So I'm gonna grab a command button, drop it here, and I'm going to cancel the wizard. This will be my recycle bin. You could put a caption in here if you want to, or if you want to put an image on here, go find yourself a picture of a recycle bin - not hard to find. I just did a quick Google search.
I use my screen capture utility, and let's see here. I'm gonna call this recycle bin button, and then for the picture, where are you? Pictures, right here where it says None. I'm gonna hit my dot dot dot button. I'm gonna browse, go to where my images are and change bitmaps to all files, and then I should see where it is right there - that's my snap that I saved with my screen capture utility. Hit OK, and there it is. Now we'll just make it the size of that graphic. There we go. There's our recycle bin button.
That wasn't that hard to do. That's like Access beginner stuff, folks. Making buttons with images on.
Now, the coding.
Right-click, Build Event, that'll bring up the code editor. I like to start off with an "Are you sure?" So if MessageBox, "Are you sure you want to recycle this record," or "Send to the recycle bin," or whatever you want to call it. Yeah, let's do "Send to the recycle bin." "You want to send this record to the recycle bin," right?
Comma, vbYesNoCancel, that gives them that cancel option, plus, slide this over a little bit so you can see it better, plus I like to go vbDefaultButton2 so No is the default, right? Plus vbQuestion.
Comma, we'll just put "Recycle" as the title, and if that is not vbYes then Exit Sub.
Let me rewrite that so the whole thing fits on the screen. Oh, someone's beaming in. Put a little line continuation character right there and that way it fits in there.
So we're gonna message box and say "Are you sure?" We're gonna say vbYesNoCancel so they get three buttons, default button is 2 (No) if they just hit Enter, and then it's a question. "Recycle" is the title. If that's anything other than Yes, we're just gonna exit sub so it's not gonna bother doing anything.
Once we get past that point, now we need to open up two different record sources. One is gonna be the one we're gonna read from - we're gonna read from the source, which in this case will be the customer table, and then we need another one we're gonna write to, which is gonna be the recycle bin.
So we're reading from one, writing to another.
So we need two record sources, so record sets. We're gonna call it rsSource as a recordset, and the rsBin, we'll call the bin the recycle bin, as the recordset.
Now whenever I'm using multiple recordsets that are pointing to the same database, I also like to declare a db variable, db as Database, and I'm gonna set that as soon as we're past this message box. I'm gonna say Set db = CurrentDb. Normally, I'll just say Set rs = CurrentDb... whatever, if I'm only working with one recordset, but if I got multiple recordsets at the same time going on, I always declare a db variable.
Now don't forget, if you set it you got to forget it, so don't forget toward the end of your sub down here, Set db = Nothing. Yes, that phrase is on a t-shirt in my store: "You set it, you got to forget it." I wasn't kidding. Recently set up a store. Check it out if you want some AccessLearningZone swag. I'll put a link down below.
Now we're gonna open up the source, which is gonna be Set rsSource = db.OpenRecordset("SELECT * FROM CustomerT WHERE CustomerID = " & CustomerID). So that's CustomerID, just like that. So now we've got an open recordset to that record.
What I want to do is loop through all of the fields in this recordset. I'm not looping through all the records. I want to loop through the fields, and this is how we're gonna make this so it'll work with any table later on, because you can have any number of fields in it. That's just gonna drop all those fields into this table.
We're gonna need a couple more variables here. We're gonna need a variable to store the record information - it'll have first name, last name, all the stuff in it. So we'll call it recordString as a String. And we're gonna need a field object, FLD as a Field.
Now I can say, once I've opened up this recordset, I can say For Each field FLD in rsSource.Fields.
Fields is the fields collection. It's a list of all of the fields in that recordset: CustomerID, FirstName, LastName, Address, Phone, whatever fields you got there you can loop through them, and not only can you get the name of the field, but you can get the value of the field.
So now what I can do is, let's go up here real quick and let's say recordString = "". Let's initialize that string, and now I'm gonna say recordString = recordString & FLD.Name & ": " & Nz(FLD.Value, "")
All right, so put the name and the value: CustomerID is 4, FirstName Richard. Now, a field value might be null, so let's handle that with an Nz. Nz and then just put an empty string there just in case. We don't want any null errors. If you don't know what Nz is, that's one of my expert topics. I'll put a link to it down below. Basically, it takes a value; if it's null, it substitutes it with something else, in this case an empty string.
At the end of each line, just to make it readable, we'll put a vbNewLine so you get one field per line. When you're done, Next FLD—that'll loop through all of the fields in that recordset. It'll create a list of them.
Let's see what we got. I'm gonna message box recordString at this point right here to see what we got, and while we're at it, let's close up our recordset too. We're gonna go rsSource.Close and set it, forget it, rsSource = Nothing, just for some house cleaning.
There's more that's gonna go in the middle here. We still gotta add this stuff; I just want to see what we got right now, if it's working.
Save it. Debug Compile once in a while, oh variable not defined—oh rsSource. See, I'm so used to using just rs, that's why you debug compile—it catches your errors. rsSource, rsSource, we haven't initialized rsBin yet, so we're good. We just declared it, we didn't set it yet. Debug compile once in a while again. All right, we're good.
Save it, close it, close it. Open it, click the button, are you sure? Yes. Oh, look at that.I've got one string with all of the data that's in this record, even the stuff you don't see. Remember, we deleted that notes field and the family size.
Right now, I could take this and dump it in my recycle bin table, which we have yet to create, and we'll do that in tomorrow's video. So tune in tomorrow, same bat time, same bat channel. Or if you are a member, you can watch it right now, because I'm going to probably break for lunch real quick and then I'm going to go record it. So by the time you see this, it will probably be online.
All right, so lots more cool stuff is coming up in part two, and there will probably be a part three too. I'm not sure yet; we'll see. But that's your TechHelp video for today.
Hope you learned something. Live long and prosper, my friends. I'll see you tomorrow for part two.
TOPICS:
Overview of creating a recycle bin for Access databases
Reasons for not permanently deleting important data
Approach for handling deletion in legacy databases
Concept and structure of a recycle bin table
Making deletion user actions use the recycle bin
Disabling direct deletions on a form
Adding a recycle bin button to a form
Setting a custom image for a command button
Programming the recycle bin button Click event
Displaying a confirmation message before recycling
Using multiple recordsets in VBA
Declaring and setting a Database variable in VBA
Reading a record from the source table with OpenRecordset
Looping through all fields in a record to collect data
Building a record summary string from field names and values
Handling Null values with Nz in VBA
Formatting multi-field data with vbNewLine
Debugging code and resolving variable naming issues
Closing and cleaning up recordsets and objects in code
COMMERCIAL:
In today's video, we're learning about creating a recycle bin feature in your Microsoft Access database, just like the one in Windows. I will show you how to let users recycle records instead of deleting them, which means you can recover important data later if needed. We'll talk about adding a recycle bin button to any form, preventing users from deleting records directly, setting up message boxes for confirmation, and using VBA to copy record details into a special recycle bin table. You'll learn about using recordsets, SQL, For Each loops, and handling null values safely with Nz. If your database is old and adding an 'IsDeleted' field everywhere would be tough, this is the perfect solution. You'll find the complete video on my YouTube channel and on my website at the link shown. Live long and prosper my friends.Intro In this video, I will show you how to create a recycle bin feature in your Microsoft Access database so users can recover deleted records instead of removing them permanently. We will talk about why it's important not to delete critical data, how to handle this in existing databases where changing every form and query isn't practical, and how to set up a dedicated recycle bin table. I'll walk you through disabling direct deletions on forms, adding a recycle bin button with a custom image, and writing the VBA code to copy record details into the recycle bin, including techniques for handling fields, null values, and code cleanup.Quiz Q1. What is the primary purpose of building a recycle bin in a Microsoft Access database?
A. To permanently delete records from tables more efficiently
B. To provide a way to recover deleted records if needed later
C. To reduce the size of the database instantly
D. To allow multiple users to access records simultaneously
Q2. According to the video, why is simply deleting important data such as customer or order information not recommended?
A. It causes errors within forms and queries
B. Deleting data always leads to corruption
C. Important data may be needed in the future and should not be permanently removed
D. It makes the database slower
Q3. For databases where retrofitting an IsActive or IsDeleted field is too difficult, what solution is suggested?
A. Backing up the database daily
B. Exporting deleted data to Excel files
C. Creating a recycle bin table to store deleted records
D. Disabling user permissions completely
Q4. What advantage does the recycle bin approach offer when implemented in an older database?
A. It updates all forms and queries automatically
B. It allows you to recover any deleted information without restoring from old backups
C. It compresses the database size significantly
D. It prevents all accidental deletions
Q5. What is the first step before adding a recycle bin button to a form for deleting records?
A. Create a backup of the database
B. Disable the user's ability to delete data directly from the form
C. Add a password to the form
D. Remove all fields except identifiers
Q6. When adding a recycle bin button to a form, what can you use to make the button visually obvious?
A. Only use text as a caption
B. Use any available image or icon, such as a picture of a recycle bin
C. Make the button invisible until needed
D. Remove all captions and icons
Q7. What does the MessageBox within the button code accomplish when sending a record to the recycle bin?
A. Confirms the deletion with the user and provides Cancel, Yes, and No options
B. Automatically deletes the record
C. Only logs the deletion to a text file
D. Bypasses user confirmation and deletes the record
Q8. Why is looping through all fields of a record in code (rather than hardcoding field names) useful when sending data to the recycle bin?
A. It prevents any field from being skipped due to form design changes
B. It saves memory
C. It increases the speed of execution dramatically
D. It only works for text fields
Q9. What role does the Nz function play when looping through fields to create a data string for the recycle bin?
A. It converts all field values to uppercase
B. It substitutes a specified value for null field values, avoiding errors
C. It encrypts field values before storing them
D. It skips all empty text fields
Q10. In the developer-level lesson shown in the video, which of the following is NOT required knowledge?
A. Using message boxes for user confirmation
B. Creating and working with recordsets in VBA
C. Writing complete custom database engines
D. Using For Each loops and basic SQL statements
Q11. Why is setting a db variable (such as db = CurrentDb) considered effective when working with multiple recordsets in Access VBA?
A. It allows simultaneous use of multiple databases without conflict
B. It ensures you are always connecting to the correct database context
C. It eliminates the need for closing recordsets
D. It automatically opens all forms
Q12. What is the common practice suggested at the end of using recordsets or database objects in VBA?
A. Exporting them to external databases
B. Setting them to Nothing to clean up resources
C. Deleting the variables from VBA editor manually
D. Resetting the computer
Answers: 1-B; 2-C; 3-C; 4-B; 5-B; 6-B; 7-A; 8-A; 9-B; 10-C; 11-B; 12-B
DISCLAIMER: Quiz questions are AI generated. If you find any that are wrong, don't make sense, or aren't related to the video topic at hand, then please post a comment and let me know. Thanks.Summary Today's TechHelp tutorial from Access Learning Zone covers how to build a recycle bin in Microsoft Access, modeled after the one in Windows. This approach lets you keep deleted records accessible instead of removing them permanently. When you delete important information, such as customer or order data, you do not want it to be irretrievable. By sending records to a recycle bin, you preserve the data in case you ever need to restore it in the future.
In past lessons, I have explained the risks of deleting important data entirely. While it is fine to remove temporary information, key business data should always be preserved, even if it becomes inactive. Some methods, like adding an "IsActive" or "IsDeleted" field, work well if you build them in from the start. However, if your database has been in use for many years, updating all related forms, queries, and reports to recognize a new field can be a tremendous challenge.
For those with established databases, building a separate recycle bin table can be much easier than retrofitting fields across the entire application. This recycle bin table will be structured to store whatever type of data you want to keep - customers, orders, products, and so on. When you need to delete something, you move or copy the information to the recycle bin table instead. This ensures that, even years later, you can recover a deleted record without having to restore from old backups.
You can design your recycle bin table to accept any type of record, tagging each entry to keep track of its origin, such as customer, order, or product. Cleaning out old items from the recycle bin is simple if you start nearing the two-gigabyte file size limit or if the old data is no longer needed. You can archive or permanently delete those records as needed.
In this tutorial, I will guide you through the steps needed to set up a recycle bin feature for your Access forms. The solution can be added to any form, so you only need to create a recycle bin button and apply minor changes to the related code for each place you need it. This makes it practical for large, complex databases.
This lesson is geared toward developer-level users. If you are new to VBA, I recommend starting with my basic introductory video. You should also be comfortable with message boxes that handle yes/no prompts, creating your own procedures and functions, working with record sets, basic SQL, For Each loops, and simple error handling routines. I have free training covering all these prerequisites available on my website and YouTube channel, so make sure you are caught up on these topics before tackling this more advanced project.
For demonstration purposes, I am using the TechHelp free template, which you can download from my website. To begin, start by opening the Customer form and adjusting the layout so there is space to work. It is important to prevent users from deleting records directly, so in the form's properties, set Allow Deletions to No. This forces users to use your recycle bin button for record deletion, keeping the process controlled.
Next, add a new command button to serve as the recycle bin trigger. You can customize this button with an image of a recycle bin if you like, making it visually clear to the user. Name the button appropriately and load your chosen image, adjusting its size as needed.
With the button in place, the next step is coding its functionality. When users click the recycle bin button, they should be prompted with a confirmation using a message box that asks whether they are sure they want to send the current record to the recycle bin. The message box should offer Yes, No, and Cancel options, with No set as the default selection to help prevent accidental deletions.
If the user confirms, the process continues by creating two record sets. The first record set reads data from the original source (the main table, such as CustomerT) for the record being deleted. The second record set will be used later to write data to the recycle bin. When working with multiple record sets, it is a good idea to manage your database object with a dedicated variable for better reliability and to help with cleanup later.
Step through the fields of the current record and build a string that contains all field names and their values. This makes it possible to store any record's information in the recycle bin, regardless of which table it comes from or what fields it contains. Use the Nz function to handle any Null field values, so your process does not fail if data is missing. The result is a neatly formatted string capturing each field and its value, separated by new lines for readability.
After constructing this string, you can display it in a message box for testing. This technique captures all of the data in your record, even fields that may not appear on the form. Closing and cleaning up your record sets is important to keep your application stable and avoid problems with locked data.
This lesson ends with preparation completed for inserting data into your recycle bin table. In the next session, I will show you how to actually create the recycle bin table and finish the process of storing and retrieving records from it.
For a complete video tutorial with step-by-step instructions on all of the topics discussed here, visit my website at the link below.
Live long and prosper, my friends.Topic List Overview of creating a recycle bin for Access databases
Reasons for not permanently deleting important data
Approach for handling deletion in legacy databases
Concept and structure of a recycle bin table
Making deletion user actions use the recycle bin
Disabling direct deletions on a form
Adding a recycle bin button to a form
Setting a custom image for a command button
Programming the recycle bin button Click event
Displaying a confirmation message before recycling
Using multiple recordsets in VBA
Declaring and setting a Database variable in VBA
Reading a record from the source table with OpenRecordset
Looping through all fields in a record to collect data
Building a record summary string from field names and values
Handling Null values with Nz in VBA
Formatting multi-field data with vbNewLine
Debugging code and resolving variable naming issues
Closing and cleaning up recordsets and objects in codePrimary Topics Access recycle bin, preventing permanent deletion, legacy database deletion strategies, VBA button coding, form design, recordsets, confirmation dialogs, string building from records
Secondary Topics image buttons, error handling basics, null value handling, debugging in VBA
|


