Fitness 4
By Richard Rost

 12 months ago
Add New, Food Group Filter Combo, Linked Forms In this Microsoft Access tutorial I will show you how to open and synchronize a detail form with a list form using the On Current event, set up conditional formatting to highlight selected rows, add a command button to create new records, filter your food list by group with a combo box, reset the filter with a button, adjust form layouts, and link forms so they close together. This is part 4. MembersThere is no extended cut, but here is the file download: Silver Members and up get access to view Extended Cut videos, when available. Gold Members can download the files from class plus get access to the Code Vault. If you're not a member, Join Today!
PrerequisitesLinksRecommended CoursesUp Next
Keywords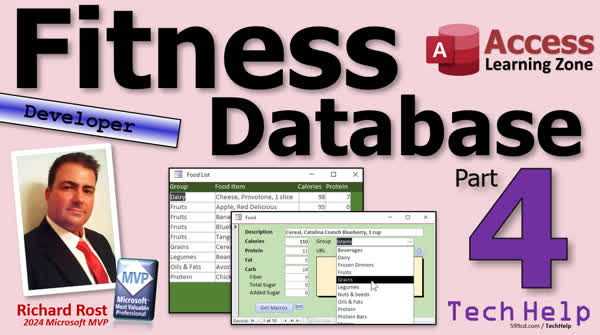 TechHelp Access, fitness database series, food form, On Current event, DoCmd.OpenForm, FoodID, subform, synchronized forms, conditional formatting, command button, VBA code, acFormAdd, On Error Resume Next, tab order, navigation pane, API key, ChatGPT, OpenAI interface, filter list, combo box, food group, After Update event, Me.Filter, allow edits, locked fields, clear filter, OnClose event, code vault, search box
 Subscribe to Fitness 4
Get notifications when this page is updated
More InformationTranscript Today we are continuing with my fitness database series. This is part four. If you have not watched parts one through three, go watch those first and then come on back.
We have our food list all set up, but we have no way to get to the food form. So let's do that first. What I am going to do is assume if you are clicking on these guys, you want to see the details. There are a couple of ways you can do it. You could do it with a subform, or you could just have the other form pop up over here and have it stay synchronized with whatever is clicked on over here. Let's try that first. See if we like it.
We will do that in an On Current event. If you want to learn more about this event, go watch this video. The On Current event fires when you move from record to record, including the first record. So what we are going to say in this form's On Current event is: DoCmd.OpenForm "FoodF", , , "FoodID=" & FoodID on the current form on the list form.
Now, the field does not exist, but FoodID exists in the recordset under the form. Nine times out of ten, you can get away with this. Sometimes you cannot. Let's find out.
There it is. Then you click on different ones here, and it will stay synchronized. There is bananas, there are tangerines, there are beans.
What I also like to do is set up some conditional formatting so you know which row you are on over here. There is a way to do the whole row at once. In fact, I have a whole video on it, but I am just going to do the current field because it is simple. It is really super simple. You just select the whole row like that. Format, Conditional Formatting, New Rule. Then you go right here, Field Has Focus. Set that to yellow like that. Then you can very easily tell which one of these fields in here has the focus. See, you can see you are there, you can see you are there, you can see you are there, and so on.
That is good enough for me. If you want to see the trick where you can highlight the whole row and then maybe have the field that you are on a little darker, I have a whole video on it. I just do not feel like doing it right now. Maybe we will do it later. If not, here you go.
I am just going to make sure this is right next to there. I have code in my code vault to make it so that if you move this form, this guy will follow it. I do not think that is necessary right now. I just want to get a lot of the features here built. I am not too worried about a ton of bells and whistles just yet. We are going to add some bells and whistles as we go along, but we do not need to do them all at once.
This is looking pretty good. Now, we need a way to add a new record here, but I also want to put a button down here to add a new record because it will confuse some people if they do not know how to basically open up any record, or if you do not have any records in here, you will not see it.
We are going to add an Add button down here on the bottom in Form Design. Grab a command button. Drop it down here. You could use the wizard for this, but I am going to try to avoid using the Command Button on the wizards because I like to use VBA code, and the Command Button wizards create macros, and I do not like macros.
So Add New, and we will call this our Add New button, AddNewBTN. Then right-click Build Event. This is going to be the same as before: DoCmd.OpenForm "FoodF", , , , acFormAdd. We are going to go into add mode.
So what is going to happen is click and then Add. Oh, wait, what happened? It did not go to a new record because the form is already open. Let's fix that.
Back into code. All we really have to do here first is close the form if it is already open. You can say DoCmd.Close acForm, "FoodF". Save as Close means if there are design changes, do you want to save them? Well, I always put acSaveYes, because your end users, if they are running a locked-down database or compiled database, will not be able to save it anyway. I have had many times where I have made some design changes and then clicked the button and then it did not save it, so I like to always say acSaveYes.
Now, there is one little problem with this. If you click that button now and that form is not already open, let's say the user closes this, it did work in that case. Sometimes it will throw an error. So all you have to do is in this case, because if that form is not open, it cannot close it. Here, you just put On Error Resume Next. I have code in my code vault to check if a form is open, but that is fine. That just ignores the error if an error does indeed happen.
If I go to the food list, you can go to Add New, see, closes it and reopens it. If it is not open, there you go.
One thing I noted in the extended cut with the other members is that this guy here is still in the tab order. I am going to take him out of the tab. So if I go tab, tab, tab, tab, see, it stops over here. I do not like that. I am going to take this guy out of the tab order. You double-click and go to Other and Tab Stop is now No. Save it and make sure we make changes. Move it back over here so it is next to this guy. Save it as well.
Another thing I want to change, I want to make this menu long and slender, kind of like the navigation pane instead of like this. That way I can still see this status box when the other forms are open. We are going to make this a little bit smaller. For now, we are just going to slide you into here like this. We are going to add more buttons. We are going to have a bunch of buttons on this main menu eventually, but for now, we are just going to do that.
Let's just make this Fitness. We do not need "DB". Yes, I know I modified it there, but I plan on resizing the label anyway. There we go. Much better. Save that.
Now I have my menu there. I have my food list next to it right there. I am going to put this guy up next to it there. It should fit when this navigation pane is closed. Perfect.
I forgot to tell you in the last video, part three, what we did in the extended cut so I could try to convince you to join. I pulled the API key out of the database because I kept flashing it accidentally in the video. The API key is what you need to talk to ChatGPT, the OpenAI interface, and I kept showing it, which is like your own private key.
Then I made it so you can color your status box, and we actually added speech into it so that the database can actually talk, which is pretty cool. You can see here, I have API key loaded successfully. When the database starts, it loads up the API key and it made this green. Those are just little enhancements.
Now, what I would like to do next is this list: it is short now, but it is going to get long. You might have hundreds of items in here if you track everything you eat. In my previous databases I have built, I have had lots of items in here. I am going to do it so that we can filter this list easily by the group without having to right-click and then filter that way. We can just pick from a combo box up top. That would be pretty sweet.
I am going to slide this bar down here. We are going to move this label down. Up here, we are going to put a combo box with the food groups in it. When they pick a food group, it will filter that list just to that group.
Form Design, combo box, drop a combo box up. Yes, look up the values of a table or query, give me my list of food groups, bring them both over, sort it by description. That is what it is going to look like next.
We are not going to store the value in any field. It is not bound to a field in the table. Just hang on to it. We are going to do some stuff with it with code. Label, we are going to get rid of it anyway and then hit Finish.
Delete this. This is going to be our food group filter. Open that up, come over here to All. Come up at the top. We are going to call this guy the food group filter. It is going to start off at null, so we are going to show everything. When they change this, we are just going to change the filter property—the data filter property right here—of the form and then turn it on.
If you want to learn more about filtering and ordering and all that kind of stuff, go watch this video.
In this guy's After Update event—the After Update runs when you change the value in that box—we are going to say:
Me.Filter = "FoodGroupID=" & Me.FoodGroupFilter
What is Me? Me is the form you are on, in this case, the Food List. Me.FilterOn = True.
Save it. Debug compile once in a while. Close it.
We also have to make sure that when this guy closes, we should close this too. Maybe. I like doing that. If this guy closes, it closes its child form.
Open it up. Now, let's say I want to filter just by fruits. Oh, this brings up another interesting point. You cannot change this value. Does anybody know why? Because Allow Edits is off. Allow Edits will not let you edit any of the records or even any of the unbound fields. We have to make a change. This is why it is cool when I am doing this stuff with you without preplanning it, because I forgot about this.
In this case, the form has to allow edits. Go to Data. Allow Edits has to be Yes. But we still do not want people to mess with this stuff. We are just going to lock these fields. So click over here, select all those fields, and set Locked to Yes. Now the form allows edits, but those fields do not. Now, this guy does.
Now, we should be able to change that value. Save it, close it, open it. Now let's try fruits. There we go. Let's try a different one. Nuts and seeds. I do not think I have any nuts and seeds. Well, not right here. I will tell you, I am a crazy one. Vegetables? No, not the vegetables. Protein? Let's see here. Oh, okay.
How about if I want to see everything? Let's delete this and hit Tab. So we have to be able to handle null values. At debug, bring it right there.
What we are going to do is in here, we are just going to say
If IsNull(Me.FoodGroupFilter) Then
Me.FilterOn = False
Else
Me.Filter = "FoodGroupID=" & Me.FoodGroupFilter
Me.FilterOn = True
End If
All we have to do is just turn it off if they blank that. Save it. Debug compile. Come back out here. Pick frozen dinners, then delete it, and look at that. It turns the filter off.I often find it's easiest to put a little checkbox here, or not a checkbox, a little button here to turn the filter off instead of having to remember to come in here and then delete this and do that.
So what we're going to do is drop a little button right there. I just copy this one, copy and paste, and slide it up here. I'll put a little X in there like that. Then you can put a little picture or whatever you want. I just use a little X button like this. This is just to turn off that filter.
That, that, and then this guy here, we'll rename it FilterOffButton, right click, build event. Here I want to say Me.FilterOn = False, and let's blank what's in the box too. So we'll say FoodGroupFilter = Null.
See how I can file, close it, close it, open it. All right, let's put something in here, fruits. Close it. Look at that. That's pretty cool. Oils and fats. Notice when this guy filters, the OnCurrent event fires and it'll update this guy.
If you want to link these so that if you close this form, this one closes too, we can do that as well. Click design view, come in here, find the OnClose event or the OnUnload event. Doesn't really matter; OnClose is the one I used to use. The difference is OnUnload can be canceled.
In here, we're just going to put DoCmd.Close. What's the close command? Do I have it in here? Not in the other form. Oh, there it is right here. We're just going to copy that and put it right there. So it'll close the food form. If it's open, it will close it and it'll ignore any errors in case it's not open.
Or you can use my IsFormLoaded code from the Code Vault if you're a Gold Member, but honestly, for something this simple, you really don't need the IsLoaded. Because it's just one line. I usually use the IsLoaded if a lot of logic depends on whether or not that form is open. In this case, just try to close it and ignore any errors if it's not open.
Here we go. It's not going to run because the form wasn't open first, but now if I close it there, they both close together. They're linked in a cosmic ballet. There we go. That's pretty sweet.
Next time, in part five, we're going to start off by putting a little search box up here too. So if you want to search for bananas, it doesn't matter what group it's in, just type in B A N A, hit tab, and it'll just find the other. It's got banana in it down here.
That will be part five. We'll start it in part five, and that's going to be on Monday, July 14th, 2025, because today is Thursday when this is being released. Tomorrow, Friday, is going to be Quick Queries Friday.
I take the weekends off. Sorry. Well, I don't take the weekends off; I don't release videos on the weekends. It gives me a chance to catch up. But I still work. I work. When you work for yourself, you'll work every day that you can. So it's rare that I take a day completely off. My wife isn't happy about that, but yeah.
Anyway, so Monday we will continue with part five and we'll start with that search feature.
That's going to do it for your TechHelp video for today. Hope you learned something. Live long and prosper, my friends. I'll see you next time.
TOPICS:
Opening a detail form from a list form using On Current event
Synchronizing two forms to show related details
Applying conditional formatting to highlight the current field
Creating an Add New button with VBA to open a form in add mode
Handling already open forms when adding new records
Using On Error Resume Next to handle potential form errors
Removing a button from the tab order on a form
Resizing and reorganizing menu layouts in a navigation pane
Adding a combo box to filter records by food group
Configuring an unbound combo box to filter a form
Setting the Allow Edits property for form and locking fields
Filtering records with a combo box and handling null values
Adding a button to clear the filter and reset the view
Automatically closing a detail form when the list form is closed
Using DoCmd.Close in the OnClose event to close linked forms
COMMERCIAL:
In today's video, we're continuing with part four of the fitness database series. You will learn how to open your food detail form from the food list and keep the two forms synchronized using the On Current event. We'll add easy-to-see conditional formatting, set up an 'Add New' button with proper VBA to open a form in add mode, and fix issues if it's already open. I will show you how to create a user-friendly filter at the top using a combo box so you can quickly filter your food list by group, as well as how to turn that filter off with a custom button. You will also see how to adjust form properties to let your filter work right without letting users modify data accidentally, and how to link forms so they close together smoothly. You'll find the complete video on my YouTube channel and on my website at the link shown. Live long and prosper my friends. Intro In this video, we continue building the Microsoft Access fitness database in part four of the series. I will show you how to open a food detail form from your food list and keep it synchronized using the On Current event, as well as add simple conditional formatting to highlight the current record. We'll set up an Add New button with VBA to open forms in add mode and handle cases where the form is already open. You'll learn how to filter your food list by group with a combo box, clear filters with a custom button, lock fields to prevent edits, and automatically close linked forms. This is part 4. Quiz Q1. What is the purpose of the On Current event in the context of the fitness database video?
A. It updates the total calories automatically when a record changes
B. It opens the food detail form synchronized to the selected food item
C. It filters the food list based on the selected food group
D. It saves the record automatically when navigating away
Q2. When adding a button to open the food form in add-new mode, which VBA code should be used?
A. DoCmd.OpenForm "FoodF", , , , acFormAdd
B. DoCmd.OpenForm "FoodF", , , "FoodID=" & FoodID
C. DoCmd.OpenForm "FoodF", , , , acFormEdit
D. DoCmd.OpenForm "FoodF", , , , acFormDelete
Q3. Why is "On Error Resume Next" added before trying to close the FoodF form?
A. To ignore VBA syntax errors when opening forms
B. To handle errors if the form is already open
C. To avoid runtime errors if the form is not already open
D. To ensure all changes are saved before closing the form
Q4. What property should be set so that a control (such as a button) is skipped when using the Tab key to navigate?
A. Locked
B. TabStop = No
C. Invisible
D. HideSelection = Yes
Q5. Why did the presenter make the menu form "long and slender"?
A. To fit more records in the food list
B. To allow the status box to be visible alongside other forms
C. To display more buttons at once
D. To use less memory in the database
Q6. Why does the video recommend using VBA code rather than macros when creating command buttons?
A. Macros are not available in all versions of Access
B. VBA code runs faster than macros
C. VBA code provides more flexibility and control than macros
D. Macros are more prone to viruses
Q7. What does the combo box with the food groups at the top of the food list enable the user to do?
A. Add a new food group to the table
B. Filter the displayed food list by the selected food group
C. Sort the food list alphabetically
D. Calculate total nutrients for the selected group
Q8. Which VBA property is set to filter the food list by the selected food group using the combo box?
A. Me.RecordSource
B. Me.Filter
C. Me.FilterGroup
D. Me.OrderBy
Q9. How does the presenter handle the situation when the food group combo box is cleared (null value)?
A. Sets Me.FilterOn = False to remove the filter
B. Prevents users from clearing the combo box
C. Sets the filter to show only default food group items
D. Automatically selects the first food group
Q10. What is the purpose of adding the filter-off (X) button next to the food group combo box?
A. To switch to a different data source
B. To clear the filter and display all records
C. To close the menu form completely
D. To save currently filtered results
Q11. Why did changing Allow Edits from No to Yes on the food list form fix the issue with the food group combo box?
A. Allow Edits controls whether bound controls can be edited or not, including adding new records
B. Allow Edits enables sorting and filtering on the form
C. Allow Edits allows unbound controls like combo boxes to be interacted with
D. Allow Edits allows the conditional formatting to be applied
Q12. How does the presenter prevent users from editing the main data fields while still allowing filtering through the combo box?
A. By hiding the fields on the food form
B. By setting the Locked property of the fields to Yes
C. By disabling form navigation buttons
D. By using a subform for data entry
Q13. What is described as a good practice when making design changes and using DoCmd.Close on a form?
A. Always set acSaveNo to avoid saving design changes
B. Only close the form when no data is present
C. Using acSaveYes to ensure any unsaved design changes are saved
D. Never close forms programmatically
Q14. What is the presenter's approach to linking forms so that closing the parent form also closes the child form?
A. Using a macro to close the child form
B. Placing code in the OnClose event to close the child form if open
C. Using a database property to link forms
D. Only allowing one form to be open at a time
Q15. In the updated design, when does the OnCurrent event of the list form fire?
A. Only when a new record is added
B. Only when the form is first opened
C. Anytime the current record changes, including the initial opening
D. Only when a filter is applied
Answers: 1-B; 2-A; 3-C; 4-B; 5-B; 6-C; 7-B; 8-B; 9-A; 10-B; 11-C; 12-B; 13-C; 14-B; 15-C
DISCLAIMER: Quiz questions are AI generated. If you find any that are wrong, don't make sense, or aren't related to the video topic at hand, then please post a comment and let me know. Thanks. Summary Today's TechHelp tutorial from Access Learning Zone continues with part four of my fitness database series. If you have not yet seen the first three lessons, I recommend reviewing those before moving ahead to ensure you have the full context for what we are building.
At this stage, our food list is set up, but we have not established a way to easily access the food form from that list. The goal now is to allow users to view detailed information for a food item when it is selected from the list. There are a couple of ways to approach this: you could use a subform, or you could have the food form open separately and remain in sync with whatever record is selected in the main list. For this example, I am choosing to open the food form and keep it synchronized with the selected item via its On Current event. If you are curious about how the On Current event works, there is another video available on that topic. In essence, the On Current event triggers whenever the user moves from record to record, including when the first record loads. By leveraging this event, we can instruct Access to open the food form filtered to display details for the selected record.
I set up the necessary code in the On Current event of the form so that the food form opens and keeps pace with the selected item in the main list. For most use cases, referencing the FoodID field here behaves as expected, since it is present in the form's recordset, but it is worth being aware that this may not always be the case. After implementing, I confirmed that the synchronization works as intended; navigating the list updates the detail view to match.
Next, I addressed a useful visual enhancement. By applying conditional formatting, I made it clear which row is currently active in the food list. This can be achieved easily by selecting the entire row, using conditional formatting, and applying a distinctive color, such as yellow, when a field has focus. While there are more advanced methods to highlight the entire row—or emphasize just the active field—this simple setup serves our purpose for now. If you want to see more complex conditional formatting techniques, including highlighting the full row with distinct shades, there is a separate video covering that subject.
To keep things organized and readable, I made sure to position the main menu and the food list forms next to each other. Although additional code could ensure the forms move together on the screen, I decided it was unnecessary at this stage, as the focus right now is to build the essential features before adding extra flourishes.
Moving forward, we needed a straightforward way for users to add new records to the food list. While it is possible to add a new record by navigating to the right places in the interface, that can be confusing, especially if the list is initially empty and the record navigation buttons do not appear. To solve this, I added an "Add New" button at the bottom of the form. Instead of using the Access Command Button Wizard, which produces macros (which I personally prefer to avoid), I wrote the necessary VBA to open the food form in add mode upon clicking the button.
However, there is a catch: if the food form is already open, simply running the open command does not always start a new record. I handled this by closing the detail form first if it is already open, then reopening it in add mode. To account for cases where the form is not yet open and to prevent errors, an On Error Resume Next statement lets Access ignore the error if the target form does not exist in memory. This ensures a smooth user experience; clicking the Add New button consistently provides a blank form for entry.
I also refined the tab order so that the Add New button is no longer included when tabbing through fields, which keeps navigation clean and intuitive for users.
With these improvements in place, I decided to adjust the layout of the main menu. I made it longer and narrower, resembling a typical navigation pane, which provides better visibility for the status box and leaves room for more buttons in the future. The database's title label was also updated for better presentation.
In the previous video, part three, I forgot to mention what was covered in its extended cut for those interested: among other things, I demonstrated how to move the API key out of the database to keep it secure, customized the status box's color, and added speech capabilities so the database can provide audible feedback, such as letting you know when the API key loads successfully. These are just a few optional enhancements that make the database more interactive and user-friendly.
Next, I prepared for a common challenge: the food list is short now, but as you log more foods, it will grow. In previous databases, I often ended up with hundreds of items, so efficient filtering becomes important. My solution was to add a combo box at the top of the food list form so users can filter the list by food group, rather than having to use Access's built-in filtering options. After adding the combo box, it was configured to display food groups from a table, though the selection itself is not bound to any field in the data. Instead, we use its value to alter the form's filter property in VBA code.
The filter is applied whenever the combo box value changes, making it simple to narrow down the foods by their group. Since the form previously had edits locked, which also prevented unbound controls like the filter combo from being changed, I adjusted the settings to allow edits while locking the data-entry controls so users can still interact with the filter without altering protected data.
To accommodate scenarios where the user might want to clear the filter and see all records again, I added logic to check for null values in the combo box. If the filter control is cleared, the filter is removed, displaying all foods once more. To make this even easier for the user, I added a small button (styled with an "X") next to the filter combo box, which, when clicked, resets the filter and clears the selection.
Another useful function is ensuring that associated forms close together. For example, if you close the food list form, any open food detail form should close as well. This was done by handling the form's OnClose (or alternatively, OnUnload) event and using VBA to close the child form automatically. For simple logic, On Error Resume Next is sufficient to handle cases where the form was not open, but more robust checks can be implemented by Gold Members using code from the Code Vault, especially if more complex logic is required.
To wrap up, I previewed some features that will be coming in part five of this series. We will add a search box to the food list for quickly finding an item by name, regardless of food group. Simply typing a few letters and pressing tab will jump to relevant records like bananas or anything else with a matching string.
Please note that new lessons continue on a set schedule. Part five will release on Monday, July 14th, 2025, while Quick Queries videos appear on Fridays and no new videos are published over the weekends. I still work weekends behind the scenes, but content is released on weekdays to maintain a steady pace.
That concludes today's TechHelp tutorial. You can find a complete video tutorial with step-by-step instructions on everything discussed here on my website at the link below. Live long and prosper, my friends. Topic List Opening a detail form from a list form using On Current event
Synchronizing two forms to show related details
Applying conditional formatting to highlight the current field
Creating an Add New button with VBA to open a form in add mode
Handling already open forms when adding new records
Using On Error Resume Next to handle potential form errors
Removing a button from the tab order on a form
Resizing and reorganizing menu layouts in a navigation pane
Adding a combo box to filter records by food group
Configuring an unbound combo box to filter a form
Setting the Allow Edits property for form and locking fields
Filtering records with a combo box and handling null values
Adding a button to clear the filter and reset the view
Automatically closing a detail form when the list form is closed
Using DoCmd.Close in the OnClose event to close linked forms Primary Topics Access forms synchronization, On Current event, conditional formatting, VBA add-new button, filtering with combo box, form property settings, DoCmd.Close for form linkage Secondary Topics menu layout adjustments, handling Allow Edits and locked fields, null filter handling |


