Fitness 70
By Richard Rost

 4 months ago
Build Tables & Relationships for a Workout Database In this lesson, we will walk through building the core workout tables for a fitness tracking database in Microsoft Access. I will show you how to create the tables, choose appropriate data types, import data from Excel, set default values, and establish relationships to maintain referential integrity. We will also discuss design considerations such as handling fractional weights and the importance of notes fields. By the end, you will have the foundational tables connected and ready for use in forms and queries, which we will continue building in the next lesson. MembersThere is no extended cut, but here is the file download: Silver Members and up get access to view Extended Cut videos, when available. Gold Members can download the files from class plus get access to the Code Vault. If you're not a member, Join Today!
PrerequisitesRecommended CoursesUp Next
Keywords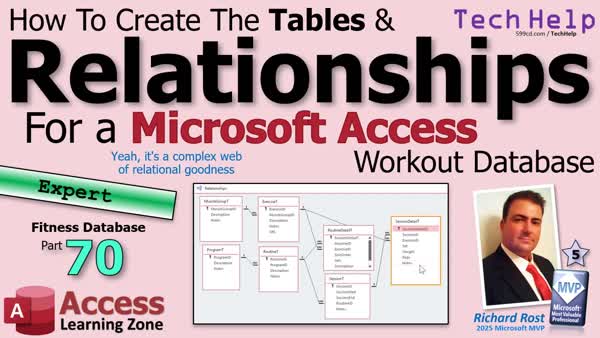 TechHelp Access, fitness database, table design, schema, muscle group table, ExerciseT, ProgramT, RoutineT, RoutineDetailT, SessionT, SessionDetailT, primary key, auto number, data types, default values, relationships, referential integrity, cascade delete, SQL Server, copy Excel to tables
 Subscribe to Fitness 70
Get notifications when this page is updated
More InformationTranscript Are you still tracking your workouts on a whiteboard like I am? Thinking that there has to be a better way? Welcome to another TechHelp video brought to you by AccessLearningZone.com. I am your instructor Richard Rost.
This is part 70 of my series on building a fitness database in Microsoft Access. In the last video, we laid out the core structure and the schema of all of the tables we need for the workout section of this database.
Today, we are going to start actually building those tables in Access. We will set up the fields. We will get our data into place so everything lines up properly. We will go over a few design choices along the way, like picking the right data types and setting default values so things behave the way you want. Then we will set up relationships between all the tables so it looks like a big spider web. Do not worry, we will make sense of it.
Remember, even though this example uses fitness for the database, you do not need to care about fitness or working out, or weights and sets and reps and all that stuff. Because the real value here is learning solid Access techniques and database design principles that you can apply to any database system.
Alright, you are ready? Here we go.
So now that we know what tables we need in our database for the exercise part, let's get to building them. I am going to create table design. I am going to try to match these as closely as I can to the Excel sheets so I can just copy and paste the data.
First up is the muscle group table. That is the muscle group ID. That is my auto number. This one just needs a description (short text) and notes (long text). Those are going to copy to a bunch of different tables. MuscleGroupT, primary key, yes.
Now for this, I have already got them typed out here in Excel, so I am going to try to get them in there. Copy just this stuff, and over here, select just that cell and then paste. Perfect. They match right up. See? Nice. Now I can still keep these IDs in the next table.
Alright, next we have exercise ID, muscle group ID, description, notes, URL. Again, create table design. This is going to be the ExerciseT, so exercise ID. We have got a muscle group ID, that is our number. We have got description, notes, and I should have copied it, but that is quick to type in. Then URL.
Now URL I am torn about. I like to make URLs long text. Most of the time they are less than 255 characters, but once in a while you can get a really long one. I never do sorting or links between them or anything. So long text is fine. We are going to save this as my exercise table.
Now I want to get this lined up right so I can copy this stuff in from here. In fact, I could probably copy this. I just have to line these fields up in the same order or flip these, whichever way you want to do it. I think I will flip them in Excel. So we are going to cut that, and then right click, insert cut cell. That way I do not have to move the fields around the table.
We will just select these, and then we will come over here and we'll select both of these fields like that and hit paste. Boom, there we go. Make sure they line up. They should line up.
Here, for each exercise, is where you put in the notes, any specifics for your machines or what equipment you use. So for me, for the chest press, I put in here, what is it, pin six, I use a Power Tech leverage gym. It has got the arms on it where you put the free weight plates on it and then you have to put the pin in at the height that you want the bar at. For me, I would put like pin six in there. Whatever notes you have specific to that exercise, that is where you put it. We are going to build forms for all this stuff in a bit too.
All right, so that is exercise. What is next? Program. Program is easy. Create table design. We have our program, so typing product program ID, description, notes. I was going to copy and paste them, but I might as well just type them. Save ProgramT and little copy and paste. So we have full body, four day, ten day, that is easy enough. Paste that in.
Next up is our routine. Create table design, routine ID, then our program ID, description, notes. Save it, RoutineT, yes. Right here. Again, I am going to flip these keys because I have all my keys at the top of the table. That is just my thing. You could put them anywhere you want, it does not matter. But now, I can just select these, copy, select these, that and paste. There we go. We are moving right along.
All right, what is next? We have got our routine detail. This one is a little more complicated. Right, table design, RoutineDetailT, auto number. We have got our routine ID and our exercise ID. This is another reason why it is good to prototype this stuff properly in Excel first, because now I have got sample data all lined up and ready to go. Sort order, that is a number. Sets, that is a number. Again, notes. Save it, RoutineDetail table.
Now we have to do some rearranging here. Here is the routine ID. Then we need the exercise ID, which is this guy. So let us cut this out. Cut. Insert. Then we have got the sort order, which is this. Cut. Insert. Then the sets, cut. Insert. Then we are good.
Oh, the description. Well, no, the description and the notes, that is... We do not really need that for this. I mean, you can put them on here, but we do not need to copy them from the sheet.
Just looking at this to keep the colors right, this color. Try to keep it so all the purple stuff, this color here, is what is actually fields in this table. Now we just need these four columns here. Copy those and we will stick those right here. All right, select and paste. There we go. All right, save it. Close it.
Next up, we have the session. That is an easy one. Create. We will design session ID, session start. Remember, do not use Date or... You can use StartDate and Date if you want to, or StartTime and Time, whatever you want. Session end, routine ID. Save it, SessionT.
If you want to default this, you can. I am going to do this in the form though, but you could default the session start if you want to, then the end could just be 30 minutes after that. Yeah, let us do it here. Let us do it here. Default value here. Let us do =Now. Then end, it is going to be =Now.
Now, there are a bunch of different ways to do it. You could do it with DateAdd if you want to, or you can just do it in minutes. If you want to add an hour, it would be Now plus 1/24th, like that. That is an hour, one twenty-fourth of a day. So if you want to default it to a half an hour, you could do 48. That is another way to do it.
Or you can use DateAdd. Here, I will zoom in so you can see better. You can do =DateAdd, what is the interval, minutes, and comma, the number 30, 15, however many minutes you want, and then the date/time like Now.
That is if you want to put it in the table, which, yeah, okay, why not. The benefit of having it in the table is that if you have multiple places where this data can be added in the future, which I do not, I cannot see us doing, but you could, then the logic is there. You do not have to keep putting it in the different forms.
All right, so sessions. There we go. Looks good. All we literally have in here is 2, 3 and 4 for the routine ID. So we will just type those. Sometimes it is easier to type them in. 2, 3, 4.
Yeah, and I did 30 minute workouts on top of each other. Okay, let us just change this to 20. Well, that is going in the future, I guess. That is okay. 20. We will do 21. Future me is working out as we speak.
All right, last table for now is the SessionDetailT, the one that holds all the stuff that brings it all together. All right, so create table design, SessionDetailT or ID, do that all the time. Session ID, exercise ID. All right. Then we have got set number, weight. Now it is up to you if you want to put fractions in here. Now that I think about it, I actually do have some weights where I do half pounds. So I am going to make this a double.
Kind of small, you could leave it... Oh, that is one place, it is the wrong one. Double. Yeah, you could leave it zero because I do have some zero weights. Body weight, obviously, if you do pushups or pullups or whatever, that would be a zero weight. But yeah, I have some like...I have got those little things that you strap around your ankles. So when I do leg lifts and stuff, you can put little half-pound weights in them. So yeah, you might have to do a fraction for that one.
Reps, that is a long integer. Not getting away with any half reps. I cannot think of why we would need a description for this one, but definitely notes. And we forgot notes on the session table, did not we? All right. So save this one as SessionDetailT. Go back and put that on the session table. Yep, forgot my notes. Do not always have a description, but I almost always do have notes.
All right. So our tables. Now we are all set to start piecing this up together. If you want to put relationships in here, you can. I do not really see a need for them just yet. Again, as I have said before, I am not a big fan of global system relationships.
The only ones I could see, really, if you want to enforce referential integrity, cascade delete session, the session details. If you delete a session, you are not going to want these details sticking around. So that is one you could do.
You are also dealing with...you have these guys. If you delete a routine, it is going to mess up your sessions. So yeah, I guess for some of these you might want to put referential integrity on. That is up to you.
See, I am planning on moving this to SQL Server later, so I can use it online, and so I am not going to keep these relationships anyway, but at least putting them in Access first will give you an idea of the relationships that you want to form in SQL Server. So that could not hurt.
All right, why not? Let us set them up. Let us have some fun.
Okay, we do not need...oh, we have all these guys in here. Okay. Now, here is one thing that a lot of people do not realize. You can remove these tables from being in here, but you have not removed the relationships. You are just taking the tables out of the layout. You can bring them back anytime by hitting the All Relationships button and it brings everybody back, including some of the hidden system tables and stuff like that. So you can just get rid of these guys very easily and then add whatever ones you want to see in here.
All right. So for example, let us start from the top of ours. So where is the MuscleGroupT? So there is MuscleGroupT, and then that relates to ExerciseT. Right there. Okay. This is a one-dimensional relationship and we will enforce referential integrity. Create.
We are not going to cascade update and cascade delete. We do not need cascade updates, first of all. Cascade updates only work, or are only necessary, if you change the primary key. If you have natural keys at all - like some databases I have seen, they will use VIN or a social security number as a primary key, which can change. If you are using auto numbers everywhere, no, you are not going to change them. I do not want cascade deletes, because if I delete a muscle group, it is going to mess up everything underneath it. I want it to say, hey, you cannot do it. So we will enforce referential integrity, but I am not going to turn cascade delete on.
All right. What is next? Program is by itself, but program relies on, or routine relies on, programs. So where is program? Program can go here. Then routine is under that. Okay, and so program ID to program ID, enforce referential integrity. Yeah.
Here is where they start to come together. RoutineDetail. This goes to both of those. So routine ID is there, yes. Exercise ID is there, yes. So now you cannot delete an exercise either.
Then from there, we have session. SessionT is over here. Actually, let us move session under here. We will link routine ID to routine ID. Of course, that. There we go.
Now we have SessionDetail. All right. Session to session and exercise. Where are you? Exercise to exercise, that. That is a pretty complicated web. I am going to hit control S to save it. That just saves the layout, folks. All the relationships are in there, plus all the other ones.
Right. But now, all of our data is all related together. Now we are ready to start building some forms for that. We will get to it in the...actually wait, I think we have a couple queries we are going to build first, and then we will get to some forms and making all this stuff work, and it is going to be fun.
All right. So today's big takeaway is getting your tables built correctly from the start so everything else in your database has a solid foundation.
Next time, we will start putting this data to work by building some queries and the beginning of the forms - tie everything together. It's like that rug. It really ties the room together. Man.
All right. Post a comment down below. Let me know how you like today's video.
That is going to be your TechHelp video for today brought to you by AccessLearningZone.com. I hope you learned something. Live long and prosper, my friends. I will see you soon for part 71. Intro In this lesson, we will walk through building the core workout tables for a fitness tracking database in Microsoft Access. I will show you how to create the tables, choose appropriate data types, import data from Excel, set default values, and establish relationships to maintain referential integrity. We will also discuss design considerations such as handling fractional weights and the importance of notes fields. By the end, you will have the foundational tables connected and ready for use in forms and queries, which we will continue building in the next lesson. Quiz Q1. What is the main focus of this video in the database series?
A. Building forms for user input
B. Constructing and designing workout-related tables in Access
C. Setting up security for the database
D. Creating charts and visual reports
Q2. Why does the instructor prefer to prototype tables in Excel before building them in Access?
A. Excel automatically converts data types
B. It allows easy rearrangement and copying data into Access tables
C. Access cannot import any data from Excel
D. Excel enforces referential integrity automatically
Q3. Which data type does the instructor suggest using for the URL field and why?
A. Short Text, because URLs are always short
B. Number, because URLs are always numeric
C. Long Text, to accommodate very long URLs and avoid character limits
D. Currency, for compatibility with reports
Q4. Why might default values be set for date and time fields in the session table?
A. To prevent unauthorized access
B. To automatically set session start and end times for user convenience
C. To enforce relationship constraints
D. To display error messages
Q5. According to the video, why would you use a double data type for the weight field in the session detail table?
A. To allow for fractional weights, like half-pounds
B. To store longer text about the weight
C. To generate random numbers
D. To encrypt weight values
Q6. What is meant by "referential integrity" when setting up table relationships?
A. Ensuring data is always encrypted
B. Preventing orphaned records when deleting related data
C. Formatting tables using colors
D. Enforcing unique values in all fields
Q7. Why does the instructor advise not enabling cascade delete for certain relationships?
A. It may cause too many secondary indexes
B. Deleting a parent record could remove important related data unintentionally
C. It slows down database performance
D. It prevents users from entering new records
Q8. What is the main benefit, as highlighted in the video, of thoroughly designing your tables before adding data?
A. It establishes a solid foundation for future database features
B. It makes color formatting easier
C. It reduces the cost of Access licenses
D. It eliminates the need for database backups
Q9. What is the recommended rule when arranging fields in tables, as per the instructor's personal preference?
A. Primary keys should always be at the bottom
B. Foreign keys must be omitted
C. IDs and primary keys should be at the top of the table
D. Table fields should be ordered randomly
Q10. For what future purpose does the instructor mention planning to move the database to SQL Server?
A. To add more colors to the tables
B. To use it online and build on the relationships designed in Access
C. To stop using relationships entirely
D. To support only local data entry
Answers: 1-B; 2-B; 3-C; 4-B; 5-A; 6-B; 7-B; 8-A; 9-C; 10-B
DISCLAIMER: Quiz questions are AI generated. If you find any that are wrong, don't make sense, or aren't related to the video topic at hand, then please post a comment and let me know. Thanks. Summary Today's video from Access Learning Zone focuses on building a fitness database in Microsoft Access. This is part 70 of the ongoing series, where we finally move from planning to actually constructing the tables needed for the workout section of our database.
Previously, we discussed the schema and structure of all the tables necessary for our workout tracking system. In this lesson, we're putting that plan into action by setting up each table in Access, defining fields, selecting appropriate data types, setting default values, and discussing the logic behind these design choices. We also work on establishing the relationships between tables, making sure all the connections are well defined and clear.
Although we're using fitness tracking as our example, the techniques and database principles covered here apply to virtually any type of Access database project. You don't need to be interested in fitness to benefit from these lessons.
To begin, start designing each table. I use Excel as a staging area to prepare my data so I can simply copy and paste it into Access, making sure the fields line up exactly between the two programs.
We start with the MuscleGroupT table, which includes fields for an auto number ID, a description, and notes. These fields are common and will be repeated in several other tables.
Next, we move on to the ExerciseT table, which contains an Exercise ID (as an auto number), a Muscle Group ID (number data type for linking), a description, notes, and a URL. I choose to store URLs as long text because while most are brief, occasionally they might exceed 255 characters. This also simplifies copying data later on from Excel if I keep the order of the columns the same.
Each exercise entry might include specific notes, such as details about machines or equipment settings. For example, for a chest press, I make a note about which pin setting to use on my Power Tech leverage gym, or any other equipment specifics.
After setting up exercises, I move to the ProgramT table, which holds basic program information like a full body routine or a four-day split. The RoutineT table then links these programs to routines, with fields for Routine ID, Program ID, and descriptions or notes. Again, copying and pasting from Excel is faster if the field order matches.
The RoutineDetailT table is where things get a bit more complex. This table ties together specific routines with exercises and includes fields like Routine ID, Exercise ID, the order of exercises, number of sets, and notes. Having sample data prepped in Excel here saves time and ensures accuracy.
Next, I create the SessionT table, which represents individual workout sessions. Some fields to include are Session ID, start and end times, and which routine was followed. For start and end times, I show how to set default values using functions like Now or DateAdd, letting Access automatically time-stamp new records. Custom defaults can save time, like setting typical session length to 30 minutes.
SessionDetailT comes last for now. This is where set-by-set performance data is stored, including Session ID, Exercise ID, set number, weight used (set as double to accommodate fractional weights), reps (as a long integer), and notes. For exercises that can have fractional weights, setting this field to double is important, while reps are always whole numbers.
After building all the tables, I talk about how and when to set up relationships. While some prefer to avoid global Access relationships, it can still be useful for enforcing referential integrity in certain areas. For example, setting up a cascade delete from session to session details ensures that deleting a session also removes related records.
I explain the process for establishing these relationships, laying out major tables and connecting muscle groups to exercises, programs to routines, routines to routine details, sessions to routines, and more. The resulting web makes complex relationships between the data clear, and saving this structure ensures your tables are properly connected moving forward.
With our tables in place and relationships defined, we're ready to move ahead with building queries and then forms to make the database more functional and user-friendly.
The main lesson here is the importance of creating robust table structures from the beginning. This solid foundation will make everything else in your database project much easier later on.
Next time, we'll begin building useful queries and forms to start working with our data more efficiently.
You can find a complete video tutorial with step-by-step instructions on everything discussed here on my website at the link below. Live long and prosper, my friends. Topic List Creating database tables for a fitness tracking system
Setting up fields in Access tables
Choosing appropriate data types for fields
Setting default values in tables
Copying data from Excel into Access tables
Designing the MuscleGroupT table
Designing the ExerciseT table
Handling long URLs in data fields
Aligning Excel data structure to Access tables
Designing the ProgramT table
Designing the RoutineT table
Reordering fields for consistency
Designing the RoutineDetailT table
Managing foreign keys in related tables
Prototyping database tables using Excel
Designing the SessionT table
Using default datetime values in Access
Applying the DateAdd function for date fields
Designing the SessionDetailT table
Handling fractional weights in Access
Assigning correct data types for weight and reps
Adding notes fields to tables
Establishing relationships between tables
Enforcing referential integrity in relationships
Setting cascade update and delete options
Understanding one-to-many table relationships
Visualizing and modifying relationship layouts in Access Article If you are still tracking your workouts on a whiteboard or using Excel, you may be looking for a better, more organized way to manage your workout data. Building a fitness tracking database in Microsoft Access is a great solution, and the concepts and skills you learn in the process can be applied to all sorts of database projects, not just fitness. This article will guide you through setting up the tables for the workout portion of a fitness database, explain important design decisions, and show you how to set up relationships between your tables to create a solid database foundation.
The first step in building your database is to identify and create the tables you will need. When moving from Excel to Access, it is helpful to match your Access table fields to your existing sheets so you can copy and paste data easily. Let's start with the Muscle Group table. Create a table called MuscleGroupT. Include an AutoNumber primary key called MuscleGroupID, a Description field as short text, and a Notes field as long text. Once the fields are created, you can copy your muscle group data from Excel and paste it directly into Access as long as the field order matches.
Next, set up the Exercise table. Create a new table named ExerciseT. The fields should include an AutoNumber ExerciseID as the primary key, MuscleGroupID (number), Description (short text), Notes (long text), and URL (long text). For the URL field, although most URLs are shorter than 255 characters, occasionally you will encounter longer addresses, so using a long text type is a good idea. Align your field order with your data source to make copying data simple.
While entering data for each exercise, use the Notes field for any special information, such as the equipment you use, machine settings, or form reminders. This flexibility lets you document anything unique to your setup.
Now create the Program table. Name it ProgramT, with an AutoNumber ProgramID, Description, and Notes fields. Enter your program options such as "Full Body," "Four Day Split," or "Ten Day Program" here.
The Routine table, RoutineT, links workouts to programs. Create an AutoNumber RoutineID, ProgramID (number), Description, and Notes. Again, match the field order to your source data for easy transfers.
The RoutineDetailT table is a bit more involved. It tracks the specific exercises and their order within a routine, as well as how many sets are assigned to each. Set up RoutineDetailT with an AutoNumber RoutineDetailID, RoutineID (number, foreign key), ExerciseID (number, foreign key), SortOrder (number), Sets (number), and Notes (long text). When organizing your data for import, make sure the foreign keys and sort order line up correctly.
For recording completed workouts, create a SessionT table. This table tracks each workout session. Include an AutoNumber SessionID, SessionStart (date/time), SessionEnd (date/time), RoutineID (number, foreign key), and Notes (long text). You might want the SessionStart field to default to the current date and time for user convenience. You can do this in the Default Value property for SessionStart using =Now. For SessionEnd, you can either add a specific interval to the start time (like 30 minutes) by entering =DateAdd("n",30,Now) or =Now+0.0208 (which represents 30 minutes in days), depending on your needs. This saves the user from having to enter times manually each session.
Finally, create the SessionDetailT table, which stores each set performed during a session. Add an AutoNumber SessionDetailID, SessionID (number, foreign key), ExerciseID (number, foreign key), SetNumber (number), Weight (number, set as Double if you need to track partial weights), Reps (number), and Notes (long text). If you do exercises with fractional weights, like half-pound ankle weights, setting Weight as Double allows for that flexibility. Bodyweight exercises can be recorded as zero weight.
After you set up all your tables and import or enter your data, the next step is to establish relationships between the tables to reinforce your database integrity. For example, connect MuscleGroupT to ExerciseT via MuscleGroupID, with referential integrity enforced. Do the same for ProgramT and RoutineT, also RoutineT and RoutineDetailT, RoutineDetailT and ExerciseT, and so on through the session and session detail tables. Enabling referential integrity prevents you from having orphaned records, like exercises without a muscle group or session details without a parent session. Generally, you should not enable cascade delete except in cases where deleting a parent record should always remove the related child records, such as deleting a Session and its SessionDetails. However, for things like deleting a muscle group, you usually want Access to stop you if there are exercises that belong to that group to prevent accidental loss of important data.
Setting up these relationships in Access is simple. Open the Relationships window, add your tables, and create the appropriate links by dragging the related fields together. Select the Enforce Referential Integrity checkbox when you want Access to ensure that related records exist.
By following these steps, you will have a well-structured set of tables for tracking your workouts, routines, programs, muscle groups, and exercise details. This clear schema gives you a strong foundation for creating queries, forms, and reports so you can analyze your progress and maintain your data accurately and efficiently. Even if your end goal is to move to a server-based system like SQL Server, designing your tables and relationships first in Access helps you visualize and refine your schema before migrating.
With your tables and relationships in place, you are ready to move on to building queries and forms that put your data to work. This is the next step in developing a practical workout tracking system or any organized database project. Primary Topics table design, field selection, data type choices, importing data, database relationships, referential integrity, default values, Access database structure
Secondary Topics fitness tracking schema, migrating to SQL Server, cascade delete best practices
|


