Text to Columns
By Richard Rost

 5 years ago
Excel Text to Columns, Split Comma Separated List
In this video, I'll show you how to take a simple text list of items separated by commas and convert them over to separate distinct items, each in its own individual cell in Microsoft Excel.
Selina from Houston, Texas (a Gold Member) asks: I've got a text file which contains a list of items separated by commas, how can I turn them into separate values, each in its own cell?
Members
Members will learn how to transpose the horizontal list that goes across columns to a vertical list that goes down a row. You'll also see how to trim leading and trailing space characters, copy and paste values, and concatenate extra text onto each value.
Silver Members and up get access to view Extended Cut videos, when available. Gold Members can download the files from class plus get access to the Code Vault. If you're not a member, Join Today!
 Links Links
Transpose Axes: https://599cd.com/XLX8
Trim Function: https://599cd.com/XLX1
Copy Paste Values: https://599cd.com/XLX8
Concatenation: https://599cd.com/XLX1
Learn More!
Questions?
Please feel free to post your questions or comments below. Thanks.
Keywords
microsoft excel, ms excel, #excel, #msexcel, #microsoftexcel, #help, #howto, #tutorial, #instruction, #learn, #lesson, #training, #database, text to columns, split list, separate list of text, comma delimited
Transcript Welcome to another TechHelp video brought to you by ExcelLearningZone.com. My name is Richard Rost, your instructor. In this video, I'm going to show you how to take a simple text list of items separated by commas and convert them over to separate distinct items, each in its own individual cell in Microsoft Excel.
Selena says, "I've got a text file which contains a list of items separated by commas. How can I turn them into separate values, each in its own cell?"
Well Selena, in order to do this, we're going to use a feature in Excel that was added in 2013, which is called Text to Columns.
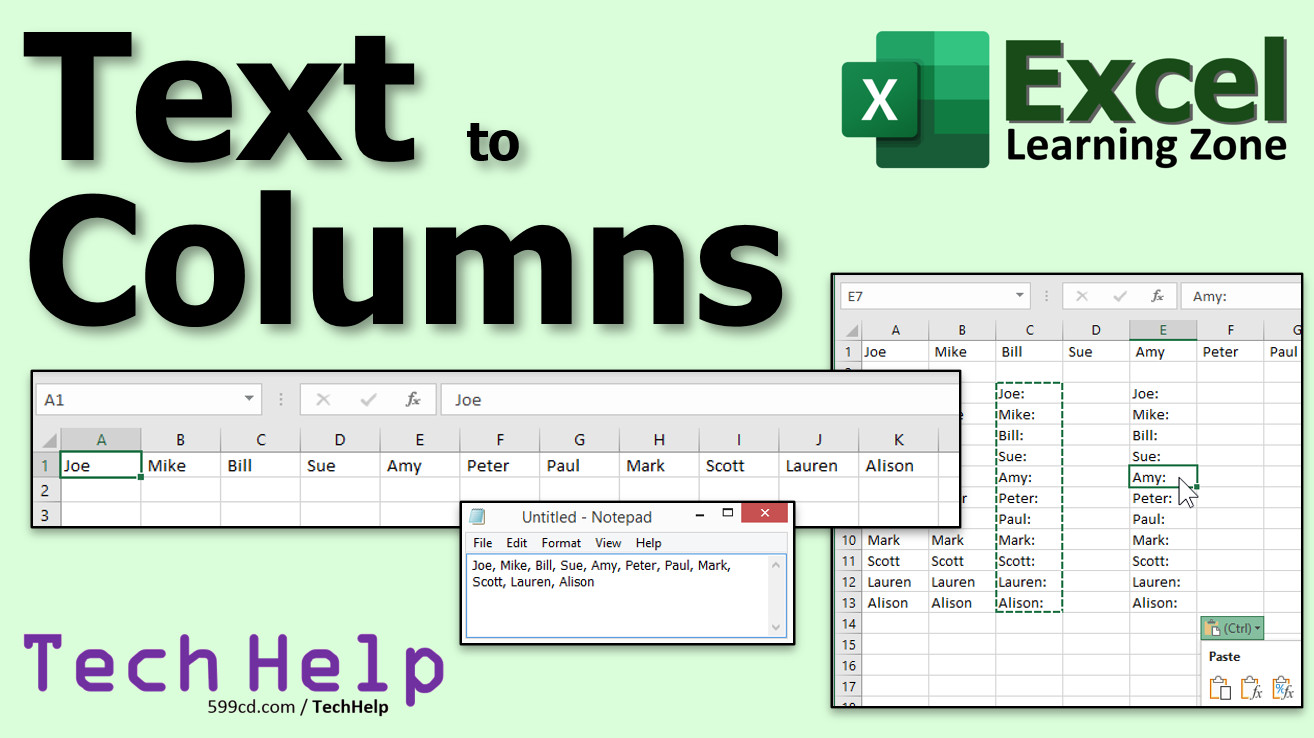
Here I am, I've got Notepad open. That is a text file, and it has a list of names separated by commas. Now, this could be a website, a Word document, or wherever. I recommend you copy and paste it into Notepad though so you are getting plain text. You are not getting any formatting with it.
Now all I'm going to do is select this, then copy (Ctrl+C) to my clipboard. Now, let's go and open up Excel. I'll open a blank workbook, and right here in cell A1, I'll just paste that (Ctrl+V). It gets pasted in one cell; you can see it up here in the formula bar.
What we want to do now is convert this over using Text to Columns. It will take this text, and you'll specify a delimiter, which is just a character that separates the items - in this case, commas. Excel will break this down into multiple columns.
This feature was added in Excel 2013, I believe. It is not even in my older classes because it did not exist then. So, what we're going to do is click on A1, then click on Data, and then Text to Columns is right there.
That opens up this dialog box. Now it says the wizard has determined your data is fixed width. It is not; it's delimited. So pick Delimited. There is a character such as a comma or a tab that separates each field. Pick Delimited and hit Next.
Now, what is the delimiter? In our case, it's a comma. You can use semicolon, space, or something else to tab off. If your data is separated by something like brackets or another character, you can put whatever character you want in here.
You can see down here in the Data Preview that it does a pretty good job of putting the column breaks wherever they need to be. Hit Next.
It's going to format each of the columns as General, but that's fine. If you want to specify Text for a particular column or if you've got a date in one of them, you can pick Date here, but we do not need to do that. Just leave it as General. Then hit Finish.
There you go. That's it. It is that simple. Each item is now separated into its own separate column. That is the Text to Columns feature.
Want to learn more? In the Extended Cut for members, I'll show you how to flip that to a vertical list that goes down in rows instead of across in columns. If you notice, there are extra space characters in there before and after the words. I'll show you how to trim those spaces. I'll show you how to concatenate, or add some text to the beginning or end of that if you want to. Then we'll learn about Copy and Paste Values so you don't have functions in the cells.
All that is in the Extended Cut for members. Silver members and up get access to all of my Extended Cut videos.
How do you become a member? Click the Join button below the video. After you click the Join button, you'll see a list of all the different membership levels that are available, each with its own special perks.
Silver members and up will get access to all of my Extended Cut TechHelp videos, live video and chat sessions, and other perks. Silver members get access to download all of the sample spreadsheets that I build in my TechHelp videos, plus my Code Vault where I keep tons of different functions that I use, and more.
Platinum members get access to all the previous perks, plus all of my beginner full courses and one new expert course every week. These are the full-length courses found on my website and not just for Excel. I also teach Word, Access, Visual Basic, ASP, and lots more.
When you do sign up to become a member, I need you to email me and tell me you want more Excel. The vast majority of my videos are for Microsoft Access because that has been my focus for the past few years. However, I am happy to add more Excel videos if I get more Excel members, so make your voice heard and I will make lots more TechHelp lessons for Excel.
Don't worry, these free TechHelp videos are going to keep coming. As long as you keep watching them, I'll keep making more, and they will always be free.Intro In this video, I will show you how to use the Text to Columns feature in Microsoft Excel to convert a comma-separated text list from a text file into separate values, each in its own cell. We'll go through copying data from Notepad, pasting it into Excel, and walking through the steps to split the text into columns using a delimiter, focusing on commas as the separator. This is a simple way to break apart lists so each item appears in its own cell for easier handling in Excel.Quiz Q1. What is the main purpose of the Text to Columns feature in Excel?
A. To convert a text list of items separated by a delimiter into separate cells
B. To add text automatically to each cell in a column
C. To merge multiple columns into a single cell
D. To change fonts for selected cells
Q2. What does a delimiter refer to in the context of Text to Columns?
A. The first word in the text
B. A character that separates each item in the text
C. A formula used for calculations
D. The formatting style of the cells
Q3. In the example given, which delimiter was used to separate the list of items?
A. Semicolon
B. Space
C. Tab
D. Comma
Q4. What should you select in the Text to Columns wizard if your data is separated by a character like a comma?
A. Fixed Width
B. Delimited
C. General
D. Date
Q5. Which version of Excel did the Text to Columns feature appear in, according to the video?
A. Excel 2007
B. Excel 2013
C. Excel 2010
D. Excel 2016
Q6. After using Text to Columns, how are the list items distributed in Excel?
A. Each item appears in a new column
B. All items are merged into one cell
C. Each item appears in a new row automatically
D. Items remain as they were
Q7. According to the video, what should you do if extra spaces appear before or after the words in your list?
A. Use a formula to add numbers to the words
B. Manually delete each space
C. Use the Trim function to remove them
D. Change the font size
Q8. What does the video recommend doing if you want to add text to the beginning or end of each separated value?
A. Use the Concatenate function
B. Use the Text to Speech feature
C. Delete the unwanted text manually
D. Use the Pivot Table feature
Q9. In the Extended Cut for members, what additional thing does Richard promise to teach?
A. How to create charts with the data
B. How to flip the list into a vertical list
C. How to print the worksheet
D. How to password-protect the file
Q10. If you want to remove any formulas from the cells after using Text to Columns, what method is mentioned in the video?
A. Use Paste Values
B. Click Undo
C. Save as PDF
D. Apply Conditional Formatting
Answers: 1-A; 2-B; 3-D; 4-B; 5-B; 6-A; 7-C; 8-A; 9-B; 10-A
DISCLAIMER: Quiz questions are AI generated. If you find any that are wrong, don't make sense, or aren't related to the video topic at hand, then please post a comment and let me know. Thanks.Summary Today's video from Excel Learning Zone covers a useful technique for anyone who needs to split data in Microsoft Excel. I want to show you how to take a simple text list, where each item is separated by a comma, and break it down so that each value ends up in its own individual cell in Excel.
I received a question from Selena, who mentioned she has a text file containing a list of items separated by commas. She wanted to know how to turn that list into separate values, each occupying its own cell.
To accomplish this, we will use a feature in Excel known as Text to Columns. This tool was introduced in Excel 2013, so if you are using an older version, you may not have access to it.
Let me walk you through the process. First, I recommend copying your data into Notepad or another plain text editor. This removes any formatting that might interfere with the process later. Once your data is in Notepad, simply select it and copy it.
Next, open a blank Excel workbook and paste your copied list into a cell, usually starting in A1. You will notice that the entire list appears in a single cell, and you can see the whole string in the formula bar.
Now we want each item from that comma-separated list to go into a separate cell. This is where Text to Columns comes in. First, select the cell where you pasted the data. Then, go to the Data tab, and you will find Text to Columns.
When you launch Text to Columns, you will see a dialog box. It may initially think your data is fixed width, but in this situation, select 'Delimited' since we have a separator (the comma). A delimiter is just a character, like a comma or tab, that divides each value.
On the next screen, choose comma as your delimiter. If your data uses a different character, you can specify that as well. Excel will provide a preview showing how it will split your data into columns. Once you confirm the delimiter, click Next.
You will see options to format your new columns. For most cases, leaving the columns as General format is perfectly fine. If any columns contain special data, such as dates, you can specify those formats here. Otherwise, just click Finish.
That is all there is to it. Excel will separate each item into its own column using the Text to Columns feature.
If you want to explore more advanced options, in the Extended Cut for members, I demonstrate how to transform that horizontal list into a vertical one, putting each value in a separate row instead of across columns. I also cover how to remove any unwanted spaces before or after your values, how to add extra text to the beginning or end of each item, and how to use Copy and Paste Values to remove any formulas and keep only the results.
All this extra detail is available in the Extended Cut for members. If you are interested in joining, there are several membership levels, each with its perks. Silver members and above get access to all of the Extended Cut TechHelp videos, monthly live video and chat sessions, downloadable sample spreadsheets from my lessons, and access to my Code Vault, which includes a wide range of useful functions.
Platinum members receive even more, including all the benefits I just mentioned, plus my entire library of beginner-level full courses, as well as one new expert course every week. This covers not only Excel, but also Word, Access, Visual Basic, ASP, and more.
If you do decide to become a member, please send me an email and let me know that you are interested in more Excel material. While most of my current videos focus on Microsoft Access, I am happy to produce additional Excel lessons if the demand is there.
Regardless of membership, you can always look forward to free TechHelp videos on my channel. As long as you keep watching, I plan to keep making them available to everyone.
You can find a complete video tutorial with step-by-step instructions on everything discussed here on my website at the link below. Live long and prosper, my friends.Topic List Copying comma-separated text from a text file
Pasting text into a single Excel cell
Using the Text to Columns feature
Selecting Delimited as the data type
Choosing comma as the delimiter
Previewing data before splitting
Completing the Text to Columns wizard
Outputting items to separate columns in ExcelPrimary Topics Excel, Text to Columns, delimited data, data import, comma-separated valuesSecondary Topics removing extra spaces, transposing data, concatenation, copy-paste values, membership perks |