Product Catalog
By Richard Rost

 4 years ago
Product Catalog with Multiple Images Per Product
In this Microsoft Access tutorial, I'm going to show you how to create a product catalog showing multiple images per product. Yeah, we're going to cheat and use a customer form, but the concept is the same whether it's products, customers, employees, properties, or whatever you want. It's basically displaying multiple images per record.
Gilian from Burlington, Vermont (a Platinum Member) asks: I'd like to create a report that I can print out or send as a PDF to my customers showing each of my products. I've used your technique from the Images video to display pictures and not store them in the database. That works great, however is there any way I can show multiple images per product? I sell furniture, and sometimes the customer wants to see the same item from multiple angles. Thanks!
Members
Members will see how to display the products in multiple columns in the report using a subreport.
Silver Members and up get access to view Extended Cut videos, when available. Gold Members can download the files from class plus get access to the Code Vault. If you're not a member, Join Today!
 Developer Students! Developer Students!
Developer Students will learn how to display the images in multiple columns in the subform! This will involve some tricky VBA coding. I cover this in Access Developer 38.
Recommended Course
 Links Links
Keywords
access 2016, access 2019, access 2021, access 365, microsoft access, ms access, ms access tutorial, #msaccess, #microsoftaccess, #help, #howto, #tutorial, #learn, #lesson, #training, #database, image gallery, multiple images per record, CurrentProject.Path, How to create a catalog of products in Microsoft Access, catalogue, How do I make a photo catalog in access, How do I Create a product catalog in Microsoft Access, Help creating a product catalog in Access, multiple columns in a form, report columns, subreports
Transcript Welcome to another TechHelp video brought to you by AccessLearningZone.com. I am your instructor, Richard Rost.
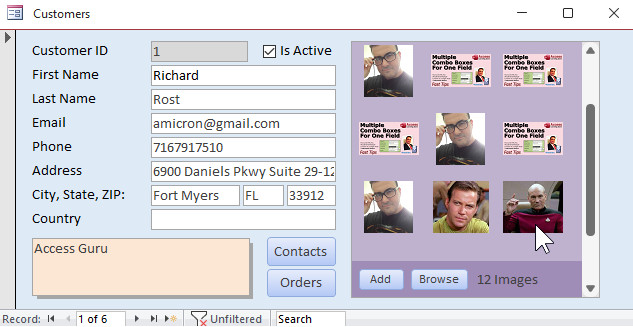
In today's video, I'm going to show you how to create a product catalog showing multiple images per product. We're going to cheat and use a customer form with multiple pictures for a customer, but the concept is the same whether you're doing products, customers, employees, properties, or whatever you want. It's basically displaying multiple images per record. So if you're doing a product catalog, great; if you want to do an employee and have multiple pictures of the employee, that's fine too.
Just wanted to explain why you see Captain Kirk and Picard there instead of pictures of a product. That's why.
Today's question comes from Jillian in Burlington, Vermont, one of my platinum members. Jillian says:
I'd like to create a report that I can print out or send as a PDF to my customers showing each of my products. I've used your technique from the images video to display pictures and not store them in the database. That's great and works great. However, is there any way I can show multiple images per product? I sell furniture, and sometimes the customer wants to see the same item from multiple angles. Thanks.
Well, yes, Jillian. That's definitely something we can do. In the images video, I show you how to display one image per record. With a little relationship to a second table in a subform, we can do the same thing with multiple images. So whether you have multiple pictures of a couch or multiple Starship captains, either one, it will work just fine this way.
So what do we need before we get started?
First, go watch my images video if you haven't already. In the images video, I show you how you can display images in your forms and reports without actually storing them in the database. You don't want to store any kind of files, whether they're pictures or Word documents. You don't want to put those things in the database—don't use attachments, don't use OLE objects. You can blow out your database. That's bad.
So watch this video and that will show you how to display these things, images, in your forms and reports.
You'll need to understand relationships. We're going to need at least two tables: customers and their images, or products and their images. Go watch my relationships video if you don't know how to work between multiple tables. These are all free videos. They're on my website. They're on my YouTube channel. There's a link right there. You'll find links you can click on in the description down below the video window that you're watching right now.
YouTube does a really good job of hiding that description. Most don't know where it is. It's right down here—see this little "more" right there? There's the description. Boom. There's all the extra stuff and here are the links you can click on. A lot of you don't know that. Some people have said, where do you find all these links? Well, they're down below. YouTube hides it with that little "more" link.
Now, you should know how continuous forms work. Continuous forms are where you can have multiple records at a time in a form as opposed to a single form with just one record. We're going to use grouping levels in reports. Go watch my grouping video. That's where you can group stuff together in a report. We're going to group all the pictures together under the customer or under the product.
Also, some of you will ask about image quality. If your images look poor in your reports, I have a video on fixing poor quality images in your reports.
So, here's the product catalog database. This is a copy of my TechHelp free template. You can grab a copy of this off my website. It's free. I renamed it the product catalog—that's fine. In here, we've got a customer table. It's got all of our customer information. Here's the customer form. Like I said in the beginning, we're going to cheat. Jillian, I know you want to do products and images. It doesn't matter if it's customers and images or properties and images. Whatever you want to do, it's the same thing. So we're going to do multiple—let's call them multiple profile pictures for a particular customer.
In the images video, I showed you how to store an image by storing the file name of the image in the customer form. But if you want multiple ones, then you've got to set up a second table with a one-to-many relationship.
So let's go to Create - Table Design. We're going to create a picture table: PictureID, that's our primary key. Then we need a CustomerID—that's a number, type long integer. That's our foreign key from the relationships video. That's how we know what customer this picture belongs to. Now we don't store the actual picture itself in here. All we store is the file name. That will be short text.
There are two ways you can do this. You can store the complete file name with the whole path—C:\\My Documents\\whatever.jpeg—or you can set up a single folder and store all your pictures in that folder. Then all you have to store is the file name itself instead of the full path. I'm going to do the latter option, because I don't think I showed you that in the images video. I just double-checked. We do the full path in there.
So, I'm going to minimize this for a minute and create a folder—new folder—and call it "images." I'm specifically going to have my images folder underneath the folder that my database is in, for a reason I'll explain in a minute. Right now, everything is sitting on my desktop, so that database folder is my desktop. But I could easily move this later on if I want to. We'll talk more about this in a few minutes.
Now, in this images folder, I'm going to put some images. What images you put in your images folder is completely up to you. I'm going to put in a bunch that I already saved. I'll copy and paste them right there. There's my images. Go to view, and then we'll go to medium icons so you can see what they are. There they are. Got some Kirk. Paramount, please don't sue me—I love Star Trek. I've got some other ones for me. These are all my images folders—the only folder we're going to need.
Let's go back to the database now. Let's save this guy. This will be my picture table—PictureT. Primary key, yes. If you want to do this for multiple things (if you want to have multiple pictures for your customers), call it CustomerPictureT. If you want to do products, call it ProductPictureT. That's what I do when I have a table that's based on another table.
Let's close that. Now you need to make a form that's going to be our subform. Right over here, we're going to have it. It's going to look just like this when we're done—a little subform, a continuous subform inside our customer form to put our pictures in.
Let's close that, and go over here. I already have a continuous form. All these ones here with little underscores in front of them, those are from my blank template. If you watch my other videos, you know my blank template, how I built that. If not, go watch this.
I jump around a lot. That's why I have complete courses—you can start from the beginning and go through to the advanced stuff without jumping around a lot. But the TechHelp videos, I jump around a lot. That's just how I have to do it.
So, we're going to take "continuous" and copy, paste—Control-C, Control-V. We're going to call this PictureF. That's my picture form, right there. Right click, Design View.
First, I'm going to delete these labels—we don't need them. Delete that, we don't need it. We'll slide that to the left, get rid of the form header and footer. Let's bind this guy to its data source—Record Source is going to be PictureT.
Now in here, this is going to have the file name in it, and then we're going to put the little picture right next to it. In the form, we just need to be able to browse so we can add pictures to it. The reports, that's where you want to make it look nice.
So let's drop our picture control. We're not going to do it from over here with Insert Image. We're going to grab the picture control from in here—Image Control, right there. Draw a box like that. When this thing opens up, cancel it. Then we can slide this over like that. Let's make this a little bit taller so this is in the middle. This guy is bound to PictureT; this is going to be our file name. Change the Control Source to FileName. I'm going to copy and paste that and make that the name.
This guy here, we can call that Picture (the name of it). The control source is going to be FileName, but the file name is going to be in that images folder underneath the current database folder. How do we do that?
This is something that's a little more advanced. I usually cover this in my developer classes. You guys are getting something cool here already.
So, Control Source—I'm going to zoom in so you can see this better—Shift-F2. I want FileName, but I want FileName in that images folder. Normally I would say "C:\\Users\\Richard\\Desktop", etc., and then tack on the file name. That's called string concatenation. That's adding the file name field onto the end of this string. But I don't know where the database might happen to be in the future. If you move it, I don't want to have to rename all these things throughout my database. There's a special variable in Access—it's called CurrentProject.Path. Right there is the folder that your database is sitting in.
Onto that, we're going to tack on "\\images\\" because we made an images folder under that, and then the file name. So that's going to replace "C:\\Users\\Richard\\Desktop", etc. Add "\\images\\" and then FileName. In front of all this, we need an equal sign. Just because you do.
Hit OK, hit Tab. That's a cool trick for today. That's really neat.
Save that, close it, and now open up the PictureF. Now type in here one of your file names, like "kirk.jpg", and hit Tab. Boom, there's Kirk. Do that, then type in "picard.jpg". Boom. Where are those file names coming from? If they're in my images folder—there's Kirk, there's Picard. Hit a little TrashPig, see—"trashpig". It's a TrashPig.
So that gets the file out of that folder. If you move your database any time in the future, as long as you've got an images folder underneath it, that's all you have to do. If you want to be able to click a button and pick that, I do cover that in the images video and the extended cut for the members. There's a little VBA code and a button that we can click on and browse for the file name. That requires a little bit of programming, but I do cover that. If you want that functionality, there's a reason right there to become a member.
Remember, Silver members and up get access to all of these extended cut videos. Gold members can download these databases and get access to my code vault with lots of cool VB code in it. Everybody gets a free class every month. But for now, the rest of us, we'll just have to type in the file names.
We're going to delete those for now, because we're not finished yet.
Now, what I have to do now is take that form and put it in here as a subform. So, Design View. Just to make things easier, I'm going to delete some fields we don't need. Delete that stuff. We can take notes and slide it down under here. We could take these buttons and drop them under here. This doesn't have to be that big.
Now we've got plenty of room for our subform. Why does it have to be a subform? Well, because the subform makes that relationship so we know whose pictures it is. Just typing in those pictures, we're filling in the file name, but the CustomerID is going to stay zero. That's what the subform does. With no extra work, Access does that for us automatically.
We'll just take this picture form, click, drag, drop—right there. Delete that label that comes in with it. Slide it up here, slide that down like that. Save it.
Now if you look at the properties for this subform, you'll see right there on the "All" tab, Link Master Fields, Link Child Fields. Access saw that we have a CustomerID in both of these tables. This is based on the customer table, this is based on the picture table, and it found CustomerID in both of them. So it created that link for us. You don't even have to have the CustomerID field on this form. It just makes that relationship. It's a really cool thing.
Save it, close it.
Let's go to our customer form now. Here's me. I have some pictures for me. I've got "rick.jpg"—boom, there's me. I'll do "alz.jpg" for me—boom. Fine, I'll do the TrashPig. There we go. Oh, TrashPig didn't come in. Oh, TrashPig's a PNG. That's why—you have to know your file names. "trashpig.png". So notice if you put the file name in wrong, it just doesn't show anything, which is okay. There's TrashPig.
Go to someone else. Here's James Kirk. We got "kirk.jpg", and we got "kirk2.jpg", and we got "1701.jpg"—there's his Enterprise.
Let's go to another one. There's Deanna—no, not many pictures of Deanna. Jean-Luc—I got "picard.jpg" and "1701d.jpg". There we go.
If we go between these, you'll see there's everybody and their pictures. That's how you can store the locations, not the pictures themselves. You can store the locations and display those images for different people.
Now, how do we put this into a report? That's what you really want. You want to put this into a report.
To do the report, I'm going to use the same technique that I used in my invoicing video. If you haven't watched it, go watch it if you want to. You don't have to; it's not really a prerequisite, but I'll use the same technique where we have groups of information, like all this is the details and this is the order information.
We'll do the same thing—this will be the customer information and down here will be the pictures. What you really want to watch is the grouping video. We're going to use grouping levels to do this.
First, we need a query. Create - Query Design. We're going to bring everything together in a nice query. I need my customer table. Double-click on that. It was giving me a hard time for a second there. Then double-click on the picture table. These things are brought together.
If you want to make sure you see all of the customers in this report, whether or not they have pictures, make this an outer join. Double-click on that line and pick "Show all the records from customer table and only the records in pictures where they are joined." You'll get that little arrow line. That's called an outer join. I have a video for that as well. If you only want to see records that have pictures, then go back to a normal join, which is what I'm going to do. I only want to print, in my customer catalog, customers that have pictures. If they don't, don't print them.
Now, I'm going to bring in the stuff that I want to see in this report—whatever you want to see in your catalog—maybe CustomerID, FirstName, LastName, maybe EmailAddress, and then the Picture. Do you need the PictureID? No, unless you want to display it. I'm assuming you'll have more stuff in your picture—maybe your pictures will have serial numbers or whatever. Actually, the serial number will probably be part of the product. So whatever you want to see about the picture other than the file name, bring that over too.
If you run that, this is what you get. There's all of my pictures—there's Jimmy Kirk's pictures and there's Jean-Luc's pictures. Then we're going to group this stuff based on CustomerID and show the individual pictures below it.
Save this query. We'll call this our CustomerPictureQ (CustomerPicture Query). Close that.
Now we're going to make a report based on that query. I've already got a report—my blank report that's already sized out and it's got all the margins and everything that I like. So I'm going to use that. Copy, Control-C, Control-V. We're going to call this CustomerPictureR.
There it is. Right click, Design View.
First thing we're going to do is bind it to its data source. Double click here to bring up the properties. Change the Record Source to that CustomerPictureQ.
This guy is already set out to eight inches because we have half-inch margins left and right.
For now, I don't need a Report Footer, Page Header, or Page Footer. We can just shrink that. What I do need is a grouping level. Let me show you what we have right now. If we go to Add Existing Fields, let's just bring everything in. Bring everybody in—everybody to the party.
That's what we have right now. I keep this guy around as a format painter thing so I can just go copy, double click on that, then go paste, paste, paste, paste. It gets rid of the border and sets the colors the way I like. That's the only reason I keep you around. You can now go—bye bye.
This stuff here is going to be in the group and this is going to be in the Detail section. But watch—if I just do this without a group, if I right click now and go to Print Preview, this is what I get. We have to put the picture in here, but you can see each record repeats. That's what the grouping header is for.
So, Design View, go to Group and Sort. This is the grouping level. Add a group. We're going to group on CustomerID. From small to large, just click More. Make sure you have "with a header section" on; you probably don't need a footer section.
Now I take this stuff and move it into the header like that—just click and drag it. Or you can cut and paste, whichever you prefer.
When I save that and Print Preview it, it looks a lot better now. There is one bit of data for the customer and then it repeats all the file names. That's what a grouping level does—group all of Jean-Luc's stuff, all of James Kirk's stuff together, and there's the related records.
Back to Design View. Let's close this pane down here. Be careful—one of my pet peeves of Access is that "X" and that "X" are so close to each other. This deletes the grouping level; this closes the pane. I hate that. Microsoft, change this and do something better. I have accidentally deleted grouping levels so many times. Close it to just close the pane on the bottom.
Now we can go through the toolbox and put the picture down here, just like we did before, and put the control source in. Or we could just copy the one we already have. Go to your picture form, Design View, copy, come over here, click, paste—there it is, same thing.
Do we even need this file name in here? No, not really—delete it. Make this as big as you want it to be so you get your pictures right there.
You could probably clean this up a bit. Do you want to see CustomerID? That's up to you. You know what I'm going to do? I'm going to get rid of CustomerID, get rid of all these labels, and get rid of LastName—and do this: Let's call the name "FullName" and set the control source to: = [FirstName] & " " & [LastName]. That's string concatenation. I'm putting two strings together. If you don't know about string concatenation, I have a video for you—go watch that one.
Maybe we'll put their email address underneath like this, make this nice and big—Format, 20 point, or maybe bigger, 26 point—bold. Email can be smaller underneath, then put the picture underneath that.
Save it, let's preview. There we go, it's looking better. See what I mean about it looking washed out? Go watch that video. It teaches you how to fix that. Maybe you have to convert these to bitmaps.
One thing I don't necessarily like is the alternating background color behind it. I don't like that, so let's get rid of it.
Right click, Design View, open up the properties for the Detail section, go to Format, and set the background to No Color. It's probably the header—the Customer Header. Change that to No Color. I talk about that in my blank video too.
If you want to display each customer on its own page, you can force a new page after the customer's displayed. You have to turn on the CustomerID footer. Go back to your grouping levels and set "with a footer section." Now you have a CustomerID footer down here. We're not actually going to use the footer for anything except we want one of its properties. Double click and set Force New Page to After Section. So each time a customer is displayed, it will force a new page. You basically get each product or customer on its own page.
Save it, right click, Print Preview. There you go. There's Richard Rost, my three pictures. James Kirk, his pictures. I love that. Jean-Luc Picard and his pictures. Make it so.
Now, right now, when you open up this product report—or, customer, I did CustomerProduct, didn't I? Yeah, Customer—this should be CustomerPicture. I did the whole video and you guys have to raise your hand and say something. This should be CustomerPicture. I'm thinking of Jillian's question in my brain and I've got picture on the mind. This should be CustomerPicture and not CustomerProduct. That's actually easy to fix because if you close this and rename it, Access is nice because it will rename anything that refers to that—CustomerPictureQ. This can be CustomerPictureR. Now right click and Print Preview and it should catch that.
It doesn't work with your VB code, by the way. If you are at the developer level, Access does not go through and rename any VB code, but it will generally catch changes in names of tables, queries, and stuff like that and fix any related objects.
Now, if you want to print only one customer at a time, like let's say you want to go into the customer form and go to Captain Kirk and then hit print and just print him, go watch this video: "Open a Report to a Specific Record." I cover that in that video. Again, you'll find links to all of these things down below.
One more thing to talk about. You've got a nice little report here. What if you want these things to show up in columns? What if you want it to look like this? This is what we're going to be covering in the extended cut. I'm going to show you how to use a subreport and make different columns in here, so you're not wasting all that space with one picture per line. You can have multiple columns of pictures—more like a product catalog.
If you want to learn even more, in my Access Developer 38 class, I show you how to do multiple columns in that subform. That's tricky and it involves some programming. Here's my developer database. We've got an "Add" button—you click add, you pick your picture. There's me—hit OK, it adds it in there. Add another one—let's say the TrashPig. Do that, puts it right in there. Add another one—the Access Learning Zone logo. Edit one of them—click on it, you can delete it right here.
Go to the next person—James Kirk. Add, hit Kirk, hit OK. Edit that one—click on it. This is the developer version—the top part is doing multiple columns in this form. Getting multiple columns to display this way involves a significant amount of programming, and I do cover that in Access Developer 38.
If you just want to learn how to do multiple columns in the report, that's pretty easy and honestly, it doesn't involve any programming whatsoever. If you want to be able to print out reports like this, sign up and become a member. Silver members and up get access to all of my extended cut videos. Gold members can download these databases and you get access to my code vault with lots of cool VB code in it. Everybody gets a free class every month. If you're a Silver member, you get a free beginner class. If you're an Expert member, you get up to the Expert levels. Gold members get Expert level. Platinum members get up to the Developer level.
Lots of you are members, but few people get their free classes. You just have to come to my website, tell me who you are, and set up an account—for free.
Hope you learned something. We'll see you next time.
How do you become a member? Click on the Join button below the video. After you click the Join button, you'll see a list of all the different membership levels that are available, each with its own special perks.
Silver members and up get access to all of my extended cut TechHelp videos, one free beginner class each month, and more. Gold members get access to download all of the sample databases that I build in my TechHelp videos, plus my code vault where I keep tons of different functions that I use. You'll also get a higher priority if you decide to submit any TechHelp questions to me, and you'll get one free Expert class each month after you finish the beginner series.
Platinum members get all the previous perks plus even higher priority for TechHelp questions, access to all of my full beginner courses for every subject, and one free Developer class each month after you finish the Expert classes. These are the full-length courses found on my website, not just for Access too. I also teach Word, Excel, Visual Basic, and lots more.
You can now become a Diamond Sponsor and have your name or company name listed on a sponsors page that will be shown in each video as long as you are a sponsor. You'll get a shout out in the video and a link to your website or product in the text below the video and on my website.
These free TechHelp videos are going to keep coming. As long as you keep watching them, I'll keep making more, and they'll always be free.Intro In this video, I will show you how to create a product catalog in Microsoft Access that displays multiple images per product using related tables and subforms. We will cover setting up the necessary tables, storing and displaying image file names without storing the images themselves, organizing images using subforms, and creating a report to group and display the catalog entries neatly for printing or PDF export. These techniques can be applied to products, customers, employees, or any records where you want to associate multiple pictures with each item.Quiz Q1. What is the purpose of creating a second table (such as PictureT) in the process described in the video?
A. To store customer contact details
B. To record product pricing information
C. To store multiple image file names linked to each record (e.g., customer or product)
D. To back up the main database
Q2. According to the video, what should you avoid storing directly in your Access database?
A. Text notes about each customer or product
B. Images or other files as attachments or OLE objects
C. Numeric values representing prices
D. Email addresses of customers
Q3. Why is it recommended in the video to store the image file name rather than the full path?
A. It makes the table load faster when opened
B. It is easier to change image file types in the future
C. The images are always stored in a consistent folder relative to the database's location
D. File names work better with queries than file paths
Q4. What variable is used in Access to determine the current path of your database file?
A. DatabasePath.Current
B. PathOfDB
C. CurrentProject.Path
D. FileDirectory.Current
Q5. How does Access automatically maintain the relationship between customer records and their related images in the subform?
A. By using the form's default property settings
B. Through the Link Master Fields and Link Child Fields properties, matching CustomerID fields
C. By manually entering CustomerID values each time
D. By creating a unique image table for each customer
Q6. What is the main benefit of using a continuous subform to display pictures?
A. It allows pictures to be displayed one at a time only
B. It enables displaying multiple images for each main record in a list format
C. It encrypts the image file paths for security
D. It makes printing impossible
Q7. What is grouping used for in the reports discussed in the video?
A. To randomly color-code the report pages
B. To sort images alphabetically
C. To group related images under their parent record (e.g., all pictures for one customer)
D. To filter out certain pictures
Q8. What must be set on the grouping level to ensure each customer's group appears on a new page in the report?
A. Set Force New Page property to Before Section
B. Set Grouping Order to Descending
C. Set Force New Page property to After Section in the group footer
D. Remove all grouping from the report
Q9. What is the purpose of using string concatenation in the report design process?
A. To combine numbers and text in email addresses
B. To join the folder path, image folder, and image file name dynamically for the image control
C. To compare two different images
D. To create random file names for images
Q10. If you want all customers to appear in the report, even those without images, what should you use in your query design?
A. Inner join between CustomerT and PictureT
B. Outer join from CustomerT to PictureT
C. No join between the tables
D. Outer join from PictureT to CustomerT
Q11. What happens if you enter an incorrect image file name in the subform?
A. Access opens an error dialog box
B. The last valid image remains displayed
C. The picture control simply displays nothing
D. The database crashes
Q12. Where can you find additional resources and links referenced in the video?
A. In the "more" section of the video description below the video window
B. In the video title itself
C. In a pop-up during the video playback
D. Only in printed materials
Q13. What approach does the extended cut video use to enhance the image layout in the report?
A. Adds music to the report
B. Arranges images in multiple columns for a catalog look
C. Formats all images in grayscale
D. Adds a watermark to each image
Q14. What programming topic is briefly mentioned as necessary for advanced image browsing or multi-column subforms?
A. SQL injection prevention
B. Using macros to automate reports
C. Writing VBA code for button-driven file selection or complex layouts
D. HTML embedding for web reports
Q15. What is the primary advantage of storing images in a folder below the database location rather than a hardcoded path?
A. Makes the images load faster
B. Ensures portability of the database and images together if moved to another location
C. Reduces database file size by half
D. Hides images from users
Answers: 1-C; 2-B; 3-C; 4-C; 5-B; 6-B; 7-C; 8-C; 9-B; 10-B; 11-C; 12-A; 13-B; 14-C; 15-B
DISCLAIMER: Quiz questions are AI generated. If you find any that are wrong, don't make sense, or aren't related to the video topic at hand, then please post a comment and let me know. Thanks.Summary Today's video from the Access Learning Zone focuses on how to create a product catalog in Microsoft Access that can display multiple images for each product. While I demonstrate the process using a customer form and multiple pictures per customer, you can apply the same principles for products, employees, properties, or any other type of record where multiple images per item are needed.
This lesson was inspired by Jillian, who wanted to know how she could generate a catalog for her customers showing each product with several pictures from different angles. In my earlier tutorial on displaying images in Access, I covered how to display a single image for each record without storing the picture directly in the database. Now, we will build on that method to associate multiple pictures with any individual record using a simple relationship to a second table.
Before getting started, it is crucial to understand a few foundational topics. If you haven't already, I recommend watching my image handling video, where I explain why you shouldn't store files directly in your Access database. Instead, store only the file names or paths to keep your database size manageable and avoid corruption. Also, a solid understanding of table relationships will help tremendously since we'll be connecting two tables: one for your main records (such as customers or products) and another for the related images.
Continuous forms in Access are useful here because you can display multiple picture entries for a single record. Grouping features in reports further help gather all images connected to a record under one heading. If image quality becomes an issue, I have an additional video to help you improve picture display in your reports.
For this demonstration, I use my TechHelp free template, which you can download from my website. Although I refer to customers and their photographs throughout, you can substitute products or any other items without changing the approach.
Previously, we only stored a single image file name per record in the main table. To handle multiple images, you'll need to set up a separate images table with a one-to-many relationship. Each entry in this new table should include a primary key, a foreign key linking back to the main record, and a field for the image file name.
There are two main ways to manage your image file names: you can store the full path or just the file name if all images are in a designated folder. I recommend the second approach for simplicity, which I demonstrate here by creating an "images" folder alongside the Access database folder. All your images should be placed there.
With your new images table established, the next step is to create a continuous form for data entry. This subform will display each image entry per main record — for example, all pictures linked to a specific customer. Instead of using an attachment or OLE object, use an image control where the source is determined dynamically. You do this using the CurrentProject.Path variable in Access, combined with the relative path to your images folder and the file name stored in your table. This way, if you move your database, as long as the images folder travels with it, everything will continue to work.
Once the continuous form is set up, embed it as a subform inside the main form. Access smartly links parent and child records based on matching foreign keys. You may notice that as you type image file names into the subform, the correct images display instantly, as long as those file names correspond to files in your images directory. If you want enhanced browsing or image-picking features, that's something I cover with a little VBA programming in my extended lessons.
After the form is working, it's time to build the report. Begin by creating a query that joins your main table with the images table. If you want to make sure all records show up in your report, even if they lack images, set up an outer join. Otherwise, use a standard join to limit the report to records that have associated images.
With your query ready, create a new report and bind it to this query. Bring in all the fields you want to display. To ensure all the images for a record are grouped together, set a grouping level in the report based on your main table's key (like CustomerID). Move identification details into the group header and place the picture control in the detail section. At this point, you'll see each individual's details followed by their associated images.
For a cleaner look, you can combine fields with expressions, such as concatenating first and last names, and rearrange the layout to suit your needs. Adjust background colors and report formatting as desired.
If you want each customer or product record to start on a new page, you can do so by adding a footer section in your report's grouping structure and setting its 'Force New Page' property. This ensures that, when you print or export your catalog, each entry appears on its own separate page.
From here, if you want to print only one person or product at a time, this can be handled as shown in my other tutorial on opening a report to a specific record.
For those interested in more advanced layouts, such as displaying multiple image columns per record in your report (to make better use of space, as in a typical product catalog), that topic is covered in the extended cut of this lesson. I'll show you how to use a subreport to achieve multiple columns, which does not require any programming. However, arranging multiple columns in a subform on your main screen (not just in reports) does require more advanced programming, which I cover in my Access Developer classes.
If you are a member at the Silver level or higher, you get access to all my extended cut videos and other exclusive resources. Gold members can download my example databases and code samples. Each membership level comes with its own perks, up to and including full courses across many Microsoft Office applications.
You can find a complete video tutorial with step-by-step instructions on everything discussed here on my website at the link below. Live long and prosper, my friends.Topic List Creating a table for storing multiple images per product or customer
Establishing one-to-many relationships for images
Setting up an images folder relative to the database location
Storing file names instead of full file paths for images
Building a subform to display multiple images per record
Binding image controls to show pictures using dynamic paths
Linking subforms to main forms using master and child fields
Using continuous forms to display image records
Using queries to join main records with associated images
Configuring outer joins to show all records or only those with images
Building a grouped report to display main records with their images
Using grouping levels to organize related images under each record
Customizing report headers and details for image presentation
Concatenating first and last names in reports
Adjusting formatting and layout in reports for better image display
Forcing page breaks between grouped records in reports
Renaming tables, queries, and reports in Access
Displaying images accurately regardless of database locationPrimary Topics Access product catalog, displaying multiple images per record, one-to-many relationships, subforms, image storage (paths not files), grouping in reports, continuous forms, report design
Secondary Topics image folder organization, path concatenation, report pagination, handling missing images, developer techniques, member video benefits
|


