Students & Parents 7
By Richard Rost

 2 years ago
Relate Students & Parents in MS Access Database Part 7 In this Microsoft Access tutorial, I will show you how to streamline adding students and parents directly within a form using a list items edit form. We'll create continuous forms for editing data, add functionality to our main menu with buttons, and enable easier navigation across your database. This is part 7. MembersIn the extended cut, we will learn how to return the new item added to the list items edit form back to the combo box that the user picked. I will show you how to achieve this with approximately eight to ten lines of VBA code. Silver Members and up get access to view Extended Cut videos, when available. Gold Members can download the files from class plus get access to the Code Vault. If you're not a member, Join Today!
PrerequisitesLinksRecommended CoursesUp Next
Keywords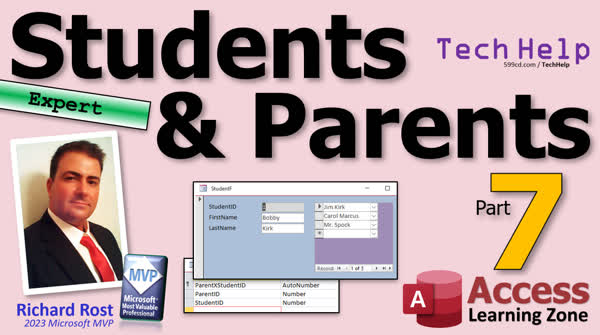 TechHelp Access, student parent database, add parent form, add student form, continuous form creation, edit parent form, edit student form, parent list form, student list form, parent child relationship in Access, VBA code for forms, subform edit process, customizing forms, list items edit form, autofill combo box with VBA
Intro In this video, we'll work with Microsoft Access to make it easier to add students or parents to your database while entering new records, without leaving your current form. I'll show you how to build continuous forms for editing student and parent lists, set up list items edit forms, and configure combo boxes to allow quick updates. We'll also cover adding headers, customizing form layouts, using VBA to create navigation buttons, and organizing your main menu for better access to your data. This is part 7.Transcript Today's part 7 of my students and parents database series of stuff to learn. If you haven't watched parts 1 through 6 yet, go watch those first.
Today we're gonna make a nice easy way for you to add students or add parents while you're in the middle of adding something. You don't want to have to stop and go back. You're adding a new student, so you open up your student form, and you put in your new student: new guy, Smith. And now you've got to add the parent. So you've got to close this, you've got to go back over here, you've got to add the parent, then you've got to close that and come back over here, and blah, blah, blah.
It would be nice just to be able to drop this down and say, oh, I've got to add someone to this list. Well, for that we can use a list items edit form. And yes, I know I've already got a video on list items edit form, but a lot of times with this kind of stuff, it's helpful to see multiple ways to do things, and I'm going to show you some new tricks and some new tips in this one. So yeah, I might have covered some of this stuff before, but you know, practice makes perfect, so you can see it from a different angle.
But if you want to learn more about it, go watch this. There's some other stuff in here too. Usually, I find when people see something two or three times, it tends to stick better, especially once you practice it yourself. So, practice makes perfect.
Now, the first thing we need is a form to be able to edit these people. Now, we already have a parent form, but the parent form is designed like this with the subform. I don't want to use this as the edit form. You could, but I don't want to. I want a nice, continuous list, kind of like my customer list form - a list with the IDs, the first name, the last name, maybe the phone number if you want. I don't care.
So let's make a nice continuous form with text boxes on it that we can use to edit both our parents and our students. I'll start with the parents. Now, this has already got the data in it and it's already got the colors and all that, so what I'm going to do is I'm just going to copy this. I'm going to copy parent f. Copy, paste. This will be my parent list form.
Now in the parent list form, I'll delete the subform. Don't need that. I'm going to turn on the header and footer. Right-click, form, header, and footer. Remember, we don't use page headers and footers in here. Let's make it that purple that we like. Let's grab our purple color-ish, kind of from there, looks good.
I'm going to cut those labels off, Control X, paste them up here in the header, line these guys up underneath - there's the ID, there's the first name, there's the last name. Line these up over the top of those, get them right about where they belong. You can make these look pretty. All right, there's first name. There.
Maybe we'll make these white so they're easier to see. All right, format. Drop that down, go to white. All right, slide that up. These are the parents, so if you want to, you can add the - I don't think we added the phone number to the parent app, did we? No, we didn't. You can put it on there. That's up to you.
Form design, add existing fields, grab the phone number, drop it right there. I'm going to delete that label, slide the phone number up. All right. Sometimes I cheat when it comes to these labels. I've shown you this in a couple of other videos. Just put a bunch of spaces in there, put phone. Easy enough. All right. OK. Save it. Close it. Open it up. And it looks pretty good.
We've got to make it a continuous form. That's why we're only seeing one record. Design view, properties, data, and change single - what? Oh, oh, oh, not data, not format. Default view to continuous forms. Should be under data. You'd think it'd be under data. OK. I've been doing this for 30 years. You'd think I'd remember what tab stuff's on. All right, there we go. Looks good.
Oh, I don't like that alternating color. One of my pet peeves. Get out of here. So there's our parent list form. This is what we're going to use for our list items edit form. So go to the student F because here's where we're going to have to add parents. Let's make this a little bit bigger. A little bit bigger. There we go.
Now, in that subform, where's that parent subform? This guy. Design view. Click on this. Data. You've got allow value list edits, leave that to yes. And then the list items edit form. This is where you're going to pick that parent list form that we just made. That's the form that's going to be called on to edit the data in this box. OK. Save it. Close it.
Now, if I open up the student form and I've added a new student, new guy Smith, and I go to find his parents. He's not in here. Now I can add with the button here, the edit list items. And I can come down here and go Papa, Papa Smith. Now when I close this form, you'll see that Papa Smith will now show up in that list. And it makes it much easier to add parents that way. OK? Pretty straightforward.
Now, I know some of you are going to ask, is it possible to have that value put right back in this box automatically? Yes, it's possible. It does involve some VBA programming, and I'll show how to do it in the extended cut for the members. There's also something called a not in list event, which I do handle in Access Developer 35, where you don't need a list items edit form at all. You can just ask the user for the value and add it to the table behind the scenes. Both of these things involve some programming. But in the extended cut, I'll show you how to do this.
Drop this down, open up the list items edit form, put in here Alex Lifeson, close this form, boom, and then he appears right back in there for you automatically. That involves about maybe eight to ten lines of code. OK? Extended cut if you want to see how to do that.
All right, so that's how we can do it with the students. And parents, we can go the other way, too. We can go to the parent form, or we can add a student list. So let's take the student form, copy, paste. We'll make a student list F. Basically doing the same thing. Design, view. Take this guy, delete you. Right-click, turn on the form header footer. Grab these, put them on top. Da da da. Da da da da. Da da da. Right? First name, last name, shrink it up, shrink that up. We don't really need a footer. Save it, close it. There's my student list.
Oh, forgot one more thing again. Format, continuous forms. Also, if you want these to be sorted, you can put under data here, you can put an order by in here. Get rid of a filter if a filter exists. You can say order by last name, comma, first name, and make sure order by on load is set to yes. OK. Save that. There's my student list. Ah, that alternating color gets me every time. These were designed as single forms that I then switched to continuous form. That's why they got like that. There's my student list.
And now on my student subform, same thing. Click on this guy, data, list items, edit form is my student list, save it, close it. So now if I open up the parent form, and I want to add a close it. So now if I open up a parent form and I want to add a student under Jim Kirk, I can drop this down. I can put Sally Kirk in here. I can close this, and now Sally Kirk will be in there. And there you go. Oh, someone's beaming in. Is it Sally?
All right. Now, since we got nice list forms, we can add them to our main menu. Come over here, design view. You can run through the command button wizard if you want, but let me show how easy this is to do with some VBA. I'm just going to copy a button, copy, paste. I'm going to put it down here. This will be my students. Give the button a name, student button, right-click, build event. That'll bring up a code builder. I've got some empty lines in there. Let me get rid of those.
Here's my student button click. All it is is do command. I've got my caps lock on. Do command, open form, student list F. That's it. Nice and simple. Save it. Make a button for the parents. Right there. Parents. Parent button. Right-click, build event. Do command, open form, parent, list F. Save it. Close it. Close it. Open it. I got a button on my quick launch toolbar to open my main menu. I covered that in the blank template video. There's my students. There's my parents.
Want to make it so you can open up the other form from these ones? Watch this, nice and easy. Design view. We'll make it so the parent ID. We'll make that blue. Which blue do we pick? That blue there, good enough. Event on double-click, right there. There we go. Do command, open form. Which one is it? The parent F, comma, comma, comma for the parent ID equals the parent ID on this form. Save it, close it, close it, open up parents, double click on bones, and there's bones.
All right, slide it over here a little bit maybe. See? Do the same thing with the student form. Here's my list of students. Right-click, design view, let's make it blue, stay consistent with your colors, event, on double-click, do command, open form, student F, comma, comma, comma, chameleon. I know it's goofy and I make the comma chameleon joke, but you'll remember that. How many commas are there? Two, three, oh, it's comma, comma, comma. OK.
Actually, I think in the song there's four. Comma, comma, comma, comma, comma. There's five. Comma, comma, comma, comma, comma. Just remember that. Student ID equals, yes, I used to love Culture Club back in high school, equals student ID. There we go. Save it. Throw in a debug compile. Time for some cough syrup. This is getting rough. There we go. Joe McCoy. Take me to Bones. OK. Take me to Jocelyn. See?
Now we've got navigation all over our database. Here's our main menu. I can go to the students. I can go to Peter. I can go to Montgomery Scott. See? I'm going everywhere. Forgot to put the phone number in here, didn't we? Right? Add existing fields, phone number, drop it right there. Right-click, or not right-click. Format paint, just like that. This stuff ain't hard, folks. This takes practice. You just got to practice with me. Watch my daily video. Practice the stuff I'm doing. Take my courses. I got lots of courses on my website. Lots of cool stuff.
Oh, we didn't make a button for our call sheet design view. Sometimes you got to make your menu bigger. Make your menu bigger. Just slide this guy down. Copy, paste. We need a call sheet. All right. Call sheet. The emergency phone number stuff. That's this thing. Student, parent, phone, whatever. Right? Right-click, build event. Do command, open report. What's the report name? Student, parent, phone, R, comma - how do you want to see it? I want AC view preview.
That's it. OK, see? One line. For those of you who are not programmers, you don't have to be. You just need to know a handful of commands, really. There's probably five or six commands you'll use all the time and that's about it. OK? Call sheet. Boom.
Speaking of making a call sheet, what happens when it comes time to send report cards home? Right? You got all these parents with their students. Yeah, let's take a student here. You got a student like Bobby Kirk. Alright? He's got three people on his emergency call sheet. But maybe only Jim Kirk needs to get a copy of his report card. You don't want to send it to everybody. You want these people there so you got their phone numbers in case of an emergency but you might only want to send a mail to one or two of these people.
So in tomorrow's video, part, what are we up to, part 8? We'll put people on a mailing list. Who's on the mailing list? Alright, Jim Kirk's on the mailing list so he gets a copy of Bobby's report card, but Carol and Mr. Spock don't need it. And then we'll make a query and a report so we can send out just the mailings to the people that need them. We'll do maybe mailing labels or something. I don't know. We'll figure it out. I haven't done it yet.
All right, now in the extended cut, again, I'm going to show you how to return that new item added to the list items edit form back to the combo box that the user picked. All right, so as soon as you pick it, boom, it's going to go right back there. OK, and again, there's also the list items edit or the not in list event that I cover in developer 35. That's a lot more advanced though. This isn't too hard.
As a reminder, silver members and up get access to all of my extended cut videos. Not just this one, all of them. There's lots of them and gold members can download these databases and you all get free classes. So woohoo! But that's gonna be your TechHelp video for today. I hope you learned something. Live long and prosper, my friends. I'll see you tomorrow for part 8 and we'll do those little mailing list things. Those little thingies. Alright, take care.
A special thank you and shout out to our diamond sponsor Juan Soto with Access Experts software solutions. They're manufacturing experts specializing in Microsoft Access MVP. Check them out at accessexperts.com.
TOPICS:
Editing Students or Parents While Adding Records
Creating a List Items Edit Form
Designing a Continuous Form for Parent List
Copying and Pasting Forms for Reuse
Adding Headers and Footers to Forms
Customizing Form Colors and Labels
Including Phone Numbers in Forms
Setting Form View to Continuous Forms
Configuring List Items Edit Form in Subform
Using Allow Value List Edits Property
Saving and Testing Forms
Adding Students to Parents and Vice Versa
Sorting Records in a Continuous Form
Navigating Between Forms
Creating Command Buttons with VBA
Opening Forms with Specific Records
Using DoCmd in VBA
Debugging and Compiling VBA Code
Building Main Menu Buttons
Adding Emergency Contact Numbers
Creating and Previewing Reports
Managing Mailing Lists for Report Cards
Setting Up a Query and Report for Mailing Labels
Using Not In List Event for Combo Boxes
COMMERCIAL:
In today's video from Access Learning Zone, I'll show you a simple way to add students or parents while in the middle of adding a new record, without having to switch back and forth between forms. You'll learn how to create a continuous form for editing your lists, set up a list items edit form, and streamline your data entry process. As a bonus, I'll also cover making your database navigation more user-friendly and adding quick access buttons to your main menu. You'll find the complete video on my YouTube channel and on my website at the link shown. Live long and prosper my friends.Quiz Q1. What is the purpose of creating a list items edit form in the students and parents database?
A. To add a list of items sequentially
B. To edit existing data inline
C. To add new items without leaving the current form
D. To view items in a grid format
Q2. Why does the speaker prefer not to use the existing parent form for editing records?
A. The existing form is not linked to the database
B. The existing form is too slow to load
C. The current form includes a subform that they do not want to use
D. The current form is not aesthetically pleasing
Q3. In the tutorial, what does the speaker recommend using to create a list form with a nice appearance?
A. Creating everything from scratch
B. Using pre-designed templates
C. Copying existing forms and modifying them
D. Using third-party design tools
Q4. When modifying the parent form, what specific view does the speaker change it to display as multiple records?
A. Datasheet View
B. Single Form View
C. Split Form View
D. Continuous Forms View
Q5. How does the speaker suggest handling alternating row colors in continuous forms, which they find annoying?
A. Change the row colors to match
B. Disable the Alternating Background Color property
C. Use conditional formatting
D. Apply a custom CSS stylesheet
Q6. What important feature does the speaker add to the student subform to link the new parent list form?
A. Deleted Records Feature
B. Allow Value List Edits and List Items Edit Form
C. Auto-Correct Feature
D. Mark as Important Feature
Q7. What does the speaker mention will be covered in the extended cut for members regarding automatically inserting newly added parents into the combo box?
A. Creating new forms from templates
B. Using VBA programming for dynamic updates
C. Adding a phone number format
D. Implementing drag-and-drop functionality
Q8. According to the tutorial, what specific event can be used instead of a list items edit form to automatically add a new item, but requires additional programming?
A. Click Event
B. Form Load Event
C. Not In List Event
D. Table Update Event
Q9. What additional feature does the speaker add to improve navigation between forms in the database?
A. Keyboard shortcuts
B. A navigational submenu
C. Double-click events on parent and student IDs
D. Drop-down menus for form selection
Q10. How does the speaker link buttons to open specific forms quickly using VBA code?
A. By using Macros
B. By using DoCmd.OpenForm
C. By using SQL commands
D. By creating hyperlinks
Answers: 1-C; 2-C; 3-C; 4-D; 5-B; 6-B; 7-B; 8-C; 9-C; 10-B
DISCLAIMER: Quiz questions are AI generated. If you find any that are wrong, don't make sense, or aren't related to the video topic at hand, then please post a comment and let me know. Thanks.Summary Today's TechHelp tutorial from Access Learning Zone focuses on making it easy to add students or parents on the fly while you are entering new records in your database. If you are following along with my students and parents database series, be sure to watch parts 1 through 6 first if you have not already done so.
The challenge we face today is simple: When you are in the middle of adding a new student, and you realize you need to enter a new parent for them, you do not want to stop what you are doing and jump to a different form just to add the parent. The same is true in reverse. Instead of bouncing back and forth between forms, we want a more efficient way to handle this.
To address this, I am going to show you how to use a list items edit form. Some of you may remember I have another video on this topic, but I think it is helpful to see things presented in different ways and to get some new tips and tricks along the way. Seeing an idea explained two or three times and practicing it yourself is one of the best ways to master it.
The first thing we need is a form that makes it easy to edit the people in our lists. While we already have a parent form in place, it is set up with a subform and is not ideal as a list items edit form. I prefer a simple, continuous form, similar to a customer list, that displays ID, first name, last name, and optionally, the phone number.
To create this, I start with the existing parent form and copy it. After pasting it, I remove the subform and turn on the header and footer. The headers will contain the labels such as ID, first name, and last name, neatly arranged over each column. For style, I give the header a purple background and make the label text white for visibility.
If we want to display the phone number, I show you how to add it by pulling it in from existing fields and adjusting the layout so that it fits nicely. This is a straightforward process and allows you to tailor the displayed information to your needs.
To ensure the form shows multiple records at once, I set its default view to continuous forms. If you notice any alternating row colors you do not like, you can turn those off in the formatting options.
Next, we set up this continuous parent list form as the list items edit form for our student entry form. That way, as you add a new student and realize you need to create a new parent, you can simply use the combo box's edit list option to bring up the parent list, add the parent, close the list, and immediately see the new parent available for selection. This keeps your workflow smooth and intuitive.
Some of you might be wondering if it is possible for a newly added parent or student to be automatically returned back into the combo box you were working with. This is certainly possible, but it requires a bit of VBA programming. In today's Extended Cut, I will walk you through exactly how to write the code so that, after you add a new item in the edit form, it gets selected in the combo box automatically. If you are interested in handling cases where a user types a value not on the list at all, I also discuss the Not In List event in my Access Developer 35 series, which adds new entries directly to the underlying table without the need for a separate edit form.
You can use the same approach if you want to add students from the parent side. Simply copy and modify the student form to make a student list form, follow the same steps to set up the headers, select continuous forms as the default view, and assign this form as the edit form in the parent subform combo box.
Sorting your lists is also simple. You can set the Order By property to sort by last name and first name, just remember to activate Order By On Load to make sure your list always opens sorted as desired.
Improving navigation within your database is another important topic. I demonstrate how to add command buttons to your main menu using a quick VBA command. By copying an existing button, renaming it, and modifying its click event code, you can create buttons that open the student list, parent list, or any other form or report you want. Using DoCmd.OpenForm or DoCmd.OpenReport, your forms and reports can be launched with one click.
For added convenience, you might want to make it easy to jump from a list form directly to the details form for a specific record. You can set this up by using the On Dbl Click event on the field of your choice and writing a short line of code to open the form filtered to the selected record's ID. I give practical tips on making this process more memorable, like thinking of the song "Karma Chameleon" as a way to remember the syntax.
You can continue enhancing your forms by making sure important fields like phone numbers are included where needed, and by giving your forms and buttons consistent colors and styles for a polished interface.
Lastly, I discuss how to add a call sheet report to your main menu. With a command button and a short line of VBA code, you can quickly open a report preview of your student-parent contact list for emergency use.
Looking ahead, I mention that in the next part of the series, we will cover mailing lists for report cards. Not every parent needs a report card, so we will see how to manage mailing lists and create queries and reports or mailing labels for the right recipients.
To recap, today's lesson covered creating continuous list forms for students and parents, setting them up as list items edit forms for easy record entry, improving database navigation with command buttons and double-click events, and previewing reports. In the Extended Cut, I demonstrate how to write the VBA code that makes your newly added parent or student automatically appear in the combo box, streamlining your workflow even further.
You can find a complete video tutorial with step-by-step instructions for everything discussed here on my website at the link below. Live long and prosper, my friends.Topic List Editing students or parents while adding records
Creating a list items edit form
Designing a continuous form for parent list
Copying and reusing parent and student forms
Adding headers and footers to forms
Customizing form colors and labels
Including phone numbers in list forms
Setting default view to continuous forms
Removing alternating row colors in forms
Configuring list items edit form in subforms
Setting Allow Value List Edits property
Selecting the edit form for combo box lists
Adding new parents from the student form
Viewing newly added items in combo box lists
Creating a continuous form for student list
Sorting records by last name and first name
Setting Order By and Order By On Load
Configuring student list as a list items edit form
Adding new students from the parent form
Adding buttons to the main menu for list forms
Creating command buttons with VBA to open forms
Naming command buttons and building events
Opening specific forms using DoCmd.OpenForm
Navigating to specific records from list forms
Adding event code for double-click form navigation
Copying event procedures between forms
Adding phone number to existing list forms
Formatting new fields for consistency
Adding a button to open the emergency call sheet report
Opening reports with DoCmd.OpenReport in preview modePrimary Topics Access forms, list items edit form, continuous forms, combo box editing, seamless student and parent entry, basic VBA navigation, menu design Secondary Topics sorting forms, customizing headers/footers, including phone numbers, reporting, navigation buttons |


