|
|
Free Lessons Courses Seminars |
TechHelp Fast Tips Templates |
Topic Index Forum ABCD |
|
||||||
|
Access Developer 14 POS Tables, Order Forms, List Boxes, Groups Welcome to Access Developer 14. In this course you will learn how to build a flexible point of sale database structure in Microsoft Access by planning out tables, relationships, and fields, and creating sample data for categories, products, and options. We'll discuss how to start building an order form that connects category, product, and options lists, and you will see how to construct a group and person select form suitable for scenarios like school billing or rewards programs, along with tips on configuration and preparing for future lessons on list boxes and multi-selection features. Lessons
Database FilesResources
UpdateThis course was originally intended to be the beginning of a complete, full-featured Point of Sale (POS) system built entirely in Microsoft Access. As the project evolved, I realized that a true POS system deserved a much larger treatment and that the developer students at this point in the series would benefit more from learning the concepts and design techniques first. While this course does not result in a finished POS application, it does provide a solid foundation and an excellent overview of how to plan, design, and begin building a real-world POS system. You'll learn valuable database design principles, table structures, relationships, user interface concepts, and other techniques that can be applied to many different projects. I do plan to revisit and expand this project in a future, higher-level Developer class once students have more experience and a larger toolbox of techniques available. Lesson SummaryWelcome! POS Database & Order Form Guide - Welcome to Microsoft Access Developer Level 14. In this course we will cover the first five lessons of building an Easy Access POS (point of sale) system in Microsoft Access. We will discuss the database structure, walk through planning out the tables, relationships, and fields, and begin constructing the actual tables using sample data. We will also start building an order form that uses categories, products, and options, preparing for future lessons on multi-select list boxes. Additionally, we will create a form to select groups and people for scenarios like school billing or rewards programs, with flexible configuration options.
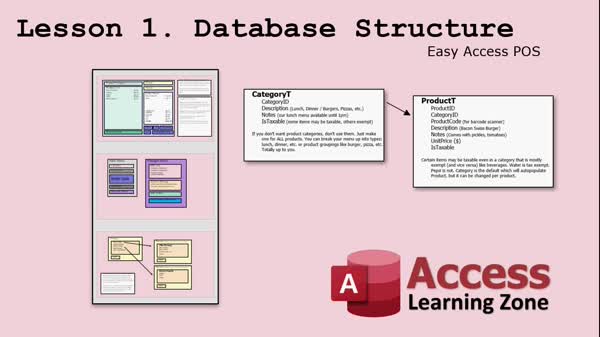
Lesson 1: POS Database: Plan & Design Steps - In Lesson 1, we will introduce the database structure for the Easy Access POS system, discuss the goals for building a customizable point of sale solution in Microsoft Access, and outline the planning process, including the main interface design, use of unbound forms, and features like group and person tracking, payment options, and future upgrade possibilities such as inventory control and online tables. We will also talk about gathering student feedback during development and considerations for tailored business needs.
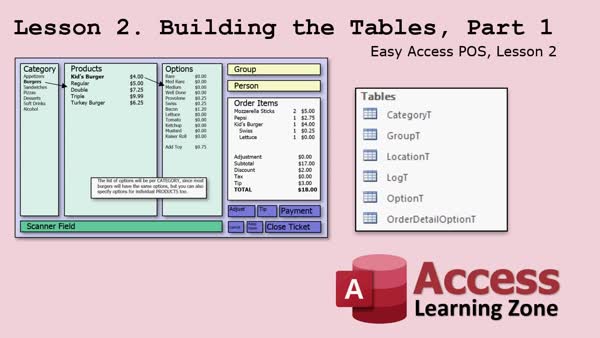
Lesson 2: Flexible POS Tables: Categories & Options - In Lesson 2, building the tables, we will start designing the foundational tables for the Easy Access POS database. I will walk you through creating tables for settings, locations, logs, groups, and persons, including important fields like tax rate, discount rate, billing information, and group relationships. We will discuss the rationale behind table structure decisions, how to handle options for products and categories, and some feedback from previous lessons regarding the layout and data needs. We will also look at considerations for credit card validation, multi-currency, and features like the signature box and open/closed order status.
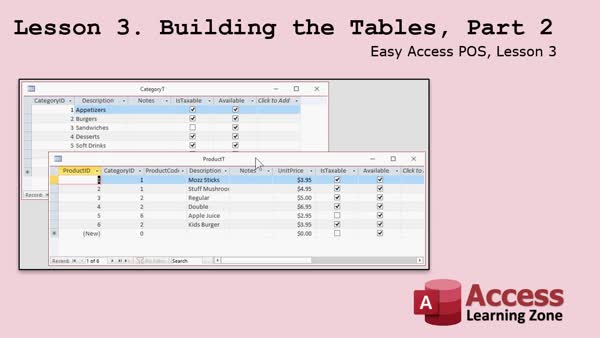
Lesson 3: Sample Tables: Categories & Payments - In this lesson, we continue building the tables for the Easy Access POS database by entering sample data for people, groups, categories, products, options, and payment types. We discuss naming conventions, the importance of including available fields for future record management, and how to use options flexibly with categories and products. I walk through creating tables for orders, order details, and order detail options and explain how to handle special cases like discontinued products or locations. We also cover considerations for assigning unique identifiers and preparing the tables for relationships and form design in upcoming lessons.
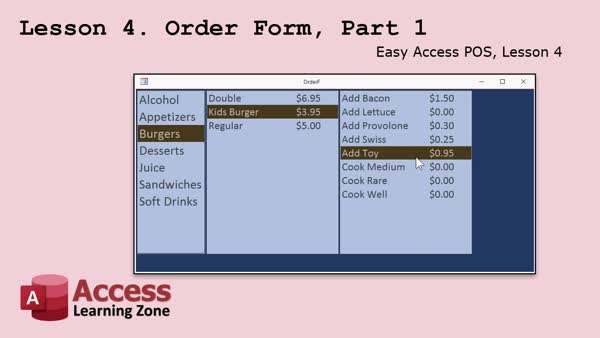
Lesson 4: Order Form: Categories & Options - In Lesson 4, we will begin building the order form by creating the category list, the product list that updates based on the selected category, and an options list that updates when a product is selected. I will show you how to design an unbound order form, set up properties for a touch-friendly layout, and connect list boxes using SQL and event procedures. We will also discuss best practices for starting with a sample database and address some useful Access form settings and common bugs. In the next lesson, we will talk about multiselect list boxes.
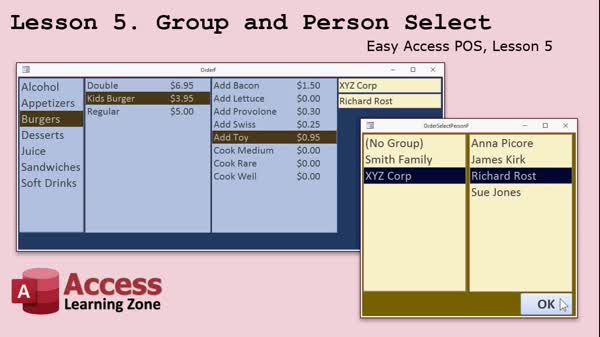
Lesson 5: Popup Group & Person Select Form - In Lesson 5, we will build the group and person select form for our order system. I will show you how to set up a pop-up form that lets users choose a group and then select a person from that group, with the selected values placed back on the main order form. We will cover naming conventions, working with list boxes for groups and people, handling form events, and ensuring only available people appear in the selection. We will also discuss user interface design and introduce upcoming topics like multi-select list boxes and recordsets.
Lesson 6: Tables, Fields, Lists & Forms - In this course we learned about planning and structuring tables and fields in an Access database, how to approach the design process starting with notes and sketches, and the steps to build order forms using list boxes. We also discussed tips for finalizing and securing the database, using forums for support, and where to find helpful resources and updates. We will talk more about list boxes and multi-select options in the next course, Access Developer 15.
NavigationKeywordspoint of sale database, POS database structure, order form design, table relationships, categories and products, group and person select, list box form, sample data tables, payment types, options list, order detail options, unbound forms
IntroIn this lesson, you will learn how to start building a fully customizable Point of Sale (POS) system using Microsoft Access, including planning the database structure, designing tables and relationships, and prototyping essential screens. I will show you how to set up tables with sample data, explain key design decisions, and begin building the order form with product categories and options. We will also create a form for selecting groups and people, useful for situations like school lunches, billing, or customer reward programs. This is Microsoft Access Developer Level 14 Lesson 1.TranscriptWelcome to Microsoft Access Developer Level 14 brought to you by AccessLearningZone.com. I am your instructor, Richard Rost.Access Developer 14 includes the first five lessons in the Easy Access PLS, that is, Point of Sale system. So, whether you are one of my developer students watching all the classes in order or you are interested in just the Access PLS system, this is the right lesson for you. For several years now, people have been asking me to build a POS system in Access. There is nothing really available on the market right now for POS systems that are built in Microsoft Access that you can customize and that are reasonably priced. For my developer students, you are going to get a lot of new techniques that I will be covering in this series. For those of you who are interested in just the POS, you can pick up those lessons by themselves. This is also the first time that I have recorded videos for a new class and posted them online as they are being recorded. This has given the students the opportunity to post feedback and ask questions between lessons. I can either answer them on the website or include those answers in the next set of videos. Even though right now Developer 14 is finished, because I always record the introduction slide last, you can still get in on developing the POS system, because Developer 15, as of right now, it is July 2020, has not been recorded yet. You can still get involved in the real-time database development. We will talk about exactly what is covered in just a few minutes, but I am using Microsoft Access 2019 with Office 365. You should be okay with pretty much any version of Microsoft Access. I would say from 2007 on. If you are one of my developer students and you are following along, I do suggest Developer 13 before this one. If you are one of the students taking this as just the POS seminar, of course you should have a good working knowledge of Microsoft Access, preferably including some VBA and some SQL. What does today's class include? First, we are going to talk about the database structure. One bit of feedback that I have gotten over the past couple of years is that my students want to see more development of the database before we start building the database. What does it look like on paper? How do I put all my fields together and my tables? How does everything relate together? We are going to spend a good amount of time doing that. About a half an hour of the first lesson is just going to be talking about what fields to include, how the tables work together, relationships, and so on. You are going to actually see me prototype the database. I have built a lot of screens up here in PowerPoint that are going to show you how things are going to look when they are done. As you can see, these are just simple diagrams. Then we will start actually building the tables. I am going to spend a good hour building the tables, going through all the fields, explaining why I am doing things the way that I am, giving you a more in-depth understanding of how these things go together. Not just how to build the table, but why I do things a certain way. We will fill in a bunch of sample data and we will see how things are going to work. Then we will get started actually building the order form, where we can pick a product category, then a list of products in each category. Each product can have different options. For example, here you can see burgers. We have got the kids burger and then a list of options: add bacon, add lettuce, add a toy, cook well, and so on. In the next class, we are going to talk about multi-select list boxes, which we have not done yet. That will allow you to pick multiple options on that option list. Finally, in today's class, we are going to build a form to allow you to pick a group and then a person in that group. This is handy if you are doing billing. For example, if you are a cafeteria that does school lunches for students, you can have your list of groups be the family, and then the list of people would be the students. If you are a restaurant, you might not want to have groups or people, or you can get information from them and put them in for reward programs. However you want to handle it. Some do all-cash options and that is fine too. This will be completely configurable. I will show you all kinds of different ways to do things. Remember, if you have any questions about the material posted in class, just scroll down to the bottom of the page that you are on while watching the video on the website. You will see that each one of the lessons has its own separate forum where you can post questions about that particular class. If you have general questions about Access that do not necessarily fall under this lesson, you can go to the Access forums. There is a link, and you can post all of your questions there. Click on the link below the video to get started with lesson one. QuizQ1. What is the main focus of Access Developer 14?A. Building a payroll management system in Access B. Building a Point of Sale (POS) system in Access C. Learning advanced Excel techniques D. Managing HR records Q2. What is unique about the way Access Developer 14 was recorded? A. It was live-streamed only once with no interaction B. It was recorded in one take without edits C. Lessons were posted online as recorded, allowing student feedback between lessons D. It was released as a complete package only after all lessons were finished Q3. What prior knowledge is recommended for students taking the POS seminar? A. Advanced knowledge of Python B. Only basic Access data entry C. Good working knowledge of Microsoft Access, including some VBA and SQL D. Expertise in network administration Q4. Which versions of Microsoft Access are suitable for following along with this class? A. Only Access 2016 or newer B. Access versions starting from 2007 onward C. Only Access 2019 with Office 365 D. Only Access 2010 Q5. According to the video, what aspect of database development will be focused on before building the actual database? A. Setting up security permissions B. Designing the user interface C. Prototyping database structure, fields, tables, and relationships on paper D. Importing data from external sources Q6. Which feature will be introduced in the next class, not covered yet in Developer 14? A. Cascading combo boxes B. Multi-select list boxes for selecting multiple product options C. Currency formatting D. Barcode scanning integration Q7. In the POS system, when is the form to pick a group and a person within that group useful? A. For generating inventory reports B. For configuring hardware settings C. For scenarios like school lunch billing where groups are families and people are students D. For setting up tax calculations Q8. How does the course allow students to interact with the instructor or other students? A. By sending direct emails only B. By using forums linked to each lesson for questions and feedback C. No interaction is possible D. Through weekly in-person seminars Q9. What will students see during the initial stages of building the POS system? A. Only finished database screens without explanation B. Simple PowerPoint diagrams and explanations of why things are built a certain way C. Finished forms with hidden fields D. Completed code samples without context Q10. What is the recommended prerequisite for developer students before taking Developer 14? A. Access Beginner Level 1 B. Access Developer 13 C. SQL Basics D. Microsoft Excel Intermediate Answers: 1-B; 2-C; 3-C; 4-B; 5-C; 6-B; 7-C; 8-B; 9-B; 10-B DISCLAIMER: Quiz questions are AI generated. If you find any that are wrong, don't make sense, or aren't related to the video topic at hand, then please post a comment and let me know. Thanks. SummaryToday's video from Access Learning Zone introduces Microsoft Access Developer Level 14, which focuses on the first five lessons in the Easy Access PLS, or Point of Sale system. This course is ideal both for those who have been following my developer series as well as anyone specifically wanting to learn about building a POS system in Access.For a long time, many students have asked me to create a POS system in Microsoft Access, since there is not a robust or reasonably priced customizable option available right now built in Access. This course answers that need. If you are one of my developer students, you will encounter a range of new techniques throughout this series. If you are joining just for the POS system, you can take these lessons independently. Another new element with this class is the recording process. I released the videos online as they were recorded, which enabled students to interact between lessons. They could offer feedback and ask questions, either directly on the website or to be addressed in upcoming video lessons. Even though the recordings for Developer 14 are now complete, you can still join the ongoing development process. As of July 2020, Developer 15 has not yet begun, so there is still an opportunity to become involved in real-time database development. We will examine all of the topics covered in Developer 14 shortly, but for reference, I am using Microsoft Access 2019 with Office 365. You should be able to follow along with any version of Access from 2007 onward. If you are one of my developer students, I highly recommend completing Developer 13 before beginning this one. Those interested solely in the POS seminar should have a solid working knowledge of Microsoft Access, with some understanding of VBA and SQL. To outline what is included in this course, we start with the database structure. A common request from students has been to see more of the planning and design process before building the actual database. That includes how to assemble all of the necessary fields, construct the table layouts, and establish relationships. We spend a significant portion of the class prototyping the database on paper, talking through choices for fields, table connections, and how everything links together. About half an hour is dedicated to this design phase before shifting to actually building the tables. I spend roughly an hour working through each table, explaining the reasoning behind the design decisions and offering insights into how and why each element fits together. I emphasize not just the steps to create the table, but also the logic behind each choice. We then populate the tables with sample data and explore how the structure functions in practice. From there, we start building the order form, which allows users to select a product category, then choose a product within each category. Each product can have its own set of options. For instance, if you are selling burgers, you might have choices like adding bacon, lettuce, a toy, or selecting how well the burger is cooked. In the next class, we will address multi-select list boxes, which allow users to pick multiple options for each product. This is a new technique for us. To finish today's lesson, we will construct a form to allow selection of a group and a person within that group. This is useful in scenarios like school lunch billing, where groups could represent families and the people could be individual students. In a restaurant, you might skip this or use it for rewards programs. The POS system is highly configurable, so you can tailor it to suit your needs. I will explain various approaches to handling these configurations. If you ever have questions about anything covered in class, you can find a dedicated forum for each lesson at the bottom of the web page for the video. General Access questions can be posted in the main forums via the link provided. You can find a complete video tutorial with step-by-step instructions on everything discussed here on my website at the link below. Live long and prosper, my friends. Topic ListDatabase structure planning for POS systemPrototyping database fields and tables Defining table relationships for POS Building tables for POS in Microsoft Access Explaining field choices in POS tables Entering sample data in POS tables Designing order form to select product categories Listing products within categories on order form Setting up product options for orders Building a form to select groups and people Customizing forms for billing scenarios Configurable group and person selection forms |
||||||||||||||||||||||||||||||||||||||||||||||||||||||||||||||||||||||||||||||||||||||||||
|
| |||
| Keywords: point of sale database, POS database structure, order form design, table relationships, categories and products, group and person select, list box form, sample data tables, payment types, options list, order detail options, unbound forms PermaLink How To Design a Customizable Point of Sale System Database Step by Step in Microsoft Access |