Students & Parents 3
By Richard Rost

 2 years ago
Relate Students & Parents in MS Access Database Part 3 In this Microsoft Access tutorial, we will learn how to create forms to manage student-parent relationships using junction tables, continuous forms, and combo boxes. I'll show you how to efficiently view and edit multiple parents for each student and vice versa. This is part 3. MembersThere is no extended cut, but here is the database download: Silver Members and up get access to view Extended Cut videos, when available. Gold Members can download the files from class plus get access to the Code Vault. If you're not a member, Join Today!
PrerequisitesLinksRecommended CoursesUp Next
Keywords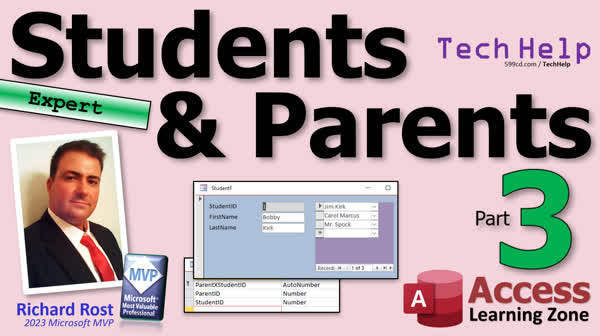 TechHelp Access, student-parent relationship, Access database design, junction table setup, Access subforms, continuous forms in Access, combo box usage, form design in Access, parent-child data management, Access form tips, Access form examples, linking forms in Access, filtering subforms, Access tutorial series
More InformationTranscript Today's part 3 of my students and parents series. We're taking students, and we're tracking their parents. We took a database that wasn't set up great, and we're making it set up great, and everything's great, and that's great. If you haven't watched parts 1 & 2 yet, that's not great. Go watch those and come on back.
All right, so in the last video, we took our student data that had the parents in here, and we offloaded that into a junction table. Now, we can have as many parents for each student as we want and vice versa, as many students for each parent as we want, which we could do before, but now we can do it both ways.
Now we need to make a form to make it easy to view, edit, add, manipulate, and do all that stuff. Here's where most people get stuck with this. The form that we're going to make where we can pick a parent for the student, that's going to be our subform. That has to be based on the junction table. That's where a lot of people get stuck.
This will be a continuous form, right? If you look at my title slide, right, this thing here, we're gonna make a continuous form where we can pick the different parents for this student. Single form, continuous form.
So I'm gonna use my template. I got a continuous form blank right here. I'm gonna copy and paste that. Copy, paste. Let's call this my parent sub F. Normally I'd have a parent form too that has all the parent data on it where you can enter the first name, last name, phone number, all that stuff. This is going to be a subform, so I'm going to call this guy parent subform, right there.
Design view this guy. Now, this guy's sole purpose is to just give me the opportunity to pick a parent. So I'm just going to get rid of this stuff that's in here. In fact, we don't even need a header or a footer in this guy. We just need a detail section. Where is it getting its data from? It's getting its data from that junction table. So go to record source and pick the junction table. Every record in this form represents one record from that junction table.
When we drop this guy into the student form as a subform, that relationship will handle filtering this part. So I'll only see the parents for student 1 or student 2 or whatever student I happen to be on. That will be handled by the subform relationship, the link parent and child fields. If you're not familiar with that, go watch my subform video.
Now in here, literally, all I need is a combo box where I can pick a parent from that entire list of parents. I almost wish that at the end of the last video I didn't delete those combo boxes that I had in here. It would be the exact same thing. But, oh, wait a minute. I'm a gold member on my own website. I can go download the old database. Hang on, I'll be right back. Let me go to my website, download the database right there. There's the old file. Let me just bring it over here. There's the other database, design view. I'm just going to copy one of these guys and we'll drop it right there.
Oh, look at that. There we go. That's why it's a good idea, even if you're going to delete these things, to back up your database. Keep versions, too. Keep the one you had yesterday, the day before, the day before. I usually keep three or four older versions of my database just in case. I know Alex is going to try to talk to me about version control. I do it myself.
So anyways, here's my combo box that I used to have in this form. We can close that. We open this guy up. There's the combo box. The control source is going to be parent ID from the junction table. We no longer need to call it parent one combo. We can just call it parent combo. I don't think I need this label in here because it's pretty self-explanatory. We'll do this, we'll slide that over like so. We're going to do a little bit of this and a little bit of that, and we're going to save this guy. Let's close it and open it back up again, take a look at what we got. There we go. It's a nice continuous form with all of my parents in it.
Now when I drop that in as a subform, it will filter so I'll only see the parents for the student that I'm on. So design view. Now we're going to grab you and go click, drag, drop. I'm going to get rid of that label that comes in with it. Slide you up over here and make this as big as you think it's going to need to be. You need three, four, five, doesn't matter. You got scroll bars too, so you can always scroll up and down. Save it, close it, open it up. Oh, wrong one. Open it up. There we go. Now you can see if I have to have Mr. Spock on here as a guardian, no problem. I can add as many as I want. When you add that record here, it creates the record for you in here. There it is right there. See, student one, the parent is two. Where's the parent two? Parent two should be Mr. Spock. Yep, see? Adding records in here adds them to the table that this form is bound to, which is the junction table. Makes sense?
Now can you reverse this? Can you go the other way? Can you make it so you can have the parent and see all of their children? Yeah, sure. You just got to reverse the process. It's not that hard. First, we'll start off with a parent single form. So again, I'll copy single F, copy, paste. We'll call this the parent F. The parent F right here will be based on the form's properties. This will be based on the parent T. We'll go to form design, we'll add existing fields, we'll bring these three things in just like this. I use my format painter like I did before. I can delete these now, slide these up to the left. Now just so I don't confuse my colors, I like to keep things color coded. So on the other form, this background color was for students where I had that purplish color for parents. I'm going to make this guy have that purplish color, which is kind of like that. Looks good. I will save this now. Actually, let's do that left align thing. Save this now. This is my parent F. Open it up. Parent form. Jim Kirk, Mr. Spock, and so on.
Now we need to make a continuous subform for all of the students. Again, continuous form, copy, paste. This will be my student sub-F, my student subform. Design view. Now again in here, we don't need all of this stuff. We can delete it. We don't need a header. We don't need a footer. I'm going to set this color here so we know that it's students. Let's go with that. Now I need a combo box in here where I can pick from the list of students. We don't have that yet, so we've got to build it again. Form design, combo box, drop it in here. Get the values from a table or query from the student table. I want to bring in, I'm going to do it this way. I'm going to go student ID, last name, first name. I'm going to rearrange them anyway. It doesn't matter. Sort by last name and then first name. That's what it's going to look like. Maybe make last name a little bit bigger. Next, what label do you want? Doesn't matter. We're going to delete it anyways and then finish. Get rid of you.
Let's take a look and see what we've got. Make this a little bit bigger. Let's save it, close it, let's open her up. Looks good. I'm only seeing one record here, why is that? Well, I didn't bind this form to a table yet, did I? See, no fields available. That's why it didn't ask me also, it didn't ask me where I want to save that value to. That's the reason why I did it that way. I want you to see this. We're going to open this guy up; we're going to go to record source. Remember, this has to be bound to the junction table. We've got two forms bound to the junction table. We're just showing different data in each one. Now, this guy's still unbound because the wizard couldn't bind it to anything because we didn't pick a table earlier.
The control source for this guy, what are we picking with this list? We're picking a student, so save it in the student ID. Now give it a name. We'll call it student combo. Now if I save this thing, close it, and open it, you should see a record for each one of the records in the junction table. Now the next problem we got here. We got just our last name showing in here, so let's fix that. Open this guy up, go to data, go to row source. We can clean this up. Now again, it's only based on one table, so we can get rid of all the student t dot and all the brackets. Get rid of the student t and the brackets. We don't need all the brackets because we're good little Access students and we don't use spaces in our field names. Makes it a whole lot easier to read. Now we're going to do that concatenation trick. We're going to make it these three fields down to two. And quote, comma, space, quote, and first name. Now this becomes one field. Remember that? Hit OK. Go to format, make this two columns, and we'll make this two inches across. Save it, close it, open it. Looks good. Now we just got to format it, get rid of all the empty space in there. Slide this up here. Do this. Someone's beaming in. Then we'll come over here like this, do a little bit of that. Save it, close it.
Now we can go into our parent form and drop in that student subform, just like this. Boom. Now we can go both ways. Now we can see the parent and all of their students. And we can see the student and all their parents. There's Jim Kirk and the kids that are associated with him. There's Mr. Spock and the kids that are associated with him. You can see he's responsible for Bobby Kirk, too; we did that a minute ago. Student F, you can go both ways now. You can see the students that are associated with the parents and the parents that are associated with students. That's pretty cool.
Now, once you've got this data in the database, there's lots more you can do with it, folks. You can make little events. So let's say you've got this up. You've got Mr. Spock's record up. And you want to be able to say, OK, let's take a look at Bobby Kirk's record here. We can make it so we can double-click on Bobby Kirk, and it'll open up the other form right to Bobby Kirk. That is going to involve a little tiny bit of programming. We'll do that in tomorrow's class. There's a lot of other stuff you can do with this. You could make a phone contact sheet so it's got all your parents and their phone numbers on it with the students. You can generate a report to show you that. You can set up who's the primary. There's all kinds of things you can do with this stuff.
You know what? Post in the comments down below what you'd like to see me do with this data. What kind of stuff do you want to see? If I like it, I'll add it to a future video. But we are going to do one more lesson with this. Let's see, today's Friday, the 12th of July 2024. We're going to do at least one more, so I will see you on Monday, the 15th, for part 4. Tune in Monday. Not tomorrow, Monday. Tune in Monday, same bat-time, same bat-channel.
And of course members, you can watch it right now. All right. Everybody else, have a good weekend. I'm off to find some more cough syrup, and that's going to be your TechHelp video for today. I hope you learned something. Live long and prosper, my friends. I'll see you on Monday for part four.
A special thank you and shout out to our diamond sponsor, Juan Soto with Access Experts Software Solutions. They're manufacturing experts specializing in Microsoft Access and SQL Server. Juan is a 13-time Microsoft Access MVP. Check him out at accessexperts.com.
TOPICS:
Creating a subform for selecting parents in a student record
Binding the subform to a junction table
Adding a combo box to select parents
Preserving database versions and backups
Explaining form properties and control sources
Filtering subform data based on parent-child field links
Creating a reverse subform to show students for each parent
Using combo boxes to select students in the reverse subform
Formatting and binding the reverse continuous subform
Embedding subforms into main forms
Linking parent form with student subform and vice versa
COMMERCIAL:
In today's video from Access Learning Zone, we continue with part 3 of our students and parents series. I'll show you how to take a basic database and improve it by creating a continuous subform for managing student and parent relationships. We'll design a parent subform based on the junction table and integrate it into our main student form. You'll also learn how to reverse this setup to view students for each parent using similar techniques. We'll wrap up by discussing some advanced features and inviting you to suggest future topics. You'll find the complete video on my YouTube channel and on my website at the link shown. Live long and prosper, my friends. Intro In this video, we continue with part 3 of the students and parents series in Microsoft Access. I will show you how to create a continuous subform for selecting parents on a student record, bind it to a junction table, and set up combo boxes for easy parent selection. You'll learn how to embed the subform in the student form, filter records using parent-child links, and reverse the process to display students for each parent. We'll also look at best practices for database backups and formatting your forms for clear data entry. This is part 3. Quiz Q1. What was the purpose of offloading student-parent data into a junction table?
A. To reduce the number of parents in the database
B. To allow for multiple parents per student and multiple students per parent
C. To create a backup of the student data
D. To assign unique IDs to each student
Q2. In the form design, what does the "continuous form" layout allow you to do?
A. Display only one record at a time
B. Display multiple records in a list view
C. Display the form in full screen
D. Display related tables side by side
Q3. What is the main function of the parent subform discussed in the tutorial?
A. To display each student's grades
B. To pick a parent for the student from a list
C. To enter parent details such as name and phone number
D. To manage the class schedules for each student
Q4. Where does the data for the parent subform come from?
A. The student table
B. The junction table
C. The parent table
D. The school's main database
Q5. What is the next step after setting the record source to the junction table for the parent subform?
A. Add a combo box to pick a parent from the list
B. Create a report to display the data
C. Design the layout of the form
D. Add buttons for navigation
Q6. Why is it a good idea to back up the database and keep multiple versions?
A. To reduce the size of the database
B. To ensure you can recover missing elements if accidentally deleted
C. To improve the speed of the database
D. To allow multiple users to edit the database simultaneously
Q7. What needs to be set as the control source for the combo box in the parent subform?
A. The student name
B. The student's ID
C. The parent ID from the junction table
D. The parent's phone number
Q8. In the tutorial, how is filtering handled to show parents specific to a selected student in the parent subform?
A. By manually entering filter criteria
B. Using a macro to filter the data
C. Through the subform relationship and link parent and child fields
D. By applying a filter query in SQL
Q9. For creating a form to view a parent's children, which form type was copied and modified?
A. Split form
B. Datasheet form
C. Single form
D. Continuous form
Q10. Which table is used as the record source for the student combo box in the student subform?
A. The student table
B. The parent table
C. A query combining student and parent data
D. The junction table
Q11. What trick does the tutorial suggest using for making the student names more readable in the combo box?
A. Changing font style
B. Concatenating last name and first name
C. Sorting by first name only
D. Displaying the student ID along with the name
Q12. What is the final step to link the newly created student subform to the parent form?
A. Adding a save button
B. Dragging and dropping the student subform into the parent form
C. Adjusting the color scheme
D. Creating a new query
Answers: 1-B; 2-B; 3-B; 4-B; 5-A; 6-B; 7-C; 8-C; 9-C; 10-D; 11-B; 12-B
DISCLAIMER: Quiz questions are AI generated. If you find any that are wrong, don't make sense, or aren't related to the video topic at hand, then please post a comment and let me know. Thanks. Summary Today's TechHelp tutorial from Access Learning Zone is part three of my series on managing students and parents in Microsoft Access. We are working on restructuring a database to properly track student and parent relationships, taking a setup that was less than ideal and turning it into one that is flexible and robust. If you have not watched parts one and two yet, I recommend catching up on those first so you can follow along.
In the previous lesson, I took the student data, which originally had all the parent information packed in, and moved that parent data into a junction table. Now, it is possible to assign multiple parents to each student and multiple students to each parent. While this kind of many-to-many relationship was somewhat possible before, using a junction table makes it a lot easier and tidier to manage the data from both directions.
The next step is to create a set of forms that make it easy to view, edit, and add information about student-parent relationships. This is where many people run into difficulties. The subform where you select a parent for a student must be based on the junction table, not the parent or student table directly. This subform should display as a continuous form, allowing you to see and work with multiple records at once.
Using a continuous form template, I create a new subform for parents. Normally, I would also have a main parent form that holds complete parent details, but for this subform, the goal is simply to pick a parent from the list. To set this up, I remove any unnecessary headers or footers, leaving just the detail section, and set the record source to the junction table. Each row in this subform corresponds to a unique student-parent relationship.
When this subform is placed inside the main student form, Access will handle the filtering automatically via the parent-child field links. This means the subform will always show just the parents associated with the student record you are viewing. If you are unfamiliar with how subform relationships work, I recommend reviewing my lesson on subforms.
Within the subform, all we really need is a combo box that allows you to pick a parent from the available list. If you have existing combo boxes that were previously set up, it is easy to copy and reuse them. If not, you can build a new combo box tied to the parent ID field in the junction table. It is a good idea to regularly back up your database so that you can recover old objects or revert changes as needed. Personally, I keep several days' worth of backups just in case.
Once the combo box is in place and set to the correct control source, the subform is ready. When opened as part of the main student form, it will present a scrollable list where you can connect multiple parents to a student. Adding a new record here will immediately update the underlying junction table with the association.
You can also reverse this process to go from the parent to the student side. For this, start by creating a main parent form—a single form view based on the parent table. Bring in the relevant fields such as first name, last name, and phone number. Use color coding or other formatting cues to make it visually distinct if you like.
Then, create a student subform as a continuous form, again removing unnecessary headers and footers. This subform will need a combo box to select students, which should be bound to the student ID field from the junction table. If you need to, build the combo box from scratch, sourcing names from the student table and formatting it for readability, for example by combining last and first names into a single display field. Remember to bind the subform itself to the junction table so that you see all relevant connections.
After arranging and formatting the subform, add it to the parent form. Now, when viewing a parent, you will see a list of all students associated with that parent, and you can update or manage those relationships in either form. In short, with this setup, you can easily view which parents are linked to a student from the student form and which students are linked to a parent from the parent form.
There is much more that you can do with the data once it is organized in this way. For example, you could create a report showing all students and their parents, build a contact sheet with phone numbers, or designate a primary parent. You could even set up events in your forms, such as making it so double-clicking a student's name in the parent form opens up the student record. That sort of feature involves a bit of VBA, which I plan to demonstrate in the next session. If you have ideas on what you want to see built with this setup, let me know in the comments. If there is enough interest, I will incorporate your suggestions into future videos.
I hope this lesson helped clarify how to build flexible forms for managing many-to-many relationships in Access. A step-by-step video guide covering all of these points is available on my website at the link below. Live long and prosper, my friends. Topic List Creating a continuous subform for parent selection
Binding a subform to a junction table
Adding a combo box to pick a parent from the list
Setting the control source to parent ID in the junction table
Filtering subform entries by current student
Embedding the parent subform into the student main form
Adding multiple parents to a single student
Creating a single form for parent records
Color coding forms for students and parents
Creating a continuous subform for selecting students
Building a combo box to pick students from the list
Sorting the student combo box by last and first name
Formatting the student combo box to show full names
Binding the student subform to the junction table
Embedding the student subform into the parent form
Viewing parents with associated students
Viewing students with associated parents
Concatenating last and first name in combo box rowsource
Adjusting subform appearance and removing headers and footers Primary Topics Access forms, subforms, junction tables, combo boxes, database relationships, form binding, continuous forms, bidirectional navigation, data filtering, database versioning
Secondary Topics form formatting, user interface design, data backup practices, report generation, primary contacts
|


