Multiple Joins
By Richard Rost

 3 years ago
Multiple Joins to the Same Table in Microsoft Access
In this Microsoft Access tutorial, I will teach you how to make multiple relationship joins to the same table in Microsoft Access. This is handy if you want to, for example, link one customer to multiple employees for things like sales rep, service tech, instructor, and so on.
Pre-Requisites
Links
Recommended Courses
Keywords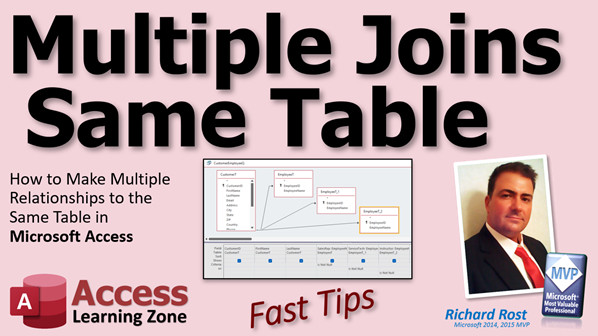
access 2016, access 2019, access 2021, access 365, microsoft access, ms access, ms access tutorial, #msaccess, #microsoftaccess, #help, #howto, #tutorial, #learn, #lesson, #training, #database, join the same table multiple times, Join same table multiple times in one query, joining to the same table, join same table twice
 Subscribe to Multiple Joins
Get notifications when this page is updated
Intro In this video, I will show you how to set up multiple relationship joins to the same table in Microsoft Access, specifically when you need to assign several roles (like sales rep, service tech, and instructor) from one employee table to a customer record. We'll walk through designing your tables, setting up combo boxes in forms, and then building a query with multiple joins so you can display these employee names in a report instead of just their IDs. I'll also show you how to format your report and filter records based on assigned roles.Transcript Welcome to another Fast Tips video brought to you by AccessLearningZone.com. I am your instructor, Richard Rost.
In today's video, I am going to show you how to make multiple relationship joins to the same table in Microsoft Access. This is one I get asked all the time. In fact, I've been asked it three times in the past week by different people. It has to do with assigning multiple values to a record that come from the same table.
For example, let's say we've got our customer table. Each customer will have separate employees that they deal with. Let's say they've got a service rep, a sales rep, and an instructor. So, different people at your organization that they deal with, and they all come from the same table.
Let's create an employee table real quick. We will have an EmployeeID - that will be our auto number. Then, we'll just put EmployeeName. Yes, I know; first name, last name, social security, all that stuff - this is just an example table.
EmployeeT. Primary key. Sure.
I'll put a couple of sample employees in here: Joe, Sue, Kim, Jake, Sal, whatever. So, we've got some sample employees in here.
Now, each customer can have three of those employees assigned to them - one for sales, one for service, and one for teaching (instructor, whatever). Let's go into the customer database.
We need a place to put those employees in the customer table. Is this the best way to set this up? Not necessarily. Generally, you would want to have another table, because you would want to have a many-to-many relationship here. You want to have it where every customer could have multiple employees, and every employee could be inside multiple customers. With a junction table and a many-to-many relationship, you could have an unlimited number of employees assigned to each customer.
But for beginners, especially, this is a lot easier to comprehend and lots of people build their databases this way. I've seen this a million times, so I am going to show you how to deal with it.
Usually, this falls along my "Rule of Three." If you've watched any of my beginner lessons or my early Expert lessons, I talk about if you've got less than three of something, sure, make multiple fields in your table. Phone numbers, addresses, whatever. You have two addresses - bill to, ship to - okay, fine. You can store those both in CustomerT. If you start getting to the point where you might need more than three of something, then you want to look at putting it in a related table.
Phone numbers, for example. If you only have home, work, cell, sure, fine. But if you start dealing with someone who has ten phone numbers or ten email addresses, that should be in a separate table.
So here, in the customer table, we're going to assign three different employees. We have a SalesRepID - this will be a number. It's a foreign key, pointing to an EmployeeID, which is the auto number in that table. I cover this in a lot more detail, by the way, in my Access Expert lessons.
Let's say we have a ServiceTechID, number, and one more, an InstructorID. Maybe they have to come for classes. I do not know what you are selling. Maybe you are selling aircraft, and they come to learn how to fly too. Someone services your plane, someone sold you the plane, someone teaches you how to fly the plane. Or, no, starships - we're doing starships.
Save that.
Now, in the form, this is relatively easy to represent because we can just make combo boxes. Come up here, drop this guy down, Combo Box, drop it there. Look up the values in a table or query. This is a relational combo box; if you've never done this before, I'll put a link down below to some videos I have that teach you how to do this.
What table or query provides the values for the box? This will be our Employee table, next. Bring both of those fields in because, remember, we need the ID to store it in the table, and the name is what gets displayed. Next. What do you want to sort by? Name is fine. Next. This is what it will look like when the box is opened. The key column is hidden; that's the EmployeeID. Next.
Now, where do you want to store this value? We'll do the SalesRep first, so we are going to save this value in SalesRepID. Next. What label do you want? "Sales Rep." That's just a label so it's in English, and then finish.
There is your SalesRepID. We'll use the Format Painter to get the colors. One thing the wizard should do that it does not, but I wish it did, is ask you for a name for the box. I don't like "Combo30" - so, SalesRepCombo.
You can either repeat that process three times and do it for the other two employee types, or you can just copy this box and change a couple of parameters. Watch this: copy, paste, paste. So I did Control+C, Control+V, Control+V. Now I have three combo boxes that are identical, but this one is going to be for the ServiceTech (if I could type today), and this one is going to be for the Instructor.
What do we have to change? The data in the box is bound to a different field - that's the control source. So, this one we're going to change to ServiceTechID and, of course, rename the box to ServiceTechCombo. Then, this guy is going to be the Instructor. Drop that down, pick InstructorID, and change this to InstructorCombo.
Save it.
The data is the same as far as the list of values. Each one of these is getting its list of values from the Employee table. That list does not change. What changes is the value you select, and that gets saved in the customer table. Now, I can pick a Sales Rep of Jake, a Service Tech of Kim, and an Instructor of Sue. The next person can get Joe for everything.
Those values are saved.
Now, the tricky part is how do we display this information in a report? This is where a lot of people get stuck. I get asked this all the time because it is easy to do in a form. You could put combo boxes in a report, but they do not look right.
So, how do we do that? Because if we do this just based on the customer table, all we get are these IDs. Let me show you real quick. Let's make a quick customer report.
Go to Report Design. Double-click here to bring up the properties, set the Record Source to CustomerT. Bring in some existing fields; all I want is the CustomerID, FirstName, LastName, and then their IDs for these guys. Bring these over here, just like that, nice and simple. Bring up the bottom of the detail section. Save this as "MyCustomerR."
Now, if I go to Print Preview, that's what I have: their IDs. But I want to see the names of their different employee reps. So, how do I do that? How do I bring that in there? The trick is to use a query.
We are going to bring in that Employee table three times into the query. If you've never built any relational queries before, go watch my relationships video. It covers this in a lot more detail. I will put a link down below.
Go to Create - Query Design. Bring in the Customer table. I want the CustomerID, FirstName, LastName, and any other fields you want (address, phone number) on this report. Bring those fields in, or just bring in the * (star), but I will keep it simple and bring these three fields in.
I don't want the ServiceRepID; I want the service rep's name. Where do I get that? The Employee table. Bring the Employee table in. You can bring it in from over here or drag from the navigation pane. Access does not see the relationship because the fields are named differently, so you have to make the relationship yourself. Take SalesRepID, click, drag, and drop it onto EmployeeID. That creates what is called an ad hoc relationship.
If I bring in EmployeeName, and I run this, I get the employee name. But it says "EmployeeName" - I want it to say "SalesRep" here. So, we are going to create an alias. In the beginning, type in: SalesRep: EmployeeName
Now that field will say "SalesRep," which is more informative than just "EmployeeName." It is called an alias.
Now, I also want the Service Tech and the Instructor. Here is the mistake a lot of people make: they take ServiceTechID, click, drag, and drop that on EmployeeID. Now, Access will try to form a relationship between this field and that, and this field and that. If you run it, you get Joe, because remember I did Joe for everything. James Kirk has Joe for everything, so that is the only record where both are the same. That is not the way to form that relationship.
Delete that one.
The key is to bring in the Employee table again. Bring in another copy of it. This is the Employee table for the SalesRep join. The next one will be for the ServiceTech join. Bring in EmployeeName and, down here, change it to: ServiceTech: EmployeeName
Now I get the proper values.
Now, we'll do it a third time.
Layout in here is important; keep your stuff looking pretty, people.
InstructorID right there. Bring in EmployeeName and make it: Instructor: EmployeeName
When we run it, everything looks beautiful.
Save this as "CustomerEmployeeQ." I like to save my queries with the table names that are in there, and I try to keep everything singular if I can - not always successful.
The next question that always comes up: what if you have a customer with a SalesRep assigned but not the other two? The way this is structured right now, you won't see that. Each of these are called "inner joins," so you have to have matching values in each of those tables. The key is to make these outer joins.
Double-click and select "Include all records from CustomerT and only those records from EmployeeT where the joined fields are equal." In other words, I want to see all of them and match up these where you can. Do that for all three of these, and you'll get a list of all your customers, and these will match up here if they can. You can use IsNull to say you want to see these, and there are lots of tricks you can use. I cover much more of this in my Access Expert series, where we talk more about relationships, doing stuff like this, things with chemicals, moving parts, molecular structures, and all that good stuff. Just kidding.
This is expert level material - it's just short of programming, but it's good in-depth database stuff.
Now that I have my query all set, I can build the report. Save and close it. Let's go back to that report. You can either start the report over or make a few minor modifications. Right-click, Design View. Change where you are getting your data from. Double-click here. Instead of CustomerT, we want to get our data from CustomerEmployeeQ - that's the Record Source property.
These three fields are no longer in there, so we can delete them.
Now, we can add new fields: SalesRep, Instructor, ServiceTech. Hold down the Shift key, click on the first one, Shift+Click on the last one, click and drag.
Save it and Print Preview. There you go. There's me with my three people. There's Jimmy Kirk with Joe, and everybody else who has stuff in there.
You can make this look pretty. I spend lots of time on pretty report design in my Access Expert classes too.
If you want to learn more cool stuff like this, and you're past the beginner level but not quite up to the Developer/Programming level, that is what my Access Expert classes are for. 32 levels, 48 hours of lessons on relationships, referential integrity, a bit of SQL, letter writing, mass email, and all kinds of cool stuff, order entry system, invoicing. Lots of stuff covered in these lessons. I am very proud of them.
This isn't hard to clean up nicely. If you want, you can do this in your page header. I like to put the labels in the header. I'll cut these out and stick them up here into the page header - then go across: FirstName, LastName. You can put these up there too - cut, paste, Sales Rep, Service Tech, Instructor. Since these are all in the same record in the database (FirstName, LastName), maybe slide these over a little bit. Sales Rep, Service Tech, Instructor. Don't go too far; remember to worry about your margins.
One thing I like to do is go with narrow margins, which I set my template default to. That means you have a quarter inch around the page. So you have a half inch off the left and the right. If you have an eight and a half inch sheet of paper, you have a half inch off of that, which means you can come out to just shy of eight. Do not go right on eight - go a little bit shy of it (one or two pips shy of it) and you should be okay. Different printers can cause different issues.
Select all of these guys, go to Format, Align Left, and whatever other formatting stuff you want to do. Save that and Print Preview. Looks decent.
Let's turn all these boxes off. Design View: select all of them by clicking here in the label, go to Format, Shape Outline, and pick Transparent. Save it and preview. That looks pretty good. Maybe a line under the top. Design View, make this a little bit bigger, get a line out of here, click and drag it across.
Someone put in the comments on one of my videos: if you hold down the Shift key, it keeps it straight. Sometimes it does, sometimes it does not. See, sometimes it comes in crazy. This is a trick I've known since the 90s, by the way, but thank you for sharing. I really do appreciate it when you give me tips because sometimes I do not know them. Sometimes you throw something in - I learned a certain way back in the early 90s when I started working with Access, and the Microsoft guys have snuck little things in there like keyboard shortcuts and tricks that I do not know. It blows my mind sometimes when a student says, "You could do this," and I try it and I am like, "Whoa, when did they change that?" It is really cool.
Thank you, whoever commented on holding the Shift key down. I have known that one for a while. I never do it, though. It's one of those things I know about but never use myself.
Since these are English labels, you can put spaces in here if you want. This is what it will look like when it is printed out, so you want it to look good.
Now save it. You can make this a different color if you want. If you have a color printer, make it light blue if you want to waste your ink. Print Preview. There you go. Looking better.
I know someone is going to ask me, "How do you get rid of all the people with blanks if they have absolutely nothing in here?" Let's go back to the report - or the query, rather. Design View. If you only want to see customers where they have at least one of these things, set the criteria to Is Not Null. Remember, it's AND across, OR down. If you want all three of those to not be null, then you'd go Is Not Null, Is Not Null. Now, when you run that, if any of those are null, you won't see any of them. That is "AND" across.
But if you go "OR" down - move these down a row - now you'll see anybody who has at least one of them. This is "Is Not Null OR Is Not Null OR Is Not Null," as opposed to all three of them being not null. That takes a little getting used to, but that is how you do that.
Now, the only time you'll be hidden is if all three of those things are null. Again, I have videos on IsNull and all that stuff. I will put links to this down below, folks. You can go watch that if you want to. Again, my Access Expert classes cover lots more of this.
There you go. Here is your Fast Tip for today. I hope you learned something. I'll see you next time.Quiz Q1. What is the main concept demonstrated in the video?
A. Creating a many-to-many relationship in Access using a junction table
B. Making multiple relationship joins to the same table in Microsoft Access
C. Designing advanced graphics in Access reports
D. Importing data from Excel into Access
Q2. What scenario does the instructor use as an example for multiple employee assignments?
A. Each customer has one employee assigned
B. Each employee can be part of only one customer
C. Each customer can have a Sales Rep, Service Tech, and Instructor, all from the same Employee table
D. Each employee has multiple customers assigned for invoicing
Q3. According to the "Rule of Three," when should you consider making multiple fields in a table instead of using a related table?
A. When you have more than three values to store
B. When you have less than three of something to store
C. When the fields are all numeric
D. When relationships are not important
Q4. Why would you choose to create a junction table instead of placing multiple foreign keys in the customer table?
A. To increase redundancy
B. To allow each customer to have an unlimited number of employees assigned
C. To make the structure simpler for beginners
D. To eliminate the need for forms
Q5. How is the EmployeeID used in the customer table setup described in the video?
A. As a primary key for the Customer table
B. As a lookup value that stores the employee's name
C. As a foreign key in multiple fields (SalesRepID, ServiceTechID, InstructorID)
D. As a calculation for commissions
Q6. In an Access form, what control type is used to allow users to assign employees to the customer roles?
A. Text Box
B. Combo Box
C. Option Group
D. List Box (multi-select)
Q7. When creating a combo box for the employee selection, what should the control source of the combo box be set to?
A. EmployeeName
B. EmployeeID
C. The appropriate foreign key field in the customer table (e.g., SalesRepID)
D. A calculated field
Q8. How can you efficiently create three similar employee assignment combo boxes on the customer form?
A. Manually create each one from scratch
B. Use the Format Painter exclusively
C. Copy and paste an existing combo box, then adjust the control source and name
D. Use only the Combo Box Wizard for each one separately, with no copies
Q9. In a basic report that pulls data directly from CustomerT, what is the main problem displayed regarding employee assignments?
A. It shows names instead of IDs
B. It shows only one employee per customer
C. It displays only the employee IDs, not their names
D. It does not include any employee information
Q10. How is the issue of displaying employee names in a report resolved?
A. By embedding combo boxes in the report
B. By using a query that joins CustomerT with EmployeeT multiple times
C. By using macros to convert IDs to names in the report
D. By creating calculated fields in the report design
Q11. When joining the Employee table multiple times in a query for Sales Rep, Service Tech, and Instructor, what is an important step?
A. Use unique table aliases for each join
B. Use a single join for all three fields
C. Only join once and use calculated fields for the rest
D. Make the joins circular
Q12. How does an "inner join" between CustomerT and EmployeeT affect the query results?
A. It shows all employees, even those not assigned to a customer
B. It shows only customers that have all three employee roles assigned
C. It shows only customers with at least one employee role assigned
D. It shows customers even if no employee roles are assigned
Q13. What should be changed in the join properties to show all customers, even those without all employee roles assigned?
A. Change to "outer joins" (include all records from CustomerT)
B. Remove all relationships
C. Change to "self-joins" only
D. Use "cross joins"
Q14. How can you set up a query to filter customers who have at least one employee role assigned?
A. Set all criteria on the same row with "Is Not Null" (AND logic)
B. Place "Is Not Null" for each field on separate rows (OR logic)
C. Use "Is Null" for all fields
D. Use no criteria at all
Q15. In the report design, what can be done to improve the visual appearance of the report?
A. Use wide margins by default
B. Place labels in the page header and align fields neatly
C. Avoid labels and use only field names
D. Stack all fields in one column
Q16. What is a benefit of creating table aliases (such as "SalesRep: EmployeeName") in query design?
A. It makes the query run faster
B. It prevents duplicate fields from appearing
C. It provides more descriptive column names in the output
D. It is required for all queries to run
Answers: 1-B; 2-C; 3-B; 4-B; 5-C; 6-B; 7-C; 8-C; 9-C; 10-B; 11-A; 12-B; 13-A; 14-B; 15-B; 16-C
DISCLAIMER: Quiz questions are AI generated. If you find any that are wrong, don't make sense, or aren't related to the video topic at hand, then please post a comment and let me know. Thanks.Summary Today's video from Access Learning Zone focuses on a common question I often receive about working with relationships in Microsoft Access: how to create multiple relationship joins to the same table. This scenario comes up frequently, especially when you want to assign several roles to a record, with each role referencing a different value from a shared lookup table.
Consider the situation where you have a customer table and, for each customer, you need to assign three different employees from your organization: a sales rep, a service tech, and an instructor. All of these roles are filled by employees listed in the same employee table.
Let me walk through how to set this up. First, the employee table should have a primary key, EmployeeID, along with fields such as EmployeeName. For demonstration purposes, I keep it simple, but in a real-world scenario, you would likely store more information like first and last names, employee numbers, and so on. Enter a handful of sample employees to work with for the example.
Now, shifting over to the customer table, we need fields to point to these employees. For each employee role, add a field such as SalesRepID, ServiceTechID, and InstructorID. Each of these fields should be a number type, serving as a foreign key that points to EmployeeID from the employee table.
Is this the ideal structure? For more advanced databases, not necessarily. In the long run, a junction or linking table would better support a true many-to-many relationship, allowing you to assign any number of employees to a customer and vice versa. However, for beginners or situations where you know you will never need more than a handful of assignments, adding separate fields for each employee type is a common solution, and it works fine.
This approach is a good fit for cases where you need fewer than three of something. If you find yourself needing more, it is a sign that you should redesign with a related table.
On the form side, representing these assignments is straightforward. Add a combo box for each employee role field in your customer form. Each combo box gets its list of values from your employee table, so users can pick a sales rep, a service tech, and an instructor from a standardized list. Make sure each combo box is bound to its respective field (SalesRepID, ServiceTechID, and InstructorID) and that the name of each control is descriptive for clarity and good maintenance practices.
You can either use the combo box wizard to build each box individually or copy an existing combo box and adjust its properties for the other roles. In both cases, ensure the control source is set correctly and update the name of the combo box so that things remain organized.
Choosing the employees for each customer saves their IDs in the customer table, but what if you want to display the employees' names, not just their IDs, on a report? This is where people often run into trouble because simply displaying the IDs is not helpful, and combo boxes do not work well on reports.
The solution is to build a query that brings in the employee table three times, once for each role, and joins each one independently to the appropriate foreign key field in the customer table. When creating this query, Access lets you add the employee table multiple times, with each join reflecting a different relationship: one copy joins by SalesRepID, another by ServiceTechID, and a third by InstructorID. For each instance, bring in the EmployeeName field and use an alias to name the output fields SalesRep, ServiceTech, and Instructor to make your output more user-friendly and easier to follow.
Remember, a common mistake is to try joining the same employee table to multiple fields at once, which will only work for records where all three IDs are identical. That is rarely what you want. Instead, bring the employee table into your query for each role separately.
Once this query is built, you might also want to switch your joins from inner to outer joins. This way, you will still see customers even if one or more of their employee role fields are blank. To change this, set each join to include all records from the customer table and only those from the employee tables where the fields match.
With your query in place, you can now base your customer report on this query. Update the report's record source to the new query, remove any old ID fields, and add in the new fields for SalesRep, ServiceTech, and Instructor. Adjust the layout as needed for readability and aesthetics, making use of report and formatting tools to set up clear headers, margins, alignment, and so on. Taking a bit of extra time on presentation will make your report much easier to use.
If you want your report to show only customers who have at least one employee assigned in any of the roles, set the query's criteria for each role's field to Is Not Null and use "or" rows to ensure that any record with at least one assigned employee is included.
Everything I've described above provides a practical way to handle multiple lookups to the same table for different purposes and display the meaningful names, not just the underlying IDs. If you want more advanced techniques, including how to structure relationships for even more flexibility, check out my Access Expert classes where we cover a wide range of intermediate topics such as referential integrity, more advanced querying, and thorough hands-on projects.
You can find a complete video tutorial with step-by-step instructions on everything discussed here on my website at the link below. Live long and prosper, my friends.Topic List Creating an employee lookup table
Adding employee foreign key fields to customer table
Creating relationship fields for multiple roles
Designing a form with multiple employee combo boxes
Configuring combo boxes to select employees
Binding combo boxes to specific fields
Copying and modifying combo boxes for different roles
Naming and organizing form controls
Saving employee selections into the customer table
Creating a basic Access report
Displaying related employee names in reports
Building a query with multiple joins to the same table
Creating ad hoc relationships in queries
Using table aliases for multiple joins
Renaming fields with aliases in queries
Changing join type to outer join for all customers
Modifying reports to pull data from a query
Adding fields from a query to a report
Formatting and arranging report fields and labels
Using Access design tools to clean up reports
Filtering reports based on employee assignment with Is Not Null
Using OR and AND criteria in query design grid |


