Load Multiple Images
By Richard Rost

 2 years ago
Auto-Load Multiple Product Images in Microsoft Access In this Microsoft Access tutorial, I will show you how to automatically load multiple images for products, customers, or any other records at one time. Learn how to set up an import folder, configure image paths, and use VBA code to streamline the process of storing image references. Megan from Chandler, Arizona (a Platinum Member) asks: I have to store multiple pictures for each of my products, and right now I'm just putting in the file names one at a time like you show in your images video. However, this is very time-consuming. Is there a way that I can select just a bunch of images and say these are all for product XYZ and have them all load up automatically? It would save me hours every day, and I will be in your debt, great Klingon Warrior. Qapla! MembersThere is no extended cut, but here is the database download: Silver Members and up get access to view Extended Cut videos, when available. Gold Members can download the files from class plus get access to the Code Vault. If you're not a member, Join Today!
PrerequisitesRecommended CoursesUp Next
Keywords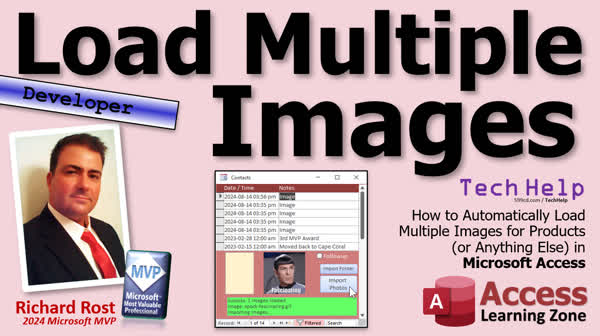 TechHelp Access, automatically load multiple images Access, automatically load product images Access, load images Microsoft Access, VBA image import Access, Access image control tutorial, batch image import Access, image database Access, Access VBA images, image path Access VBA, load images Access form, image reference Access database, image path reference Access
Intro In this video, I will show you how to automatically load multiple images into your Microsoft Access database using an import folder and VBA code. We'll set up folders for your images, create a button to open the import folder, and automate the process of copying file paths into a related table. I'll walk through modifying your forms to display images dynamically, use string functions to find file extensions, and explain the necessary VBA logic, including while loops, if then statements, select case, and record sets. This tutorial is geared toward developers who want to save time managing images in Access.Transcript Welcome to another TechHelp video brought to you by AccessLearningZone.com. I'm your instructor Richard Rost. Got a good one for you today. I'm going to show you how to automatically load multiple images for products or customers or whatever you want at one time in Microsoft Access.
Today's question comes from Megan in Chandler, Arizona, one of my Platinum members. Megan says, I have to store multiple pictures for each of my products, and right now I'm just putting in the file names one at a time like you show in your images video. However, this is very time-consuming. Is there a way that I can select just a bunch of images and say these are all for product XYZ and have them all load up automatically? It would save me hours every day, and I will be in your debt, great Klingon warrior. Kapla.
Now, the Star Trek reference alone will get you a video, and being a Platinum member, well, that just bumped your question up to the top of the list. So let's talk about it.
Okay, in my images video, I show you how to display images in your forms and reports by just simply putting the file name in a text field and using the image control. We do not use attachments. We do not store images inside our databases. All right, they bloat your database, and they're bad for you. Go watch this video for all the information you need on that.
Now, in the extended cut, I teach you how to make a browse button. So you can click on that, pick a file, and it puts the file name in there for you automatically. Today, I'm going to show you a trick where you can set up an import folder, and you can drop all the pictures that you want into the import folder and then click a button, and they'll all get loaded into your database on whatever record you want. Let me show you a sample.
All right, so today, what we're going to do is we're going to take a customer form. We're just going to drop pictures in the contacts. Let's pretend this was a product record. You can have another table that's related to it where you can have multiple products, okay? And then those will be displayed in here. So what we're going to do is we're going to set up an import folder. We'll make a button so you can click on it, and it will open up that import folder. It's just a folder underneath your database folder, right? We're going to call it the import folder.
Now, any pictures that you want to import into the database, you put in this folder. So I'll just go grab some. All right, I copied these pictures into the import folder, and now I'm going to go back to the database. I'm going to hit import photos, and look at that. They all came in automatically. There's this one, this one, this one, this one, this one, and they're all stored in the contacts under this customer. Whatever images were in that folder are just immediately tagged in here.
These aren't actually imported into the database, but we've stored the location in the contact table. So if you come down here, here they are. And there's the locations. We're going to copy them to an images folder under the database, rename them, and store them. So they're under here in images. There they are with the unique file names now, okay? And you can use them in your database, and they're attached to the customer right there.
And this could be, like I said, this could be a product, this could be students, this could be whatever you want — documents, doesn't matter. So that's what we're going to cover in this series.
Let's talk some prerequisites first. What do you need to know before we get started today? Well, it's going to be a developer-level video. So you're going to need some VBA. Obviously, go watch that images video that I mentioned earlier. Now, if you've never done any VBA programming before, don't worry, it's not scary. Go watch this video. It'll get you started, everything you need to know in about 20 minutes.
We're going to use a while loop to loop through the file, so make sure you understand while loops. We're going to use some of the string functions left, right, mid, in string, those guys, make sure you know these. We're going to use in string reverse. That's finding something from the end of a string. We'll use that to find the file extensions. We're going to use if then statements, make sure you know how to use these. And we're also going to use a select case statement. So brush up on this one.
We're going to use a record set to add the file to the contact table. All right, so make sure you know how to use record sets. These are all free videos. They're on my website. They're on my YouTube channel. Go watch all of these if you're not familiar with any of this stuff, and then come on back. This is going to be a developer, developer. This is a higher-end developer bit of code we're doing today. So for those of you who keep telling me you want more advanced stuff, well, here's some advanced stuff. I usually cover this kind of stuff in my developer course.
Now, we're also going to use some basic file input-output, reading through files in a folder, that kind of stuff. I don't have TechHelp videos for this kind of thing. I'm going to show you what you need to know today in today's video. But if you want to learn more about these things in Access Developer 30 and 31, I cover basic file input-output, reading, writing text files, file and folder navigation, copying files and lots more. So I'll put links to these down below as well if you want to learn more about these things.
All right, we're going to start with a copy of my TechHelp free template. This is a free database. You can download a copy from my website if you want to. I'm going to call this one load multiple images. And we're going to put this in its own folder. I'm just going to put mine on my desktop. So new folder, we'll call this images database or whatever you want to call it. And I'm going to put this guy in there. Okay, now inside of this folder, there we go, it opened up on my other screen. We're going to create two other folders. One is going to be our images folder. And that's where we're going to store images that are actually logged in the database.
Okay, remember, we don't store files in the database itself. We put them in a folder, and we just store the reference, the file, and path to that image in the database itself. Then we're going to set up another folder called our import folder, new folder, import folder. And that's where we're going to put files that we have not yet inputted or imported into the database. And we'll just drag them all, drop them in there like you just saw me do a minute ago, hit a button, and they'll all get copied up to the images folder and then deleted, and then logged, and then everything will be hunky-dory. Okay, all right.
And yes, for those of you that are asking, can't you just use a button to select multiple files with the file dialog? Yes, you can. It's a lot more advanced. I find this method a lot easier, actually. And I will cover that in the extended cut for the members after we're done with what we're doing here. But this works easy, and the programming for this is not that difficult.
All right, so let's open up our database. And the first thing we need to store is a location to keep track of the image file name. So I got customers and contacts already set up in here. What you want is if you want to have multiple pictures associated with something, you're going to want to have another related table to store all of that something. If you're doing a customer's profile picture, and it's just one, you can just store the file name in here, right in the customer table, which is what we did in the images video.
But, if you've got multiple profile pictures or multiple pictures that you want to associate with this customer, you're going to need a second related table. So if this is products, you can make a product images table, and you can store 15, 20, 1,000 pictures for that product in the related table. I've already got customers and contacts set up, so rather than waste all this time reinventing the wheel, we're just going to store the pictures related to this customer in the contacts table.
Okay, so let's go to the contact table design view. And right down here on the bottom, I'm going to put my image, don't use the word image — image is a reserved word, just like picture is a reserved word, you want to try and avoid those as possible. If you're not sure if something is a reserved word, just put my in front of it, like instead of date. Date's reserved, my date, or whatever. All right, save this. And I'm going to go, let's go into here and just put some sample data in one record. I'm going to put in my image for me. I'm going to put in here, I'm just going to put in Picard.jpeg. And I'm going to throw a file called Picard.jpeg in the images folder, just so we can see that it's working.
Okay. All right, here's my images folder. And I'm going to grab a copy of Picard that I just happened to have handy. We're going to drag and drop that into here. And there we go. So now you'll see that that's in there. When we build the form, you'll see that it's working.
All right, next up, let's open up the contact form where we're going to store our pictures, or we're going to display the pictures, I should say. And we don't need the notes to be quite that big for this example. So I'm going to shrink up notes just like that, and we're going to put a nice big image right here in the footer. So we're going to go to form design, and find the image control, which is this guy, do not use this guy, this is different, this is an unbound object frame, don't use this guy, that's a bound object frame — those are different completely. You want this guy, image. All right, draw out a box down here, like about so. You're going to cancel this, we just want an empty image frame right there.
Okay. If you want to give it a background color, I like to give it a background color so that people can tell something's there, like that. All right, that's just empty. Let's open up the properties for it. I don't like image eight, let's call it my image object. All right, so we don't confuse it with the actual image field value. Now, for the control source, I want to use my image, which is a field in the table underneath this, right, my image, but I need to tell the database to look in the database folder, and then go into the images folder under that to find my image.
All right, how does that look? I'm going to zoom in, so you can see this better, shift F2. Okay, it's going to be equals current project.path, that's the current database folder, and backslash images, that's my images folder, right, backslash, close quotes, and then my image, the field name. So it's going to be whatever the path is to the database, right, C colon, backslash, users, backslash, Rick, backslash, desktop, backslash, whatever the database folder name is, slash images slash Picard. All right, that's going to be put all together, and it's going to be in the control source to this guy right there. All right, save it, close it, open it back up again, and there's Picard, right, because I got Picard.jpeg in the table. So that's easy.
So far, nothing new. We've done all of this before in the images video. Now we're actually ready to start building our buttons and put some code in to pull in the multiple pictures and put them in different records up in here. And we'll start that in tomorrow's video. So tune in tomorrow, same bat time, same bat channel.
Yeah, we got all of the prep work done. Sometimes the prep work can take a few minutes, right, but you got to get the database set up properly. And of course, if you remember, you can watch it right now, because I'm going to post it as soon as I'm done with recording it in just a few minutes. But that's going to be your TechHelp video for today. I hope you learned something. Live long and prosper, my friends. I'll see you tomorrow for part two.
A special thank you and shout out to our diamond sponsor, Juan Soto with Access Experts Software Solutions. They're manufacturing experts specializing in Microsoft Access and SQL Server. Juan is a 13-time Microsoft Access MVP. Check him out at accessexperts.com.
TOPICS:
Automatic loading of multiple images in Access
Setting up an import folder for images
Creating a button to open the import folder
Copying images from the import folder to the database
Storing image file paths in a related table
Using VBA to automate image import
Using a while loop to loop through files
Using string functions to find file extensions
Using if then statements in VBA
Using a select case statement in VBA
Using a record set to add files to a contact table
Basic file input-output in VBA
Creating folders for images and imports
Using the image control in Access forms
Configuring the image control's properties
Setting up the image control's control source
Displaying images dynamically in a form
COMMERCIAL:
In today's video, I'll show you how to automatically load multiple images into your Microsoft Access database. You'll learn to create an import folder to easily drop all the pictures you need, and with a simple click, watch them get loaded into the database for your selected records. We'll discuss setting up related tables for multiple images, building the necessary form controls, and using VBA code to streamline the process. Perfect for developers needing to save time and automate tasks. You'll find the complete video on my YouTube channel and on my website at the link shown. Live long and prosper, my friends.Quiz Q1. What does Megan from Chandler, Arizona need help with in Microsoft Access?
A. Storing attachments inside the database
B. Automatically loading multiple images for products
C. Creating a report for product listings
D. Designing forms without code
Q2. Why should you avoid storing images directly inside a Microsoft Access database?
A. It makes the database run faster
B. It decreases the database size
C. It is more secure
D. It bloats the database
Q3. In Richard's tutorial, where are images intended to be stored instead of within the database?
A. In an email
B. In a folder outside the database
C. In an embedded Excel file
D. In an online drive
Q4. What must be created to facilitate importing multiple images into the database?
A. A new report
B. An image control
C. An import folder within the database folder
D. A form with attachment support
Q5. What is the purpose of the import folder in Richard's method?
A. To display images on the form directly
B. To temporarily store images pending import
C. To permanently store all imported images
D. To email images to customers
Q6. Which visual basic for applications (VBA) knowledge does Richard suggest you need for this tutorial?
A. Enumerator objects only
B. Loop constructs like while loops and string functions
C. Advanced data connection strings
D. HTML and CSS integration
Q7. To dynamically reference images stored in the database, which control is used on the form?
A. Button control
B. Label control
C. Image control
D. Text box control
Q8. In the tutorial, what is the correct field name format Richard uses to avoid reserved words?
A. image_field
B. Image
C. MyImage
D. Image1
Q9. How does Richard suggest forming the image file path in the form's image control source?
A. By hardcoding the full file path
B. By using the equals current project.path and concatenating with folder and file name
C. By embedding the images directly
D. By referencing an external URL
Q10. What will be covered in the extended cut of the video series?
A. Creating a report for displaying images
B. Using a button to select multiple files with the file dialog
C. Embedding images directly within Access forms
D. Exporting data to Excel
Answers: 1-B; 2-D; 3-B; 4-C; 5-B; 6-B; 7-C; 8-C; 9-B; 10-B
DISCLAIMER: Quiz questions are AI generated. If you find any that are wrong, don't make sense, or aren't related to the video topic at hand, then please post a comment and let me know. Thanks.Summary Today's TechHelp tutorial from Access Learning Zone focuses on how to automatically load multiple images for products, customers, or any other records in Microsoft Access. Many users find it tedious to enter image file names one at a time when managing several pictures for each item. Today, I am going to show you a streamlined approach that lets you handle batches of images with just a few clicks, making your workflow much more efficient.
The challenge here is to easily associate multiple images with a particular database record without manually entering each file name. The foundation for this process is set up in my earlier video on displaying images using a text field to store file names and using the image control in forms and reports. As a reminder, we do not use attachments or store actual images inside the Access database because doing so increases the size and can harm database performance. Instead, we manage files externally and simply store their file paths in tables.
To recap, in the previous videos, I have demonstrated how to display an image by putting just the file name in a table and using the image control to show it on a form. In the extended cut, I go further and show you how to build a browse button so you can pick a file and have its name pop into your field automatically. Today's lesson will take this up another notch. I'll explain how you can set up a dedicated import folder, drop any number of images into it, and with a click of a button, have all those images registered in your database under your chosen record automatically.
While my demonstration uses customers and contacts, the same approach works for products, students, or any other data type. The method is to set up an import folder within your main database folder. Any image you want to add gets dropped in there. Then, with a dedicated button in your Access form, those images get linked to the current record after being moved to a permanent images folder, renamed for uniqueness, and their locations logged into a related table.
It's important to highlight that we are not importing images directly into the database. We keep image files stored in a folder and save their locations in an associated table. This allows the images to appear tied to the correct record—such as a customer or a product—in your database, while keeping database size under control.
This method can be used for any scenario where you need multiple items associated with a single record. Products, customers, students, or even documents can be handled the same way. This video covers the entire setup process.
Let me outline some prerequisites. This is a more developer-focused lesson, so you will need some background in VBA programming. If you have not watched my earlier video about working with images in Access, I suggest you do that first. If VBA is new to you, I have an introductory video on my website that explains the basics in about 20 minutes.
In this tutorial, we rely on a few standard programming techniques. You should be familiar with while loops since we'll use them to iterate through files. Some string manipulation is required, so you should know functions like Left, Right, Mid, InStr, and InStrRev, which help us find file extensions and work with file names. We will use If Then approaches, and Select Case for decision-making within the VBA code. We'll be adding records programmatically to a related table, so understanding record sets in VBA is essential. All these concepts are covered in free videos on my website, so check out those resources if you need a refresher. This is an advanced topic typically discussed in my developer courses, perfect for anyone eager for more challenging content.
Additionally, we'll touch on basic file input and output, such as reading through files in a folder, renaming them, and managing file and folder operations. While I do not have specific TechHelp videos solely on those basics, I do explain what you need in this lesson. For more in-depth material, my Access Developer 30 and 31 courses cover these subjects thoroughly with file and folder navigation, reading and writing text files, copying files, and more.
For our demonstration, I start by using a copy of my TechHelp free template database, which you can download from my website if you want to follow along. I give this database its own dedicated folder, then create two subfolders inside it. The first is an images folder, which stores the files that are officially linked in your database. Remember, we store only file paths in the table, not the images themselves. The second subfolder is the import folder, where you temporarily place files that are ready to be imported. After the import process, the files are moved from the import folder to the images folder, renamed, and linked in the database, with the originals then deleted from the import location.
Some might ask if it's possible to use a file dialog to select multiple files at once. The answer is yes, but it requires more advanced programming. The approach I am showing you here—using an import folder—is simpler to set up and just as effective for most users. For those interested in an even more advanced method, I cover importing multiple files via the file dialog in the extended cut of this lesson for my members.
Now, let's look at how to prepare your tables and forms. In your database, you need a place to store the image file name or path. If you only have one image per record, you can just add a field directly in your main table (like Customer). But if you need multiple images, you need to create a related table (for instance, ProductImages for products or ContactImages for contacts), allowing for any number of images to be associated with a single record. In this tutorial, my example uses the Contacts table already set up, linking multiple images to a single customer record.
In table design view, add a field to hold your image file path. Avoid using common reserved words like "image" or "picture" for field names. It's often safer to prefix your field names with something like "my," as in "myImage." Enter a sample file name, such as Picard.jpeg, into your table for testing. Place a corresponding image file in the images folder in your database directory so you can see the process in action.
When you move to form design, add an image control (not the object frames, which are different) where you want the images to be displayed. Set the image control's properties so that it reads the image path dynamically. This usually involves combining the current project path with the images subfolder and the file name from your table. This way, any record that specifies a particular file will display that image on the form, as long as the file exists in the correct folder.
Everything I have described up to this point has been demonstrated in my earlier images video. What comes next is where we build out buttons and add VBA code to handle the bulk import process. This code will cycle through the files in the import folder, copy them to the images folder, update your related table, and clear the import folder so you can start the process again at any time.
We have completed the preparation steps in this lesson. Getting the tables and folders set up properly is crucial before automating the import process. The rest of the code and detailed implementation will be covered in the next lesson. Meanwhile, you can start experimenting with your own setup as described here.
For a complete step-by-step tutorial showing every part of this task, including the actual VBA coding necessary for the automated bulk import, visit my website at the link below. Live long and prosper, my friends.Topic List Automatic loading of multiple images in Access
Setting up an import folder for images
Creating a button to open the import folder
Copying images from the import folder to the database
Renaming images and storing them in a designated folder
Storing image file paths in a related table
Setting up tables to handle multiple images per record
Adding a field to store image file names
Using VBA to automate image import
Using a while loop to process files in VBA
Using string functions to extract file extensions
Using in string reverse to find the extension in file names
Using if then statements in VBA
Using a select case statement in VBA
Using a record set to add files to a table
Basic file input-output in VBA
Creating folders for images and imports
Placing images in a folder instead of storing in the database
Using the image control in Access forms
Configuring properties of an image control
Setting up the control source for dynamic image display
Displaying images dynamically in a form |


