MsgBox Timer 2
By Richard Rost

 2 months ago
Create a Countdown Timer Message Box, Part 2
In this lesson, we continue building our MsgBox Timer by creating a reusable public function that opens our countdown form, passes prompt and title parameters using TempVars, and returns a Boolean value based on the user's response or timer expiration. We will walk through setting up the supporting module, connecting the form to this function, handling user responses, and implementing prompt/title customization. We will also discuss use cases such as prompting users for action to prevent database issues due to inactivity and upcoming enhancements in later lessons.
Members
In the extended cut, we will add support for up to three custom buttons with dynamic positioning, allow custom button captions, add default values for countdown duration, enable background color changes, and turn the message box timer into a fully reusable system you can easily copy to any database. I will show you how to set these options and further enhance your message box timer beyond the basic yes/no functionality.
Silver Members and up get access to view Extended Cut videos, when available. Gold Members can download the files from class plus get access to the Code Vault. If you're not a member, Join Today!
Prerequisites
Links
Recommended Courses
Keywords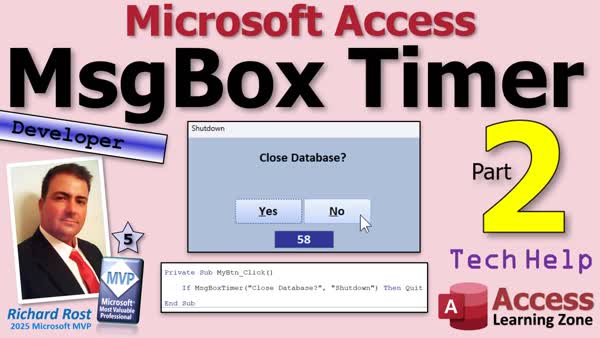
TechHelp Access, message box timer, VBA timer, temp vars, dialog form, acDialog, DoCmd.OpenForm, return value, Boolean function, inactivity detection, custom button captions, dynamic button positioning, countdown duration, close main menu, PromptLabel, automation
 Subscribe to MsgBox Timer 2
Get notifications when this page is updated
Transcript Welcome to another TechHelp video brought to you by AccessLearningZone.com. I'm your instructor Richard Rost. This is part two of my message box timer countdown, whatever you want to call it. Series? If you haven't watched part one yet, what are you doing here? Go watch part one. You'll find a link down below and then come on back.
Alright, so in part one, we got our form built. There it is. Where is it? Right there. And the buttons work. The timer works and it returns a value by setting a temp var. But we have to have something to receive that value, that temp var.
You can put this either in your global module or you can make your own new module for it. I'm going to make my own module. That way it's easy to transplant into a different database too. You have one form and one module and they both start with message box timer. So that's easy to remember.
So I'm going to go up to Create and then Module, not Class Module, just a regular module. Click on that. Now we're going to call this guy. It's going to be a Public Function. That way it can be used anywhere in the database. We're going to call this guy message box timer. And we're going to send in two parameters, the prompt as a string, and optionally, a title as a string. Optionally, we'll make it blank. I'm going to move this down onto the next line so it's easy for you all to see. And this function is going to return a Boolean, a true/false value.
So it takes in, it has to take in a prompt. You have to give it something. Optionally, give it a title. We'll put that up in the caption of the form, just like message box does. And it's going to return a true/false value, a Boolean value.
We're going to do DoCmd.OpenForm, the message box timer F that we just created. And we're going to say, comma, comma, comma, all the way over to WindowMode. And we're going to set that equal to acDialog. Now, if you don't like all those commas there, you can do this instead. You can say, look at the parameter, see, it's WindowMode. Let me slide it over so you can see it better. It's over there, watch it. WindowMode is the name of the variable. So you don't have all these commas there. You can go WindowMode:=acDialog. That's how you do that.
That comes in handy if you have a sub or a function that's got a million parameters and you only care about two of them.
Now, what does acDialog do? I have talked about this in several videos before. acDialog says we're going to open up this form and we're going to stop execution of your VBA code until that form closes.
Since forms themselves can't return values, that's why we're using the temp var. Then we can read the temp var that the form sets before it closes and use that in this function. You see how that works?
So this line is going to stop execution once that form opens because it's a dialog form now. Normally you can open a million forms and they'll all just do their own thing, but this stops everything else in the database until this form returns its value.
Now we can say message box timer, that's this function, equals whatever that form put in the temp var. TempVars! MessageBoxTimer (what did I get out of my notepad over here?) ReturnValue. Open a form, wait for it, get its return value, and then return that for the function.
Save this. This will be my message box timer mod for module. Debug, compile.
Now we're ready to test it. Right-click. Design View. Let's go into our Hello World button here. Let's say if message box timer, just like message box, we made our own message box timer. What do you want for a prompt? Let's say "Close main menu?" And then for the caption, we'll say "Close". Close menu, like that.
Now, just like message box, if that returns a true value, then DoCmd.Close acForm, Me.Name, acSaveYes. So close the main menu we're on, because we're on MainMenuF right now.
Alright, save it. Debug, compile. Close it. I'm going to open up my main menu again. It's right here, but I have it on my quick launch bar right up there.
Alright, ready? Click. There's my thing. Now, we haven't done these yet. We haven't done the prompt in the caption yet. If I say "No," nothing happens. If I say "Yes," look at that, it closed the main menu.
So what's happening is, oops, my button moves the form over there by the way, that's okay. Now, what happens is, when this guy opens up, if I say "No," it returns a no value in that temp var to the calling function, which is my message box timer function, and so then it says, close the main menu. And if I say "No," it doesn't.
Now, if this thing gets down to zero, then it should trigger the default value, which is set when we open this form, and that's going to be false. So I'm going to let it time out.
Here is a little trick. You can lock this box if you don't want them to be able to do this. You can short circuit this. I'm just going to put a 5 in here real quick. You have to do it between the timer ticks, though. There we go. See, you have to do a 5 and then a tab. Missed it. Let's try it again. It's tricky. You have to get it within one second. There, I did it.
So now we're five, four, three, two, one, and it closed because it returned a false, which was the default value.
Alright. We still have to set that prompt and that title. So let's go back into our module here.
Normally the way you do this with a form is you open the form and then you set its value. So you'd say like Forms!MessageBoxTimerF!PromptLabel.Caption = whatever the prompt is, right? The PromptLabel on that form's caption property is equal to whatever the prompt is that the user sent in here. That's normally how you do this and it will compile, no problem. Save it. Close it. Open it. And it still didn't work.
Alright. Let's say no, and then, oh, if you can't find the referenced form, debug what happened. Remember, this runs and at that moment, all the execution in the database stops. The form opens, the timer starts counting down, it's waiting for you to click yes or no, and when you click yes or no, what happens? It saves the temp var, closes that form, and then it's no longer open for this line to execute properly.
So we have to do this before we open the form. How do we do that? We'll use our friend temp vars. This time we'll set temp vars before we open the form.
We'll say TempVars!MessageBoxTimer_Prompt = prompt. And then I'm going to copy this and we'll do the same thing for the title. TempVars!MessageBoxTimer_Title = title. So now we're going to put these parameters in temp vars that this form can read when it opens.
Save it. Come back over here. Let's go to the form itself. Design view. Now, when this guy loads in the On Load event, we'll read those values in.
Right here, we'll say PromptLabel.Caption = TempVars!MessageBoxTimer_Prompt. And then the form's title, Me.Caption = TempVars!MessageBoxTimer_Title. And the default value gets set. And then the timer continues and everyone's happy.
Ready? Debug, compile. What did I do? PromptLabel.Caption - variable not defined. What do you think I did there? Did I not label these correctly? Let's see. Oh yeah, let's see. That's the label for...okay, my bad. I typed in the caption, but I didn't give that a name. That's why we debug, compile, right? PromptLabel, no space. The caption can have a space, the label name itself should not.
Alright, save it. Let's debug, compile again. Alright, we passed the compile test. Close it. And now click. And there we go. See? "Close main menu" - the caption's up here.
And we're good. And there we go. You can use it to check for anything that happens in a loop. If you have stuff that runs like a bunch of events, like the user said, he has an event that runs at the end of the day, I've had stuff like that too. You click it and let it run, and then you go away and you forget it's running. Anything where you have to prompt the user but you don't want to wait forever for them, you can throw this in there just like a message box.
One big thing you can do is check for user inactivity. The user goes home for the day and forgets to log out, and then it messes up your backup at night if someone has the database open. So you can regularly loop and pop up a message box that says, hey, are you there? And then the timer will wait for them to answer yes or no. Well, more just yes.
I guess they could answer no and immediately close the database. Now, I've actually got another video coming out, probably next week, where we're going to talk about that in more detail. We're going to have it so that the database is constantly watching to see if the user is doing anything, and then if it detects inactivity for maybe an hour or half an hour, whatever you want to set it to, then it will pop up a message box like we made today and it'll say hey, are you there? And if they don't answer that, then it'll close the database.
So that's coming up probably next week. I'm going to put a link to it down below to what I'm planning on its link being, and you can check it and see if the video is finished. If you're watching this in the future, maybe six months from now, that video is probably already there waiting for you. And if not, you'll have to wait or become a member and you'll have it as soon as I finish it.
Now in the extended cut for the members, we're going to take this even further. We're going to add support for up to three custom buttons. Could be zero, could be one, could be two, could be three. We'll dynamically position them depending on how many you have - one will be centered, two will be centered, three will be centered or none.
We'll be able to set our own custom button captions. I did some funny ones here: Wizard, Warrior, Cleric. But you could do whatever you want. Retry, Abort, Yes, No, True/False, whatever. We'll add some default values to our function so you can specify the countdown duration. You want five seconds, twenty seconds, two hours. We could change the background colors. We're going to turn it into a fully reusable message box timer system that you can copy and paste easily into any database.
Again, this is all covered in the extended cut for the members. Silver members and up get access to all of my extended cut videos, not just this one, all of them. There's hundreds of them. Gold members get all the databases that I build in the extended cuts and the TechHelp videos, and everybody gets some free training every month. So check it out.
There you go. Now you've got a cool message box with a timer and the user can answer yes or no and everybody should be happy. No more database sitting there hung at the end of the day because someone went home and forgot to answer yes or no to their backup prompt or whatever.
That's going to do it for your TechHelp video for today. I hope you learned something. Live long and prosper, my friends. Post a comment down below and let me know what you thought of today's video and any questions you have. I'll see you next time.Intro In this lesson, we continue building our MsgBox Timer by creating a reusable public function that opens our countdown form, passes prompt and title parameters using TempVars, and returns a Boolean value based on the user's response or timer expiration. We will walk through setting up the supporting module, connecting the form to this function, handling user responses, and implementing prompt/title customization. We will also discuss use cases such as prompting users for action to prevent database issues due to inactivity and upcoming enhancements in later lessons.Quiz Q1. What is the main purpose of creating a message box timer as described in the video?
A. To allow users to respond to prompts within a set time limit
B. To display random messages for user entertainment
C. To automate data imports in Access
D. To prevent users from opening multiple forms at once
Q2. Why is a temp var (temporary variable) used in the message box timer implementation?
A. To pass values directly between multiple databases
B. Because forms cannot directly return values to the calling code
C. To store permanent settings for the application
D. To save memory resources in large databases
Q3. What type of function is message box timer defined as, and why?
A. Public Function, so it is accessible from anywhere in the database
B. Private Function, to control access to it
C. Sub Procedure, as it does not return a value
D. Event Handler, because it handles button clicks
Q4. When opening the message box timer form, what does setting WindowMode:=acDialog accomplish?
A. Opens the form as a subform within another form
B. Sends the form to the background
C. Pauses execution of VBA code until the form is closed
D. Minimizes the form on open
Q5. How are prompt and title values passed from the function to the timer form?
A. By storing them in hidden text boxes
B. Through global public variables
C. By setting TempVars that the form reads when it loads
D. By modifying the registry settings
Q6. If a user does not respond within the time limit, what happens by default?
A. The database crashes
B. A runtime error occurs
C. The default value, typically False, is returned
D. All forms are forced to close
Q7. How does the function handle assigning the prompt and caption if the form is already open?
A. By setting the values after opening the form
B. By setting TempVars before opening the form and reading them in the form's On Load event
C. By using DLookup to fetch settings from a table
D. By hard coding the prompt and caption within the form
Q8. What feature is mentioned for handling cases where a user is inactive for an extended time?
A. The timer will take a screenshot of the screen
B. The timer will send an email to the admin
C. The database will prompt the user to see if they are present and close if no response
D. The timer will automatically save all data
Q9. What additional features are mentioned for the extended cut for members?
A. Ability to import/export database settings
B. Support for up to three custom buttons with customizable captions and durations
C. Built-in live chat window
D. Integration with Microsoft Excel
Q10. What happens if you try to refer to a control on a form after it has been closed using this method?
A. The reference works as normal
B. The reference automatically opens the form again
C. An error occurs because the form is already closed
D. The control values are saved in the cloud
Answers: 1-A; 2-B; 3-A; 4-C; 5-C; 6-C; 7-B; 8-C; 9-B; 10-C
DISCLAIMER: Quiz questions are AI generated. If you find any that are wrong, don't make sense, or aren't related to the video topic at hand, then please post a comment and let me know. Thanks.Summary Today's video from Access Learning Zone continues my lesson on creating a message box with a countdown timer in Microsoft Access. This is part two of the series, so if you missed the introductory video where we built the main form and set up basic button and timer functionality, make sure to go back and watch that first before moving forward.
By the end of the previous lesson, we had a form with functional buttons, a working timer, and a mechanism for returning values via a temporary variable. But for this to be effective, we need a way for other parts of the database to receive that return value.
You can integrate the code for this in a global module or create a dedicated new module. I recommend making a separate module for the message box timer, as it keeps things organized and easier to copy into a different database if needed. You'll end up with one form and one module dedicated to this system.
Begin by creating a regular module (not a class module) and define a Public Function. Naming it logically, such as message box timer, helps keep things clear. This function should take at least one required parameter for the prompt text and an optional one for the title. The function will return a Boolean value (true or false).
The prompt parameter is required, as it's the message shown to the user. The title is optional and will appear in the form's caption, just like Access's built-in message box. Since the function should return true or false, we leverage Access's temp vars to receive the user's response from the form.
When the function runs, it uses the DoCmd.OpenForm method to open the message box timer form in dialog mode (WindowMode set to acDialog). This dialog setting halts the execution of any following VBA code until the form is closed. It ensures the user has to respond before anything else can continue, matching the behavior of a standard message box.
Since Access forms cannot return values directly to calling functions, the form sets a temp var before closing. The function then reads the value from that temp var and returns it.
After saving and compiling your module, you can test the system by adding it to, for example, a Hello World button on your main menu form. When the button is clicked, the function can be called just like the built-in message box, passing the appropriate prompt and title. If the returned value is true, the form closes; otherwise, nothing happens.
Currently, if the timer counts down to zero, the form returns the default value, which is set to false. This acts as a safety net in scenarios where a user doesn't interact with the prompt.
To improve on conventional methods of passing parameters to the form, such as directly setting label values after opening the form, we instead use temp vars. Before the form opens, set TempVars!MessageBoxTimer_Prompt and TempVars!MessageBoxTimer_Title to the desired strings. Then, inside the form's On Load event, read from these temp vars to set the prompt label's caption and the form's title, respectively.
While testing, you might run into issues if your label's name and its caption don't match or if you type them incorrectly. Double-check these properties and ensure you give your label a valid name without spaces. Debug and recompile if needed.
With everything connected, clicking your test button now shows the correct prompt and title in the message box, allowing the user to respond, or letting the timer expire and trigger the default response.
This message box timer is useful for situations where you want to prompt the user but not leave processes waiting indefinitely. For example, if a process runs at the end of the day and a user fails to respond, the timer's default ensures the database stays in sync and doesn't hold up backups or other overnight operations.
Another application is tracking user activity. If you want to ensure a user is still at their desk, you could regularly display this message box. If there's no response in a set period, you can have the database log out the user or close itself.
In the extended cut for members, I go even further. You'll learn how to add support for up to three custom buttons with their own captions, and the system will dynamically position them based on how many you decide to use. You will also be able to specify your own countdown duration and even customize background colors. This turns the utility into a fully reusable component you can drop into any Access database.
Silver members and up receive access to all my extended cut videos, and gold members get all the databases I build, along with additional free monthly training. If you want to take your Access skills to the next level, check out those membership options.
With this setup, you can now create a message box with a timer for any situation that requires a user response, with protection against inactive sessions hanging your database. No more waiting endlessly for users to answer backup or shutdown prompts.
You can find a complete video tutorial with step-by-step instructions for everything discussed here on my website at the link below. Live long and prosper, my friends.Topic List Creating a Public Function for the message box timer
Passing prompt and title parameters to the function
Setting up the function to return a Boolean value
Using DoCmd.OpenForm with acDialog to open the form
Reading and returning the temp var set by the form
Testing the message box timer function in a real scenario
Handling default behavior when the timer counts down to zero
Using temp vars to pass prompt and title to the form
Setting form label and caption using temp vars on load
Handling user responses for yes and no buttons
Using the timer for user inactivity scenarios in Access
Debugging label naming issues in the form
Testing and compiling changes for the message box timerArticle In this article, I will walk you through building a reusable message box with a countdown timer in Microsoft Access using VBA. The idea is to create a dialog form that will prompt the user for a response, such as Yes or No, but automatically select a default action if the user does not respond within a set time. This is useful for situations where you need to prompt users for confirmation but want the application to continue if they leave their desk or forget to respond.
The foundation of this message box timer involves both a form and a module, which allows you to easily transfer the functionality to other databases if needed. The form displays the message, the countdown, and buttons for the user to respond. The module contains the function that calls the form and handles the return value.
To begin, create a new standard module in your database, not a class module, and name it something memorable. In this example, let's call it MessageBoxTimerMod. Inside the module, we define our main function, which can be called from anywhere in the database. Here's the function:
Public Function MessageBoxTimer(prompt As String, Optional title As String = "") As Boolean
TempVars!MessageBoxTimer_Prompt = prompt
TempVars!MessageBoxTimer_Title = title
DoCmd.OpenForm "MessageBoxTimerF", WindowMode:=acDialog
MessageBoxTimer = TempVars!MessageBoxTimer_ReturnValue
End Function
Let me break down what happens here. The function takes two parameters: a required prompt (the message you want to display) and an optional title (which appears in the form's caption bar). It returns a Boolean value, True or False, depending on the user's choice.
Before displaying the form, the function sets two TempVars (temporary variables) with the message and title. This allows the form to access and display this information when it loads. By using TempVars, we avoid problems with setting the form's controls after it opens, which does not work reliably with dialog forms because execution halts until the form closes.
The command DoCmd.OpenForm opens the dialog form called MessageBoxTimerF. By specifying WindowMode:=acDialog, Access halts execution of further code until the dialog form is closed, just like a standard message box. Once the user responds and the form closes, we retrieve the user's response from TempVars!MessageBoxTimer_ReturnValue and pass it back from the function.
Now, you need to update the form to consume these TempVars when it loads. Open your dialog form (MessageBoxTimerF) in design view. Locate the label that displays the prompt text and ensure it is properly named, for example, PromptLabel. Set the On Load event of the form to include the following VBA code:
Private Sub Form_Load()
PromptLabel.Caption = TempVars!MessageBoxTimer_Prompt
Me.Caption = TempVars!MessageBoxTimer_Title
TempVars!MessageBoxTimer_ReturnValue = False ' default value in case timer runs out
End Sub
This code sets the label's caption to the prompt text and the form's caption to the title you provided. The default return value is set to False, so if the timer runs out and the user did not click Yes or No, False is returned.
On your form, include at least two buttons, such as Yes and No. Configure the On Click events to set the return value and close the form, for example:
Private Sub YesButton_Click()
TempVars!MessageBoxTimer_ReturnValue = True
DoCmd.Close acForm, Me.Name
End Sub
Private Sub NoButton_Click()
TempVars!MessageBoxTimer_ReturnValue = False
DoCmd.Close acForm, Me.Name
End Sub
You should also add a timer to the form. On each timer tick (every second, for example), decrease the countdown. When the countdown reaches zero, close the form and let the default return value stand.
Next, to use this timer message box in your application, simply call the function where you would normally use MsgBox. For example, suppose you have a button on your main menu form that closes the form if the user confirms. In the button's click event, write this code:
If MessageBoxTimer("Close main menu?", "Close") Then
DoCmd.Close acForm, Me.Name, acSaveYes
End If
If the user clicks Yes, the main menu closes; if No or if the timer expires, the form stays open.
This system can be adapted for any situation in your database where you need a message box that will proceed with a default action after a certain time without user input. For example, you might use it in automated nightly processes or to check for user inactivity and close the database if the user has left it open unattended.
To make it even more flexible, you can expand this by allowing custom button texts, more than two options, changing the countdown duration, or even adjusting colors for visual cues. For now, you have a solid, reusable solution for a timed message box in Access. Copy and paste the form and module into any Access database where you want this functionality, and you are ready to go. This prevents issues like databases being left open all night because a user forgot to answer a prompt, making your applications more robust and user-friendly.Primary Topics
Access VBA, message box customization, timer countdown forms, tempvars, dialog forms, returning form values, function modules
Secondary Topics
user inactivity checks, form parameter passing, error troubleshooting, reusable database components
|


