Custom Form Backgrounds
By Richard Rost

 6 years ago
Custom Form Backgrounds - Change Titlebar Color and More!
In this video I will show you how to create a completely custom look for your forms. Whether you want to design something modern, futuristic, or you're feeling nostalgic for the good old days of Windows XP, you can make your forms look EXACTLY the way you want them with this technique. You can have a custom titlebar, buttons, and more.
Anthony from UK (a Learning Connection member) asks, "Is there a way to change the properties of the form title bar? I would like to left-align the caption, change the font, font color, and perhaps the background color. Can you do this in Access?" (Paraphrased)
Members
I'll show you how to add click-and-drag functionality our custom forms. You'll learn about the MouseDown and MouseMove events.
Silver Members and up get access to view Extended Cut videos, when available. Gold Members can download the files from class plus get access to the Code Vault. If you're not a member, Join Today!
 Links Links
Design Aesthetics: https://599cd.com/Aesthetics
Customer List Form: https://599cd.com/CustomerListForm
On Mouse Move Event: https://599cd.com/acd16
Intro In this video, I will show you how to create custom form backgrounds in Microsoft Access, including tips for designing unique looks using graphics from programs like Paint or Photoshop. You will learn how to mimic the appearance of past Windows styles, recreate elements like the title bar, and add your own close and minimize buttons. I will walk you through inserting background images, adjusting form properties, and using transparent buttons to match your custom design, so you can fully personalize your Access forms beyond the built-in options.Transcript Welcome to another TechHelp video brought to you by AccessLearningZone.com. I am your instructor Richard Rost.
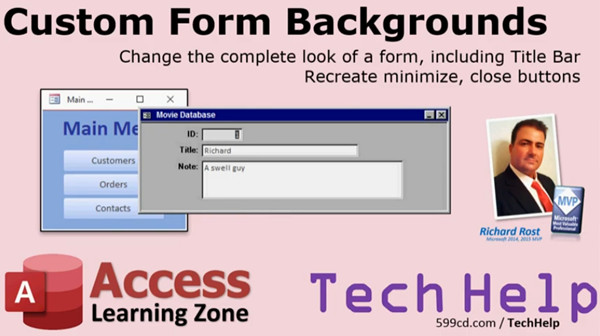
In today's video, I'm going to show you how to set up a custom form background in your Microsoft Access Forms. Change the complete look of the form, including the title bar, which you normally can't do in Access.
If you're feeling futuristic, you can make your own futuristic look in whatever graphic editor that you want, like Photoshop. Or if you're feeling nostalgic like me and you want to make your forms look like Windows 95, like the one you see on the screen, you can do that too. I'll also show you how to recreate the minimize and close buttons.
Anthony from the UK, a Learning Connection member, asks, "Is there a way to change the properties of the form title bar? I would like to left align the caption, change the font, font color, and perhaps the background color of that title bar. Can you do this in Access?"
Well, generally the answer is no. Access does not give you much control over what you can do with the outline of form windows. You can do whatever you want on the inside of the window, but the form window itself is actually controlled by Windows. And even if you change your Windows theme and the Windows colors, you still don't get much control over what happens inside of Access. So in this video, I'll show you how to get around that.
Access gives you a lot of control about what you can do in here. You can change fonts, colors, sizes, all that stuff. What happens up here is handled by Windows. Access doesn't draw windows on the screen. Access just fills in windows. Windows, the operating system, draws those windows.
There are several ways to change a lot of the stuff in Access. You can use themes. If you go to design view, you can go over here and change themes, but this just changes what's inside the window. It doesn't change what's up here. You can go out to your Windows control panel and change the way a lot of things look in Windows, but it still doesn't change this color or this font, these title bars, and all this stuff. That's all set. Access handles the way these windows are drawn for forms differently than most applications do.
So if you want to change the way your title bar looks, you have to do it yourself. The good news is you can do most of it without any programming at all, but you'll lose a little functionality, like the ability to move the window around. But as long as you're ok with that window popping up in a specific location, then you're good.
What you need to do is design yourself a custom-looking form in whatever designer you like. You can use Windows Paint or Photoshop, or, in the last lesson when I talked about form aesthetics, I used Excel or PowerPoint. You can draw objects that look like a window. Remember these guys that I drew in the last TechHelp? There's a link to this video down below. Click on it and watch this if you haven't already. I created my own little custom form using PowerPoint or Excel.
The only thing that didn't change is this. Can't change this. But you can recreate it using a borderless form. Let me show you what I mean. Go into your form design properties and find "Border Style." Visible is the default. Go to "None." And yes, I cover all the other ones in my lessons, but just go to "None" for now. Close that, and now open that customer form back up and look at that. There's no border around it.
You still have these navigation buttons on the bottom and the record selector. You can actually control whether these are visible or not too. Those are just simply properties. If you don't want to see those, you can turn those off too.
Now, what do you do for a border? Well, you have to make your own background for this. Let's close this guy real quick or go back to design view. That's the only way you can get back out of there, by the way, because notice you've got no close button. You have to create your own close button, your own minimize, your own maximize.
The menu bar, or, excuse me, the command button, that's a little more work, but I wouldn't bother with that to be honest. You could do everything over here. But let's go back to design view and let's find or make a background that you like.
Let's say you're feeling nostalgic. I went out to the web and I did a Google search on some older images. You've got your DOS, your old DOS editor, you've got Windows 3, you've got Windows 95 and Vista looks. I even found one here from Access 95. This is an old form from Access 95 that I found on Google.
If you want to build something new and cool-looking and futuristic, go to town. Or, if you're feeling nostalgic and you want to go back to this look, you can.
Let's say this is the stuff you want. This is what you want. Now, you can either leave these fields in here and just put your text boxes on top of these, or you can get rid of these and just go blank. You can do something like this. I'm using Windows Paint. This is the easiest graphic editor to use and it works fine for stuff you're going to do in Access. If you like to go high speed and use Photoshop, that's fine.
All you have to do in here is, with the selection tool, just do this. Draw a box like that and then grab one edge of it and go like that. That'll wipe the whole thing. It just basically fills that box over the top of that. If you want to go with that and just take the border, that's fine. I'm going to leave that there. I'm going to undo that. I'm going to leave those text boxes in there and those labels, because, like I showed you in the last class, you can design the whole form and just fill your data in where you want it to be. I think I am going to get rid of this record selector because I'm going to turn the record selector and the navigation buttons off. We'll make our own.
You have to be very careful in here, and you have to just kind of go like this and then slide that over the top of that like that. Let's see if I can get rid of it. Yeah, that's good. It always misses a little tiny piece of the top. It's not exact. Let's see here. Did I get it? Yeah, that's perfect. I'm not going to bother recreating this whole thing. I'll just make that like a close button that they double click on.
Let's go back over to Access here for a minute. I'm going to whittle this down to the fields I want in here. We get rid of these buttons. I'm going to keep the ID. What do we have in this thing? We're going to do the ID. And then I have this field called title and then note.
So we have ID. Let's keep first name as that title and we'll get rid of this stuff, and we'll keep the notes around. I'm going to do that. Let's make these so they're basically transparent and very small. So I'm going to highlight all of these, right-click, go to properties. Let's change the font size down to nine. Let's go back style--transparent. Looks good. So now I have just my text boxes, and we're going to slide these over that background image.
Let's go back over to Paint. Now, I'm going to use my screen capture utility. I use HyperSnap, but you can just move this up into the corner and shrink this down and copy and paste it if you want. However you want to do it, how you want to get this image into Access. I have a cool screen capture utility. There are a million online. I'm just going to grab the corner here, and I missed it. Hang on.
There. It was easier to do off camera because I want to get it exact to the right pixel and it took me a minute. Let's go back over to Access. I'm going to paste this in here now as an image.
The border always comes in thick, so let's turn the border off. Oh no, this one came in transparent. That's fine.
Let's take these little labels we have sitting back here and put these right over these boxes, just like so. You can match them up exactly if you want to. I'm just going to get them close enough. There. I do the same trick with reports. Oh, I got that image in there when I captured it. Oh well, that's going to have to stay there because I'm not redoing it.
You might have to right-click on this guy and go to Position, Send to Back. Yeah, there we go. Let's get these right on there. Perfect. Notes. There we go. That's going to have to stay there for now. I'm sorry.
Let's close that up. Save it. Close it. Customers.
Now we have to do a little bit more work. Turn off these things. Right-click, Design View. Right-click. Hang on. This happens sometimes. I don't have right-click Design View available anymore. So you have to come up here to Views under Home tab, Views, Design View. That'll happen sometimes.
Let's go to turn off the control box. No. Close button. No. Those are already gone. Minimize and maximize buttons. No. We have to go to Navigation Buttons Off, Record Selectors Off, and Scroll Bars: Neither. Close that up. Let's take a look at it again.
Now it's starting to look like our form. I guess we'll see borders around these text boxes. Let's turn those off. Again, no Design View, so Design View. Let's highlight these. Let's click on that background, turn that off, and Format, the shape outline is transparent. That should get rid of those borders. Back to Form View. Looks good.
It's still overlapping. If you want to get it exact, we could come in here and play with that size a little bit more. If the grid is--I covered this in the last lesson--you could change the grid size. Where are we at here? Let's see. Grid X and Grid Y. They're currently set to 24. Slide this up so you can see it. Let's make these 48. That makes it so that it's a little more exacting in here. You can have more control over exactly where your controls are.
24 is 24 dots per inch. It's a coarser grid. This made the grid more fine so you can have a little bit more control over it.
Save that. Close it. Open it back up.
For those of you who are new and are just joining us and have never watched one of my TechHelp videos before, I like to have fun with these TechHelp videos. This is entertainment for me, so I have a good time with it. It's nowhere near as structured and as formal as my actual real classes are. So if it seems like I'm moving off a little bit, I am. This is fun for me. That's what TechHelp is all about.
And yet, that's going to bother me. I'm sorry. I have to go back and do it again. Hang on. Let me get another copy of that. Let me redo it one more time here.
I have to use my mouse keys to get right exactly on that corner, and then I'll come down here and get this one. OK, that should do it without that in the middle.
All right. Back to Design View. Well, I think I'd learn by now I don't have a Design View. OK. Get rid of this. Click delete and then paste the new one. Paste. There we go. Right click. Position. Send to Back. OK. Perfect.
What I was saying before is I use this technique all the time with reports. I used to always get clients who would say, "I need to recreate this report exactly in Access with this exact dimensions, because I have to submit it to whoever's--insurance companies usually." And they need this exact form--government agencies.
So what I would do is take a nice high quality scan of that form, of that report. That's another thing: people always use the word "form" as a printed thing. With Access terminology, it's "reports." So I would take a high quality scan of their document. Then I would make an image out of that and put that in as the background of the report.
Of course, the problem would come when you'd have spill over if the information in the field was too big, but that's their problem. That's the form you have to use. I could make the font smaller.
So let's see what we have. Close that. Open it up. Looks good.
Now we need to recreate these buttons because right now they do nothing. That's easy to do. Design View. We need to place transparent buttons over these ones.
Fortunately, there are command button wizards for these, so you don't have to do anything. You can come in here and go, "Give me command button right there. Drop it like here." Let's start with the close button. We've got form operations, close form, next. Just put text down here. We're going to make it transparent so that doesn't matter, next, and then finish.
I'm going to get rid of the caption text. Let's bring up its properties, double-click on it, change transparent to yes. There. Now I have a transparent button. I'm going to make it nice and small. I'm going to make it fit right over that button. Get it the best you can.
See if it works. Save it. Close it. Open it back up. Close this form. Oh, it's a beautiful thing. Look at that.
Now for this over here, I'm not going to take the time right now to recreate that whole menu. Most people never use it. But they double click here sometimes to close that form, so we're just going to take that button, Design View, copy that button, and put it over the other side for now.
If enough people email me or post in the comments and you want to see me recreate this little menu, I can. It's not that hard. You can even do it with all this box. It pops up right here. Actually, that's not a bad idea. I'd make a hidden list box right here with those things in it as commands. That would take a little doing, but you could recreate this exactly, except it would open up over the form.
I copied that button. Save it. Close it. Open it back up again. Looks good.
It's not a double click, but the wizard doesn't do this. If you know macros at all, you can go in here and make it on double click. There's an on double click event. Where is it? In fact, let's do that. I'm not going to use a macro. Let's get rid of that macro. Delete that macro.
Let's go to the on double click event. We're going to put in here--there's a little bit of VBA. Don't be scared. I know I try to keep the free TechHelp videos programming-free because there are a lot of beginner users and non-programmers who like to watch them. But I might throw in from time to time just a line or two of code. It's not that hard.
Let me back up just a step and show the non-programmers what I'm doing. The on double click, I'm going to click this dot, dot, dot button. You might get another window up. This is "what kind of builder do you want?" Pick the code builder. That brings you into the VBA editor. There may be some more panes and stuff on the screen. I turn them off for class, looks like I have the ever use them.
Right here, I'm going to set Command30 double click. That's the button that we're working with and it's one line of code:
DoCmd.Close
All right. And then acForm is if you want to use that, but you don't have to. I'm just going to hit comma, comma. I like to say acSaveYes in case there were any design changes. The middle thing here is just the name of the form. If you want, you can put Me.Name in there, but you don't have to. It defaults to the current object.
Save this. Let's close the editor. Close this. Close that.
Now this should now be--see, I'm clicking on it--click, click, nothing happens. If I double click, it behaves just like the other one did. So I made it from a click event to a double click event.
Unfortunately, we have to do the same thing with the minimize and maximize buttons, but guess what? It's one line of code. There are no wizards for these, but it's really easy to do.
Again, Design View. I'm going to copy this button over here, and let's slide it over the top of--see, I missed. I have to grab that. There we go. Slide that over the top of maximize.
Open it up. I just thought of a problem. When you maximize this, it's going to have to change that background image to a different button. We're not going into that much depth today. It could be done, though. You could have a separate image that's not visible that pops up over that button. It's possible. I'm not going to cover it right now, but you certainly could do it.
The on-click event for this button is simply DoCmd.Maximize. That's it. Its neighbor is right next door, DoCmd.Minimize.
Open that up. Click DoCmd.Minimize. Let's see what happens. We're going to have a problem with the restore buttons. Let's see what it looks like.
Let's do the minimize first. Not bad. Now it's just sitting down there. If you double-click on it, that's a training issue. Now that's fine. It sits down here minimized. If you double-click on it, it pops back up. That's actually kind of nice.
Let's see what the maximize looks like. Maximize is going to be a lot of programming because you'd have to have it where it knows that it's maximized, you'd have to redraw the window or make it so that this image changes. You can have two images and then change it back and forth.
I honestly would probably find it easier to just not offer them maximize to be perfectly honest. Oops. And that's still maximize. Let's draw it back down. Actually, let's see something here. Hold on. Customers, maximize. You know what, there's a restore button right up here. Yeah. But it doesn't change the dimensions of this form. I would just turn off maximize, to be honest with you. Gray it out. Make it look like it's not available.
Go back into your thing here. Let's zoom in. You could either remove that button completely or just gray it out. Draw some gray in there. I'm going to do this. I'm going to grab this button. Let me see here. Let me grab this and just slide it over that one. Oh, I went too far. There, I got it. Took me a minute.
Offer them minimize. No reason for a maximize for this form. It's only three things. If you want to do it, it'd be a lot of work, but you could do it. It's possible.
Now I just have to recreate this guy. I need to make a clipboard. Back to Access, back to Design View. Oops. Clicked on the wrong window. Sorry about that. Back to Design View. Come on. Stay with me. Delete. Then let's get rid of that maximize button there. We don't need it. Put you where that is. Then paste. Right-click. Position. Send to Back.
All right. Save. Let's move this back up here. Save it. Close it. Open it.
We've got a double click over here, we've got minimize. Don't need a restore button. Maximize is gone, and we have a close button.
Now, as far as record navigation goes, I would suggest open this up from a list form. I just accidentally tried to move this out of the way. That brings up another issue--moving this form around.
Yes, it's possible. I'm going to cover it in the extended cut. I do know how to do it. It's going to take a little while. I'll do it for the members in the extended cut edition. But for the rest of everybody, this is just going to have to sit here. You can close it, you can move it, whatever.
I would suggest open it up in design view, like CustomerF Design View. Put it exactly where you want it, like there. Save that position by hitting save. Now, when you open it, it should open in that spot. Whenever you move a form and hit save, it'll save its location. I have other lessons on how to exactly control where a form opens up.
As far as record navigation goes, moving through the records, I would suggest do it with a list form like this. We have a list of customers, and then you can double-click on one of those. I have other lessons on that too. I'll put something in the links below the class. Look for the link called Customer List Form. You basically have a list of customers, and then you double-click on this, and it'll open up that customer.
But if you want to move around inside of this form through the records, you can't. There are buttons to give you that navigation capability, and you can put them on here. They're right here. I think the wizard does them too. Let's see. Record operations. Yeah, right here. Add new record, delete record, duplicate record, print, and so on.
I'll just do one. I'll show you the--let's see, record navigation. We can do these too. Go to next record, like this one. I'll put a little picture on it: arrow to the right. Remember that one. Finish.
Here's my little--and you can make this transparent and put it over little buttons, do whatever you want with it. Once that button's on your form, right now you can use this to navigate through the records.
So you can recreate any look and feel you want. Design your own form using your graphic editor and make buttons look exactly the way you want. Then just drop a transparent button over the top of it like I did here in Access. That's exactly how I would do it if I wanted to make something cool and futuristic or totally retro like this.
If you want, you can also save this as a template. If you want to make all your forms look like that, there's no way to do them all at once with any kind of theming. You have to do them individually. But if that's what you really want, you can achieve pretty much any look and feel you want inside of Access.
Want to learn even more about creating your custom form? In the members-only extended cut video, I show how to move that custom form around the screen with click and drag, just like you would a normal window. I'll teach you about the mouse down and the mouse move events and how you can use those to click and drag that window. Here it is, click and drag, look at that. That's really neat, isn't it? So we can close it, we can open it, we can minimize it, and we can click and drag it.
How do you become a member? Click on that join button down below the video on my YouTube channel. Silver Members and up will have access to my extended cut TechHelp videos, live video and chat sessions, and lots of other perks. Just click on the join button and you'll see all the different membership levels that are available.
But don't worry, these TechHelp videos are always going to be free. I'm going to keep making them as long as you keep watching them. If you want to help me out, like and share this video. The more likes, the better. Of course, subscribe to my channel, that's absolutely free, and click that little bell so that you get notifications whenever I release a new video.
There are more links down below the video. If you look toward the description there, where it says "show more," YouTube does a pretty good job of hiding them, but click on that, it'll open up and you'll see different links for different lessons and free videos and all kinds of stuff.
If you have not yet checked out my free Access Level 1 class, it's absolutely free, it's three hours long, covers all the basics: building tables, forms, queries, all that stuff. If you like Level 1, Level 2 is just $1. That's it, no gimmicks. It's just to get you as a new customer, and if you like it, you can buy more. All it costs you is a buck, and it's another whole hour of class, and it's free for members. If you join my channel as a member, you get Level 2 for free.
If you want to see your question answered in a video like this one, submit it on my TechHelp page. There's the address, I'll put a link below. Stop by and check out the Access forum on my website. You can always drop me an email if you'd like. I do prefer them submitted on my website, but if email is your only option, there it is. There's my other cool stuff: Facebook, Twitter.
That's it, I hope you learned something, and we'll see you next time.Quiz Q1. What is the main reason you cannot change the appearance of the Access form title bar using Access itself?
A. Access deliberately locks out title bar customization for security.
B. The form window, including the title bar, is rendered and controlled by the Windows operating system.
C. There are hidden settings in Access for title bars, but they are hard to find.
D. Access only allows title bar changes if you upgrade to the Pro version.
Q2. What must you do if you want full creative control over the look of your form, including the title bar area?
A. Use Access themes to change the entire window, including the title bar.
B. Change your overall Windows color scheme.
C. Design your own custom background and use a borderless form in Access.
D. Hack into Access using third-party tools.
Q3. What is the effect of setting the "Border Style" property of an Access form to "None"?
A. The form becomes read-only.
B. The form cannot be resized.
C. The form loses its default Windows border and title bar.
D. The form deletes all controls on it.
Q4. When using a borderless Access form, which functionality do you typically lose?
A. The ability to enter data
B. The ability to scroll through records
C. The ability to move the form around the screen by dragging
D. The ability to print the form
Q5. How can you recreate standard window buttons like Close or Minimize on a custom Access form?
A. By using standard Access property settings only
B. By overlaying custom images with transparent command buttons and adding appropriate events
C. By enabling advanced options in the Access Options menu
D. By using only VBA code with no graphical work
Q6. What graphic editors were suggested in the video for creating custom backgrounds for forms?
A. Only Photoshop
B. Only Excel
C. Windows Paint, Excel, PowerPoint, or Photoshop
D. Only online graphic editors
Q7. What should you do if you want input controls, such as text boxes, to blend seamlessly into your custom background?
A. Increase the border thickness
B. Make the background style transparent and remove borders
C. Change their color to black only
D. Always use the default look
Q8. How can you get a background image from a graphics editor or scanner into your Access form?
A. Print it and scan it directly into Access
B. Use a screen capture tool to copy the image, then paste it into Access as an image control
C. Export it as a PDF and import into Access
D. Convert the image to SQL and load it
Q9. To make navigation and record selector buttons disappear from your form, you should:
A. Delete them from the database window
B. Set their Visible property to False in design view
C. Use the form properties to turn off Navigation Buttons and Record Selectors
D. Remove all control sources from the form
Q10. What Access event was used in the video to allow a form Close button to react to a double-click instead of a single click?
A. On Load
B. On Open
C. On Double Click
D. On Mouse Move
Q11. What simple VBA command was shown to close a form from a button's double-click event?
A. Forms("FormName").Hide
B. DoCmd.Close
C. Application.Quit
D. Me.Visible = False
Q12. What issue arises if you try to maximize a custom borderless form?
A. The default Windows maximize button always appears
B. You must redraw or replace the background image to fit the new size
C. The form closes automatically
D. The minimize button stops working
Q13. If you want a form to always open in a specific spot, what should you do according to the video?
A. Edit the startup macro
B. Arrange the form where you want it in design view and click save
C. Edit the registry
D. Lock the database window
Q14. How can you recreate a custom record navigation experience inside your form?
A. Only by using VBA code
B. By adding custom navigation command buttons and overlaying them on your background
C. By importing navigation from an external application
D. By editing the layout in the Windows Control Panel
Q15. What important limitation was mentioned regarding theming (making all forms look the same)?
A. There is a single setting in Access to apply to all forms
B. You must edit every form individually to match your custom style
C. You cannot apply any customization
D. It requires administrator access to Windows
Answers: 1-B; 2-C; 3-C; 4-C; 5-B; 6-C; 7-B; 8-B; 9-C; 10-C; 11-B; 12-B; 13-B; 14-B; 15-B
DISCLAIMER: Quiz questions are AI generated. If you find any that are wrong, don't make sense, or aren't related to the video topic at hand, then please post a comment and let me know. Thanks.Summary Today's video from Access Learning Zone focuses on how you can create a custom background for your Microsoft Access forms, completely changing the appearance of your form—even the title bar, which normally cannot be modified directly within Access.
Many users have unique preferences for how their forms look. If you prefer a modern, futuristic style, you can design your form background in any graphics editor such as Photoshop. On the other hand, if you are nostalgic and would love the classic appearance of Windows 95, it's possible to recreate that as well. I will also guide you through the process of rebuilding minimize and close buttons to reinforce the look you want.
The question for this lesson comes from a student who asked about changing the title bar properties on a form—specifically, whether it is possible to left-align the caption, or modify the font, font color, and background color of the title bar in Access. The straightforward answer is no. Microsoft Access does not offer much customization for the window outline; the window itself is managed by Windows, not by Access. Even if you adjust your Windows theme or colors, those changes do not carry over into the form title bars inside Access.
However, you have significant control over a form's inner layout. While Windows draws and controls the external frame, you can adjust fonts, colors, and sizes within the form window itself. There are themes you can apply in design view to help style your forms, but remember that this only affects the inside of the window. The title bar and its border are left unchanged because they belong to the Windows interface.
To work around this limitation, you can design the form window entirely yourself. The only trade-off is that you lose some built-in functionality, like the ability to move the window as easily as before. If you do not mind the form opening in a specific location, though, this workaround can be quite effective.
To start, use a graphic editor—Paint, Photoshop, Excel, PowerPoint, or whatever tool you prefer—to create the form's custom look. You can make the window appearance as retro or as modern as you like. Place text boxes and controls as needed on top of this custom image. If you want to recreate the title bar, the next step is to set the form's border style property to "None." Doing that removes the border and allows you to overlay controls anywhere you want.
You may notice that navigation buttons and record selectors remain. These, too, can be hidden using simple property changes. Once you have a borderless window, you can import your newly designed background image and stretch it to cover the entire form. Be sure to layer your text boxes and labels on top of the relevant areas of your background image for alignment.
If you need to adjust elements, you can resend the background image to the back or bring controls to the front as needed. You may also notice some issues with borders on your text boxes, which can be fixed by making them transparent through their properties.
When adding your custom close and minimize buttons, Access provides a command button wizard to help you place transparent buttons over your graphical images. These buttons can be linked to standard form actions such as closing the form. In the case of recreating the double-click to close feature commonly found in classic Windows forms, you can go a step further and use simple VBA code. Creating an event for when the button is double-clicked and inserting a single line of code will achieve the desired effect.
Minimize and maximize buttons can also be emulated with transparent command buttons placed over the appropriate graphics. Assign the correct on-click events for minimize or maximize to each button. Keep in mind, however, that implementing full maximize and restore behaviors may require additional effort, like swapping background images, which you are free to attempt. If you only need minimize and close, those are easy to create with basic button properties.
For navigation within the form, I recommend opening detailed forms from a list form—double-clicking an entry on the list opens the specific detail. You could also add record navigation buttons directly onto the custom form using the wizard, with the option to make them match the style of your background by adjusting their transparency and positioning.
All these techniques allow you to completely control the look and feel of your Access forms. You can create whatever aesthetic you prefer, whether it is futuristic, retro, or something entirely unique. If you wish, you can even save your custom design as a template, though you will need to apply it individually to each form since Access does not directly support changing all forms with a single theme.
For those interested in enhancing the experience further, I cover in detail how to let users move the custom form window by clicking and dragging, just like a standard Windows window, in today's Extended Cut for members. This involves using the mouse down and mouse move events to replicate window movement behavior. Becoming a member gives you access to this and many other advanced video tutorials, live sessions, and additional perks.
If you are new to my tutorials, I recommend checking out my free Access Level 1 class which provides a comprehensive introduction to Access, including creating tables, forms, and queries. Level 2 is available for just one dollar, or free to channel members.
Feel free to submit your own questions on my website if you would like to see them answered in future videos. You are also welcome to visit the Access forum, email me, or connect with me on social media.
You can find a complete video tutorial with step-by-step instructions on everything discussed here on my website at the link below. Live long and prosper, my friends.Topic List Setting a custom form background in Access forms
Recreating classic Windows form designs using images
Using a graphic editor to design custom form backgrounds
Importing and positioning background images in Access forms
Configuring Access form properties for a borderless look
Turning off record selectors and navigation buttons
Overlaying controls on a custom form background
Sending background images to the back in Access
Making text boxes and labels transparent
Fine-tuning form control positioning with grid settings
Setting up transparent command buttons over image areas
Assigning VBA to button events for close, minimize actions
Creating double-click close buttons using VBA
Customizing record navigation with button controls
Saving form location and setting default open position
Recreating custom navigation and action buttons
Applying the design to multiple forms via template duplication |


