|
|
Free Lessons Courses Seminars |
TechHelp Fast Tips Templates |
Topic Index Forum ABCD |
|
||||||
|
Access Advanced 5 Macros, Separate Addresses, List Box Moves Welcome to Access Advanced 5. In this course you will learn how to use macros to automate common database tasks in Microsoft Access, including managing separate billing and shipping addresses for customers and orders, as well as setting up order forms and invoices to display these addresses. We will also cover how to move items between two list boxes using macros and SQL code, control employee status with buttons or double click actions, and introduce additional topics such as the AutoExec macro, macro error handling, and features of the macro design tab in the ribbon. Lessons
Resources
Lesson SummaryWelcome! Macros: Billing & Shipping List Box - Welcome to Microsoft Access Advanced Level 5. In this course we will focus on advanced Microsoft Access topics, primarily working with macros to automate tasks and add database functionality. We will add separate billing and shipping addresses to customers and orders, implement these changes on order forms and invoices, and discuss how to move items between two list boxes using macros and SQL code. We will also talk about using buttons and double clicks to set employee status, and wrap up with miscellaneous topics including the AutoExec macro, macro error handling, and the macro design tab in the ribbon.
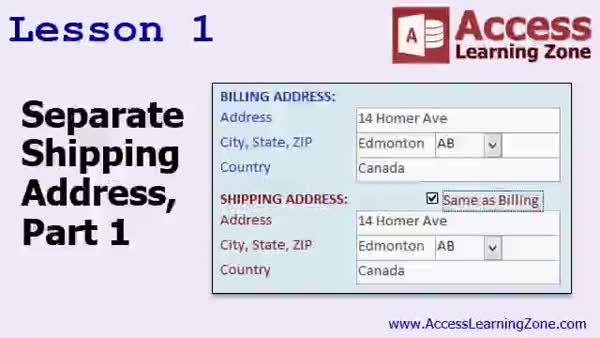
Lesson 1: Add Billing & Shipping Addresses - In Lesson 1, we will discuss why it is important to keep a history of both billing and shipping addresses for your customers, and I will show you how to modify your customer table and form to store a separate shipping address alongside the billing address. We will walk through adding these fields, creating a "ship same as billing" checkbox, and setting up a macro so the shipping address can automatically copy from the billing address if needed. We will also talk about planning for future needs, such as handling multiple addresses per customer.
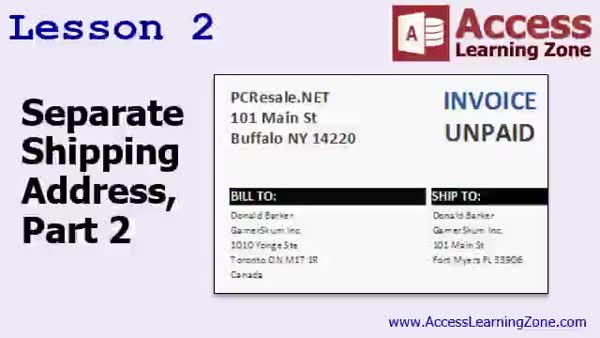
Lesson 2: Store & Show Billing/Shipping Addresses - In Lesson 2, we continue working with the separate shipping address by adding the same shipping fields to the order table so each order records the shipping address used at the time it was placed. We will walk through copying these fields from the customer table, updating the order form so address fields have default values from the customer, and ensuring the proper addresses appear on the invoice report. We will also discuss how to restrict users to adding orders from the customer form to keep address data accurate and talk about why it is important to store shipping address history for orders.
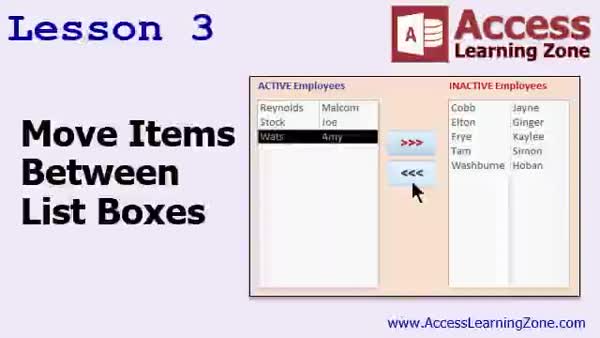
Lesson 3: Move Items Between List Boxes - In this lesson, we will walk through how to move items between list boxes in Microsoft Access without using drag and drop, which Access does not support natively. I will show you how to create two list boxes for active and inactive employees, set up buttons and double-click actions to transfer items between them, and use simple SQL statements and macros to update and refresh the lists. We will also briefly discuss why third-party solutions are not ideal and how you can display selected employee details using forms. The focus will remain on a straightforward, built-in Access solution.
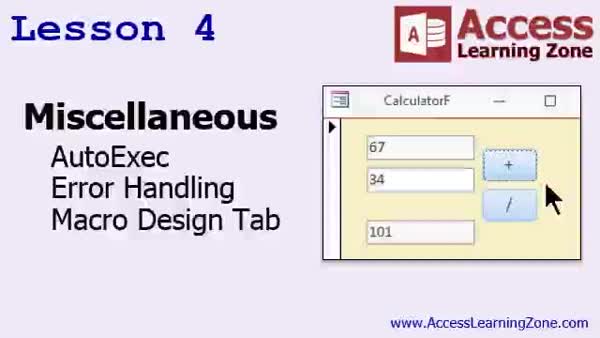
Lesson 4: AutoExec, Error Handling, Macro Tab - In Lesson 4, we will cover several miscellaneous topics that do not warrant a full lesson of their own. We will discuss how the Auto-Exec macro can run actions automatically when an Access database is opened, and I will demonstrate error handling options in macros, including using the On Error action and custom error messages. I will also show you how to handle potential issues like type mismatch and division by zero in simple calculator macros. Finally, we will review the macro design tab in the ribbon and examine some of its basic features.
Lesson 5: Adv SQL, Security & Support Review - In this course we learned about using SQL update commands in Access, explored upcoming topics for further advanced levels and the Developer series, and discussed available seminars and resources for additional learning. We also talked about how to get help through student forums, the tech support contact process, and membership discounts on seminars. The review covers submitting feedback via surveys, the importance of following support guidelines, and information on licensing if you wish to train multiple users with this course.
NavigationKeywordsmacros, billing address, shipping address, separate addresses, list box item move, order forms, invoice report, ship same as billing, copy address macro, employee status, autoexec macro, macro error handling, macro design tab, SQL update
TranscriptWelcome to Microsoft Access Advanced Level 5 brought to you by AccessLearningZone.com. I am your instructor, Richard Rost.This is the Advanced Series of our classes. The Advanced Series focuses primarily on macros, which allow you to easily automate tasks and add functionality to your database. This class follows Access Advanced Level 4. I recommend you finish Levels 1 through 4 before taking this class, as well as my 9 beginner levels and my expert levels 1 through 32. The beginner series covers the fundamentals. The expert series goes into a lot more detail. This is the Advanced Series covering macros and events, and of course, the developer series is coming up next. In the developer series, we will focus on Visual Basic programming. Today's class was recorded using Microsoft Access 2016. I believe everything covered should work fine with Access 2007 through 2013. If you find something that is different, please let me know. Most of these commands have not changed much since 2007. If you are still using Access 2003 or earlier, it is time to upgrade. But if you are still using a legacy system, I do have classes for Access 2003 as well that go into the details. Check my website for those. The sample database for today's class can be found at this page: 599cd.com/databases. I recommend you build the database yourself, starting with beginner level 1 and working your way through. That is the best way to learn - by doing all of this yourself. But if you have not done it, if you jumped in midstream and you want to download my copy of the database, you can download it from this page. You will need your course password and then you can get it right from there. Now, let's take a look at what is covered in today's class. In lesson 1, we are going to learn how to add a separate billing address and shipping address to our customers and our orders so we can track where things were shipped at the time the order was placed. In lesson 2, we are continuing with the separate shipping address. In this lesson, we are going to add the same fields to our order table so we can track where each order was shipped to at the time the order was placed, and we will put those fields on our invoice. Now, Microsoft Access by itself does not support Click and Drag or Drag and Drop. But in this lesson, I am going to show you a technique that is pretty simple, where you can move items between two different list boxes. We will do an example of active employees and inactive employees, but you can use this for pretty much any two list boxes you want. You can click on an item in one, or double-click on it and then have it move to the other box. We will use this to set active employees or inactive employees. You can either use buttons in the middle, or you can double-click and it will jump from one list to the next. A little tiny bit of SQL code and one macro command. In lesson 4, we are going to talk about a couple of miscellaneous topics that I have had on my list here to cover that really do not make a full lesson of their own. We are going to talk about the Auto-Exec macro, some error handling in your macros, and we will go over the macro design tab in the ribbon. Thanks for watching. IntroIn lesson 5 of my Microsoft Access Advanced series, we will learn how to add separate billing and shipping addresses for customers and orders, track where orders were shipped at the time they were placed, and display this information on invoices. I will also show you a method to move items between two list boxes, useful for things like managing active and inactive employees, using simple SQL and a macro command. We will cover a few additional topics, including the Auto-Exec macro, basic error handling in macros, and an overview of the macro design tab in the ribbon.QuizQ1. What is the primary focus of the Access Advanced Series Level 5 class?A. Forms design B. Reports formatting C. Macros and automation D. Visual Basic programming Q2. Which prerequisite is recommended before taking Access Advanced Level 5? A. Only the beginner series B. Developer series C. Beginner Levels 1-9, Expert Levels 1-32, and Advanced Levels 1-4 D. None, anyone can take it Q3. What version of Microsoft Access was used to record this class? A. Access 2003 B. Access 2016 C. Access 2007 D. Access 2010 Q4. Which versions of Access are most features in this class compatible with? A. Only Access 2016 B. Access 2016 and later C. Access 2007 through 2013 D. Only Access 2003 Q5. Where can you find the sample database for this class? A. Microsoft official website B. 599cd.com databases page C. AccessLearningZone.com homepage D. Windows Store Q6. What does lesson 1 in this class cover? A. Creating a new table for products inventory B. Adding a separate billing and shipping address to customers and orders C. Setting up database security D. Building a dashboard form Q7. What feature is discussed in lesson 3 regarding list boxes? A. Filtering list box items using queries B. Moving items between two list boxes to set active or inactive status C. Sorting list box data alphabetically D. Exporting list box data to Excel Q8. Which is NOT mentioned as a method for moving items between list boxes in Lesson 3? A. Using buttons between the boxes B. Drag and Drop functionality C. Double-clicking an item D. Macro command Q9. What topics are discussed in lesson 4? A. Table relationships and normalization B. The Auto-Exec macro, error handling in macros, and the macro design tab on the ribbon C. VBA basics D. Advanced reporting tools Q10. If you want to learn Visual Basic programming with Access, which series should you take next? A. Expert Series B. Beginner Series C. Developer Series D. Advanced Series Answers: 1-C; 2-C; 3-B; 4-C; 5-B; 6-B; 7-B; 8-B; 9-B; 10-C DISCLAIMER: Quiz questions are AI generated. If you find any that are wrong, don't make sense, or aren't related to the video topic at hand, then please post a comment and let me know. Thanks. SummaryToday's video from Access Learning Zone is Microsoft Access Advanced Level 5. I am your instructor, Richard Rost.This course is part of the Advanced Series, which centers around macros in Microsoft Access. Macros are essential tools that help you automate tasks and expand the capabilities of your database without needing to write complex code. This class builds on the material covered in Access Advanced Level 4. Before jumping into this course, I strongly suggest you complete Beginner Levels 1 through 9 and Expert Levels 1 through 32, along with Advanced Levels 1 through 4. The beginner series introduces all the fundamentals, while the expert series dives deeper into details. The advanced classes, like this one, focus specifically on macros and events. After finishing the Advanced Series, the Developer Series will be next, where we will focus more on Visual Basic programming and working directly with VBA in Access. I recorded this class using Microsoft Access 2016. However, nearly everything we discuss today should work just fine in Access versions 2007 through 2013 since these features have not changed significantly. Should you come across any differences or find that an example does not quite work as shown, please let me know. If you are running Access 2003 or earlier, it is highly recommended to upgrade since many features are substantially different. However, if you are on an older version, I do offer courses tailored to Access 2003 on my website that are more specific to the differences in those versions. For this course, you will find a sample database available for download on my website at 599cd.com databases. I highly encourage you to build this database yourself right from the beginning, starting with Level 1. That hands-on learning is the best approach and helps reinforce the skills. But if you prefer, or if you are jumping into these lessons midway, you can download my copy of the database from the website using the course password provided with your registration. Now, let me give you a quick overview of the lessons included in today's class. In lesson 1, we will learn how to add separate billing and shipping addresses for both customers and orders. This allows you to record where orders are actually shipped at the moment the order is placed, which is essential for tracking purposes and record-keeping. Lesson 2 continues this shipping address topic. Here, we will place these new shipping address fields into our order table and update the invoice to display them. This approach lets you see precisely where each order was sent, tied to the details stored at the time. Next, even though Microsoft Access does not have built-in support for drag and drop features, I will demonstrate a straightforward way you can move items between two list boxes. We will build an example using active and inactive employees, but the same technique can be applied to any two list boxes in your database. You can select or double-click an item in one list box to move it to the other. This method involves just a minor bit of SQL and one macro command. You will also see how to offer users the option to use buttons or simply double-click to transfer items from one list to the next. In lesson 4, we will cover several miscellaneous topics that are useful but do not require an entire lesson each. We will discuss the Auto-Exec macro, which allows you to automate actions when your database opens. I will introduce some error handling techniques for your macros, and we will explore the macro design tab on the ribbon to see some options available there. If you would like to see a complete, step-by-step video tutorial for everything covered here, visit my website at the link below. Live long and prosper, my friends. Topic ListAdding separate billing and shipping addresses to customersTracking shipping address per order in the orders table Adding shipping address fields to the invoice form Moving items between two list boxes with a macro Using SQL and macros to transfer list box items Implementing active and inactive employee lists Using buttons and double-click actions to move list items Creating and using an Auto-Exec macro Adding error handling to macros Reviewing the macro design tab in the ribbon Primary Topicsmacros, billing address, shipping address, list boxes, item movement, SQL, error handling, macro design, Auto-Exec macrosSecondary Topicsdatabase building recommendations, compatibility notes |
||||||||||||||||||||||||||||||
|
| |||
| Keywords: macros, billing address, shipping address, separate addresses, list box item move, order forms, invoice report, ship same as billing, copy address macro, employee status, autoexec macro, macro error handling, macro design tab, SQL update PermaLink Microsoft Access Advanced 5 |