Account Balances 2
By Richard Rost

 3 years ago
Track Account Balances & Transactions, Part 2
This is part 2 of my Microsoft Access Account Balances tutorial series. In this series we will build a database to track your account balances and daily transactions.
In this video, we will make an editable query for our Accounts form, set up red color formatting for negative numbers without using Conditional Formatting, and we'll build the Account Detail form to edit additional information about each account.
Members
Members will learn how to add color schemes to each Account so they appear in a different color on the Account form.
Silver Members and up get access to view Extended Cut videos, when available. Gold Members can download the files from class plus get access to the Code Vault. If you're not a member, Join Today!
Prerequisites
Suggested Template
Links
Member Links
Recommended Courses
Next Video
Keywords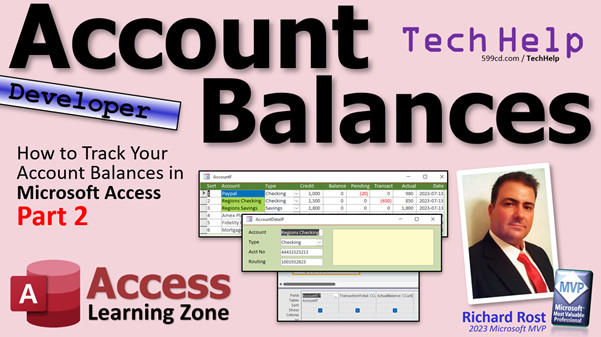
access 2016, access 2019, access 2021, access 365, microsoft access, ms access, ms access tutorial, #msaccess, #microsoftaccess, #help, #howto, #tutorial, #learn, #lesson, #training, #database, track microsoft access account balances, personal finances, daily spending transactions, track finances, balance chart, credit and debit, banking activity, credit card balances
More InformationTranscript Welcome to another TechHelp video brought to you by AccessLearningZone.com. I'm your instructor, Richard Rost.
This is part two of how to track your account balances in Microsoft Access. If you have not watched part one yet, please go watch that first before watching this one. Otherwise, you are not going to understand what's going on.
Today we are going to make sure we set up an editable query for our account form. Then we are going to build the account form. After that, we are going to set up some formatting for these numbers. The negatives show up red like that, but we are not going to use conditional formatting. We are going to use regular number formatting, which I think is cool.
Then we are going to set up a single form. I forgot to put that on the slide. I am going to set up a single form with additional details, the account number, the routing number, and some notes. You can double-click on each one of your accounts here and open up this form on top of it. You can see this stuff here too.
Then we will do some conditional formatting for the accounts. I will do a couple of them here, but you get the point. Here we go.
Before we get started, though, if you don't know how to make a relational combo box, that's where you pick a value from another table or query, go watch this video first so you understand this before we continue.
We are back, ladies and gentlemen. I am recording yesterday's video, which I just recorded about 20 minutes ago, but we'll call it yesterday's video. Now I realize that I really, really, really do want this to be editable because the whole point of having it like a spreadsheet like this is because I want to be able to come in here and update it. I want to be able to click in here and edit this. That's the whole point of this. It's my daily balances and all that. I don't want to have to double-click on this to open up a single form with another record. I want to be able to change things right in place.
So we are going to keep this because we do need this calculator. We do need this transaction total calculation so we can calculate our actual balance. I really think that it's going to be faster if we have this aggregate query because if we don't have the aggregate query, we'd need to use a DSum in place of this. DSum is going to have to run for each one of these records, or six of them. Imagine if you had 60. It's going to have to go through your entire transaction table and sum those all up. For a small database, it's not going to be that noticeable. But if you've got a bigger database, it will take significant time, especially over a network.
Now if we keep the aggregate query and we use DLookup in another query, this aggregate query is going to run once. It's going to generate those totals quickly. Then we can use DLookup in a second query to look up that transaction total based on the account ID. So that's going to look up one record each time. Yes, it's still slower than the aggregate query by itself, but it's going to be faster than DSum.
Now, I haven't tested this. This is my hypothesis based on my almost 30 years of experience with Access. I'm pretty sure that's how it's going to work. This would make an interesting research project, if any of you want to try it. Aggregate query by itself versus a regular query with DSum to get this value, versus what I'm going to do: have the aggregate query and use DLookup to pull that value out of the aggregate query.
Those three things I'd be curious to see. I bet you this is faster than the DSum though. You'd need a pretty big database with probably at least tens of thousands, if not hundreds of thousands of records. I would run it over a network to really get a feel for the speed, but that's just my hypothesis. That's what I'm thinking and I'm going to stick with it.
So we're going to still keep this account Q, but I am going to rename it to account total Q. Whoops, not design. I'm going to rename it. Rename account. We're going to call this account total Q. I'm just going to grab this and paste it over this guy.
Now I'm going to make another query. This will be the real account Q and I want account Q to be editable in place. Query design, bring in your account T, bring in all the records. Now by adding DLOOKUPs and stuff over here, we don't make this so that it's not editable. It's that join to the aggregate query that makes the other query not editable. Here I can say that my transaction total... let's call this transaction... let's zoom in. Transaction is going to be DLookup. I want to look up the transaction total from the account total Q where the account ID equals account ID for this record.
If I run that, it's really quick, but I only got six records, but you can see there it is. Again, we have to convert that to currency. You don't have to, but I want to have it look like that here. Looks good. Transactions right there. Let's call it transaction total. This shouldn't be a problem because we can refer to it differently here because transaction total is inside quotes inside the DLookup, but shouldn't cause any problems. That's good. Keep the fields the same.
For the next one, we can literally just copy this and paste it over here. This one is going to be the actual balance. We're going to look up actual balance. There's two lookups per record, but we save this account Q, but our query stays editable. See, I can still edit. I can still add new ones and it will just use lookups for this stuff. That's what I want.
If you want to learn more about this recordset not updateable stuff and how a query becomes not editable, go watch this video here and that will explain that in more detail.
Now it's time to start our account form, which is going to look like this. Let's close this puppy down here. Now I've got a default continuous form. I don't really need the rest of this stuff because I was going to keep it around in case I wanted to pull pieces out of this stuff, but it's just taking up space and I've got blanks already in here. So this, this, this, yeah, that many will keep and you'll get all the order stuff. So I don't need those. Delete that stuff. I don't need that. I do want my macros, my global module. I don't need a customer order detail order invoice. We can get rid of those. They're just taking up space at this point. I don't need contact, customer order, and order.
I was going to wait until the end to clear this stuff up, but yeah. There we go. Looks good. So I'm going to base my account form off the continuous form. Copy and paste that. This will be the account F. Open you up. It's pretty bland. Design view. This is going to be based off of that account Q. We'll change the record source over here. That's the editable one.
I'm not going to bother showing IDs on here. We don't need it. So I'm going to delete you. Actually, I'm just going to delete the... let's do this. Hold this down. Let's bring in the fields we want. Add existing. This we don't need. This we're going to make a combo box for. So I do want sort order, account name... I'm holding down the control key, by the way... account number. I don't need that on this screen, or the routing number. That's something that you might want to have, show me the details for this account kind of thing. Or you could put them down here in the form footer. That's up to you. Maybe notes and stuff. Yeah, let's do that. We'll put those down below. So I'll bring those in too. Why not? Credit, balance, pending, date, updating. This and that. So we want all this stuff in here. So we're going to drop it. Delete the labels.
We're going to line this stuff how we want it. Sort order can go over here. We don't need a gray field. Sort order on the left like that. This we don't need. The account name can go here. Yes, you're going to watch me do some formatting. Sorry about that. The type's going to go next to it. Account number and routing number, let's throw that in the footer. I forgot to put a notes field in here. We're going to add notes too. I put notes in, like for credit cards. I'll put a note in there like "received the credit update on January 1st" so I know how. You don't want to ask for a credit increase too often, so I'm just going to know, OK, I just got one six months ago. Wait.
You might not want this stuff visible at all, too. That's up to you. In fact, let's not put those out there for now. For credit, go about there. These would be smaller numbers, especially for my accounts. Balance pending, you bring these all up here. Ending, down here. There.
One thing that I don't like is I have to select all of these, right-click, size to grid. When you pull them off of this thing, they come in just slightly larger than the default grid setting. Like that, date updated is going to go all the way to the right. OK, so we have balance, pending transactions, and then the actual balance, and then date updated. Here's where the pipe is going to go. Bring that bottom up. Close that.
I don't want purple for this. Just while I'm thinking about it, I'm kind of doing things in no particular order. Let's go green for this form, green because it represents money.
This will be the sort of labels. You could do one big label across the top. I often do that. In this case, I'm not going to, because I might later want to make these sort labels. I have a whole separate video on that. Account. Here, paste, here, paste, paste, paste. This is going to be the pipe. This will read "balance" and "transact" is good enough. Actual balance. Much better. Then we have to make all these a little bit smaller. Whoops. Come here. Here we go.
Read it. Balance. Founding.
I know it's a little boring, but when I skip this and just say, "I'm going to format this now" and do it off camera and come back, I get more people complaining about that. If you're a little bored, put me on fast forward. I shouldn't be too long, but I hate having people get confused about what I did. I want you to be able to see everything that I do on camera, almost all of it.
So, type. We're going to slide in here. Let's make that a combo box. Form design, combo box. Drop it here. I want to look up the values in a table or query. Next, that's going to come from transaction type. Bring over both of those fields. Next, what do you want to sort by? Account type. Next, that's what it's going to look like. The key column is hidden, but that's the value that gets stored in the table. We've been through this.
Next. Store that value in account type ID in the account table. Next, what label do you want? Doesn't matter. We're going to delete it and hit finish. We've got a label. Slide you up into here. There we go. That's our relational combo box. That's one of the prerequisites. If you've never done that before, then go back and watch that video.
Some formatting. We have to do our tab order. Click here, go to tab order, auto order, and I can see right there, combo 21. I always forget the wizard doesn't let you name that box. Combo 21's got to get changed. This guy, account type combo.
Let's shrink this up. Bring this over. I like to leave a little bit of room over here for scroll bars just in case. Probably won't need it, but save it. Close it. Let's take a look at it.
Looks pretty good. We've got some aligning to do. Now, I normally hate layout mode. Once I put VBA code in a form, I never use layout mode again. But since we haven't put any code in this form, layout mode is OK for now. Let's see things as they are on the form with layout. In here, you can make some basic changes like I can left-align that, I can right-align these guys. Looks like I might have to actually go into design view and change those. Design view. Make these that width right there.
I think I did these all this time. Layout mode. I've had to completely re-record forms because it just corrupted all the code behind it. That was back in a 2007 database when layout mode first came out. Yeah, I don't like new features. So I stopped using layout mode for most things.
Now, as I mentioned in the other video, I generally do not use pennies in here. Let's get rid of those. Design view. Let's do it. Let's open up the properties for all of those. Decimal places, we're going to set to zero. Let's see what we got. This here too. We're going to make sure this is formatted as short date, which I am using the ISO date standard. Still too small.
If you don't know what the ISO date format is, it's this. It's universal. Everyone on the planet should use it. I'm on a mission to change everyone's mind that you should use this. In America, we do the stupid month-day-year. Europe does something a little more reasonable, day-month-year, but it's still backwards. It should be year-month-day. Everyone knows it. Everyone can agree on it. Think of the year first, then the month, then the day.
It'd be stupid to write seconds-minutes-hours. Who would do that? That's small to big. No, big to small. Then the whole thing works out perfectly for computers too. Year-month-day-hours-minute-seconds.
These are getting bigger. We could get rid of the dollar signs in here too. Let's come in here and set this format menu. I'm going to set this to custom. I like these. Again, go to properties. I am going to make the format like this: #,##0. All right, save it. Close it. Let's check it. That's what I want. Looks better.
What does that do? Let me go back in here, select, and right-click properties. These are optional. I want the thousands separator. I always want to see a zero in the first digit.
Moving on, I've got a whole video on this too. Put a semicolon here. Do this for the second one, do the same thing in parentheses, and then after that, in square brackets, put red like that. Hit OK. Save it. Close it. Then open it back up again. There you go. Negatives are in red.
If you want to learn more about that stuff, go watch this video. There's all kinds of stuff. You can format the greens, you can format the nulls. All of this is without conditional formatting. This is just right in the format for that cell itself. I can tell we need to make these just a tiny bit larger, though. This might fit. If you're dealing with balances in the millions, then this won't fit. You'll have to make it bigger. Or if you've got that much in your accounts, you can pay me to do it.
The date updated does need to get a little bit bigger, though. Let's see. I don't want to get too big here. Go back. Perfect.
We will add some conditional formatting to this later, because I like to see when I update my balance here. One of the tricks that I'm going to add later is when I double-click on one of these fields, it updates the date. This way I can see which accounts I haven't manually gotten the balance information from.
Like I said in the other video, PayPal and Amex and Capital One are the other ones I use a lot. Those have transactions coming out almost every day. A lot of them are automated, like DoorDash, for example. So I check those daily. Every day I'll come in here, type in the new balance, and the date updates. I can see which accounts I haven't checked in a while. So we'll make it so if it's 10 days old, it'll go to yellow. If it's 30 days old, it'll go to red, that kind of stuff. We'll be doing that in a future video. That's coming up.
If you want to make these green, like I did in the other video, you can too. You can put green in that format instead of red. I kind of like this though. I've been used to looking at my spreadsheet, which is this, for the past couple of years with the green backgrounds and stuff. But honestly, this is a little easier on the eyes. I think I like this better. The red still stands out as being negative. I think I'm going to keep this. I really like this.
Next up, I think I am going to make a single form to have more information on it. I can double-click on this account, for example, and open up a single form that's got its details - the account number, routing number, notes, the other things.
Plus, for the extended cut, the members, what I'm going to do is we're going to have it so you can specify the color and load up the conditional formatting based on the color that you specify for that particular account. I've covered it in extended cut before. We're going to integrate that into this database.
But for now, let's make that single form. I'm going to close this for now. I want to add in the account table. I want to add those notes, because I do use those notes a lot. Not memo. See, I know they changed it to long text. I still type memo every time I come in here. I try to keep all my fields singular, but notes is the exception, because I've been calling it notes since day one, and that's just not going to change. That's a bad habit, but I'm just going to do it. It's my only exception usually.
Now I'm just going to take the account F, copy and paste that. I'm going to call this account detail. Because what I'm going to do is we don't need all of this stuff on that form. In fact, we don't even need the date. That's going to be updated on the other form. In fact, I don't even want the sort order in here. All I want is the account name. I'm going to take this guy here, cut it, click on this and paste it. That way it attaches to that label. Format that as black. Account name, account type, we do want that here. Cut, paste, format painter, slide it over.
Then we'll bring in... Let's see, we don't need the header or footer here. Since we don't need those totals, this form will actually load faster if we just base this on the account T.
Let's bring in the other stuff that we don't have on the other form. I'm going to bring in the account number, the routing number, and the notes. Put those right under here. We'll put the notes over here like I always do. This is one of the reasons I wanted to keep the customer form around, because I can format that notes like I always do. Let's do this: format, click, bang, bang. Call this acct note, and just routing. I feel no one knows what those mean.
There, resize, resize, slide over. I spend so much time making these perfect. Like this right now, we're going to add color in the extended cut. Close that. We're going to align all this stuff left. We're going to change this to the light yellow that I like to use, which is that, and then lighten it up just a bit. There. There are your notes. Maybe change this background just a touch. I like to stay with them. Save it.
Now, I'm going to make this form modal so it opens up on top of the other one. I don't want the users scrolling through accounts in here. I want you to open them up from the other form. You can let them scroll if you want to, but I don't. It causes problems sometimes. We're going to turn off scrollbars. We don't need them. We're going to turn off navigation buttons and record selectors. We'll make our own delete button. I don't like letting users delete stuff.
In fact, that brings me back to this guy. We're going to make some changes over here too. On this form, I don't want users to delete or add records directly from here. So we're going to turn off Allow Deletions and Allow Additions under Data. Again, we'll make buttons for both of those things. It's just, you're asking for problems if the user can click your X and delete the record. I know that this looks like it's not editable anymore, but it is. You can still come in here and change stuff, which I do want. That's a big deal.
We're going to deal with this too, because notice when I just changed that, this didn't update until you leave the record. Even then, it didn't update. So we're going to fix that in a future video. We have to do some refreshing after this stuff is edited. And I don't mean like refreshing like, you know, 7 Up.
How do I get to that account detail F? This shouldn't be continuous. Good thing I did that. Not layout. Find this, set it back into a single form. Format. Never use datasheets and never use split forms. Don't ask me. A lot of people ask, "How can I do this with a split form?" You can't. Datasheets and split forms are almost no better than using a table or query, which we don't do. Single forms and continuous forms. That's all. Don't send me your questions if they involve a datasheet or a single form. I'm going to make a video on just that topic. Don't use split forms, datasheets, or whatever I just said.
We're going to use a little code to open this guy. I like to put it in a double-click event behind that. Design view, right here. Event, on double-click, right there. Dot dot dot. That brings up the code builder, first little bit of code in this database, real simple one. First, we're going to do Me.Refresh. It's going to refresh the record you're on in case you've made changes. Then we're going to do DoCmd.OpenForm "AccountDetailF", WhereCondition:="AccountID=" & AccountID
Even though it's not on the form, it's still in the underlying recordset below the form. So it should work. It should find it.
Back over here, let's open up that account again. Double-click on this one, and it pops up right there. You can probably slide this down. One thing about a modal form is that if you are in design mode, it will always hide the navigation pane. But your users won't see that anyway if you set it up right. So it'll just look like that. When I'm developing a database it's open, but even when I'm using my own databases, I almost always have this closed so it doesn't look all wacky.
Normally I would color this stuff blue, as I say in a lot of my other videos. I color stuff blue if you can click on it to do something. But I'm not going to in this case because, like I said in the extended cut, we're going to make these colored based on this stuff and do that in the extended cut.
Now, non-extended cut people, I am going to show you that you can apply that conditional format if you want to directly in here. But it's not as nice as what I'm going to show in the extended cut. For example, come into here, account name, go to format, conditional formatting, and you can add your rules in here manually.
New rule, field value, equal to, as you can put in here PayPal in quotes. Then drop this down, pick the blue you want, put the white, hit OK, hit Apply, hit OK, close it, save it, open it back up again. There's your PayPal. There's your conditional formatting. But you have to manually do that in design mode based on the actual value of whatever the field is.
I'm going to teach you in the extended cut how we can put a color code here, and then we're going to manually feed that. We're going to add those conditional format rules when this form loads in VBA.
But if you only want to do it for a couple of things, like regions for example, you could do one for Regions Checking and Regions Savings. Format, conditional formatting. If we add a new rule, if we say field value is... let's say, there is no contains here. Let's see if we can do it with "expression is." How about we try account name like "*regions*"? That will color those green. Let's give this one green. So I want to get all the Regions in one shot. That works. That's good. You can do all your Regions accounts. If it has the word regions in it, it will do that. That's another option. But I'm going to show you something better in the extended cut.
That's what we're going to cover in the extended cut for the members. We're going to do custom color code so you can just specify it at the table level without having to change it in design view. We'll do it with some VBA when the form loads. Silver members and up get access to all of my extended cut videos, and gold members can download these databases. Intro In this video, we continue building our account balances tracking system in Microsoft Access by setting up an editable query, designing a continuous account form, and applying custom number formatting to display negative balances in red without using conditional formatting. You'll also see how to add a single-form view for additional account details like account number, routing number, and notes, and how to use DLookup with aggregate queries for better performance. Finally, we'll talk about basic conditional formatting for the account names and set up double-click navigation to the detail form. This is part 2. Quiz Q1. What is the main advantage of making an aggregate query to calculate balances instead of relying on DSum for each record?
A. Aggregate queries are easier to create than DSum expressions
B. Aggregate queries allow for in-place editing of all fields in the query
C. Aggregate queries run once and return all needed totals, making them much more performant on large datasets
D. Aggregate queries require less storage space in an Access database
Q2. Why is using DLookup in conjunction with an aggregate query potentially better than using DSum for every record, especially on large databases?
A. DLookup retrieves all records at once
B. DLookup on an aggregate query retrieves one value per record, making it faster than running DSum repeatedly
C. DLookup always returns more accurate results than DSum
D. DLookup cannot be used with aggregate queries
Q3. Which of the following will make a query in Access not editable?
A. Adding a DLookup expression in a field
B. Having a join to an aggregate query
C. Formatting fields using the Format property
D. Using number formatting for currency fields
Q4. What is the proper way to keep an Access query editable while adding calculated lookup fields such as transaction total or actual balance?
A. Use DSum for calculated fields directly in the editable query
B. Join the editable query directly to the aggregate query
C. Use DLookup to pull totals from the aggregate query based on record ID
D. Only display the calculated fields on a form, not in the query
Q5. Why is it generally better to use standard number formatting (with a format string) rather than conditional formatting for tasks such as making negative numbers display in red?
A. Number formatting is less flexible than conditional formatting
B. Number formatting cannot display negatives in red
C. Number formatting is more efficient since it is handled directly at the field level, not as an overlay
D. Conditional formatting runs faster than number formatting
Q6. Why might you choose to hide or move the account number and routing number to the footer or another single form instead of placing them directly in the main account list form?
A. To prevent users from seeing sensitive data unnecessarily in the main list
B. Because Access does not support displaying these fields in continuous forms
C. To save disk space in the database
D. Because these fields must always be encrypted on forms
Q7. What is the main reason for setting Decimal Places to zero and customizing the Format property for currency-type fields in the account balances form?
A. To make the form look less professional
B. To remove pennies and customize the visual presentation for easier reading and consistency
C. To reduce memory usage in the Access database
D. To prevent users from entering fractional values
Q8. According to the tutorial, what is the ISO date format and why is it preferred?
A. Month-Day-Year, because it matches American conventions
B. Year-Month-Day, because it sorts correctly and is universally understandable
C. Day-Month-Year, because it matches European standards
D. Month-Year-Day, because it matches most Excel files
Q9. In the context of this tutorial, which type of combo box is demonstrated on the form for account type selection?
A. Simple list of string values
B. Lookup combo box based on a separate account type table
C. Value list entered manually in the form properties
D. A combo box that generates options from a VBA function
Q10. What practical benefit does making the account detail form modal (opens on top and restricts actions) provide?
A. It allows navigation to other forms while keeping the detail form open
B. It prevents users from accidentally navigating to or editing other records before finishing with the current detail
C. It enables editing of multiple records at once
D. It reduces the database file size
Q11. Why might it be a good idea to disable Allow Additions and Allow Deletions on the main account continuous form?
A. To force users to use special buttons for these actions and reduce risks of accidental record changes or deletions
B. Because it prevents editing existing data
C. Because Access will run faster with these options disabled
D. To enable split form features
Q12. In this tutorial, how is a double-click event used on the account form?
A. To delete the current account record
B. To open the account detail form with details for the selected account using VBA
C. To switch to datasheet view
D. To trigger a macro that exports the record to Excel
Q13. What is a limitation of using manual conditional formatting in design view for coloring specific account names (like PayPal) or regions?
A. You cannot use expressions for field values
B. Conditional formatting only works with numeric fields
C. You must manually update rules in design view for each new condition or value
D. Conditional formatting automatically updates for any new accounts
Q14. Why does the instructor discourage the use of datasheets and split forms for applications like this?
A. Split forms and datasheets reflect live table data and are limited in customizability, making them unsuitable for most form-based applications
B. Split forms and datasheets offer better performance than single forms
C. Split forms allow free use of VBA
D. Datasheets and split forms automatically implement all necessary security measures
Q15. When formatting number fields to show negative values in red without conditional formatting, what is the proper format string example used?
A. 0.00;[Red]-0.00
B. #,##0;[Red](#,##0)
C. 0.00;0.00;[Red]0.00
D. [Red]0.00;0.00
Answers: 1-C; 2-B; 3-B; 4-C; 5-C; 6-A; 7-B; 8-B; 9-B; 10-B; 11-A; 12-B; 13-C; 14-A; 15-B
DISCLAIMER: Quiz questions are AI generated. If you find any that are wrong, don't make sense, or aren't related to the video topic at hand, then please post a comment and let me know. Thanks. Summary Today's TechHelp tutorial from Access Learning Zone picks up with part two of my lesson on how to track your account balances in Microsoft Access. If you have not yet reviewed part one, I strongly encourage you to check that out first to ensure you understand all the foundation concepts before proceeding with today's material.
In this segment, I want to focus on making sure that our account form is powered by an editable query. This is important for anyone who wants the end result to feel more like a spreadsheet: you need to be able to update your records inline, quickly, without having to open a separate detail form for each change. I'll show you how to build this account form, and I will also demonstrate how to apply number formatting techniques so that negative numbers pop out in red. Notably, we'll do this through custom number formatting rather than conditional formatting, which gives us more flexibility and better performance.
We will construct a single form view that displays enhanced account details such as the account number, routing number, and notes. You'll be able to open this detail form by double-clicking any account in your main list, giving you access to these specifics without crowding the main view.
Additionally, we'll go over some basic conditional formatting for your accounts right on the form—just enough to give you the idea so you can customize further as you wish.
If you're not familiar with building relational combo boxes, which let you select a value from another table or query, I strongly recommend learning that first so today's steps make sense.
Now, as I'm reviewing what we did previously, it's clear that a key objective is keeping our main query editable. The idea is that I want to update my daily balances right in the list, just like a spreadsheet—without needing to double-click into a separate detail screen each time.
For our calculations, you might wonder: why not use DSum for our transaction totals? It turns out that using DSum would force Access to recalculate results for each record, which can really slow your database as the number of records grows, especially over a network. Instead, we'll use an aggregate query to add up transactions and then use DLookup to retrieve those totals in our main query. This approach is generally much faster and keeps our queries editable. In my experience, this strategy offers the best tradeoff between speed and flexibility, but feel free to experiment and test if you're interested in the performance of different methods.
We'll rename our original aggregate query for clarity (for example, to account total Q) and then set up a secondary query—our truly editable account Q—to use DLookup to pull in the computed transaction and balance totals per account from the aggregate results. This ensures our main form remains editable while displaying real-time values.
If you ever want a deep dive on why certain queries become uneditable in Access and how to troubleshoot that, I have another detailed video on that subject that can help.
Next, we'll build the account form itself. I'll base this on a continuous form layout, refining it to only show the fields we care about for quick entry and referencing, like sort order, account name, credit limit, balance, pending transactions, actual balance, and the last updated date. Fields like the account number and routing number, which aren't needed constantly, can go into a footer area or be confined to the single account detail form.
While designing, I'll tweak the alignment, order, and visual style, skipping the display of unnecessary fields to keep things tidy. For the account type, we'll use a combo box linked to an external lookup table—if you haven't worked with relational combo boxes before, that prerequisite video will be helpful.
We'll also pay attention to the tab order for easier data entry. I like to use formatting tricks such as aligning fields precisely to the grid, removing pennies from currency formats by adjusting decimal places, and switching to the internationally preferred ISO date format (year-month-day). This last step not only standardizes things but also makes sorting and computations far less painful.
For numeric fields, we'll enhance the format to show thousands separators and to display negative amounts in red, just as you might expect in an accounting spreadsheet. This is all achieved through simple formatting options rather than heavier, resource-consuming conditional formatting rules.
We'll address the final visual touches for clarity and usability, adjusting font sizes and columns so everything fits logically, even when account balances get very large.
Down the road, I plan to add features like automatic color coding for updated balances based on how recently you've checked an account—think yellow for accounts not updated in ten days, red for thirty days, and so forth. These items will come in future lessons.
For now, we'll also build out the single account detail form. This form will pop up when you double-click on an account in the list, offering a modal view focused on fields like account number, routing number, and notes. I'll show you how to trim the form to just the essential fields, apply light color accents for clarity, and turn off navigation buttons and scrollbars to avoid accidental changes or deletions. Users should only edit or update records using actual buttons, not via Access's default interface, to prevent accidental data loss.
We'll cover the simple VBA code that drives the double-click action—refreshing the main record, then opening the detail form filtered to just the account you clicked on. This ensures a smooth, user-friendly experience.
For those curious about split forms or datasheets, I recommend against them for most Access applications. They offer little benefit over tables or queries for editing and add unnecessary complexity. Stick with single and continuous forms.
Finally, although you can apply traditional conditional formatting by hand in design mode, that approach is manual and inflexible. In the extended cut for members, I'll show how you can specify a color code in your table and use VBA to apply those colors dynamically as the form loads—giving you robust, centralized control over your interface colors without having to touch the design view each time something changes. This is especially useful if you want to highlight certain accounts or categorize them visually.
Silver members and up can access all of my extended cut lessons, and gold members can download the finished databases.
You can find a complete video tutorial with step-by-step instructions on everything discussed here on my website at the link below. Live long and prosper, my friends. Topic List Creating an editable aggregate query for account balances
Renaming and organizing queries for clarity
Setting up DLookup functions in queries
Ensuring queries remain editable when adding calculated fields
Building a continuous account form from a query
Customizing the account form layout and fields
Adding a relational combo box for account type
Adjusting form tab order for usability
Formatting number fields without conditional formatting
Applying custom formats for red negative numbers
Formatting date fields using the ISO date standard
Placing account number, routing number, and notes in form footer
Adding and formatting a notes field to the account table
Creating a single form for detailed account information
Configuring modal form properties for the detail form
Removing navigation and scrollbars from detail form
Disabling add and delete operations directly on the account form
Adding double-click code to open detailed forms
Applying conditional formatting rules to account name fields
Manually setting up color formatting for specific account names and patterns Primary Topics editable queries, form design, account tracking, number formatting, DLookup vs DSum performance, aggregate queries, conditional formatting, modal forms, Access VBA
Secondary Topics relational combo boxes, recordset editability, form usability, user input restrictions
|


