Custom MsgBox 4
By Richard Rost

 3 years ago
Custom MsgBox in Access. Part 4: Button Captions
In this Microsoft Access tutorial series, we focus on creating a custom message box using VBA, enhancing the standard MsgBox function.
In Part 4, we will learn how to change the button captions from OK/Cancel to Yes/No or whatever else you want. We'll change the return value from a string to a number. We'll see how to process that value to display different messages.
Members
There is no extended cut, but here is the database download:
Silver Members and up get access to view Extended Cut videos, when available. Gold Members can download the files from class plus get access to the Code Vault. If you're not a member, Join Today!
Prerequisites
Recommended Courses
Coming Up
Keywords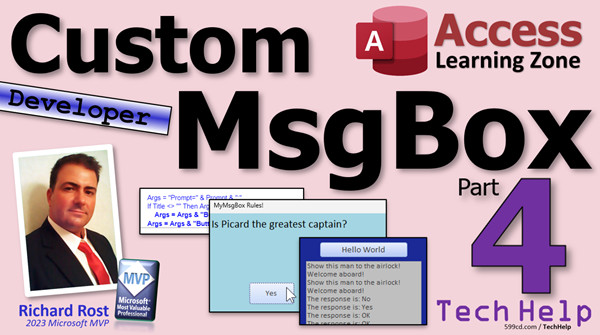
TechHelp Access 2016, Access 2019, Access 2021, Access 365, Microsoft Access, MS Access, MS Access Tutorial, #msaccess, #microsoftaccess, #help, #howto, #tutorial, #learn, #lesson, #training, #database, Custom Dynamic MsgBox, Custom MsgBox in Access, Button Captions, Button 1 Caption, Button 2 Caption, Return a Number not a String
Transcript Welcome to another TechHelp video brought to you by AccessLearningZone.com. I'm your instructor Richard Rost.
Today is part four of my custom message box series, where we're making a better, bigger, faster, $6 million man version of the message box. Of course, this is part four, so if you haven't watched parts one through three, go watch those first. Come back here afterward.
Today we're going to work on our buttons. We're going to be able to change the captions of the buttons from OK/cancel to yes/no, or whatever you want to have on there - pink and red, I don't care. Then we'll see how to handle the return values and have different responses and stuff based on those.
All right, so now we've got a fairly functioning box here. Let's change the buttons. You don't always want OK/cancel. A lot of times you want yes/no. Do you want to delete the entire database? Yes or no? Do you want to self-destruct the ship? Yes or no?
So let's close this and add to our box, so it can accept arguments for the captions on the buttons.
All right, let's open up our code editor. Let's go to our global module and find our function right down here: MyMessageBox.
Now, we're sending into it prompt and title. Let's send in two more things. Comma, new line; let's try to keep the lines so they don't get too long so you guys can see them.
Now remember, once you start with an optional parameter, the rest of the parameters have to be optional.
So, optional ButtonOne (you can call it ButtonOneCaption, you can call it whatever you want) as a String. I'm going to set the default for this as "OK," so if I don't tell it anything else, ButtonOne is going to be an OK button. I know it's different from how the default Access message box works, because they have those weird VB OK plus VB whatever, but now we're going to do it differently.
We're going to actually set - we'll have three buttons total when we're done - but we're going to set what the captions and the values of those buttons are.
Comma, then optional ButtonTwo as String equals "Cancel" for what we have right now.
Now we have to add those when they come in - we have to add those to our args parameter. So after this line, those are going to be specified as the defaults. It is technically possible for you, as a developer (because remember your end users are never going to be doing this), it is technically possible for you to send in an empty string by sending in empty double quotes. You shouldn't do it, but you could.
You could put a check down here for each one, like you could say, just copy this. Copy, paste, paste, and you can do the same thing for button one here. If button one is not blank, then args = args & "buttonone=" & buttonone. Same thing for button two. If button two is not blank then button two = button two, just like that.
Now we've added those to our OpenArgs string. Now we go to our form and read those values in. Here's our form.
Actually, one thing I want to do on the form itself: let's go to the form in design view. This guy. All right, this is the OK button and the Cancel button, but that's going to change because we could have a yes button, no button, whatever. So let's rename these.
I want to keep it simple to start - you know how we keep it simple, then you add a little bit to it here and there. We're going to rename these to Button1 and Button2. I know I usually end in BTN, but we're going to change it for this, so Button1, and this guy is going to be Button2. You're going to leave those captions on here in design view, that's fine.
All right, back here - wait, someone's beaming in - hola, wait for it.
Now that we've already got this code built to parse out the string of the OpenArgs, adding new stuff to it is insanely simple. Watch this. I'm just going to copy this one, copy, we're going to paste it down here.
If the name is ButtonOne, then we're going to set ButtonOne.Caption to whichever is the name value one, the value part. That's it. That's all you've got to do to add new stuff in here.
I told you the last lesson was probably the hardest stuff we're going to do in this entire series. Now that we've got the infrastructure built, it's just adding gravy onto our turkey. I keep thinking this because - I know you're watching this next week, but for me, Thanksgiving is tomorrow, so I've got turkey on the brain.
So now we're done. Now we can go back to our main menu code. This is the code in the button that actually calls it, right here. I've got MyMessageBox: "Welcome Cadets" and stuff like that. Let's change this around so it's a yes/no box.
My question is going to be "Is Picard the best captain or the greatest captain?" Now we're going to rephrase this to just "the greatest captain," and then we'll make our title over here.
I'll leave it as Starfleet Academy. I had something else different in the other thing, but we'll just leave it as Starfleet Academy. All right, so it's a Starfleet Academy entrance examination quiz: "Is Picard the greatest captain?"
Now I want to make this a yes/no box. So, we can now specify - look at that - we can now specify "Yes" and "No" as the responses.
Save it. Debug, compile. Come back out. Let's close it. Hit our button.
So, Academy - "Is Picard the greatest captain?" Yes.
And why is it not working? Let's figure it out. Let's see what happened.
Hmm. Does anybody know what the problem is? Pause the video and see if you can figure out what the problem is. This is a great teaching moment. Pause the video now, go see if you can figure it out. I know what the problem is; let's see if you know what it is.
So, the buttons don't work. Let's close the form. Right-click, you've got no other way to close this. See, this is one of the things you have to be careful of, because if this happens to your end user they've got no way to get out of here except for just shutting Access down. And you can't even shut Access down; you're going to have to kill the task. But we as developers, since we still have development mode, we can right-click, go to design view.
Now, if you go back to your code window, everything looks okay. Everything looks fine. Let's do a debug compile. Everything compiles.
What's the problem? Well, let's start drilling down into our code. Let's start taking a look at what happens when we click on these buttons again. Right-click, build event. There it is. There's our problem; see what it is?
We renamed the buttons. When you rename the buttons, the code gets mismatched. Note to Access development team: this would be an easy thing for you guys to fix.
If a user changes the name of any object, if there's code under that object (an event or whatever), just change the code. Couldn't be that hard to do, right? You guys are awesome, you should be able to easily fix that. Somebody add this to the Access team's to-do list. This has bothered me for years. Well, it gives me something else to teach in my classes.
Okay, so Button1 used to be our OK button, so go find the OK button code, right down here. Take that, delete this, stick it up in here.
We're no longer going to return just an OK; we're going to return the caption in the button: Button1.Caption. And then we'll do the same thing for the cancel button.
The cancel button click stuff is right here. We're going to drop it down in, delete this code - we don't need it any more - and do the same thing in here: Button2.Caption.
Save it. Debug, compile. Back out. Close it. Click the button and there we go, there's our Yes and our No. It gets returned back to the calling subroutine or function or whatever, and now we can do stuff with this.
We go into our code. Let's go back to our main menu code. Instead of just saying the response is, we can have fun with it here. We can say: If S = "Yes" then status = "Welcome aboard". Otherwise, status = "Show this man to the airlock". End If.
Now we can say: Welcome aboard, or No - show this man to the airlock. So, now we're starting to get to the point where we're returning values.
Another option you could do, if you don't want to return a string, is you can have the message box return a Long (return a number). I actually prefer this method. I've been showing you as a string, but what I like to do is make it so this behaves like it returns a number.
Go back to the MyMessageBox function. Here, we're going to change this from a String to a Long; it's going to return a number now, which means the temp var that we're setting has to be a number. That gets set in the form.
So instead of returning that, we're going to say Button1 is going to return - now there's a lot of ways you can do it. Again, I give you options. You can return a 1 and a 0; that way you can say: If MessageBox whatever then. That's definitely an option. Most of the time I only need two buttons, yes and no, so you can return a 1 and a 0.
But I'm going to make it so the buttons return their numeric value. So this is going to return a 1; this is going to return 2. Because in the next part, we're going to add a third button, so we can have Yes, No, and Cancel. We'll do that in the next part. For now we have 1 and 2.
Save that, and now back in our main menu. This is no longer going to return a string. So we're going to change this - you don't even really need to declare this and put it into a variable. You could treat this just like I do in a lot of my classes, where I say: If MyMessageBox(blah blah) = 1 then. Just like that, right?
If this comes back as 1, and you could set these up as constants if you like. You can make your own constants, like vbYes, vbNo, remember those things? But then you run into problems if you rely on it being, you know, vbOK, because that's got a different value than vbYes, and so on, so stick with your own values here if you want.
These are still captions, so those are still strings. Save it, debug, compile. Come in here again.
You can do it the way you want to do it - you want to use numbers, you want to use strings, you want to use emojis, do whatever you want. They're your LEGOs, build it however you want to build it.
There you go, there's some more functionality.
Don't forget, if you like learning this kind of stuff with me, I have lots, lots, lots, hundreds of hours of lessons on my website. So come check it out. I'll put a link down below to my Access Developer lessons. If you follow along with this stuff, you belong in my developer class. You'll be an ace, you'll be a star, you'll be in there with the smart kids.
But that's going to do it for part four, people. In part five, we're going to add that third button. Don't tell anyone.
All right, that's going to be your TechHelp video for today. I hope you learned something. Live long and prosper, my friends. I'll see you tomorrow.
Bye-bye.Intro In this video, we continue building a custom message box in Microsoft Access by adding the ability to customize button captions and handle different button responses. I will show you how to pass custom button text, manage return values for each option, and update your code so your message box can offer choices beyond just OK and Cancel, such as Yes and No. We will also address common pitfalls when renaming controls in Access forms and how to return either string or numeric values based on which button was clicked. This is part 4.Quiz Q1. What is the main new functionality added to the custom message box in this part of the series?
A. Allowing the user to change the color of the message box
B. Allowing customizable button captions and handling their return values
C. Adding a third button immediately
D. Making the message box display images
Q2. When modifying the MyMessageBox function to support custom button captions, what did the instructor say about optional parameters?
A. Only the first parameter may be optional
B. All parameters must be required
C. Once you start with an optional parameter, the rest must also be optional
D. Optional parameters are not allowed in VBA
Q3. What is the default caption for ButtonOne in the updated MyMessageBox function?
A. Cancel
B. Yes
C. No
D. OK
Q4. If a developer sends an empty string for a button caption, what happens?
A. The button will not be displayed
B. The button will display as OK
C. The button will have a blank caption
D. The function will generate an error
Q5. Why did the instructor rename the buttons on the form from "OK" and "Cancel" to "Button1" and "Button2"?
A. To allow for easier identification of button color
B. To support user-specific captions like Yes/No or custom names
C. To match the default Access naming convention
D. To reduce form loading times
Q6. What issue occurred after renaming the form buttons, causing the custom message box to stop working?
A. The database became corrupted
B. The event code was still linked to the old button names
C. The form could not open
D. The button captions would not update
Q7. What solution did the instructor provide for fixing the button click event issue after renaming the buttons?
A. Reset all form controls
B. Delete the buttons and add new ones
C. Move and update the event handler code to the new button names
D. Revert the button names to their original values
Q8. How did the instructor enhance the return value functionality of the custom message box?
A. By returning user names
B. By returning the button caption as a string, then changing to returning a numeric value
C. By returning boolean values only
D. By returning error codes
Q9. According to the lesson, what are some advantages of returning numeric values instead of strings from the message box function?
A. Numeric values are easier to compare in code
B. Only numeric values can be shown on screen
C. Strings cannot be used in VBA
D. Numeric values allow you to customize the font
Q10. What guideline did the instructor give about relying on built-in VBA constants like vbYes and vbOK?
A. Always use these built-in constants for consistency
B. Avoid relying on their values and define your own to prevent conflicts
C. They are required for message boxes to work
D. These constants automatically change based on the button caption
Q11. What is planned for part five of this series?
A. Adding color-changing functionality
B. Adding a third button to the message box
C. Making the message box resizable
D. Integrating sound effects
Answers: 1-B; 2-C; 3-D; 4-C; 5-B; 6-B; 7-C; 8-B; 9-A; 10-B; 11-B
DISCLAIMER: Quiz questions are AI generated. If you find any that are wrong, don't make sense, or aren't related to the video topic at hand, then please post a comment and let me know. Thanks.Summary Today's TechHelp tutorial from Access Learning Zone focuses on building a custom message box in Microsoft Access, continuing with part four in this ongoing series. If you have not gone through parts one through three, I strongly suggest starting there first, as those lessons lay the important groundwork for what I'll cover today.
In this lesson, the goal is to make the buttons on our custom message box more versatile. Instead of just sticking with the classic OK and Cancel labels, we will expand the functionality so you can easily switch the button captions to anything you need, such as Yes and No, or even more unconventional options if you prefer. I will also address how to handle each button's return value to allow different actions based on the user's response.
Our custom box is coming along nicely so far, but it is time to enhance it by enabling custom button captions. There are plenty of scenarios where OK and Cancel simply are not enough. For instance, if you want confirmation for a significant action, asking the user with Yes and No options is much more appropriate. Think about prompts like "Do you want to delete the entire database? Yes or No?" or even "Do you want to self-destruct the ship? Yes or No?"
To make this possible, adjustments are needed in both the code and the form design. First, we expand our existing function where we pass the message box prompt and title, so that it now also accepts two additional parameters for button captions. Both should be optional parameters to maintain backward compatibility for code that only needs the default button labels. ButtonOne and ButtonTwo can be named however you like, but for clarity, I'll stick with those names, setting their default values to "OK" and "Cancel" respectively.
With these optional parameters set, developers can decide exactly which button captions appear each time the custom message box is called. If you ever want to leave a button blank, it is technically possible by passing an empty string, although it is not recommended. You could always build in logic to check for blank captions and handle them accordingly.
Next, those captions need to be connected between the function and the form. In the code that opens the message box, these new labels get passed through, and inside the form's design, we rename the actual buttons to keep things clear and consistent. Instead of calling them OK and Cancel, we set their names to Button1 and Button2. This helps make everything clear as we may repurpose these buttons for many kinds of labels in the future.
Changing button names in Access forms does introduce a quirk that every developer should be aware of. When you rename a control, like a button, any event code linked to the original name becomes disconnected. This means that click events no longer work until you re-link or re-code these procedures for the new button names. It is a longstanding quirk in Access, so after renaming your buttons, always double-check your event handlers and reassign the proper code.
With that in mind, update all relevant click events to reference the new button names. Make sure that your code returns the appropriate result, whether that is the caption of the button that was clicked or some other value you want to process.
Now, on the code that calls the message box, you can customize the prompts and button labels as much as you want. For example, asking "Is Picard the greatest captain?" with "Yes" and "No" buttons is simple. You pass those values into your message box function, and then, depending on which is clicked, you process the return value.
If you want the return value to be the actual caption of the button clicked, you can work with strings directly. This allows for a lot of flexibility; you can respond differently if "Yes" or "No" is chosen. As a next step, you might prefer having the message box return a number instead of a string, behaving more like the built-in Access MsgBox function. In this scenario, adjust the code so the function returns a number, such as 1 or 2 for each button, and update your logic wherever you handle the result. This approach is especially useful if you plan to add more than two buttons in future enhancements.
You also have the freedom to define your own constants for button values, or you can use strings, numbers, or whatever makes sense for your specific project. The important thing is that the infrastructure you have now supports a wide variety of button setups and return values.
That wraps up part four of this series. Be sure to check out my complete video tutorial on my website for step-by-step instructions on everything covered here. Live long and prosper, my friends.Topic List Changing message box button captions
Passing optional parameters for button captions
Updating OpenArgs to include button captions
Parsing button caption arguments in the form
Renaming button controls for dynamic captions
Updating button event code after renaming controls
Returning button captions to the calling code
Handling message box return values in calling procedures
Returning numeric values instead of strings from the message box
Allowing custom logic based on returned valuesPrimary Topics Access VBA, custom message box, dynamic button captions, function parameters, button event handling, return value types, error debugging, form controls
Secondary Topics naming conventions, user interface design, suggestions for Access improvement
|


