Gift Certificates
By Richard Rost

 4 years ago
Create, Print, & Track Gift Certificates in Access
In this Microsoft Access tutorial, I'm going to show you how to build a database to create, print, and track gift certificates.
Nadir from Denver, Colorado (a Platinum Member) asks: I've been using Microsoft Publisher to print gift certificates for my business. It makes a nice printout for the certificate, but then I have to type the info into my database to track when it's redeemed. Couldn't I just do the whole thing in Access?
Members
Members will learn how to create multiple gift certificate templates to work with, so you can choose from several different designs for your printout. We will also build a certificate list form so you can see all of the certificates, just the ones that are unredeemed, and get a total of how much face value is still outstanding.
Silver Members and up get access to view Extended Cut videos, when available. Gold Members can download the files from class plus get access to the Code Vault. If you're not a member, Join Today!
 Links Links
Keywords
access 2016, access 2019, access 2021, access 365, microsoft access, ms access, ms access tutorial, #msaccess, #microsoftaccess, #help, #howto, #tutorial, #learn, #lesson, #training, #database, gift certificate database, gift certificate database template, voucher, unique certificate code, microsoft access gift certificate template, gift certificates in microsoft access, certifica, Add tracking numbers to gift certificates or coupons
Transcript Welcome to another TechHelp video brought to you by AccessLearningZone.com. I am your instructor, Richard Rost.
In today's video, we're going to make some gift certificates. I'm going to show you how to build a database to create, print, and track gift certificates in Microsoft Access.
Today's question comes from Nadir in Denver, Colorado, one of my Platinum members. Nadir says: I've been using Microsoft Publisher to print gift certificates for my business. It makes a nice printout for the certificate, but then I have to type the info into my database to track when it's redeemed. Couldn't I just do the whole thing in Access?
Well, of course, Nadir, there are a couple of different things you can do. You can either lay out the fields in a report to print on your existing paper gift certificates if you want to feed them into your printer, or you can just use a scanned image for the background and print the whole thing out as a report without having to buy separate certificate paper. Either one will work. Let me show you some ideas.
Before we get started today, I have a bunch of prerequisites for you. Of course, we've got to learn how to walk before we can run. So, go watch these videos before continuing on with this one. These are all free videos. You'll find them on my website. You'll find links to them down below.
Now, before we get started, if you haven't watched my Blank Template video, go watch it. I'll put a link down below in the links section below the video. It explains how I build the basic setup of the database that I'm going to use for today.
You're also going to need to know how basic relationships between tables work. So, if you don't know that, go watch my Relationships video. Again, this is free. I'll put a link down below. And while you're at it, go watch my video on relational combo boxes where you can use a combo box to pick a value from a different table. We'll use that for picking the customer for our gift certificate.
We're going to make a custom certificate ID for each certificate instead of using an auto number, so I want you to go watch my customer codes video too. Again, free video.
I also strongly recommend you watch my invoicing video too. Even though you might not need it, I have a couple of things in here that I'm going to be using in today's class, like the customer combo box. This is optional, but go watch this if you can.
Go watch my Open a Report to a Specific Record video because when we open up the gift certificate to print, we have to know how to open up a single page of a report - that certificate. So, go watch this video if you don't know how to do that. I'm going to show you, but go watch the video.
I've also got a similar TechHelp video I did a little while back called Print Documents that has some of the same concepts that I'm going to show you today. If you want, go watch this one too, then come on back.
The first thing we need is a background image to use for our gift certificate. If you're happy with what you're getting from Microsoft Publisher, feel free to get one of those up on the screen and then just screen capture it. Use a screen grab utility or Windows Snip, and just make an image of that and save that as an image on your drive.
The easiest way to line up the fields so that they print out properly over it is to just put that as a background image and then put the fields where they go. I'm going to show you. I do this in just a minute.
But I'm going to go out to the web and look for some gift certificate background images that I can use for my database. I'm going to search for blank certificate border. You get a bunch of images like this up. Pick whichever ones you like and save them to your drive.
So, I'm going to click on one of them. Let's go with this guy. Then over here, right click and then open image in new tab. That opens up a brand new tab and that looks pretty good. Sometimes you'll get them with watermarks on them, but just find one that you like, and when you've got one that you like, you can either screen capture this or just save the file directly to your downloads folder. So, right click and then save image as, and then save it as whatever you want.
I already grabbed three that I liked before, so I'm going to use these, but that's how you save this. I'm just going to hit cancel for now. Let me show you the one that I'm going to use. I saved an earlier certificate one. It looks like this. Pretty cool. It's got the fields already on it and I'm just going to line my Access fields right up over these so it prints, and I'm going to keep this background if you want to, or you can just use this and then delete the image if you want.
So, let's see how to do this.
Here I am in my TechHelp Free Template. This is a free download on my website. You can go grab a copy if you want.
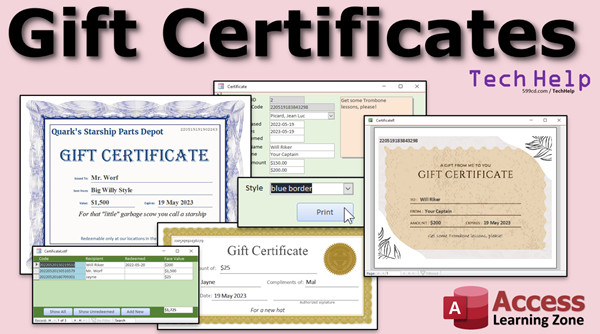
The first thing we need is a table to store our certificate data in. So, Create - Table Design. Let's start with a certificate ID. That will be our AutoNumber. I'm going to want a customer ID. That's my foreign key, so that'll be a Number of type Long Integer. Then we're going to put in a certificate code. I'm going to make that Short Text. That's a code - number, letter, whatever you want to make it, that you can put on the gift certificate that uniquely identifies it. You don't want the certificate ID on there, the AutoNumber, because then your customers will know how many gift certificates you've got out there. If someone buys certificate 100 in December and then comes back in February and buys another one, they get 102, and they're going to know you only sold two of them. So, we're going to make up our own custom certificate code to put in that field.
We'll need a date purchased. I'm going to make that a Date field and default value that to =Now(). That's =Now() - that puts the current date and time in that field. We'll put date expires, and let's say you want to make the default a year for that. You come in here, in the default value, and put =Date()+365. It's roughly a year. If you want to use an exact one year from now, then you'll have to use the DateAdd function. I have videos for that; I'll put a link down below. But Date()+365 is good enough for most instances. Remember, this is a default value. You can override it if you want to.
Now, when they redeem it, we'll put in the date redeemed. We'll leave that one blank for now. That's how we can tell whether or not it's been redeemed. When someone redeems the certificate, you put the date in there and then we know it's been closed.
Now, how about a recipient name? Short Text. You could do first name/last name, all that stuff, but I've generally found when it comes to giving gift cards or gift certificates, people want to put something in there like "To Dad," or "To the best boss ever," that kind of stuff. So, first name/last name really doesn't fit this. Just like I'm going to put in sender name, which will also be Short Text. We could pull first name/last name off of the customer's record, but they might not want it to be from Rick Rost. They might want it to say "From Dad" or whatever. So, we'll leave those both as fields that the user can just type in what they want.
Then we're going to put a purchased amount in there that will be Currency, and we'll put in a face value as Currency. Face value is what will print on the certificate, but purchased amount is what they paid for it. So, you might spend $100 to buy a $200 gift certificate, something like that. That's why you know how much revenue you've earned from the certificates and what you can expect the user - the recipient - is going to redeem it for.
Then finally, almost every table gets some notes, and we'll make that a Long Text. I almost typed in Memo. I'm still in the habit of typing in Memo - Long Text fields used to be called Memo a few versions back.
Let's save our table - Ctrl+S. This will be my CertificateT (Certificate Table). Do I want a primary key? Sure. Access will find the AutoNumber up top here and make that the primary key field so that no two can be duplicated. While we're at it, this certificate code - I also want to come down to Index and say Yes (No Duplicates). I don't want two of the same certificate codes in here. We're going to generate the certificate code in the form. I'll show you how to do that in a few minutes.
Close this down, save changes - yes. Let's go make our certificate form now.
I'm just going to base it on my SingleF here. If you watch my Blank Template, you know what that is. We're going to go Copy (Ctrl+C), Paste (Ctrl+V), CertificateF for form. Now I can right click and Design View this one. First thing, let's change the color. Go to Format, and let's make this background color like a light green. There we go.
Now set its data source. Double click right there where the rulers come together, bring up the property sheet on the Data tab, find the Record Source property. Set that to CertificateT. That's my certificate table.
Now close the property sheet, find the Form Design, and Existing Fields. Here's my field list right there. Let's bring everybody to the party. Click on the first one, Shift-click on the last one, let the Shift key go, then click and drag and drop them all right there.
We're going to rearrange it for just a second, and now we can close the field list.
The only reason I keep these guys around is for format painting. I like the format here, so I don't have to keep changing all the formats. Click on this one, double click the Format Painter (which I have on my Quick Launch toolbar - you can find it over here in the Home tab). Now, click on CertificateID and click on CertificateCode. Those are two things the user can't modify. Turn off the Format Painter.
Now, the CertificateID is an AutoNumber, so the user can't type in that anyway. The certificate code we're going to generate in just a minute, but I'm going to lock that field. Come over here, where it says Locked, and turn that to Yes. The user can't just type in any old certificate code that they want. The system is going to generate it. We'll see how in just a minute.
Now, CustomerID is going to be a combo box, and we've already got a combo box built for that. So, I'm going to delete this guy. Come over to my invoicing form, which is on the customer form, go to Orders. It's this guy right there. We can just steal it right from here. Watch this - Design View, click on the combo box here, Copy. Close this to get it out of the way. I'm back over here and then Paste. There's a combo box. As long as the fields are named the same thing, we're okay.
I'm going to move the certificate code up under the ID like that. We'll arrange the labels and stuff in a minute. In fact, while I'm thinking about it, I'm going to do the same thing with Notes. We already have a Notes field. Delete that. Come back over here. We can just grab this one. It's already got all the same formatting. The field is called the same thing. Delete the Notes field, then paste it right there.
Again, as long as the fields are named the same, you can do it. If the fields are named differently, you just have to come in here and change the control source and the name.
Let's format paint over the rest of these guys. Click on this one, double click the Format Painter, and go click, click, click, click, click, click. Turn that off. Now we're done with you guys. Thanks for your help.
I'm going to align everybody to the grid and size everybody to the grid, because notice the little dots - they're not all lining up (one of my pet peeves). I'm going to select everybody. Right click. We're going to go Size to Grid and right click, Align to Grid. Just to make sure everybody's lined up nicely on the grid. Then we're going to start moving stuff around.
So, these can go over here like that, and I'm going to fix the labels. You can make the labels look nice and pretty. Customers can slide up under there. I'm going to have to move some things around just a little bit. Notes is going to go over this way. Our date fields will come in under here, and I'm going to kind of squish this stuff together. There we go. This can be bigger. This could be bigger. Dates are usually pretty small.
Recipient name and sender name can be wider. Purchased amount and face value.
Let's finish fixing our labels up here. That's going to make it just too big. Let's see what we get there. Slide this a little bit. There we go. That should still be fine. And then face value. Another one of my pet peeves with Access - it's not just you, it's Access - when you modify a label, it just gets off the grid again. See that? I hate that. I've complained a few times about that.
Slide that bottom up. Notes can come over here a little bit more.
We're going to leave room down here for a button to print with.
Let's see what we got. Save it. Close it. Open it back up.
Looks pretty good. We got a couple of things to do in here. First off, I want to line everything up to the left, because I don't like it when numbers and dates usually align to the right, and text to the left. So, let's make everybody Align Left. Design, Select, Format, Align Left.
Save it. Close it. Open it. Wrong one. Open it up. There we go. See, they're still not all lined left. Sometimes you have to do them individually. Or sometimes the trick is you can select them all, Format, Center them, and then align them left. That sometimes does it, because if you get a mixed bag of these, some of them already are aligned left and some aren't, then it doesn't change all of them. It's kind of weird. It's picky. Part of learning how to work with Access is learning its quirks.
Now, this Date Purchased is defaulting to Now. It's got a time on there. I only want to display the date, but I like saving that time in the table so I can tell what time of day this was purchased. In a retail situation, sometimes it's handy to know that you made most of your sales between noon and 4pm. We don't need to see that here. It's going to be defaulted automatically.
So, I'm going to select all of these guys. I'm going to right click and go to Properties. Under Format, I'm going to put in "Short Date". It will use your system's short date format. There we go. I use the ISO date format, so it's year-month-day. Yes, I have a video on how to set that up too. I'll put a link down below in the link section. Lots of videos for you to watch.
All right, let's get to that certificate code. What do we want to put in here? I don't want the user seeing ID1, ID2, ID3. Again, the auto numbers are not for you; they're for Access to make relationships (for example, that customer ID). We're going to put a number in here that is human readable, has some meaning, and you can't possibly duplicate it.
What I'm going to do is make my code a combination of the date, time, and a random number. Open this up. Go to Data, Default Value. Now I'm going to zoom in (Shift-F2). This is going to be a little long.
I'm going to put the date/time in here but I want to format it a certain way. I'm going to use the Format function: =Format(Now(),"yyyymmddhhnnss"). So, it's going to take today's date and time and format it just like that. Then, after that, I'm going to tack on a random number. I think 1 to 1000 is probably good enough.
So, that's going to look like this: Format(Int(Rnd()*1000), "000"). That's what it looks like. Let me expand this so you can see it.
I have a whole separate video on random numbers, too. You don't have to watch it now if you don't want to, but if you want to learn how Access generates random numbers, go watch that video. I'll put it in the link section.
But this basically says "give me a random number from 0 to 999, and format it like this so it always appears as three digits." So, if you get just a 9 for example, it'll be 009. So, it's going to take that code of the date and tack on a three-digit random number. You're not going to get two that are going to duplicate, because it's accurate to the second, and you have a thousand possibilities. So, unless you have a ton of people using this database simultaneously, the chances of duplicates are very low.
There's my custom code. Now let's see if it works.
When you open up the form...wait, wrong one. Let's put a button on the main menu real quick; that kind of annoys me. Yeah, we could use the wizard, but I'm going to use just one line of VBA. Just one line. If you've never done any VBA programming before, don't be scared. Go watch my Intro to VBA video. It's about 20 minutes long, it's free, and it'll teach you all the basics. Sometimes you only need one or two lines of code to do really cool stuff. Go learn it.
So, I'm going to copy one of these buttons, Copy/Paste. I'm going to put it right down here. We're going to change the label. This is Certificates. I'll make it Gift Certificates. Since we're working on this, I'm going to bold that so it stands out, and let's make it red or blue so it looks different.
Now give the button a name over here: giftCertBtn, whatever you want to call it. Right click, Build Event. If you get a window up asking you what builder you want, pick the Code Builder. Here I am; my code builder opens up, and I'm inside Private Sub giftCertBtn_Clicked. Don't worry about all the rest of the stuff on the screen. In here, you're going to type in:
DoCmd.OpenForm "CertificateF"
That's it. All you need. I just want to open up my gift certificate form.
See, once you learn a little VBA, that's even faster than running through the command button wizard. There's literally a handful of commands you have to remember, and then all kinds of power gets added to your database.
Back to the main menu, Gift Certificates. And there's my code: 20220520 15:02:04 with random number 705 on the end. If I close this and come back into it, I get a different number. That's my certificate code. That's going to be printed on the gift certificate. The user isn't going to know what it is, and they can't tell how many certificates you printed based on that number.
Let's put a couple of certificates in here. The first one is from Jean-Luc Picard. You have the purchase date, the date expires. If you want to change these, you can. The recipient name, it's going to Will Riker. The sender name is going to be your Captain, so he'll know who it is. Let's say the purchased amount was 150 and the face value is 200.
When I hit tab, it jumps up here. We've got to fix our tab order.
If you don't know what the tab order is, I have videos on that too. I'll put a link down below in the link section. Basically, it's where the cursor goes when you hit tab.
What I'm going to do is click on the detail section. Go to Tab Order. Hit Auto Order. I have to make one little change because it goes across and then down, so Notes is up here. We're going to click on Notes and drag it to the bottom like that. Hit OK.
One more change I want to make. I'll go to the Other tab, click on the form properties right here, and look for the Cycle property. It's set to All Records. That means when you tab past these fields, it goes to the next record in the form. I want to stay on the current record, so it'll just loop around in the fields on this one gift certificate. So now, when I tab... If I tab again, it goes back to certificate ID. See that?
Let's make one from Will Riker to Mr. Worf from Big Willy Style. Let's say it's $1,000 and the face value is $1,500.
Now, we have our form all set. Now we need to print this thing.
Let's go make a report. I have a blank R Report down here. I'm going to use this guy. Copy, paste. We're going to call this my CertificateR (Certificate Report). Then right click, Design View.
Personally, I always find it's easier to work with reports by maximizing them. I don't know why. I don't do this for forms because with forms I like to see how big they fit on the screen, but with the report I want as much room as possible.
Now, I'm not going to need a report header, a page header, a report footer, or a page footer, so I'm going to right click and get rid of these - just turn them off. Save some space. We don't need them for this report. You know what, I'm going to get rid of that label too.
So, here's my report. Go to Page Setup. Switch to Landscape, which means instead of 8.5 by 11, it's going to be 11 inches wide by 8 tall. Most gift certificates are printed landscape. Go to Margins and make sure you're on Narrow. Narrow margin all around. You can go smaller if you want to try and get that border right along the edge of the page, but remember your printer's limitations. A lot of printers won't go more than a quarter inch from the edge of the page.
Turn this off. That means we can now go out to 11 inches this way minus half an inch for our margins. So, drag this edge. Here's 11. That's the edge of the physical paper. With the margins, we're at 10.5. I like to come in just a little more than that, like one grid dot in, so you don't get a warning that says the page width is too wide.
We can do the same going down; at 8.5 would be the page width, so I'll go to 8, just a touch shorter.
Save this real quick (Ctrl+S). Now let's bring in that image I grabbed off the web earlier. Go to Report Design, Insert Image, browse...find your image. It's right there. Okay.
You get a funky cursor. Just click and drag anywhere, make a box. There it is. Slide it up into the upper left hand corner. Grab this edge, drag it out to the edge, come down at the bottom, slide this down to the edge.
Save it. Now you might see this guy up here that says the report width is greater than the page width, but it's not. This error message comes up sometimes even when you shouldn't get it, so I'm going to close this report and then reopen it in Print Preview mode. Right click, Print Preview. There it is. Looks perfect. Looks beautiful. It's not giving you that extra page. Sometimes if you go too wide, it'll spill onto page two. But don't worry about it. It fits. Access sometimes gives you a warning even when it shouldn't.
Go back to Design View. Notice - now it's gone.
Now it's time to put our fields on this. Again, go to Add Existing Fields. Oh, Show All Tables. If you see Show All Tables, it means you forgot to bind the report or form to a particular table or query. You don't want to use this. This is sloppy.
Go to the report properties. Data. Bind this to the CertificateT table.
Now, when you go to Add Existing Fields, you should see the list of fields that are in that table. Don't use the unbound option - trust me, it gets messy.
First, I want my certificate code. Don't need either of these on there. I want the certificate code - I'm going to put it up here in the upper left corner. Get rid of the label that comes with it. Slide it maybe right there.
I'm going to format this as I want it to look. The first thing is, I want to make the background transparent so the gift certificate shows through. Go to Format, Shape Fill, Transparent. Also Shape Outline, Transparent, so we don't see a box around it.
Pick whatever font you want. I'll leave it with Calibri. Let's go with 24 point so it's bigger. Make sure it's wide enough for your code to appear in there. If you want to bold it, make it red, do all that stuff.
Let's slide down here a little bit. Let's grab the recipient name next. Drag it, drop it there. Delete the label. We're going to format paint in just a minute.
The sender name goes on the From; delete that. The face value goes here on the Amount; delete the label. The expiration date is DateExpires. Click, drag, drop it there. We're done with this. Notes go on the bottom; notes down there; delete that label.
Close that. Let's do some format painting. Click on this, Format Painter, click the rest. Sorry if it's flashing; it's flashing for me too. Access is not a graphics rendering program, so sometimes with a graphics-heavy picture in there and you scroll, it flashes on the screen. Not much you can do about that. This isn't Photoshop.
Turn the format painter off. Click on all of these with the shift key held down, so you can make them all taller at the same time. There we go. Make them a little wider too while we're at it, but not too wide.
Recipient name can go there, sender name can go there, face value, date expires. Notes - for notes, I'm going to center it, and I'm going to make this look like it's handwritten. So, up here, pick a different font like Bradley Hand, that one looks kind of cool, maybe bolded.
Save it. Close it. Open it up again, right click, Print Preview. There we go. Looks really cool. Zoom in. Of course, this is a low resolution image I picked off the web. I'm sure you're going to want to get a high quality image. Now that you've got your fields lined up, give it a print and make sure that it lines up in the right spots, then you can delete that background image if you want. I'll leave this one the way it is. All you have to do is just go into Design View, delete that image, and then these fields will be lined up right where you left them. So, you could print on an existing paper gift certificate if you want to. If you have a good quality inkjet or laser printer, you could just do it right from Access.
Considering the cost of ink nowadays, it might be cheaper to just buy a blank gift certificate from a supply house.
Sometimes you don't want to see this thing. Oh, here's another thing that bugs me sometimes. If you click on this image, you can't click on the individual fields in front. You have to click off of it somewhere and then back on the fields. Lots of little quirks. Part of working with Access is learning its quirks.
Now, one more thing I've got to show you. When you generate it, it's going to generate every gift certificate. See that? There's Big Willy's, there's Jean-Luc's. So, I want to open up just the certificate that I'm on when I'm in the gift certificate form. If I'm on this one, I want to hit a button and print just this one. That's why I wanted you to watch that video on opening a report and printing a specific record.
Design View. Command button. Drop it down here. Cancel the wizard, because the wizard doesn't have this option. Print. Right click, Properties. We'll call this my PrintCert button. Right click, Build Event.
Two lines of code we need. The first thing is a Me.Refresh. That saves the current record, because if it's dirty (if you're editing it), it won't be saved to the table, and if you open up the report, it won't have all the right data in it. I cover that in the other video.
Then we need a DoCmd.OpenReport:
DoCmd.OpenReport "CertificateR", acViewPreview, , "CustomerID=" & CustomerCombo
That says CustomerID for that report equals the CustomerCombo on this form. Even though CustomerID is not a field on the report, it's still in the recordset under the report, so it'll work.
Save it. Close it. Open it. Let's go to Big Willy Style and print. There it is, Big Willy Style gift certificate, and we're on just page one. Go to the other one, click print. There you go, that's the other certificate.
In the extended cut for the members (Silver members and up), we're going to do multiple gift certificate types for each certificate. We'll make two more and line them up properly, just like we did, and you'll be able to pick which one you want to print for each certificate.
So, here we have Blue Border, Gold Certificate, or the same one we just had. Let's go to Blue Border and hit print. There's the Blue Border one. Or, if you want, the Gold Certificate, and you get that one. That's all covered in the extended cut for the members.
Silver members and up get access to all of my extended cut videos, and Gold members can download these databases. Wait, I added something new - I added this little guy down here. We added a certificate list form. I wasn't planning on doing this, but I added it to the extended cut anyway. You can see all the certificates that are in the system.
Gift Certificates opens up this list. They're sorted by code, which is basically sorted by the date that they're sold. You can show all, show all the unredeemed ones. So, you can see these ones haven't been redeemed yet. You get a total down here, so you know how much face value is out that you still have to cover. Double click on one of these to open it up. Hit Add New to add a new one. When this form closes, it will refresh this list too. I added that too. That's all covered in the extended cut.
Why you're not a member yet, I don't know. You get all this cool stuff. Come on and join. You'll find the link down below. Click that blue Join button, and we'll see you next time. Hope you learned something.
How do you become a member? Click on the Join button below the video. After you click the Join button, you'll see a list of all the different membership levels that are available, each with its own special perks.
Silver members and up will get access to all of my extended cut TechHelp videos, one free beginner class each month, and more. Gold members get access to download all of the sample databases that I build in my TechHelp videos, plus my code vault, where I keep tons of different functions that I use. You'll also get a higher priority if you decide to submit any TechHelp questions to me, and you'll get one free expert class each month after you finish the beginner series.
Platinum members get all the previous perks, plus even higher priority for TechHelp questions, access to all of my full beginner courses for every subject, and one free developer class each month after you finish the expert classes. These are the full-length courses found on my website, not just for Access, too. I also teach Word, Excel, Visual Basic, and lots more.
You can now become a Diamond sponsor and have your name or company name listed on a sponsors page that will be shown in each video as long as you're a sponsor. You'll get a shoutout in the video and a link to your website or product in the text below the video and on my website. But don't worry, these free TechHelp videos are going to keep coming. As long as you keep watching them, I'll keep making more and they'll always be free.Intro In this video, I will show you how to build a Microsoft Access database for creating, printing, and tracking gift certificates. You'll learn how to set up the necessary tables and forms, use a custom code for certificates, add recipient and sender information, work with background images for professional printing, and create reports to generate the certificates. I'll also walk you through adding a button to print just one certificate at a time from your form, and give you tips for aligning fields and working with Access's design quirks.Quiz Q1. What is the main topic of the video?
A. Setting up data entry forms in Access
B. Creating, printing, and tracking gift certificates in Microsoft Access
C. Making mailing labels in Access
D. Generating invoices in Access
Q2. What is a suggested way to create a background for the gift certificate in Access?
A. Using only solid color fills
B. Drawing shapes manually in Access
C. Using a scanned or downloaded image as the background
D. Printing certificates without any background
Q3. Why should a custom certificate code be used instead of the AutoNumber field for the certificate code?
A. AutoNumbers are unreliable in Access
B. It makes the certificate look more professional
C. To prevent customers from inferring how many certificates have been issued
D. Custom codes are easier to enter by hand
Q4. What field type should be used for the "Purchased Amount" and "Face Value" fields in the certificate table?
A. Short Text
B. Number - Integer
C. Currency
D. Date/Time
Q5. How should the "Recipient Name" and "Sender Name" fields be handled according to the video?
A. Pull the names directly from the customer table always
B. Allow users to type any text they want, not just a first and last name
C. Make them drop-down lists of employees
D. Disable editing for these fields
Q6. What is the purpose of setting the "Locked" property to Yes for the certificate code field in the form?
A. To allow users to update the code easily
B. To prevent users from editing the system-generated certificate code
C. To make the field invisible on the form
D. To allow auto-filling from the customer name field
Q7. If you want to make a combo box to pick a customer for the gift certificate, what technique should you understand?
A. How to join two fields into one
B. How to use relational combo boxes
C. How to create multi-select list boxes
D. How to use filter by form
Q8. What should the default value for the "Date Purchased" field be set to?
A. =Date()
B. =Now()
C. =Today()
D. Leave blank
Q9. What is the formula discussed for generating a unique certificate code?
A. =AutoNumber+Random()
B. =Format(Now(),"yyyymmddhhnnss") & Format(Int(Rnd()*1000),"000")
C. =CertificateID & CustomerID
D. =Date() & Time()
Q10. Why is "Notes" typically included in the certificate table?
A. To store transaction IDs
B. For storing custom information or comments about the certificate
C. To keep track of the printer used
D. For recording email addresses
Q11. When setting up the report for printing certificates, how should margins be handled for most gift certificate paper?
A. Use wide margins to prevent overlap
B. Use the default margins
C. Set margins to narrow and ensure design fits within the printable area
D. Remove all margins completely
Q12. If you want to print only the currently viewed certificate from the form, what method does the video recommend?
A. Use the default print button in Access
B. Use the wizard to make a print button for all records
C. Use VBA and DoCmd.OpenReport with a filter for the current record
D. Export to Excel and print from there
Q13. What should you do if you want to use an existing paper certificate with pre-printed borders?
A. Print the entire certificate including the borders each time
B. Overlay fields in Access over a blank image, then delete the image before the final print
C. Only use plain paper for certificates
D. Only print certificates using Publisher
Q14. What does the "Cycle" property set to "Current Record" do for the form?
A. Prevents saving data on the form
B. Causes the cursor to go to the first field of the next record when tabbing
C. Keeps the cursor circulating only within the current record when tabbing
D. Allows users to tab out of the form
Q15. What is the importance of the "Me.Refresh" command in the print button VBA code?
A. It prints the form fields directly to the printer
B. It saves the current record to ensure up-to-date information is printed
C. It resets the form to blank
D. It refreshes the printer queue
Q16. What is one benefit of using a report in Microsoft Access to print gift certificates versus other programs?
A. Reports in Access cannot use images
B. Access reports automatically email certificates
C. You can print and track certificates in the same system
D. Access can only print text, not formatted documents
Q17. How can you ensure the certificate codes are unique and difficult to guess?
A. Use customer initials only
B. Combine the formatted date and time with a random three-digit number
C. Use sequential numbers only
D. Use only the customer's phone number
Q18. If you want to print multiple types of certificates with different borders, what does the video suggest?
A. Only one template can be used per database
B. Use multiple report layouts and select which one to print
C. Print one type and color the borders manually
D. Access cannot handle this requirement
Q19. What should you do to align fields and controls neatly in the form or report design?
A. Manually nudge them with the mouse only
B. Use the Size to Grid and Align to Grid options
C. Ignore alignment because it does not affect printing
D. Always center all fields
Q20. What was the purpose of using a "Certificate List" form in the video?
A. To display, filter, and select certificates in the system easily
B. To view reports only
C. To enter only one certificate at a time
D. To let customers view their certificates online
Answers: 1-B; 2-C; 3-C; 4-C; 5-B; 6-B; 7-B; 8-B; 9-B; 10-B; 11-C; 12-C; 13-B; 14-C; 15-B; 16-C; 17-B; 18-B; 19-B; 20-A
DISCLAIMER: Quiz questions are AI generated. If you find any that are wrong, don't make sense, or aren't related to the video topic at hand, then please post a comment and let me know. Thanks.Summary Today's video from Access Learning Zone demonstrates how to use Microsoft Access to create, print, and track gift certificates. This project originated from a question by a viewer who had previously used Microsoft Publisher to print gift certificates but then had to enter the details manually into a database for tracking. The natural question was whether all of these steps could be accomplished within Access itself. The answer is yes, and today I'll show you how to set up a system for gift certificates using Access.
There are two methods you can use: either match your data fields to preprinted certificate stock, or use a digital image as your background so that Access prints the entire certificate, including the design and the data. Both options are straightforward once set up, and I will walk you through the steps.
Before getting started, I recommend you have some foundational Access skills. Make sure you've watched my introductory videos covering the basics of database templates, table relationships, and combo boxes. Be familiar with generating your own custom codes since we'll be making a custom certificate code for each certificate rather than using an AutoNumber. It would also be helpful to understand how to open reports to specific records, as well as the basics of Access invoicing if you want to use features like picking customers with combo boxes. All of these resources are available for free on my website, and you'll find links provided below.
To begin, get a background image for your certificate. If you're happy with your design from Microsoft Publisher, just take a screen capture and save it as an image. Alternatively, you can look online for blank certificate borders and save your chosen image to your computer. This background image will then serve as the basis for your report layout.
Next, design the table to store your gift certificate information. Start with a primary key as an AutoNumber field for internal use, but we'll also add a certificate code field for the unique, printable code. Include fields for customer, recipient and sender names, purchase and expiration dates, purchase amount, face value, and additional notes. The certificate code will be generated with a combination of the current date, time, and a random number to keep each one unique and not sequentially obvious.
After creating the table, build a form for data entry. Base it on your typical single record form, connect it to your certificate table, and bring in all necessary fields. Make sure to customize your form by arranging fields and labels neatly, aligning them to the grid, and adjusting tab order as needed for easy navigation. Replace the customer field with a combo box if you want to select from your customer list. Lock fields that shouldn't be editable, such as the AutoNumber and the certificate code.
It's good practice to ensure consistent data formatting. For dates, set the display format to "Short Date" so the date of purchase appears as a date only, though the actual time is stored in the table for any potential reporting needs.
When it comes to generating the certificate code, use Access's formatting and random number functions to automatically produce a code that combines the date, time, and a three-digit random value. This ensures each certificate is uniquely identifiable but does not allow others to infer how many you've issued.
Having set up the data entry form, integrate it into your system through a button on your main menu. You can use a simple line of VBA code to open the certificate form quickly from your menu. If you're new to VBA, my introductory tutorial will help you get started, and you'll see how even just a few lines can make your database behave just as you want.
With records entered, the next step is designing a printable report. Start with a blank report in landscape orientation and set your margins for the format that fits your chosen certificate image. Insert your background image, stretching it to fit the printable area. Bind the report to your certificate table, then add the data fields—certificate code, recipient and sender names, face value, expiration date, and notes—in appropriate positions over the background. Set these field backgrounds and outlines to transparent so the image shows through. Adjust fonts and alignments for a visually appealing printout.
Remember, you don't need to include all fields on the printed certificate—pick the ones you want the recipient to see. Also, make your notes field look handwritten by selecting a script-style font. Always print a test to verify everything lines up before finalizing.
After printing, you might notice that Access by default generates a report with all certificate records. To print just the certificate you're working on, add a Print button to your form. In the button's event procedure, refresh the current record to save changes, then open your report filtered to display only the current certificate. I recommend this approach to prevent accidental printing of your entire certificate list.
In today's Extended Cut for members, I cover more advanced features. We add the ability to create multiple certificate templates and choose the design you'd like to print for each certificate. I also explain how to create a list form that displays all existing certificates, sorted and filterable by status (such as unredeemed), so you can quickly track your outstanding certificates and their total value. The list form offers quick access to edit individual certificates or add a new one, with automatic refreshing upon closing the detail form.
For those who want to get even more out of their Access development, consider joining as a Silver, Gold, or Platinum member. Membership provides many benefits, including access to extended cut videos, downloadable example databases, and priority TechHelp support.
You can find a complete video tutorial with step-by-step instructions on everything discussed here on my website at the link below. Live long and prosper, my friends.Topic List Creating a gift certificate table in Access
Designing custom fields for gift certificates
Setting default values for date fields
Generating unique certificate codes with date and random numbers
Enforcing unique codes with indexed fields
Building a gift certificate data entry form
Configuring combo boxes to select customers
Customizing form layout and field formatting
Locking fields for user security
Aligning and resizing form controls
Formatting date and currency fields on forms
Managing tab order and cycle properties on forms
Adding navigation buttons with basic VBA
Opening forms using DoCmd.OpenForm in VBA
Designing a printable certificate report
Setting up landscape orientation and margins in reports
Inserting and resizing background images on reports
Binding reports to specific data tables
Overlaying database fields on certificate backgrounds
Formatting report controls to blend with background
Centering and styling text fields in reports
Printing individual certificates from form records
Using Me.Refresh and DoCmd.OpenReport to print current record
Filtering reports with criteria for single records
Testing certificate printouts in Print Preview modePrimary Topics Microsoft Access, database design, gift certificate management, form creation, report design, custom code generation, printing, data trackingSecondary Topics VBA basics, Access quirks, background images, tab order, field formatting, access control, membership features |


