Association 3
By Richard Rost

 3 years ago
Microsoft Access Association Database, Part 3
This is Part 3 of my Microsoft Access Association Database. In this video we will modify the TechHelp template that I use for most of my databases. We'll change the customer table over to a person table and see what other items in the database that effects that we have to then change. We'll build an update query to set some default values for existing records. We'll see how to do a global find and replace in VBA code. And we'll build the rest of the tables in the database which will be easier now that we have a great road map to follow from the first couple of lessons.
Pre-Requisites
Links
Members
What's Next
Keywords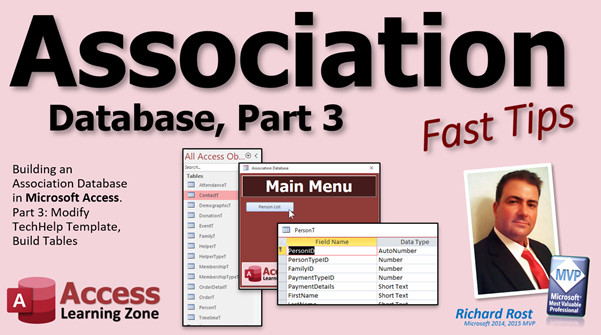
access 2016, access 2019, access 2021, access 365, microsoft access, ms access, ms access tutorial, #msaccess, #microsoftaccess, #help, #howto, #tutorial, #learn, #lesson, #training, #database, Change CustomerT to PersonT, Update Query, Global Find & Replace in VBA Code, Build Rest of Tables
 Subscribe to Association 3
Get notifications when this page is updated
Intro In this video, we continue building the Microsoft Access association database by modifying the TechHelp template, converting customer-related objects and fields to represent people instead, and making several adjustments across tables, forms, and queries. I will show you how to perform global replacements in VBA code, update queries to modify existing records, and walk through the process of building out essential tables including people, families, demographics, events, attendance, timeline, donations, memberships, and helper tables. This is part 3.Transcript Welcome to another Fast Tips video brought to you by accesslearningzone.com. I am your instructor, Richard Rost. We are continuing today with part three of our association database. We are going to be modifying the TechHelp template that I have been using for millions of my videos - a little bit of an over-exaggeration, but hundreds at least.
We are going to modify that template and make some changes to it. We are going to convert customers over to people because in our association database, we do not only have customers; we have members or parishioners or whatever you want to call them. People works fine. Then we will do some other minor tweaks to it, change a query here too, show you how to do a global replace in the VB code, and then build all the rest of our tables which we have already laid out in the previous couple of videos. Now that we have done that, it is much easier to put all the tables together. So that is going to be covered in today's video. Here we go.
We are going to begin today by starting our actual Access database, now that we are in lesson three. Database setup and planning are very important. I know I do not do it in a lot of my lessons because I have been doing this for a long time, and I do not always lay out every database. But for big projects, I certainly do.
Here is a copy of my TechHelp free template that I start all my databases with. I am going to make a copy of this, and we are going to call this Association Three. That is because this is lesson three. So, Gold members, when you download these databases, this is the virgin template before we started, and this will be the database after this lesson, which is lesson three. I do this in the full courses too. So, like Expert 1, Expert 2, Expert 3 - if we are building on the same database for all those lessons, you will get both copies. In most of my classes, I did not always do it at the beginning, but by the end, I always do.
Now, we are always going to refer back to our layout here - our road map, as I like to call it. So, the first thing we are going to start with is changing our customer table into our person table. It is really just a matter of nomenclature, but it makes a big difference. Especially if you are dealing with most associations that I can think of, they do not call people customers, so it is kind of a big deal.
Let us change some of the cosmetic stuff first. We have got the TechHelp free template - let us change that. Let us go to File > Options, and under Current Database, change the name to Association Database. It says you have to close and reopen, but you do not have to - it works. I do have a lesson where I show in VB code how to change that if you want to.
We have got our main menu, which is going to stay the main menu. So, let us come in here and I like to change the caption of the form. Change this also to Association Database. I am not going to keep up with the version number in here. I always forget. I am going to change this a little bit because it helps to not get confused with which database I am working with if I start them all with the same main menu. So let us make the Association Database dark red. I am going to make that a little bit darker red, slide you down about there. That looks good.
This is now going to be the person list, the person form. We are going to get rid of this button because we are going to actually force them to come in from the person list. I am going to get rid of both of those buttons. Now, if you open up the properties for this -
One of the things you have to keep in mind is the names of your objects. This is now going to be the person list button. I am going to get rid of that date; we do not need that. Let us get rid of that button too. We do not need that. I am going to keep the status box here because we might need it in the future for some stuff.
Normally, these things are just in here for experimenting and testing and for classes and showing things. We are going to make this more of a finished database.
Now, if we go into our VB code - by the way, I put up on my quick launch toolbar the View Code button; you can get to the same thing by going under Form Design and that is right there. I just like to have it up here because I use it constantly, and I cover that in one of my other lessons too.
But in here we have got some stuff we need to change. First of all, anywhere in the code you see TechHelp template, we have to change this to Association Database Copyright 2023. I will change all these later, but status we still need, and the rest of this stuff we do not need in here. We are going to get rid of all of this stuff because we are going to have to rebuild that button code.
One thing is, when you rename your objects out here, as you are going to see in just a minute, it does not change any of your VB code. So if you have stuff in here called customer, you still have to come in here and change it. I am just going to delete all of this stuff and put the code in that button again. Leave status though because we might still use status.
Save this. We will make buttons in here for our other things too. When the database opens up, it is going to open up to this main menu here.
Now, the first thing we are going to change is the customer table. We are going to rename this to PersonT. Open it up in Design View and decide what we are going to keep and what we are going to do.
Sometimes for these things, I like to maximize my table design - query design sometimes; even though I do not use the tab layout, I like the overlapping windows when I am designing. Sometimes it is easier to see these things maximized.
CustomerID is not going to change; personID, we can still keep what is in here. First name, last name, email address, city, state, zip, country, phone, notes - all fine. Family size and everything else from this point on we can delete.
So what do we have that is different? I think we are going to have to add familyID - let me be bold about what we need to add here. FamilyID, personTypeID, dateCreated, isActive - I just deleted it and all that stuff down here. I am going to move this over to the side.
We have personTypeID (a number, type Long Integer; it is a foreign key), familyID (again a number), dateCreated (that is going to be a Date/Time; put a default value of =Date() - if you care about date and time, you can use Now(), but I do not really care for time for adding customers).
We had a bunch of "is" stuff. We had isActive, which I had before but deleted - that is a Yes/No value, and the default for that should probably be Yes because when you add a new customer or person to your database - I am going to, you are going to hear me call them customers a million times because in all my videos I do customers, so if I say customer you know what I mean.
IsRegularAttendee - that is something you might not know up front. I am going to leave that at No, and that is just going to be for ease of later on when we add people to events and stuff. IsOnEmailList - we are going to make that default Yes. I think by default if you have an email for someone you might as well mail to them. IsOnMailingList - that is up to you. Do you want to make sure they get the mailing? That is up to you. I will leave it No for now. IsInDirectory - I am going to put people in my directory unless they tell me specifically not to.
What else do we have? Payment info. Let us do what we talked about with the donation table: paymentTypeID (that will be a link to a type - e.g., check, cash, whatever) and then paymentDetails. I am not going to get super specific on this; I am just going to leave that a text field so you can either put in the check number or, for donations for example, or you could put in their credit card details if you want. Obviously, if you want to do credit card number, expiration date, that is up to you. In this database, I am not going to get super specific on that. I do have separate lessons available for accepting payments and all the fields you have to track for that: credit card numbers and such - I have a whole separate video on tracking credit card numbers and checking expiration dates and verifying it with a checksum and all that, so that is a whole separate lesson.
Now, one thing I like to do - and this is personal preference - I like to keep all of the ID fields up top; anything that is an ID I like to keep up at the top. So I am going to move that up. That is going to separate paymentTypeID and paymentDetails, so I will bring paymentDetails up with it. Just to keep all the IDs together. It is just something I always do. It is my thing, I guess.
Let us save the table, close it down, open it back up again, take a peek, and make sure that everything looks good. We will fill these IDs in in the future with helper table data. Let us see if it looks okay.
Now remember, whether we set these default values to Yes or No, that does not affect existing records. That is good to know. So, for example, if you want to take isOnEmailList and set everybody to Yes - if you have only got a couple of people in here you can just go and click by hand. In fact, I have got 29 of them in here, so I would just sit here and go click down, click down like that. But let me show you the right way to do it: just make a really quick update query.
Let us say isOnEmailList and isInDirectory - we want both of those to be set to True for all of the existing records. That is a simple update query. If you have never done an update query before, watch this video.
Make sure you get the table closed. Go to Create > Query Design, bring in the PersonT table. Bring in the fields you want to change: we want to change isOnEmailList and isInDirectory, both of those. Go to Query Design, set it to Update. In the "Update To" row, just put Yes or True. Run it. Now, I have my warnings turned off (I cover that in my blank database setup), but close this. You do not have to save changes since we do not want to keep that around. It is a one time thing only. Now, if I open up my PersonT you can see those are all set to True now.
Now if we take a look at the contact table: the contact table still lists a customerID in here, so we are going to edit this in Design View. Change this to personID.
We will let them modify the form too. The form - here is the interesting thing about the form: if you look at the contact form, you will see it says personID there (this is the hidden customerID). It says as personID, if you open it up. The control source changed to personID, but the name of the control did not change. That is interesting: if you change a field name, Access updates the queries and forms bound to that field, but it does not change the name of the control. Most importantly, it does not change any VBA associated with it.
So, come in here (double-click on it), and put this to personID as the name of the control as well. If you have any VBA in this form, make sure you change that around. I do not think I do, let me check. There is nothing in here, just make sure you change that.
Actually, while we are at it, let me show you how to do that. That is the whole purpose of this database, for me to show you that stuff as it comes up. So, I am going to find every instance of this in my code. Control+H brings up Find and Replace. I want to change "TechHelp free template copyright 2022" to "Association Database copyright 2023." Select "Current Project" - that will get all of the code everywhere in the database (all the modules, all the form modules). I like to do them one at a time (you can "Replace All"; it's probably safe), but I will do one at a time. Replace, and you will see it pops it up here in the upper left-hand corner. Then replace each one. That is how you bulk-replace all your code.
I normally do not keep the Project Explorer on, but I think for this project, you can see all the different stuff we have.
So that is that. The contact form is good. Save changes because all of these form modules change, so yes.
The contactT is good, that is fine. The order table - we are going to use this for our membership dues and such. Again, same scenario: we have to change customerID to personID. Save that, and we have to modify our form.
I have to change the label, and the combo box is now going to be personCombo. Let us see what the data looks like: "Select..." - this is coming from CustomerLFQ, that is our query. Let us go change that. Close this, close this, save changes here. This CustomerLFQ is the query that gives us the last name, first name, like that, so we put those inside our combo box. Go to Design View. This all looks fine, but we just have to rename the query. Right-click, rename - this will now be PersonLFQ. Now we can put that in the order form, Design View. Open this up, and it should be good. This is going to be changing because this is looking for Forms!CustomerF!CustomerID, but we will get to that in a little bit. I am going to need that. You are probably not going to use the single customer form; I am going to use the other one at some point.
I am just going to get rid of this VersionHistory table. I put it in there so I can track differences in the TechHelp template. We do not need it for this database. This is fine for now, and I think we are good with the customer stuff.
The customer form, this one - we are not going to use this one. Let us delete this one altogether. We are going to use this one here - let us rename this one, this will be PersonF. This is the one that has the subform; we are going to use this subform to swap out for whatever else we are doing.
Right-click, Design View. First up is the caption. Let us call this People. I know database-wise it is person, but that does not really look right for the user, so this is the people - people in the table, who are the people in your database.
We are going to come back later to work with this in more detail. For now, I just wanted to change that so you can see what we are doing. Of course, we will change the personID idea. I want to focus on the tables first, get all the tables right first, then we will work on the forms.
So, we have the person table all set, contact table and order table are pretty good. Let us add the family table now. Create > Table Design. This is going to be the familyID, auto number, the description of the family, the headPersonID (again, I like to keep those together), notes (long text), and dateCreated. That should be good enough for the family table. Now we can add families and put people in families.
Let us add the demographic table. DemographicID - we have a whole bunch of other IDs that go in here: personID, dateOfBirth (DOB, that is a Date/Time field), genderID, maritalStatusID, occupation, educationLevel, and ethnicityID. Save that as DemographicT.
Yes, I just turned my system beep down because sometimes it gets jacked back up to 100 without me even doing it.
Next up is our event table: eventID (auto number), eventTypeID (number), description of the event, startDate (I usually put a default start and end date, but I prefer putting that in the form as I am working). We added a locationID, another ID that can go up top. That is all for event table.
We have got our attendance table: create table design, attendanceID, personID, eventID (remember, this is a many-to-many relationship - junction table), attendanceStatusID (that is going to be a helper value, e.g., on-time, late, etc.), maxAttendees (that will be a number, you can set a default value, zero means there is no max), notes, dateCreated.
What was I going to do before this? We did the event table - I am going to copy and paste those into there: notes and dateCreated in every table (attendance table, event table, demographic table). I always forget - you want notes and dateCreated in pretty much any table; it is nice to know when something was created.
Next up is timeline: timelineID, personID, timelineTypeID, startDate, endDate, notes, dateCreated. Save as TimelineT. See how much faster this goes when you have it all planned out ahead of time? I have got my plot plan here, so I am just following this. That is why it is a good idea to put time into this. Save it, close it.
Next, donations: donationID, personID, amount (currency), fundID, paymentTypeID, paymentDetails, notes, dateCreated. FunID goes up top. Save as DonationT.
Membership tables, which is basically how groups are managed: MembershipID, personID, membershipTypeID, startDate, endDate, notes, dateCreated. Save as MembershipT.
Actually, looking at my notes - for MembershipT, we have startDate and dueDate. In other words, the member since date (they have been a member since 1995, for example) and their dues are paid until this date (this is how you know when to bill them again). If they are monthly, that is what the membership type is going to tell you. Save it.
This is the membership type table: description, dues (currency - how much it is to be in that group, e.g., silver member, gold member, platinum member), frequencyID (will be from the helper table). Save as MembershipTypeT.
Did I put those in here? Yes, I did.
Now, what else do we have? That is it. So far, these are already built. Just the helper type tables left.
Now it gets tricky. Create > Table Design. The first thing we need is our HelperTypeT - that tells us what kind of helper tables we have. So, HelperTypeT: auto number, description, and that is it (e.g., gender, marital status, occupation, etc.). Save it as HelperTypeT. Watch the video on helper types if you have not yet - we will get into this stuff very soon, maybe next lesson or level five.
That is all you need in this one. Then, create > table design. We need a HelperID (auto number), HelperTypeID (number, linking back to the other one), and the HelperValue (text). You can use this to store numeric values or currency values, but you have to remember to convert them on your own. Normally, this table is just used for lists of lists, as we talked about before, but you can use it to store other values if you want.
Now, in my ABCD, I actually make something in here called a SystemValue. If you set this as a system value, that means it is in your code somewhere and cannot be changed or deleted. That involves a lot more programming - if you want to learn how, that is in my ABCD, parts one and two (I will put a link to that down below). For this database, we are going to keep it simple. You can modify the list, just make sure you do not delete or break something. For example, if you delete "Mail," then everyone who is marked "Mail" will have a problem. Be careful with that.
Save this as my HelperT - that is the list of lists table.
We have got all our tables built. I am satisfied with that. We got that and some other tweaks to our database done in about 20 minutes. That is not that bad. Again, that is why I stress this: it is important to lay your database out first before you start coding everything.
Normally, what I do is I come in and grade these out as I finish them; that way I know when I come back. I want to keep those just the same colors as this for the next class, so when we start building forms, you can see. I knew I was going to finish all these in one video, so I was not worried about that.
There you go - that is part three. That is your Fast Tips video for today. Part three is now finished, and we will see you soon for part four, where we will start working on the forms.
Hope you learned something. I will see you next time.Quiz Q1. What is the primary change being made to the TechHelp template in this video?
A. Converting customers to people and modifying related objects and tables
B. Switching from Access to Excel for database management
C. Adding new reports to track expenses
D. Deleting all existing tables to create new ones from scratch
Q2. Why is the name change from "customer" to "person" significant in the context of the association database?
A. Associations typically refer to participants as people, not customers
B. "Person" is a more professional term in all databases
C. It allows the database to connect directly to social media
D. "Customer" tables are deprecated in Access
Q3. When changing object names in Access (such as from customer to person), what does NOT automatically update?
A. Table and field names in forms and queries
B. Names of controls on forms
C. VBA code references to renamed objects
D. Both B and C
Q4. What is an efficient way to update values for all existing records in a table after changing a default value?
A. Manually editing each record one by one
B. Compacting and repairing the database
C. Using an update query to modify the relevant fields
D. Deleting and recreating the entire table
Q5. What is the main purpose of the PersonT table after modification?
A. To store all payment transactions
B. To keep detailed information about people/members in the association
C. To manage all event types
D. To log security issues
Q6. What kind of relationship does the Attendance table represent in the database design?
A. One-to-one between Person and Event
B. Many-to-many between Person and Event
C. One-to-many between Person and Demographic
D. Many-to-one between Person and Helper types
Q7. The video demonstrates a method for making global text replacements in VBA code using what feature?
A. Query Wizard
B. Control+H (Find and Replace) in the VBA editor
C. Macro Recorder
D. Table Analyzer
Q8. Why does the instructor move all "ID" fields to the top of table designs?
A. Personal preference for organization and consistency
B. Requirement by Microsoft Access
C. To improve query performance
D. To enable faster exports to Excel
Q9. What is the purpose of the HelperT and HelperTypeT tables?
A. To track donations made by members
B. To manage dynamic lookup lists and grouped values like gender or marital status
C. To store credit card information
D. To hold the history of changes to the main menu
Q10. What advice is given regarding planning and designing tables before coding or working on forms?
A. It is unnecessary for small projects
B. It can be skipped if you have previous experience
C. It is crucial for larger projects and saves time later
D. Only reports need to be planned in advance
Q11. What field is suggested to be added to most tables for tracking when entries were made?
A. versionNumber
B. comments
C. dateCreated
D. activeStatus
Q12. What does the instructor say about changing the "default value" of a field with existing records in the table?
A. It updates all existing records automatically
B. It deletes all existing records
C. It only affects new records going forward
D. It locks the field from editing
Answers: 1-A; 2-A; 3-D; 4-C; 5-B; 6-B; 7-B; 8-A; 9-B; 10-C; 11-C; 12-C
DISCLAIMER: Quiz questions are AI generated. If you find any that are wrong, don't make sense, or aren't related to the video topic at hand, then please post a comment and let me know. Thanks.Summary Today's video from Access Learning Zone covers part three of our association database project. In this lesson, I focus on modifying the TechHelp template, which is the starting point for many of my video tutorials. While it might sound like I've used this template in millions of videos, it's really just hundreds, but the point is that it's a reliable foundation to begin with.
The main changes in this session involve converting the existing customer table to a more generic people table, since our database needs to handle more than just customers – we might have members, parishioners, or whatever term fits your organization. 'People' is a more inclusive term that works well. I will also demonstrate some useful techniques such as performing a global search and replace in the VBA code, making tweaks to queries, and then building the remaining tables we planned in earlier videos. With the groundwork already completed, assembling the tables goes much faster.
When planning any database, setup is critical. While I don't always map out every project in my shorter lessons due to experience, for larger projects like this, it's important to do the prep work to avoid problems later on.
I begin by making a copy of my free TechHelp template and naming it Association Three to correspond with lesson three. For Gold members, when you download these databases, you'll have access to both the untouched template as well as the database completed after each lesson, so you can follow along or start fresh if needed. I follow the same approach in my full courses.
Referring back to our project outline, the first step is changing the customer table to a person table. This is mostly about naming conventions, but it's important because the terminology should fit your organization's needs. Most associations don't refer to their members as customers.
Next, I address some of the cosmetic changes. I rename the database under File and Options from TechHelp free template to Association Database. This helps avoid confusion about which database is currently open, especially when working on several projects. I also like to set a distinctive color scheme on the main menu for clarity.
The main menu remains, but I customize the form's caption to reflect 'Association Database'. I also remove or edit buttons as necessary to streamline the interface, such as making sure users access records through the updated person list. I keep the status box for potential future use.
Renaming objects is not just about appearances; it's also essential to update the underlying code. Changing object names like customer to person in tables and forms doesn't automatically update your VBA code, so this has to be done manually. I remove unnecessary legacy code and keep anything that may still be useful.
Moving to table design, I open the customer table, rename it PersonT, and adjust the fields as needed. Fields like first name, last name, and contact details stay, but irrelevant fields are deleted. I add new fields such as familyID, personTypeID, dateCreated, and various flags like isActive, isRegularAttendee, isOnEmailList, isOnMailingList, and isInDirectory. For payment details, I add paymentTypeID and keep paymentDetails as a general text field. I prefer grouping all ID fields at the top of the table for organization and clarity.
I update existing records using an update query, particularly for flags like isOnEmailList and isInDirectory, to ensure consistent default values across all entries. It's good to remember that changing a field's default value does not affect existing records, only new ones.
For the contact table, customerID is changed to personID in both the table and related forms. It's important to note that Access updates the record source fields in forms and queries when you rename a field but does not update control names or VBA code, so these have to be checked and changed manually.
I demonstrate how to perform a bulk search and replace in the VBA editor to update copyrights or other recurring text strings throughout all modules in the project.
The order table gets similar attention: the customerID field becomes personID and the associated forms and combo boxes are updated accordingly. I also rename the query behind the combo box to match the new terminology. Any obsolete tables or forms, like VersionHistory or the old customer form, are removed or renamed as necessary, keeping only what we need for this project.
Next, I construct the remaining tables: family, demographic, event, attendance, timeline, donation, membership, and membership type. Each table has its unique fields, but certain principles remain consistent, such as including notes and a dateCreated field in every table to maintain a clear record of changes and creation dates. When creating tables that store types or categories (like demographic categories or event types), I use helper tables to simplify management and ensure consistent references throughout the database.
The HelperTypeT and HelperT tables are set up to store different types of lists, like gender or marital status, providing a flexible, scalable way to handle lookup values. Advanced concepts like protected system values are mentioned as something you can explore in my ABCD class if you want more robust safeguards, but for this project we keep it straightforward.
Careful database planning has made assembling all these tables a smooth process. Once all tables are created, I make sure everything is saved and organized, ready for future steps, such as building forms.
This concludes part three of the series. In the next lesson, I will focus on creating and refining forms for this association database. For a more detailed, step-by-step walkthrough of everything discussed here, you can find the complete video tutorial on my website at the link below.
Live long and prosper, my friends.Topic List Modifying the TechHelp template for an association database
Renaming the customer table to PersonT
Adjusting form titles and captions for the new database
Removing unnecessary buttons and controls from the main menu
Editing form object names to reflect new nomenclature
Making cosmetic changes to form design and colors
Performing global find and replace in VBA code
Updating field names in tables and related forms
Setting default values for new Yes/No fields in PersonT
Adding new fields to PersonT for association needs
Arranging and organizing ID fields in table design
Running an update query to change values in existing records
Renaming foreign key fields in related tables (e.g., ContactT, OrderT)
Renaming and modifying queries used in form combo boxes
Deleting obsolete forms and tables from the template
Updating form control names after changing field names
Building the FamilyT table for grouping people
Creating the DemographicT table with relevant fields
Building the EventT table with supporting fields
Designing the AttendanceT junction table
Creating the TimelineT table for person histories
Building the DonationT table for tracking contributions
Creating the MembershipT table with dates and type info
Building the MembershipTypeT table including dues and frequency
Establishing HelperTypeT for helper table categories
Designing HelperT as a flexible list of list valuesPrimary Topics Access database design, table modification, renaming fields, converting templates, global code replacement, association database structure, primary key adjustments, helper tables creation
Secondary Topics default values, update queries, form adjustments, template management
|


