Association 4
By Richard Rost

 3 years ago
Microsoft Access Association Database, Part 4
This is Part 4 of my Microsoft Access Association Database. We will convert the old customer form over to the new person form and add whatever fields we have to. We'll learn how to make Control Tip Text and use the Locked property. We will add a family combo box to select which family this person belongs to. We will create a family form with a combo box to select the head person of that family. We'll modify the row source of the combo box to only show people in that family. This will involve changing the SQL statement and using an OnCurrent event in the form.
Pre-Requisites
Links
Members
What's Next
Keywords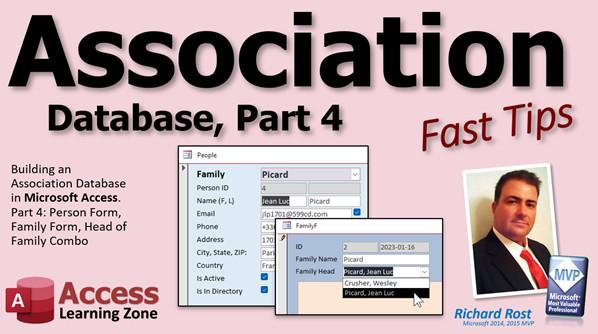
access 2016, access 2019, access 2021, access 365, microsoft access, ms access, ms access tutorial, #msaccess, #microsoftaccess, #help, #howto, #tutorial, #learn, #lesson, #training, #database, Person Form, Control Tip Text, Locked, Family Combo, Family Form, Head of Family Combo, OnCurrent Event, Change SQL RowSource
 Subscribe to Association 4
Get notifications when this page is updated
Intro In this video, we continue building the Association Database in Microsoft Access by updating the person form with new fields and adding a combo box to assign people to families. We then create the family form, set up a combo box to choose the family head, and use SQL and VBA to filter the list so only members of the selected family appear. You'll see practical troubleshooting, coding techniques, and step-by-step design changes throughout the process. This is part 4.Transcript Welcome to another Fast Tips video brought to you by AccessLearningZone.com. I am your instructor, Richard Rost. This is part four of our Association Database.
We are going to work on the people/person form - people, persons, whatever you want to call them. We will set up the additional fields that we need. We will make the family combo box where you can pick what family they belong to, optionally. Then we will start making the family form. The family form will have a combo box where you can pick who the head of the family is - the head of household, as you might want to call it. Then we will make the combo box only show people who are in that family, which is tricky. It is going to involve a little bit of SQL, a little bit of VBA, and some event programming. It is going to be really, really, really, super cool. So stick around.
All right, let's get started with part four. I am going to take part three's database, copy it, and change it to part four. So Gold Members, when you download this, you will have three, which is the start of today's video, and then four, which is the end of today's video. I will open this one up, and we will work with this. This way you do not have to go back to the previous class.
People used to complain about that because I would just save one copy. It would be the database that was at the end of that lesson, but you would have to go back to the previous lesson to get the end of that one. If you did not follow the classes in order, then you would not have that one. So if you bought just, for example, Access Expert 15, but you did not buy 14, then you would not have that database. Of course, I always tell people not to skip around, but people do. That is all right. I would send them a copy of the database. Not a problem.
So the first form we are going to work on is the customer list. I did not rename it in the last video—I should have. I was primarily focused on the forms. Let's rename this as the person list. Open that up. Here it is. In design view, the first thing we have to change, obviously, is that caption to "person list," or we can call it "people"—that is fine. Save it.
Now, we have to add it to the button, since we renamed it, so we have to redo the button. Right-click, Build Event, first little bit of code for you. Right-click, Build Event. Now bring up our code builder. DoCmd.OpenForm "PersonListF". That is it because we are showing all the records. Save it. Close it. Close that.
Every time I put VB code into a form, I like to close it down and restart it, then click. And there it is. We can leave that purple and that is fine.
Now, this is showing me that somehow I must have missed some fields because Customer Since and Credit Limit should not still be in there. What did I do here? Let's see. Design View, first table, Family. Okay, I see some of those fields did not delete, so "Family Size"—did I delete? I did not delete them. I forget which—"Family Size" delete, "Customer Since" delete, all right, "Credit Limit" delete. I thought we deleted all these in the first lessons—last lesson, at least. All right, I think we are good. Close that. Save it.
Now, when you open this up, that is what I was looking for. We should see this: #Name? errors because those fields no longer exist. All right, right-click, Design View. Now, PersonID was CustomerID, so we have to change this. That also means we have to change our code. Remember, from either the blank or the Contact Database videos, that there is some code in here. So, let's take a look at the code.
All right, we have "OpenCustomer" called in two different places. All right, right here, "OpenCustomer." Now, I am going to get rid of all this because we are not going to call them customers. Honestly, I do not think we need this button. I am going to get rid of that button because I just put that on there first because it is easy to show newbies how to do that. But we are just going to rely on the double-click event for this guy. Remember, I make them blue for double-click events.
Okay, so the On Double Click event for that is going to be DoCmd.OpenForm "PersonF", , , "PersonID=" & PersonID. That is all we need. If you need a refresher on how to do that, watch this video: "Open a Form to a Specific Record."
All right, close it up. Close that. Close that. Save changes if you have to. Then, if I double-click, there you go. All right, perfect. Let's work on this guy.
All right, so right-click, Design View. Right off the bat, I am going to get rid of these fields because we do not need them. I am going to change this to PersonID. Do not forget to change you from CustomerID over to PersonID, right? Copy, paste there.
All right, I am going to move First Name and Last Name together. So we are going to go Name F, L, like that. We are going to go First Name and Last Name. Delete this and slide it up here. Okay, looks good. Maybe put a little bit of a gap there; a little tiny bit.
Okay, Email is next. That is fine. Phone number is next. That is fine. Same thing with Address. I have got the City, State, Zip, which I already did. We will go back here: City, State, Zip. Slide you up like this and then cut. Okay. Country is up to you. If you are a local organization, obviously you might not need that if you have all members in the same country. But even if you are, let us say, in Buffalo, New York, you might have some people from right across the river there up in Ontario. So, you never know.
Now, we have got a bunch of "Is" things. I am going to move "IsActive" down here. All right, there is "IsActive." Then we have got a bunch of other stuff. You have got "IsRegularAttendee," "IsOnMailingList," and "IsOnEmailList." I am going to flip this around. Let's put "Active" over here—right, "IsActive." And then we will put that checkbox there. Copy and paste. We will go "IsRegularAttendee." Change this guy: "IsRegularAttendee." Don't forget to copy and paste that up top there.
All right, "IsActive," "IsRegularAttendee." Now, for "IsOnEmailList" and "IsOnMailingList," I am going to put little checkboxes right next to the email address and their street address. Like this. I am going to copy this without the label. Whoops. Undo. Copy, paste. Sometimes you have to get that little four-way pointer. Delete the label. Slide this guy up here next to email. Like that. Okay, we are going to change this guy. This is "IsOnEmailList," copy, paste.
How is the uninitiated user going to know what that is about? For that, we can use Control Tip Text. What is going to happen is, on "Email List"—obviously veteran users will get to know what that means. If you want to take them off the email list, check that box. Same thing; we will copy and paste it. Copy and paste it. Slide it down here, and we will make this one "IsOnMailingList." "IsOnMailingList," copy, paste.
Then we have got our "IsInDirectory," which we could stick... Let's just put it over... Actually, let's do two rows—two columns. This looks okay. "IsActive," "IsRegularAttendee." Probably could put it down here. "IsInDirectory." "IsInDirectory." This is just a matter of personal preference, however you want to leave it. "IsInDirectory," and you could put Control Tip Text over these two if you want to, but I do that usually with things that do not have labels just to save some space.
All right, we have got the "DateCreated." I am going to stick the date created... I do not like people to be able to modify that, so I am going to put that right here. Copy, paste this. Slide it up here. Delete the label that comes with it. This can be the date created. Copy, paste. Format is Short Date. Data: Locked is Yes. That means you do not want them changing that. Remember, you cannot change, but this guy they could change, but we do not want them changing.
All right, looking at the roadmap, the remaining fields we have here: PersonTypeID is going to be from the helper table. FamilyID is going to be from the family table. PaymentTypeID is from the helper table as well. And we have got PaymentDetails.
Okay, let's tackle the family next. Now, it is easier to do this stuff if you have got some data in here first. I do not mean Lieutenant Commander. So, family name is what you could put in here: "Riker Family," "Picard Family," "Firefly Family," and maybe "Voyager Family." You could do it however you want to group people together. If you are doing companies, you could have these as companies—ABC Corporation. Family does not have to be an actual family; it is whatever you want to group together. Maybe they all have the same mailing address or however you want to do it.
All right, so we have got some data in our Family table. We can now make a combo box to pick our family. I am going to slide all of this stuff down and put Family after... Actually, let's put Family before... No, let's put it down under their name. Or what do you think? Let's put it at the very top. Put Family up top here.
So, go to Form Design, get a combo box, drop it right there. We are going to get our value from a table or query, the Family table. What do we want in the combo box? FamilyID and Description. Next. We want to sort by Description. Next. That looks fine. Next. Store that value in the FamilyID field. Next. Put label as you want—Family. Or you can call it Group if you want.
Okay, so there is the FamilyID. We are going to make this bigger, like that. Maybe make the font just a hair larger. Let us see. What does it look like? 14 point? Yeah, 14. Yeah, get that black so you can actually see it. Maybe add a splash of color. How is that? Bold it, maybe. Tell me what you think.
All right, now we can save this. If we open up a family... Let's do the inventory. Oh, getting custom right even somewhere. Okay, "Enter Parameter Value." I am glad this came up. That means somewhere is looking for a CustomerID. We have to figure out who. This guy is getting his data from the Person table. Okay. Someone in here is looking for CustomerID.
I am going to try taking a look at the subform. There it is. Somewhere, someone in there is looking for CustomerID. So, the subform—I knew it was not this because we just built it; nobody else has any data associated with it outside of that table. The subform control was the only thing in there that could possibly be looking for it. So it is trying to link CustomerID to PersonID. So we just change that, and that should fix that.
Well, that came up—"Enter Parameter Value" is one of those things I get asked about all the time. I made a whole separate video about it. There it is. Go watch this if you get this a lot. Usually, it is something someone spelled incorrectly, or got something spelled wrong.
By the way, I want to also bring up that a lot of my videos, when I am doing a TechHelp or one of my class videos especially, I run through it once ahead of time and just quickly go through it and make sure everything is good—make sure I know what I am doing, first of all, but make sure that I know nothing weird is going to pop up. I have not prescripted or prerecorded or run through any of this stuff. So these little mistakes that I am running into, you are seeing them as I am seeing them. If I goof, I am leaving it in here, and I do that on purpose. A lot of my students say they like that because if I run into a problem like that, chances are you will too at some point. I want you to see them as I see them. So, I have not prerecorded or run through any of this stuff yet. This is just all straight off the top of my head. As I am doing it, you are getting it.
All right, so let's save this. Now, close it. Open it back up again. All right, perfect. Now I want to put "Diana" in the Riker family. Close that. Let's obviously put "William Riker" in the Riker family. Okay, beautiful. Let's put "Picard" in the Picard family. We will put... Oh, also, I will put "Crusher" in the Picard family—why not? "Mom's up Picard," in a future timeline. Janeway, we have got the Voyager family. Let's see here. Who else have we got? Oh, here is the Firefly family. Okay, I will put a couple of these.
All right, it is good to do—it's easier to build a database if you have got sample data. Okay, good enough. Probably we do a "Rush" family.
Oh, and I just noticed, we still have not fixed this yet. So, for now, let's just get rid of this stuff here for now. We are going to put some more stuff in here later. We are going to put some filtering and some sorting and some cool stuff in here too. But for now, we will just keep this simple. All right, it is my person list.
Obviously, you know all the basics. If you want to sort, you can click on here. You can sort it on a field. Sort it on this field, or you can right-click on a field and sort it here. Okay, you can sort it by ID. We are going to make some easier things in the future to do that stuff, and I have all kinds of other lessons on that too.
All right, so back in. I am going to be in a Riker family. Okay, perfect.
Now, we have got to make the family form. The family form is going to have a subform with all the people in that family. So for that, we can start off by just modifying our simple single form here. I am going to copy, paste, and this will be the FamilyF. The FamilyF is going to be pretty simple and straightforward. We are going to change this so the record source is the Family table.
All right, this will become the FamilyID. Do not forget to change the name. This will be the description of the family. Oops. What other fields do we have here? Obviously, Notes and DateCreated. So, for that, we can borrow those.
Come in here, Design View; DateCreated and Notes. I am going to click on DateCreated, control-click on Notes, and let's grab a label too. Copy that label. Copy. Close all that. Paste it in here. There we go. Notes probably came in with it down here. Yep, that's okay. We will put DateCreated underneath. I actually do not need the ID to do that. That, and do that. We did it with the other form, so we do not really need that label. Sorry.
All right, FamilyID is fine. Here's the Description. Here we will call it Family Name. Let's slide this over a touch.
Now, what other fields do we have to add here? We have Description, Notes, DateCreated, and HeadPersonID. Now, the HeadPersonID is where you pick the person in charge of the family, like they get the mailings, they get whatever information about the family, etc. They are going to show up first on lists, that kind of stuff. That is going to be a combo box of people in this family.
This I find easier to do with a query. We already have a PersonLFQ here. We can add FamilyID to this without affecting any other records. You can always add fields when... not always, but you can usually add fields to an existing query without affecting them too much. There, we can put the numbers in there for that FamilyID.
Now we can make a combo box of family members that are in this FamilyID. So, Form Design, another combo box. Grab it here. This time we are going to get a query—our PersonLFQ. PersonID, we need LF, and we are going to bring in the FamilyID too. Actually, let me think. No, we do not really need the FamilyID in there. Yeah, get rid of that.
Next, sort by LF. Next. That is what it is going to look like. We have to hide this one ourselves because it is not based on a table; it is based on a query. You do not get the little checkbox here to hide the bound columns. So we have to go like this and go, shoo, and make that small.
Next. What is the bound field? PersonID. Next. We are going to save that value in our HeadPersonID. Next. What label do you want? Family Head. What do we want to call it? I do not know.
Then we will just resize this and do that. By the way, this guy is called a relational combo box. It is relational because it brings in data from a different table to fill a value in this form. If you want some practice with that, go watch this video.
While I am at it, I just want to take a brief pause for our sponsor, which is me. If you are enjoying working like this and building a database along with me and learning fun stuff as we go along, this is how my full courses are. It is one of the reasons why I wanted to put together this series of free videos—so you can see what my actual courses are like. I start from the beginning and I work through every problem. We take a little bit here, a little bit there. We do a little of this, a little of that. I do stuff in order, the way you should learn them, like we are doing in this series. We are doing the tables, and then we work into the forms, and then the form controls, queries, reports, a little of this, a little there.
I do not teach you everything that you need to know about tables first. A lot of books are written that way—I do not do that. I start from the basic stuff, the beginner stuff. We have expert lessons, some advanced stuff, and all the way up to developer lessons. I have 40 some levels of developer lessons, teaching VBA programming and all that. I teach you stuff the way you should learn it in the right order. If you decide you want to come to my website and check it out, Level 1 is free—always. You can either purchase lessons outright or, if you want to join and become a member, I have several different memberships available. If you want to become a member where you get the extended cuts and stuff like that, I have the Silver, Gold, and Platinum memberships.
But I also have this thing up here called the Learning Connection, and the Learning Connection gives you a new lesson every week and you start in order: Beginner 1, 2, 3, 4, 5, and you get a 50% discount. So check that out if you are interested in my full classes.
That is all for the advertising. Back to class.
All right, so we are back to our HeadPersonID here. I am going to format paint over that, so it is black. Now, this guy right here is going to be a combo box of people. Close that, open it back up again. There is Riker. I want to pick the head of the Riker household, but I am seeing everybody. It would be nice to limit this list to just people in the Riker household that are already marked as "Family Name = Riker," right?
There are two ways you could do this. You could make another query and just have this based on the FamilyID so this would open up and you would only see FamilyID equals 1. That is the easy way to do it. But I am going to show you a slightly more advanced way that is a whole lot easier. Doing it this way, you do not get tons and tons of extra little queries in your database. We are just going to modify the SQL.
Click on this combo box. Turn off the field list. Bring up the properties for the combo box. Now it is called Combo4—I do not like that. We are going to call this HeadPersonCombo.
Now, where does it get its data from? This thing right here. It says:
Select [PersonLFQ].[PersonID], [PersonLFQ].[LF] from [PersonLFQ] order by [PersonLFQ].[LF]
Let me just hit Shift+F2 so you can zoom in and see that. It says:
Select PersonLFQ.PersonID, PersonLFQ.LF
From PersonLFQ
Order by PersonLFQ.LF
Now, I am going to clean this up just a little bit. Since we only have one table or query in here that we are getting our data from, we do not need the brackets. I am going to delete that. Since we do not have spaces in our field names, I can delete all these brackets. This is just something that makes this a bit more easily readable. Sometimes it is easier to read this stuff if you do not have all these, and Access does not care if you have line breaks in here. This makes it even more readable.
All right, so now this makes a lot more sense now, right? These fields from PersonLFQ, order by LF. This is called an SQL statement. If you are going to learn Access, learn SQL—trust me. I have got whole separate videos on this. You can start with this one—this is my free SQL with Access video.
You can see right here, another example:
Select CustomerID, FirstName, LastName
From CustomerT
Where LastName = 'Ross'
That is what we are going to add to what we have got going on here. So we are going to say "Select from this query." Right here, we are going to put a WHERE condition:
Where FamilyID = 1
Just put a 1 in there for now. Let's see what happens. Hit OK. We are going to save this. Close it. Let's open up the family form again.
Now, we are on FamilyID 1, family name: Riker. Drop it down, and there we go. Now I am only seeing the people that are in Family 1 for Riker because I changed the SQL in this box. It is only showing me the records where the FamilyID equals 1.
What happens if I move to Family 2? If I drop this box down, now I am still seeing just Family 1. So, we need to be able to change that SQL statement on the fly. Whenever this record loads up, we need to change that SQL statement.
How do we do that? We are going to do that with an event called the OnCurrent event. The OnCurrent event runs whenever a record—when you move from record to record, or whenever the first record is loaded with the form opens. In this OnCurrent event, we are going to say, "I need you to rewrite that SQL statement in that combo box so I get a list of people in this family."
Right-click, Design View. The first thing I am going to do is get that SQL statement. Come over here, Shift+F2. When you do that, Access does not keep those line breaks—that is just to make it easier to write while you are doing it. Let's take all this, cut it out, snip, hit OK. You are going to leave a blank resource here. That is fine because when this form loads up, in the OnCurrent event, we are going to set it right here.
How do we set that? Well, that is going to be... what was the name of that box? HeadPersonCombo.
Here we go. Ready? HeadPersonCombo.RowSource equals that stuff that we just copied to our clipboard:
Select PersonID, LF
From PersonLFQ
Where FamilyID = 1
Order by LF
Just like that. That is a valid statement. This should work just fine, but I do not want a number 1 there. I want whatever the current FamilyID is there, off of the form. That guy—which, while I am at it, I am going to left justify it because it has been bothering me that it is aligned right.
Okay, so that is the FamilyID field. Right here, we are going to say, close your quotes, and FamilyID, then open it back up again because we need that space there. Got to have that space after the FamilyID, otherwise it runs into this one.
See what I did there? So that is going to be replaced with whatever the current record is, whatever the current FamilyID is—2, 5, 10, whatever.
This is a little more advanced, which is why I am walking you through it step by step. Normally, I would not get to something like this until my advanced lessons.
All right, so we are going to save that. We are going to close this down. We are going to close that. Open up the family form.
All right, there are the Rikers. Move to the next record, the OnCurrent event runs, change the SQL in this box, and there is the Picard family. Look at that. Move to the next one, there is the Firefly family. What else have we got? Voyager family—see, just Catherine Janeway. Then ABC Corp does not have anybody.
Now, what happens if we go to a blank record like that? We get a syntax error. So, we are going to have to check to see if that is null before we do that code.
Come in here, and right here, we are going to say:
If IsNull(FamilyID) Then Exit Sub
If we do not have a FamilyID—if they go to a blank new record, you have to exit out of it because you do not want any error message.
There we go. You might want to clear that too, right? You could say here:
HeadPersonCombo.RowSource = ""
If it is null, give them nothing for the RowSource. Then, if they drop the box down, they will not see anything.
Go to a blank record, drop it down, and it is empty. That is a pretty cool trick.
I think that is all for today. In the next video, we are going to start off with making our list of people in the family over here so we can double-click and go to it, and then it will open up the person form from this form. So, we will double-click on the Picard family and it will bring you to Picard. We will be looking at the list there, and then we will go backwards, the other way, so you can double-click here in the family and it will open up that record. That is how you can link people together.
So, there you go. There is your part four. That was your fast tip for today. I hope you learned something. We will see you again soon.Quiz Q1. What is the purpose of creating a combo box for the "Family" field in the person form?
A. To allow selecting a family from an existing list for each person
B. To automatically generate new families for every person
C. To display all people in the Family table at once
D. To filter persons by age
Q2. When setting up the family combo box in the person form, what source should the combo box use to get its values?
A. Query from the Person table only
B. Family table containing FamilyID and Description
C. Linked Excel spreadsheet
D. The Contact form
Q3. In the redesign of the person form, how are fields like "IsOnEmailList" and "IsOnMailingList" visually represented?
A. As drop-down lists under the address field
B. As checkboxes next to the respective email and address fields
C. As text boxes for user entry
D. As command buttons
Q4. What is a "relational combo box" as described in the video?
A. A combo box that only lists numeric values
B. A combo box that provides choices from a related table or query
C. A combo box that can only show current form values
D. A combo box for entering unrelated data
Q5. When limiting the "Head of Household" combo box in the family form to people in the selected family, what is the most efficient way suggested?
A. Create a separate query for every family
B. Modify the SQL RowSource property dynamically using the OnCurrent event
C. Use multiple list boxes and macros
D. Manually update the combo box every time the family changes
Q6. What does the "OnCurrent" event do in Access forms?
A. Runs only when the form is first created
B. Triggers every time you move to a different record or the form loads a record
C. Runs when the database is closed
D. Is needed only for reports
Q7. What error might you encounter if you try to update the HeadPerson combo box when there is no FamilyID, and how is it best handled?
A. Database shutdown; handled by restarting Access
B. Syntax error; handled by checking for null FamilyID and exiting the subroutine if null
C. Calculation error; handled by updating the form properties
D. Data type mismatch; handled by re-indexing the database
Q8. Why is it important to lock the "DateCreated" field on data entry forms?
A. So users can freely update the creation date
B. To ensure the user can delete it if needed
C. To prevent users from modifying the original date the record was created
D. To allow the database to recalculate the date automatically
Q9. What is the benefit of building the database with sample data, as demonstrated?
A. It allows you to sell the database immediately
B. It makes the design process easier by allowing you to experiment and see how forms work
C. It prevents Access from crashing
D. It ensures only the administrator can view the forms
Q10. What key concepts are demonstrated in dynamically filtering combo box contents based on another field's value?
A. Only table design changes are required
B. Use of SQL, VBA event programming, and form property adjustment
C. Binding to queries exclusively with no code
D. Deleting and recreating tables each time
Q11. According to the instructor, what is the main advantage of seeing mistakes and fixes in real time during the video?
A. It makes the video longer for more content
B. Students never make those mistakes themselves
C. It gives a realistic view of troubleshooting in database development
D. It avoids the need to explain concepts in detail
Answers: 1-A; 2-B; 3-B; 4-B; 5-B; 6-B; 7-B; 8-C; 9-B; 10-B; 11-C
DISCLAIMER: Quiz questions are AI generated. If you find any that are wrong, don't make sense, or aren't related to the video topic at hand, then please post a comment and let me know. Thanks.Summary Today's video from Access Learning Zone focuses on part four of our Association Database series. The main goal is to enhance the person form by adding the fields we still need and creating a combo box to select the family each person is part of. We'll also begin constructing the family form, which includes its own combo box to pick the head of the family or head of household. The trick here is to configure that combo box so it only displays people who belong to the selected family. This involves using a bit of SQL, some VBA, and event programming.
To get started, I take the previous database from part three, make a copy, and update it to part four. This way, Gold Members who download the resources will have access to both the start and end versions for this lesson, so there is no need to go back to earlier parts unless you want to review.
The first task is renaming the "customer list" form to "person list." After renaming it, I update the relevant button to open our new form correctly using its name. Every time I insert or modify VBA code in forms, I prefer to close and reopen the form to make sure everything loads fresh. This helps prevent any carry-over issues.
Next, I noticed that some fields such as "Customer Since" and "Credit Limit" were still present, even though they should have been removed in previous lessons. So I deleted those fields for clarity and simplicity. The process then includes adapting the PersonID field, which previously was CustomerID, and ensuring any code references are updated accordingly.
Moving on to the person form, I reorganized the layout by grouping first and last name fields for better usability. The email and phone fields remain, followed by address, city, state, and zip code fields. Including the country field is a matter of preference and depends on whether your organization is local or serves international members.
We then work with several Boolean fields, like IsActive, IsRegularAttendee, IsOnMailingList, IsOnEmailList, and IsInDirectory. For better user experience, I positioned the mailing and email list checkboxes next to their respective address fields, keeping the design intuitive. Where it's unclear to users what a checkbox refers to, I add Control Tip Text so users can hover and get more information. The "DateCreated" field is also visible but locked to prevent accidental changes.
A few fields such as PersonTypeID, FamilyID, PaymentTypeID, and PaymentDetails are still pending. For the FamilyID, I briefly describe the importance of having some sample family data so we can create a meaningful combo box for family selection. Adding names like "Riker Family," "Picard Family," and others provides groups that people can be associated with. Remember, a family can be any logical grouping—it doesn't have to be a traditional family. It could also represent a company, common address, or any category you find useful.
After loading the Family table with some initial data, I walk through creating a combo box linked to the FamilyID. I place this combo box near the top of the form so users can assign a person to a family easily. Formatting the combo box for better readability is just a matter of preference.
When issues pop up, like an "Enter Parameter Value" prompt, this typically means a field or object is referencing something that's misspelled or renamed, such as using CustomerID instead of PersonID. These are common mistakes, and fixing them involves updating the linked field properties so the subforms work as intended.
Once the basic structure is in place, it becomes easier to work with the data and assign people to families for demonstration purposes.
Sorting is always available by clicking on the field headers or right-clicking on the field, but we'll look at more advanced sorting methods in future lessons and other videos.
The next step involves creating the family form itself. This form will show the family details and include a subform listing all people associated with that family. The initial setup is straightforward—copy the single-record form, change its data source to the Family table, and add FamilyID, Description (Family Name), Notes, and DateCreated. The field for HeadPersonID is important as it marks the head of the family.
Designing the combo box for the head of family requires a query showing only members of the current family. I explain that normally, you could create a separate query for each family, but a more streamlined approach is to dynamically edit the SQL statement behind the combo box based on which family record is currently showing. This makes your database more efficient and easier to maintain.
To achieve this, I edit the combo box's RowSource SQL directly and then employ the OnCurrent event of the form to adjust that SQL each time a different family record is loaded. The SQL includes a WHERE clause filtered by the current FamilyID, ensuring that only members of the relevant family appear in the combo box.
Handling special cases is essential. For instance, if you navigate to a new (blank) family record, the code checks if FamilyID is null and exits without trying to set the RowSource, preventing syntax errors. Optionally, the RowSource can be cleared if there is no valid FamilyID.
Toward the end of the lesson, I talk about the teaching approach used in these videos. I purposely do not prerecord or edit out mistakes, so students can see how to troubleshoot and solve problems as they arise. This mirrors real-world database development, where you often encounter unexpected issues and have to resolve them on the spot.
Looking ahead, the next video will show how to list people in a family and set up navigation so you can double-click to open person records from the family form, or vice versa. This effectively links people and families for easy access and management.
To find a complete video tutorial with step-by-step instructions on everything discussed here, visit my website at the link below.
Live long and prosper, my friends.Topic List Renaming and updating the person list form
Updating form buttons and associated VBA code
Converting CustomerID fields to PersonID fields
Restructuring the person form fields and layout
Adding and configuring checkboxes for status fields
Using control tip text for unlabeled checkboxes
Adding and locking the DateCreated field
Setting up combo boxes for helper and related tables
Populating sample data into the Family table
Adding a combo box to select FamilyID on the person form
Configuring the family combo box to display descriptions
Fixing subform links from CustomerID to PersonID
Assigning people to families using the combo box
Creating a new Family form based on the Family table
Adding Description, Notes, DateCreated fields to the family form
Adding a combo box for HeadPersonID on the family form
Building a relational combo box to show only family members
Modifying the combo box RowSource SQL statement
Using the OnCurrent event to update combo box SQL dynamically
Inserting the FamilyID variable into the SQL WHERE clause
Using VBA to prevent errors on blank family records
Clearing the combo box RowSource when FamilyID is null |


