Custom MsgBox 6
By Richard Rost

 3 years ago
Custom MsgBox in Access. Part 6: Default Button
In this Microsoft Access tutorial series, we focus on creating a custom message box using VBA, enhancing the standard MsgBox function.
In Part 6, we will learn how to set the Default and Cancel buttons. This way if you have a "Yes/No" box and you don't want the default option to be "Yes" then you can change it to "No." This would be important if you are asking the user "are you sure you want to delete all of these files?" and you don't want him accidentally hitting ENTER for Yes. We'll also learn how to reference controls on a form using the Me.Controls collection.
Members
There is no extended cut, but here is the database download:
Silver Members and up get access to view Extended Cut videos, when available. Gold Members can download the files from class plus get access to the Code Vault. If you're not a member, Join Today!
Prerequisites
Links
Recommended Courses
Coming Up
Keywords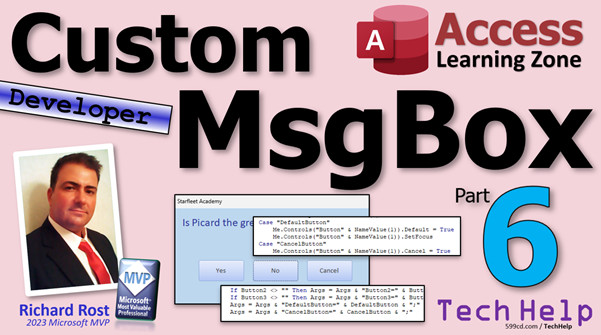
TechHelp Access 2016, Access 2019, Access 2021, Access 365, Microsoft Access, MS Access, MS Access Tutorial, #msaccess, #microsoftaccess, #help, #howto, #tutorial, #learn, #lesson, #training, #database, Custom Dynamic MsgBox, Custom MsgBox in Access, default button, cancel button, default button 1, default button 2, default button 3, me.controls collection, me.controls("field") notation
Transcript Welcome to another TechHelp video brought to you by AccessLearningZone.com. I'm your instructor, Richard Rost.
In today's video, we are continuing with our custom message box. This is part six. Today, we're going to learn how to specify the default and cancel buttons for your message box so that the default button does not always have to be the first one.
If it pops open and the user accidentally hits Enter, you do not want them always pushing Yes, especially if the question is "Do you want to delete all these records?" You might want the default value to be No. We can do that with a regular message box. Today, we are going to do it with our custom message box.
I'm also going to teach you a new way to reference controls on forms using the Me.Controls collection, which is a lot more powerful.
This is all coming up today in part six. If you have not yet watched parts one through five, go watch those first and then come on back. I'll link to them down below and you can click on that.
We have the possibility to have three buttons on here. I only have two right now - buttons one and three. But what if you pop the message box open and you do not want the default value to be the first one? This came up a lot in my regular classes. In fact, I made another whole video on the different options for the standard message box because you might not want that first button to be the default. Go watch this video if you want to learn that.
Now, we have some different things we can do here. We could simply swap the button captions the way we built this, or we can simply tell the message box which one is the default button, just like we do with a standard message box.
Let's go back to our function. Bring up your code editor and find your global module and find the MyMessageBox right here.
What we're going to do is, you know how forms can have a default button and a cancel button. The default button is the button that gets pressed when you press Enter, and the cancel button is the one that gets pressed when the user hits Escape.
We're going to set both of those. By setting the default button as No, it will basically take the effect of doing what we want. We'll also set the focus on that button too, because if there are no text boxes on the form, the button that gets pushed is the one that has focus.
We're going to say optional - actually, let's make a new line here. You'll see why in a minute. Optional DefaultButton As Long = 1, Optional CancelButton As Long = 2. Actually, let's go three because we have Yes, No, and Cancel. So, by default, the default button will be one and the cancel button will be three.
We're going to add it to our arguments down here. For this one, it's just going to be Args = Args & "DefaultButton=" & DefaultButton & ";".
It has to come in with the value, so give it whatever value is sent in. Again, this is something that you, the developer, are setting - your end user will never be setting these options. So just make sure you set a proper option there.
Now the function can handle DefaultButton and CancelButton parameters. Next, let's go to the form and make the form aware of these two things. Go over to the form and find down here where we're going to say "Case DefaultButton."
What are we going to do here? We have the value of DefaultButton in the NameValue1 field. It is stored in this area, so NameValue1 represents which button: 1, 2, or 3.
I could put another If statement in here and say "If NameValue = 1 then Button1.Default = True, else if it's 2 then," but I can do this with just one line if I know how to reference the controls using the Controls collection.
Instead of saying Button1.Default = True, you can also use Me.Controls("Button1"). That is the same thing, just a different way of naming your buttons. There is a Controls collection in the form, which is Me, and in that collection, you will find Button1.
The reason why we use this notation is because now that this is a string, you can actually put a value in there. You could say "ButtonX" like that, and it would use Button1, Button2, Button3, or whatever you send to it. The "x" is in the variable. We will just substitute that.
This is Me.Controls(ButtonX), whichever button: 1, 2, or 3. Actually, I think in this case you cannot have that space there. Then .Default = True.
We are setting the Default property of ButtonX to True. In Access, only one control can have that True property. If you set one to True, anybody else gets set to False. Access handles that by itself.
The same thing goes for the Cancel button. I'm just going to copy and paste this. For the Cancel button: Me.Controls(ButtonX).Cancel = True.
Save it.
Now, let's save this and come back out here. Let's change our Hello World button a little bit. Let's go right in from here. We're going to say "Is Picard the greatest captain?" We're going to just use Yes and No. Yes, No. For Button 3, we will send empty. DefaultButton, let's make the default button 2. The Cancel button can be 3.
If there is no third button, you just will not have a cancel button. If they hit Escape, nothing will happen. As we have it now, the default button should be 2 - button two.
Let's try it and see. Save it. Open it up and press Enter. And that's the set. Welcome aboard. What's the problem? What's wrong? What's going on?
If you open it up, you will see that Yes still has the focus. It is the first control in the tab order, so it is going to get the focus automatically.
For our code to work, we have to go back to here. We also have to put the focus on this button. Copy this, and go like this: ".SetFocus". That is going to make sure that button has the focus when the form opens up.
Now, if we come in here and open it up, look at that - No has the focus and No is also our default button.
You have to have a text box on the form, really, for that to work. You need to have some other controls when you hit Enter. But just by putting the focus there, you can do it.
I figured that code was good to have just in case you do decide to add text boxes to your form later, and this will still make it the default button.
Now, if you decide you want to do Yes, No, Cancel, save that. Now you have your third button showing up, and that one will be the escape button. If I hit Escape, it pushes that and says "Very... lot." I think I need to change the logic in there. We need to put our Else If L = 2 Then ... else status, "Make up your mind," or whatever. Save it.
Come back out here, click, hit Escape, and it pushes the third button.
There you go. Now you have the default button set in your form.
That is going to do it for part six, folks. Hope you learned something and hope you enjoyed this TechHelp video for today. Live long and prosper, my friends. I'll see you next time.Intro In this video, we continue building our custom message box in Microsoft Access by learning how to specify which button should be the default and which should be the cancel button, just like with the standard MsgBox. I will show you how to update your function and form so you can safely set the default response to something other than the first button, such as No for confirmation dialogs. We will also cover an easier way to reference controls on your forms using the Me.Controls collection. This is part 6.Quiz Q1. What primary feature does the custom message box discussed in the video allow you to specify?
A. The background color of the message box
B. The default and cancel buttons
C. The font style of the message box text
D. The size of the message box window
Q2. Why might you want to set the default button to No instead of Yes in a message box that asks "Do you want to delete all these records?"
A. To make the dialog look more colorful
B. To prevent accidental deletion if the user presses Enter
C. To encourage users to delete more often
D. To disable keyboard shortcuts
Q3. In Access, what happens if you set the Default property of more than one button to True?
A. Both buttons become default buttons
B. Access automatically sets any previously True button to False
C. The form crashes
D. None of the buttons respond
Q4. What does the Me.Controls collection allow you to do in your VBA code?
A. Reference a form by its caption
B. Access and manage controls by their names as strings
C. Change the database password
D. Save the form layout to a file
Q5. Why is using Me.Controls(ButtonX).Default = True preferable in the custom message box function?
A. It allows you to dynamically set which button is the default
B. It makes the button captions bold
C. It prevents users from closing the form
D. It automatically creates a backup of the form
Q6. How does the video recommend ensuring that the correct button has keyboard focus when the message box form opens?
A. Reordering the buttons on the form
B. Setting the .SetFocus method on the desired button
C. Changing the background color of the button
D. Making the button invisible and then visible
Q7. What should you do if there is no third button provided, but a CancelButton parameter is set?
A. The form will ignore the CancelButton parameter and Escape will not trigger any action
B. The form will show a hidden cancel button
C. Access will display an error
D. Escape will close the form regardless
Q8. What is the advantage of referencing controls on a form with Me.Controls("Button1") compared to direct property references like Button1.Default?
A. It reduces the amount of code required by half
B. You can substitute variable names to access different controls dynamically
C. It improves the form's performance
D. It makes the form read-only
Q9. When should a developer set the DefaultButton and CancelButton parameters in the custom message box function?
A. When the end user requests it
B. When designing how the message box should function for user safety or preference
C. Only when there are text boxes on the form
D. Only when using standard message boxes
Q10. If you want the Escape key to close the message box, what must be true about your button setup?
A. Escape will only work if at least two buttons are present
B. You must assign the Cancel property to one of the buttons, typically the third one
C. The form must have no text boxes
D. Escape cannot be assigned to any button in Access
Answers: 1-B; 2-B; 3-B; 4-B; 5-A; 6-B; 7-A; 8-B; 9-B; 10-B
DISCLAIMER: Quiz questions are AI generated. If you find any that are wrong, don't make sense, or aren't related to the video topic at hand, then please post a comment and let me know. Thanks.Summary Today's TechHelp tutorial from AccessLearningZone.com continues our work on building a custom message box in Microsoft Access using VBA. This is part six in the series. Today, I will show you how to set which button should be the default and which should act as the cancel button on your custom message box form. This means the default button no longer has to be the first button, which is important when, for example, you want the answer "No" to be selected by default when prompting the user with a critical question like, "Do you want to delete all these records?" The last thing you want is for someone to hit Enter by mistake and delete everything because "Yes" was the default.
With the standard Access message box, it is easy to set the default button, but we also want this flexibility in our custom message box form. In addition, I will teach you a new technique for referencing controls on your forms using the Me.Controls collection. This is a much more flexible and powerful method for dynamically working with your form's controls by name.
First, just a quick note: if you have not watched parts one through five in this custom message box series, I strongly recommend starting there before moving forward with part six. You can find links to those earlier lessons on my website.
Right now, our custom message box can include up to three buttons, though the current example only uses two. Sometimes you want to make "No" the default response instead of always having the first button, like "Yes," selected by default. This scenario often comes up in classes, and I even have a separate video discussing all the standard message box button options in Access, which you can watch as well if you are curious.
There are a couple of ways to achieve our goal. We could swap the captions on the buttons, but a better solution is to let the developer specify which button is the default and which acts as the cancel button, just like the standard MsgBox in Access.
To set this up, open your code editor, find your global module, and locate the function that creates your custom message box (MyMessageBox). Forms support a default button (activated with Enter) and a cancel button (activated with Escape). We are going to add parameters to the function to specify these. The default will be button one for DefaultButton, and button three for CancelButton, which typically corresponds to a "Cancel" option if present.
These parameters are meant for the developer to set - your end users will not see or change these options. Just make sure you specify sensible defaults.
Once the function handles these DefaultButton and CancelButton parameters, the next step is to update your form so that it recognizes which buttons are to be default and cancel. You will have a value that indicates which button is to behave as the default, and you can store this information in a variable.
Instead of repeated If statements that specifically reference Button1, Button2, or Button3, you can leverage the power of Me.Controls in Access. With Me.Controls("Button1"), you refer to the button using its name as a string. This allows you to use variable names and programmatically set, for example, which button should have its Default property set to True. Access handles it so that only one button can be the default at a time.
The same technique applies to the Cancel property. Copy your Default setting code, change Default to Cancel, and you are done.
When you test it, if you discover that pressing Enter still activates the first button, it may be because that button is at the top of the tab order and receives focus by default. In that case, make sure to set the focus to the button you want to be the default by using the SetFocus method after specifying which button is Default. If there are no text boxes on the form, setting the focus will ensure the correct button responds to the Enter key.
This method keeps your code flexible and will continue to work even if you decide to add other controls to your form in the future.
Now, if you want to use three buttons (such as "Yes," "No," and "Cancel"), just specify the corresponding button numbers for DefaultButton and CancelButton. When a user hits Escape, it will activate the button you chose as CancelButton. Make sure your event handling code appropriately responds to which button was pressed, so you can present different messages or actions for each scenario.
That wraps up part six. You should now be able to control which button acts as the default and which one functions as the cancel option on your custom message box form, just like with the standard Access message box.
For a complete step-by-step video walkthrough of everything discussed here, visit my website at the link below. Live long and prosper, my friends.Topic List Specifying the default button in a custom message box
Specifying the cancel button in a custom message box
Setting default and cancel buttons using function parameters
Passing DefaultButton and CancelButton values to the form
Storing button selection values in form fields
Accessing form controls using the Controls collection
Dynamically referencing form buttons by name
Setting the Default property of buttons programmatically
Setting the Cancel property of buttons programmatically
Using SetFocus to assign focus to a button on form open
Handling scenarios with two or three message box buttons
Implementing Escape key behavior for a custom cancel button
Updating message box logic based on user selection
Testing the default and cancel button functionalityPrimary Topics custom message box, setting default button, setting cancel button, Controls collection, form VBA, button focus, Access formsSecondary Topics tab order, optional parameters in VBA, user interface safety, function parameters |


