MsgBox Timer
By Richard Rost

 2 months ago
Create a Countdown Timer Message Box (MsgBox) In this lesson, we introduce how to create a MsgBox Timer in Microsoft Access that prompts a user with a countdown message box. We will discuss building a custom dialogue form with Yes and No buttons, a visible timer, and default response behavior if the user does not answer in time. We start by designing the form, setting up the timer event and TempVar handling, and preparing for the wrapper function to use the timer form. No code is demonstrated yet, but we lay out all setup steps needed for the MsgBox Timer. Brennan from Aurora, Colorado (a Platinum Member) asks: How can I make Microsoft Access show a message box with a countdown timer? I have a process that runs for about 15 minutes at the end of the day, and sometimes I forget it's waiting for me to click OK before it finishes. I'd like Access to give me 60 seconds to respond and then automatically choose a default answer if I'm not at my desk. Sometimes I forget it's running and leave for the day. Then my backups don't run right. MembersThere is no extended cut, but here is the file download: Silver Members and up get access to view Extended Cut videos, when available. Gold Members can download the files from class plus get access to the Code Vault. If you're not a member, Join Today!
PrerequisitesLinksRecommended CoursesUp Next
Keywords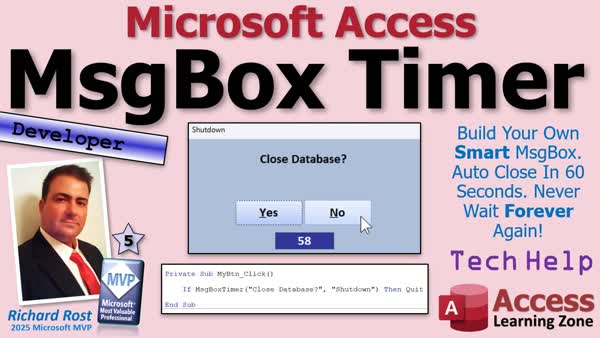 TechHelp Access, countdown message box, dialogue form timer, vba timer event, global function, TempVars, message box timer, default response timer, prompt label, command buttons, return value TempVar, timer interval, yes no button, form load event, form timer event, acForm close
 Subscribe to MsgBox Timer
Get notifications when this page is updated
Transcript Need to ask the user a question, but don't want your code waiting forever for an answer? Welcome to another TechHelp video brought to you by AccessLearningZone.com. I'm your instructor Richard Rost.
Today, we're going to talk about creating a countdown message box in Microsoft Access. We'll build a custom dialogue form that displays a timer. It lets the user click yes or no, and it will automatically choose a default response if the clock hits zero.
Today's question comes from Brendan in Aurora, Colorado, one of my platinum members. Brendan says, how can I make Microsoft Access show a message box with a countdown timer? I have a process that runs for about 15 minutes at the end of the day, and sometimes I forget it's waiting for me to click OK before it finishes. I'd like Access to give me 60 seconds to respond and then automatically choose a default answer if I'm not at my desk. Sometimes I forget it's running and leave for the day, then my backups don't run right.
I feel your pain with that. I've got some events too that I just click, like when I queue up my email batches for my holiday sale. I let it run. It takes half an hour. I forget all about it. I go to have dinner and then go play with the dogs or whatever, and then my system has been sitting there for two hours. It would be nice if it gives you an "Are you still here?" kind of thing. So yes, we can absolutely set that up.
First, some prerequisites though. This will be a developer-level video. What does that mean? We need some VBA to do this right. So if you've never programmed in VBA before, go watch this video. It's about 20 minutes long. It'll teach you everything you need to know to get started.
You should know how to use the timer event. I've got a couple of different videos where I cover the timer event. This one's kind of the opposite. This waits in the background and then it checks to see if you have a notification, and then the timer pops up a form in your face. We're kind of doing the opposite today. We're going to give the user the form, and then the timer event will close it if they don't answer. So this is kind of like backwards from this one. But this video will explain the timer event in more detail. I'll cover it a little bit today too.
You should know how to create your own function. We're going to create a global function today that we can use called message box timer. So go watch this video if you need help with functions and global stuff and all that good things with molecular structures and moving parts. I'm just kidding. Go watch this if you don't know how to make your own function.
And of course, we're going to use Adam's favorite TempVars. So if you don't know what TempVars are, go watch this. These are all free videos. They're on my YouTube channel. They're on my website. Go watch these, then come on back.
All right. First up, this is the TechHelp free template. This is a free database. You can grab a copy from my website if you want to. You'll find a link down below.
In here, I've got a blank form that I call SingleF. There's a continuous form too, but I'm going to use the SingleF for this one. I'm going to copy and paste, Control C, Control V. We're going to call this guy MessageBoxTimerF. MessageBoxTimerF right there.
We're going to design this guy. We can get rid of these controls. We don't need these. Let's change some properties. This is going to be just a single form we're going to pop up. It's not going to have any data in it, so we don't need a data store or any of that stuff.
There are some settings I want to change. Auto Center set to Yes. We don't need record selectors or navigation buttons. We're not going to need scroll bars. I'm going to turn off the control box and the close button because the only way the user is going to close this is going to be by using our buttons. We don't want them to just close it.
Now, we're also going to set the timer interval to 1000. This is in milliseconds, and this means that every one second, the timer will run. The timer event. When this guy is open, we're going to have a little box down here. We're going to start at 60 seconds, and every second, it'll count down one. When it gets to zero, the event will run, which will be to click whatever default button we want.
Let's save it. We're going to add a couple of controls. First up, we're going to add a label right up top here. This will be our prompt, like what the message the user says. Put whatever you want in here, like "Prompt Label."
Let's format it. We'll make it black and make it bigger, however big you want it. I'm going to make it bold and center it. I want this guy to be right about, let's say, here. This doesn't have to be too big of a form. Let's bring this out to exactly four inches. Now everything is nice and centered. I like having it centered on these grid lines. This can be a little shorter too. Let's do that. Depends on how big you want your message to be.
Let's make two buttons, command buttons. Drop a command button here. Cancel the wizard. Unfortunately, there is no message box "Yes" button wizard.
Let's change this to say "Yes" on it. Again, we can make these a little bigger if you want to. Black, maybe 16 point, bold, whatever you want. They're your buttons. I'm going to put this guy about there. Let's give it a good name, not Command5. Let's call this guy the YesBtn (Yes button).
Copy and paste. We're going to slide you over here. We're going to put the word "No" on you. If you want to put the little ampersands in there so it's Alt+N and Alt+Y, you can do that too. Alt+Y.
This is going to be the No button, NoBtn. There we go. Save it all. Once in a while. That's my "Debug Compile" once in a while, but we haven't done any code yet. Save it from time to time, I guess.
We need a timer box to go on the bottom. This is going to be a text box. We can get rid of the label for it. Again, you can format it to look however you want. If you want it big and obtrusive, that's fine. Let's make it white with a dark blue background. I'll center it and bold it, and let's go 16. 16 points works well for this form.
There's our timer box. Let's name this guy the TimerBox. Save it. Close it. Open it. Where are you? Right there, open it up. Looks good. Not much has happened so far. Buttons don't do anything yet, but that looks about what I want.
We got rid of the close box. I accidentally double-clicked. We got rid of the close box, so the only way we can get back into it is to right-click and go to Design View. Of course, you don't want your users being able to do this, so you're going to lock it down using my Simple Security video. That's a whole different video, but this will show you a lot of ways to lock your database down so your users can't poke around and do things you don't want them to do.
Now we're ready for some code. The first thing we're going to do is find the Form Load event. Go right here, bring up the form's properties, go to Events, and find On Load. That'll open up our VB editor. There it is.
I'm going to resize it a little bit. Now, when this guy loads up, I never trust design settings. That timer interval that we set earlier could easily get changed, so I'm going to force it to be set to 1,000 milliseconds here.
Me.TimerInterval = 1000
We're forcing it to one second.
The timer box, that box that we created, here's where we're going to put the default value for that. So, the timer box equals 60. So when the form loads up, we're going to set it to 60 seconds. Change that value to whatever you want. Five seconds, 20 seconds, two hours, I don't care.
Now, we're also going to set the default value here. The way we're going to pass the value back to the function that calls this form is using TempVars. I'll explain why in more detail later, but that's kind of how you have to do it with a dialogue form.
TempVars, and we're going to use a few different TempVars. We're going to call the TempVar here MessageBoxTimerReturnValue equals, let's say, false. They don't say anything, and we're just going to click the false. You want to click the true, OK? You're going to ask them like, "Hey, are you still here?" That kind of thing.
That's all we need in the form load event.
Now we need the form timer event. What actually happens when the timer goes off? Go to form, and then drop this down and go to Timer. This is what happens every second. Every second, the timer interval is one second, so every second, we're going to subtract one from the timer box.
TimerBox = TimerBox - 1
That's 59, 58, and so on.
If the timer box gets down to zero, then we're going to close the form. So:
If TimerBox <= 0 Then
You should be able to say 'just equals zero,' but I never know. I always like to catch that just in case.
We're going to do:
DoCmd.Close acForm, Me.Name, acSaveYes
That's the form we're on, so you don't have to keep specifying the name again for the form you're on. I like to throw an acSaveYes on the end of that. Again, if your database is properly locked down, your users can't make design changes, but this is for you in case you accidentally made a change and you run the form and then your changes aren't saved.
The timer gets down to zero, and the user hasn't clicked the button. It's going to close the form and return this default value that we set in the form load event.
Now for our buttons. Right-click on the Yes button, go to build event. If the user clicks the Yes button, we're going to return true. Here's the value right there. This is how we're going to return the value, by setting that TempVar. Then we're going to close the form. Just copy this and paste it there.
For the No button, build event, do the same exact thing. But we're going to return false. Actually, Yes is returning a true, and then No is returning a false.
Now the form itself is done. Save it. Debug compile once in a while. There's our 'once in a while.'
Now the form's all set. So now if this form opens, it's going to count down. If it gets to zero, it'll close and return the default value, which is no. So if you're asking someone, "Hey, are you here?" and they don't say anything, it'll return No. Or if you open it up and you click yes, "I am here," it'll return the Yes.
Now, how do we return that value? We've got it sitting in a TempVar, so we have to have something to receive it. To do that, we're going to build what's called a wrapper function, and we'll do that in tomorrow's video.
Tune in tomorrow, same bat time, same bat channel. Or if you're a member, you can watch it right now because I'm going to keep recording tonight until I'm done with this. Sign up and join as a member and you can watch it right now. If not, you'll have to tune in tomorrow.
That's going to be your TechHelp video for today. I hope you learned something.
Live long and prosper, my friends. I'll see you tomorrow for part two.Intro In this lesson, we introduce how to create a MsgBox Timer in Microsoft Access that prompts a user with a countdown message box. We will discuss building a custom dialogue form with Yes and No buttons, a visible timer, and default response behavior if the user does not answer in time. We start by designing the form, setting up the timer event and TempVar handling, and preparing for the wrapper function to use the timer form. No code is demonstrated yet, but we lay out all setup steps needed for the MsgBox Timer.Quiz Q1. What is the main feature being developed in this video tutorial?
A. A custom report for data exports
B. A countdown message box in Microsoft Access
C. An automatic backup system for Access
D. A login security form for users
Q2. Why did Brendan want a countdown message box?
A. To get reminders about daily tasks
B. To ensure Access processes complete if he is away from his desk
C. To make the form look more modern
D. To schedule database backups at a specific time
Q3. Which programming language is being used to implement the solution?
A. SQL
B. Python
C. VBA
D. JavaScript
Q4. What event is crucial for running the countdown in the form?
A. Click event
B. Timer event
C. Open event
D. Close event
Q5. How often should the timer event run in the custom form?
A. Every 10 milliseconds
B. Every 100 milliseconds
C. Every 1 second (1000 milliseconds)
D. Every minute
Q6. What is the initial value set for the countdown in the timer box?
A. 15 seconds
B. 30 seconds
C. 60 seconds
D. 120 seconds
Q7. What control is used to display the countdown timer to the user?
A. Combo box
B. Text box
C. Option group
D. Check box
Q8. How does the form return the user's choice (Yes or No) back to the calling code?
A. By writing to a table
B. By updating a global variable
C. By using TempVars
D. By changing the form's caption
Q9. What happens if the countdown reaches zero and the user has not clicked a button?
A. The form stays open indefinitely
B. The form is minimized
C. The form automatically closes and returns the default value
D. The database deletes all records
Q10. What value does clicking the Yes button set in the TempVar?
A. Null
B. "Yes"
C. True
D. False
Q11. What property is set to ensure the form pops up centered on the screen?
A. PopUp = Yes
B. Auto Center = Yes
C. Modal = Yes
D. Center Form = Yes
Q12. What does turning off the control box and close button prevent?
A. Users from maximizing the form
B. The timer from running
C. Users from closing the form with standard window controls
D. The form from being resized
Q13. Why does the tutorial recommend using the acSaveYes option in the DoCmd.Close statement?
A. To save user-entered data on the form
B. To ensure unsaved design changes are saved
C. To speed up form closing
D. It is required by Access to close any form
Q14. What is the name of the form created for the timer message box?
A. SingleF
B. MainDialogF
C. MessageBoxTimerF
D. CountdownF
Q15. What is the final step mentioned before transitioning to part two of the tutorial?
A. Designing the main form
B. Writing a wrapper function to return the response
C. Adding a database backup routine
D. Creating a security system for the database
Answers: 1-B; 2-B; 3-C; 4-B; 5-C; 6-C; 7-B; 8-C; 9-C; 10-C; 11-B; 12-C; 13-B; 14-C; 15-B
DISCLAIMER: Quiz questions are AI generated. If you find any that are wrong, don't make sense, or aren't related to the video topic at hand, then please post a comment and let me know. Thanks.Summary Today's video from Access Learning Zone covers how to create a countdown message box in Microsoft Access. The focus is on building a custom dialog form that includes a timer, offering users a chance to respond within a set time frame. If the timer reaches zero without a response, the form will automatically pick a default choice.
The scenario comes from a member who sometimes runs end-of-day processes that wait indefinitely for a user response. He wanted a system where Access would provide a 60-second warning before acting on its own, helping avoid situations where unattended prompts stall other important tasks, such as backups.
I can relate to needing this feature myself. For example, when I run long processes, it would be helpful to have Access check if I am still present and then continue automatically if I don't respond. Fortunately, yes, this is completely doable.
There are some prerequisites before you start. This is more of a developer-level lesson, so a basic understanding of VBA is necessary. If you're not familiar with VBA, I recommend reviewing the beginner resources I've provided, where I cover the essentials in about 20 minutes.
Additionally, you should know how to use the timer event in Access forms. There are other video tutorials available that explain how the timer event works in detail. In today's lesson, the timer will drive the countdown and trigger an action when it reaches zero.
You'll also need to be able to create your own functions, specifically a global function we'll call message box timer. If you need a refresher on functions and working with global variables like TempVars, check out the free lessons linked on my site or YouTube channel.
We'll be using the TechHelp free template, which is available for download from my website. I start with a blank single form called SingleF, which I copy and rename MessageBoxTimerF.
First, I strip out unnecessary controls to keep things simple, since this form won't be bound to any data. Several form properties should be adjusted: set Auto Center to Yes, and turn off record selectors, navigation buttons, scroll bars, and the control box. Disable the close button as well, so the only way to close the form is with your custom buttons.
Next, set the Timer Interval property to 1000 milliseconds so that the timer event fires every second. On the form, add a prominent label for the user prompt, and format its size and position as desired. It's also helpful to size and center the form neatly.
Place two command buttons on the form for yes and no responses, and assign clear names to them (such as YesBtn and NoBtn). You may want to assign keyboard shortcuts using the ampersand for accessibility.
Add a text box at the bottom for the countdown timer display, format it to stand out, and name it TimerBox.
Once the layout is ready, make sure the form's on load event initializes everything. In VBA, force the timer interval setting to 1000 ms to avoid design-time changes being lost, and set the timer box to start at 60 seconds (or any interval you want). Use a TempVar to store the value your function will pass back based on the user's response.
For the timer event, decrement the counter by one each second. When the timer hits zero, close the form and rely on the default TempVar value to be returned. This ensures the automated default behavior in the absence of user input.
For the button click events, set the TempVar to True for the yes button and False for the no button, then close the form. This allows your application to check the TempVar and know which option was selected, or if the countdown expired.
The resulting form displays a message and a countdown. If the user does nothing, the form closes when time runs out and applies the default action. If the user clicks Yes or No during the countdown, the appropriate value is returned.
At this point, all the mechanics for the form itself are in place. The next step is handling the return value from the TempVar. This involves setting up a wrapper function, which is covered in the next video.
You can find a complete video tutorial with step-by-step instructions on everything discussed here on my website at the link below. Live long and prosper, my friends.Topic List Creating a custom countdown dialog form in Access
Setting form properties for the countdown dialog
Adding and formatting a prompt label in the form
Adding and customizing Yes and No buttons
Adding and formatting a timer display text box
Disabling standard form close controls
Setting and enforcing the TimerInterval property
Initializing countdown and TempVars in Form_Load
Implementing the Timer event to decrement countdown
Automatically closing the form when timer reaches zero
Returning the user's response using TempVars
Handling Yes and No button click events to set return valueArticle If you have a process in Microsoft Access that needs to pause for user input, you might typically rely on a standard message box. The downside is that a regular message box will wait for as long as it takes until someone clicks a button. If you forget about it, the process sits idle indefinitely. To avoid this, you can design a custom message box form with a countdown timer. This allows you to prompt the user, automatically choose a default response when time runs out, and keep your processes moving - even if you are not at your computer.
To build this solution, you will use a custom dialog form along with some straightforward VBA code. You should be comfortable with forms, the Timer event in Access, creating functions, and using TempVars. If you are not familiar with these, you may want to spend some time reviewing the basics of VBA programming in Access.
Begin by creating a new form. You do not need to bind this form to any table or query. Start with a simple single form and name it MessageBoxTimerF. Open the form in design view and remove any fields that are present by default. Set the form properties as follows: Auto Center to Yes, Record Selectors and Navigation Buttons to No, remove scroll bars, and disable the control box and close button. This ensures the user can only interact with the form using your buttons.
You will want this form to always appear centered and uncluttered when popped up. Set the Timer Interval property to 1000. This value represents milliseconds, so a setting of 1000 means the Timer event will fire once every second. The Timer event is what will control the countdown.
Now, design your user interface. At the top, add a label that will display your prompt or question to the user. Style it as you like, making sure it stands out and is easy to read. Below this, add two buttons: one labeled Yes and one labeled No. Name the buttons YesBtn and NoBtn, respectively. You can also use ampersands in the captions for keyboard shortcuts, such as &Yes and &No, for more accessibility.
At the bottom of the form, add an unbound text box. This will show the countdown timer. Delete the associated label, then style the text box to be prominent - perhaps bold, center-aligned, and with contrasting colors. Name this text box TimerBox.
Now it is time to add the VBA code that will power the countdown and handle button clicks. Open the form's property sheet, go to the Events tab, and create a handler for the On Load event. This code will set up your default timer and response value each time the form is loaded:
Me.TimerInterval = 1000
Me.TimerBox = 60
TempVars!MessageBoxTimerReturnValue = False
Here, the timer interval is set to one second, the TimerBox is set to an initial value of 60 (meaning 60 seconds), and the return value is set to False as the default (corresponding to the default No answer). You can adjust the starting value to however many seconds you want the user to have.
Next, add code for the form's Timer event. This is what will decrement the timer and automatically close the form if the time runs out:
Me.TimerBox = Me.TimerBox - 1
If Me.TimerBox <= 0 Then
DoCmd.Close acForm, Me.Name, acSaveYes
End If
Each time the Timer event fires (every second), the code subtracts 1 from the value in TimerBox. When the counter reaches zero, the form closes automatically. Because the TempVar was set to False by default, if the user does nothing, the function will return No.
Now wire up the buttons. For the YesBtn, create an On Click event with the following code:
TempVars!MessageBoxTimerReturnValue = True
DoCmd.Close acForm, Me.Name, acSaveYes
For the NoBtn, the code is nearly identical, except it sets the TempVar to False:
TempVars!MessageBoxTimerReturnValue = False
DoCmd.Close acForm, Me.Name, acSaveYes
This means that whichever button the user clicks, the TempVar MessageBoxTimerReturnValue will be updated with True or False before the form closes.
At this stage, you have a dialog form that counts down and collects the user's response - or automatically uses a default answer if time runs out. To use this dialog as a true message box replacement (and retrieve the TempVar value back in your VBA code), you will need to create a wrapper function that opens the form as a dialog and reads the return value. That step comes next, but with just the work above, you now have a form that handles timed user input far more flexibly than a simple MsgBox.
This approach is extremely useful for processes that should not wait indefinitely for a user - such as end-of-day tasks or batch runs where a missed confirmation could leave a long process stalled. With the timer, if the user steps away or forgets, the system proceeds safely with your chosen default response.
Remember to protect or lock down your database so users cannot bypass your safeguards by directly closing the form or switching to design view. Now you have a flexible, user-friendly Access dialog that will not leave your database hanging!Primary Topics Microsoft Access, VBA programming, custom forms, timer event, TempVars, message boxes, user prompts, form design
Secondary Topics form properties, dialog management, user security, developer-level prerequisites
|


