|
|
Free Lessons Courses Seminars |
TechHelp Fast Tips Templates |
Topic Index Forum ABCD |
|
||||||
|
|
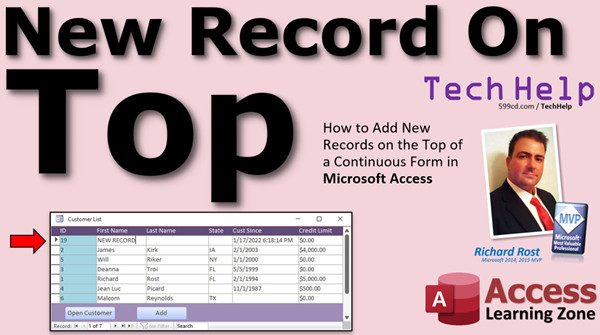
New Record on Top By Richard Rost Add New Record on Top of a Continuous Form In this video, I will show you how to add new records at the top of a continuous form instead of at the bottom, which is the default setting. David from Woodbridge, Virginia (a Gold Member) asks: I have a continuous form which sorts records by date with the most recent entries at the top. I have a button that allows me to add a new record, but it adds it at the bottom. Is there a way to add the new record at the top of the form? MembersMembers will learn a more elegant solution by collecting the data in unbound fields, performing checks on that data, and then adding the record using SQL before requerying the form.
Silver Members and up get access to view Extended Cut videos, when available. Gold Members can download the files from class plus get access to the Code Vault. If you're not a member, Join Today!
Links
AddendumThere is a minor bug in the code in the extended cut. The following line should be changed:
To:
I've updated the database download with the fix.
Keywordsmicrosoft access, ms access, ms access tutorial, #msaccess, #microsoftaccess, #help, #howto, #tutorial, #learn, #lesson, #training, #database, new record on top of continuous form, New record at top of continuous form, add new record at top of form, Continuous Form New Record at Top, gotorecord, acnewrec, requery, gotorecord, acfirst, gotocontrol, isnull, db.execute
IntroIn this video, I will show you how to set up a continuous form in Microsoft Access so that new records appear at the top of the list instead of the bottom. You will learn how to sort your form by date in descending order, create a custom "Add New" button using VBA, automatically fill in the date, requery the form, and set the focus to the first data entry field. This approach makes data entry quicker and keeps your most recent records front and center.TranscriptWelcome to another TechHelp video brought to you by AccessLearningZone.com. I am your instructor, Richard Rost.In today's video, I'm going to show you how to add new records on the top of a continuous form instead of the bottom in Microsoft Access. Today's question comes from David from Woodbridge, Virginia, one of my Gold members. He posted this in the forum earlier today: I have a continuous form which sorts records by date with the most recent entries at the top. I have a button that allows me to add a new record, but it adds it at the bottom. Is there a way to add the new record at the top of the form? Well David, there's no setting that lets you change that. That's just a default behavior of Access. That's how Access was built. That's how continuous forms work. But with a little trickery, we can get that new record to appear at the top of the form off the bat, and then you can fill in the details. Let me show you how to do it. Before we get started, there are two videos I'd like you to watch first. Continuous forms: if you don't know what continuous forms are, those are the forms where you can have multiple records on the screen at a time, kind of like a list. And watch my Intro to VBA video. We're going to need four or five lines of VBA code. VBA is not scary. It's easy. I'll show you everything you need to know. But go watch Intro to VBA first, it's like 20 minutes long. It'll walk you through all the basics. Once you learn a little bit of VBA, your Access databases become so much more powerful. Go watch this first and come back here. Go on, go do it. Go watch it. Here I am in my TechHelp free template. This is a free database. You can grab a copy from my website if you want to. You'll find a link to get this in the links section down below the video, so click on that. Get a copy of this database or use whatever database you want. Now in this database, I've got a customer list, which is a continuous form. You can see there's one record, two records, three records, and so on. What David is saying is he wants to add a new record at the top of this list because he's got this list sorted by the date the record was added. Let's pretend this customer sense is the field that I want to store it on. Let's design this form. Let's open up the properties for this form, go to data, and I want to find Order By. Order By is the field that we're going to sort by. So we're going to change this to use the field name customer sense, but I don't want it in ascending order. I want it in descending order, so it's DESC. Customer sense descending means that this form is going to sort this list by customer sense descending, so the newest records will show up at the top. Make sure you have Order By On Load set to Yes. If you turn that off, then the order is still saved in the form, but you have to manually turn it on every time you open the form, which we don't want to do. So save that, close this and reopen it. Now you'll see the most recent records are at the top. These are pretty old, but these are customer sense, so they're supposed to be years in the past. If you add a new date in here, like today's date, and then close this form and reopen it, you'll see that record is now up top. Access databases by default are designed to add the new record at the bottom. That's just how they work. You can hit the little add button down here and it'll bring you down to the bottom. If you've got 5,000 records in here, it's going to bring you all the way to the bottom. You might want to have it so it pops a new record up at the top. What we're essentially going to do is make our own add button. It's going to go to a new record. It's going to add the date in there because once you add any bit of information into this record, it creates the new record. So it'll go to the new record, put today's date in there, save the record, and then requery the list. When that happens, it's basically the same thing as if you close and reopen it. Now you'll be here on the first record. Just hit the button and all that will happen in the background. Let's see how we do that. We're going to need a little VBA. I'm going to open up my design view here. Let's go to Form Design. In the control box, find a button, click, and drop that right there. Now the wizard's going to start up. There is an option under record operations to add a new record, but I don't want to use this wizard because this wizard creates macros and I hate macros, so I'm going to cancel that. We're going to put some VBA in this button. Let's change the caption so it says Add New. Bring up the properties for this button. Over here, double-click on it to bring up the properties. Go to all, and the first thing I'm going to do is give this button a good name. I don't like Command17, so we'll go addNewBTN for button. Now I'm going to right-click on that button, go to Build Event. Your VBA editor will start up. You may get a window asking what builder you want. Pick the Code Builder. If you watched my Intro to VBA video, you know all about that. Now in here, I can put in the code that's going to happen whenever I click on this button. The first thing I want to do is go to a new record. That's going to be DoCmd.GoToRecord. The next couple of things we can just ignore. We can use the default values because the defaults there are Active Data Object. We can just hit comma, and then object name comma. It's going to assume whatever you're on as the default object, so the form that we're on, for example. You don't have to specify the commands there, but this one we do need. So we're going to use acNewRec. That's it. When we click the button, it's going to go to a new record on the current form. Save it, make sure it works. Save and close it. Open the list back up and hit Add New. There it goes. That's all we told it to do so far: go to a new record. Now that I'm down here, I want to fill in that date automatically, or any one of these fields really, but the date is the easiest one. Back to our code window, right here we're going to say customerSense (that's the name of the field) equals Now. That will put the current date and time in there. Save it, come back over here, let's test it, make sure it works. I'm going to close the form, reopen it, and click. There we go. Let me make this a little bit bigger so you can see the whole thing. In fact, we can get rid of Credit Limit; we don't need that on here. We'll just do this. While I'm at it, I'll get rid of State, too. All we need is First Name, Last Name, and Customer Sense for this example. Save it, close it, open it back up, and there we go. There's our blank new record at the top with the current date and time in it. Now, when you click the button, it goes to the new record and it adds it at the bottom. So I need to requery this so that it shows up at the top for me. What we're going to do is get rid of that. I'm going to delete that record. Go back in here. After I set that value, I'm going to say Me.Requery. That's going to requery the records in this form. Save it, come back out here. I'm going to close it. Reopen it. Ready? Add New. Boom. There we go. It went to a new record, added the customer sense in there, which creates a new record, and brings me back up to the top after it requeries it, because it's sorted by the customer sense date. Now, I don't want to be sitting in the ID field. It would be nice if I just went right to the first name field so I can just start typing in the first name. How do we do that? There's another command called GoToControl: DoCmd.GoToControl. It's going to be, what is the name of it? FirstName. Just like that. So go to a new record, set the time and date, requery, and then go to the first name field. Let's try it. Let me get rid of this record right there, and close it. Open it back up again and Add New. Boom. There we go. It added the new record, set the time, requeries it, and puts me right in the first name field so I can just type in Joe Smith. You can also set this button as the default button. What the default button is: if you press Enter on the keyboard, it's the same as if you press that button. I can go like this, design view, go to here, go to the other tab, find Default and set that to Yes. There's also Cancel. Cancel means if you hit Escape on the keyboard, it's the same as pushing that button, like a close button or something. Save it. Now we can just do this. Watch: I can press Enter; it's like pushing that button. Amy Jones, Enter. Sue Small, Enter. Jim Kirk, Enter. See how nice and easy that is now. As you can see, with a little programming (we've got four lines of code in there), that's it. That's all you need. You learn those few commands and you make your databases so much more powerful and user-friendly and easy to work with. You can do cool things like this. Now, one major problem that I have with this is that there's nothing to stop someone from doing this: click, click, click, click, click, add a bunch of empty records. There's not a whole lot you can do to get around that, because in order to do the method that I'm doing, you have to go to a new record, set a value here, and then jump back up to the top. If you want to make first name and last name required fields, this technique won't work. You'll need something else. What I'm going to show you how to do in the extended cut for the members is instead of jumping to a new record, we're going to have some unbound fields up here. We can put values in at the top. I can put in Joe and then Smith, and then if I press Enter, it can yell at me and say, you're missing data. It can do validation and check these fields before they're even added to the table. You could do something like check to see if Joe Smith is already in there with a little DLookup. So if I type in Amy Small from New York, and a credit limit of 500, I press Enter and she gets added automatically. We'll do that with a little SQL and a little more programming, but it's a lot more elegant, as you can do data validation before the record is ever added to the table. I will cover this in the extended cut for the members. Silver members and up get access to all of my extended cut videos - over 200 of them now. Gold members can download these databases. How do you become a member? Click on the Join button below the video. After you click the Join button, you'll see a list of all the different membership levels that are available, each with its own special perks. Silver members and up will get access to all of my extended cut TechHelp videos, one free beginner class each month, and more. Gold members get access to download all of the sample databases that I build in my TechHelp videos, plus my code vault, where I keep tons of different functions that I use. You'll also get a higher priority if you decide to submit any TechHelp questions to me, and you'll get one free expert class each month after you've finished the beginner series. Platinum members get all the previous perks, plus even higher priority for TechHelp questions, access to all of my full beginner courses for every subject, and one free developer class each month after you've finished the expert classes. These are the full-length courses found on my website - not just for Access, too. I also teach Word, Excel, Visual Basic, and lots more. You can now become a Diamond sponsor and have your name or company name listed on a sponsors page that will be shown in each video as long as you're a sponsor. You'll get a shout out in the video and a link to your website or product in the text below the video and on my website. Don't worry, these free TechHelp videos are going to keep coming. As long as you keep watching them, I'll keep making more, and they'll always be free. QuizQ1. What is the default behavior in Microsoft Access when adding a new record to a continuous form?A. New records always appear at the top B. New records always appear in the middle C. New records always appear at the bottom D. New records do not appear until the form is closed Q2. Which property must be set to ensure a form is sorted by a particular field when loaded? A. Default Value B. Order By C. Filter D. Record Source Q3. How should the 'Order By' property be set to display the most recent entries at the top of the form? A. FieldName ASC B. FieldName ascending C. FieldName DESC D. FieldName random Q4. What is the purpose of setting 'Order By On Load' to Yes in a form's properties? A. To ensure data entry is restricted B. To automatically apply sorting each time the form loads C. To filter records by a specific value D. To disable editing in the form Q5. Why is it necessary to use VBA instead of the built-in button wizard for this solution? A. The wizard can only delete records B. The wizard creates macros and does not allow custom sorting C. The wizard cannot move to new records D. The wizard does not function in continuous forms Q6. In VBA, which command moves the form to a new, blank record? A. DoCmd.MoveToNew B. DoCmd.GoToControl C. DoCmd.GoToRecord , , acNewRec D. Me.NewRecord Q7. What is the next step after moving to a new record to ensure it appears at the top after sorting? A. Manually refreshing the form B. Assigning a new value to a sorted field (e.g., setting a date) C. Editing an existing record D. Duplicating another record Q8. What command is used in VBA to refresh the records displayed on the form after adding a new record? A. Me.Update B. Me.Refresh C. Me.Requery D. Me.Reset Q9. After refreshing, why might the form focus remain in the wrong field, and how is it corrected? A. Access always focuses on the last field, and this cannot be changed B. The focus defaults to the ID field but can be moved using DoCmd.GoToControl C. Focus can only be changed with a mouse click D. Access locks focus to customer sense Q10. What does setting a button's 'Default' property to Yes achieve? A. Makes the button invisible B. Makes pressing Enter on the keyboard act as if the button was clicked C. Prevents the button from being clicked D. Disables keyboard shortcuts Q11. Which limitation exists with this method for adding new records at the top? A. It cannot add records containing dates B. It may allow adding multiple empty records unintentionally C. It only works with single forms D. It prevents editing any records Q12. What is an advantage of using unbound fields and additional validation, as discussed for more advanced users? A. Data can be validated before being added to the table B. It is easier to create records in bulk C. Records cannot be deleted D. It disables data sorting Answers: 1-C; 2-B; 3-C; 4-B; 5-B; 6-C; 7-B; 8-C; 9-B; 10-B; 11-B; 12-A DISCLAIMER: Quiz questions are AI generated. If you find any that are wrong, don't make sense, or aren't related to the video topic at hand, then please post a comment and let me know. Thanks. SummaryToday's video from Access Learning Zone covers how to add new records at the top of a continuous form in Microsoft Access, instead of at the bottom where they normally appear.This question came in from a viewer who has a continuous form displaying records sorted by date, with the latest records at the top. When he clicks a button to add a new record, Access always appends the new record to the bottom of the list, which means it doesn't immediately appear at the top where the most recent records are. Unfortunately, there is no setting in Access that allows you to change this behavior directly. Continuous forms are designed to show new entries at the bottom by default. However, with a little VBA programming, we can make Access display new records at the top of your form after you add them. Before diving in, I recommend that anyone unfamiliar with continuous forms or VBA in Access watch two specific videos first. The first explains what continuous forms are and how they operate - essentially letting you see multiple records as a list on a single screen. The second video is my "Intro to VBA" lesson. You'll need to know a bit about working with VBA since the solution here requires a few lines of code. The VBA video is twenty minutes long and walks you through the most important basics. Once you understand those, you'll be able to do a lot more with your databases. In this demonstration, I use my TechHelp free template database. You can download a copy of this from my website, but these steps will work with any database. In my example, the continuous form is a customer list. Each customer record includes a field called "customer sense," which is the date the record was added. We want to sort this form so the newest customers appear at the top. To do that, go into form design mode, open the form properties, and set the "Order By" property to sort the customer sense field in descending order. Make sure the "Order By On Load" property is set to Yes. This ensures the form is always sorted correctly when you open it, with the most recent records shown first. Even with the form sorted, Access will still add new records at the bottom by default. If there are thousands of records, scrolling down to the bottom every time you want to add a new record quickly becomes inconvenient. The goal here is to create our own "Add New" button that automates a few necessary steps: moves you to a new record, fills in the date, saves the record, and refreshes the list so the new entry appears at the top. Then you can immediately enter the rest of the customer details. To set this up, insert a new command button onto the form in design view. Don't use the wizard's add record option, as it creates macros instead of VBA code. Cancel the wizard, set the button's caption to "Add New," and assign it a meaningful name like addNewBTN. Open the VBA editor for the button's click event. The code will instruct Access to go to a new record in the form. Next, fill in the customer sense field with the current date and time using the Now function. At this point, the new record is created. To make the new record appear at the top, use the Me.Requery command, which refreshes the data in the form and re-applies the sort order. Finally, set the focus to the first name field so you can immediately start entering the rest of the record. Test this by saving and reopening the form. When you press the new button, the form jumps to a new record, inserts today's date, updates the list, and places you in the first name field ready to type. You can also set this button as the default button for the form. When you do that, pressing Enter on your keyboard is the same as pressing the button. The cancel property works similarly with the Escape key, and is useful for "close" or "cancel" actions. The end result is a much friendlier experience for users. With just a handful of VBA commands, you get more control over your form and create a smoother data entry process. One concern with this method is that users can repeatedly click the button and generate blank records with only dates. Since the technique relies on populating a field to trigger the record's creation, required fields like first name or last name can't be enforced at this stage. If you need to make sure certain fields are filled out before a record is created, you'll need a different approach. In the extended cut for members, I explain an alternative using unbound fields at the top of the form. This method lets you perform data validation before the record is added. Users enter information into the unbound fields, and when they press Enter, the code checks for completeness and can even determine if the record is a duplicate using a DLookup. Only after passing validation will the data be inserted into the table. This approach is more advanced but creates a more robust data entry form. Silver members and up have access to all extended cut videos, with more than 200 available now. Gold members get database downloads from these tutorials, higher question priority, access to my code vault, and one free expert class each month after the beginner classes. Platinum members receive all previous perks, plus even more priority, access to all full beginner courses for every topic, and a free developer class each month after completing the expert classes. If you're interested in these benefits, you can join by visiting my site and looking at the membership options. Remember, all TechHelp videos are and will remain free for everyone. You can find a complete video tutorial with step-by-step instructions on everything discussed here on my website at the link below. Live long and prosper, my friends. Topic ListAdding new records at the top of a continuous formSorting continuous forms by date descending Setting the Order By and Order By On Load properties Creating a custom Add New button with VBA Navigating to a new record using DoCmd.GoToRecord Populating a date field automatically with VBA Requerying the form to refresh record order Moving the focus to a specific field with DoCmd.GoToControl Setting a button as Default in the form properties Deleting unnecessary fields from a form design Limitations of this approach with required fields |
||||||||||||||||||||||||||||||||||||||||||||
|
| |||
| Keywords: TechHelp Access new record on top of continuous form, New record at top of continuous form, add new record at top of form, Continuous Form New Record at Top, gotorecord, acnewrec, requery, gotorecord, acfirst, gotocontrol, isnull, db.execute PermaLink New Record on Top in Microsoft Access |