Continuous Forms
By Richard Rost

 6 years ago
Continuous Forms. Click to Open Specific Product.
Learn how to create continuous forms in Microsoft Access. Otherwise known as List Forms, these allow you to scroll up and down and view all of the products in a table or query. We will create a continuous form to display a list of our products. I'll also show you how to click on one of the products, and then click on a command button to open up the single form for that specific product.
Wyatt from Anchorage, Alaska (a Gold Member) asks: How can I display all of my products in a list so that that I can scroll up and down through them. I'd also like to be able to click on one to open up that product's form. A total count of products and my total inventory value would also be nice to see, too. Thanks!
Members
I'll show you how to calculate a line total (qty on hand * unit price) in addition to form footer totals for the total value of your inventory and the total number of products on hand.
Silver Members and up get access to view Extended Cut videos, when available. Gold Members can download the files from class plus get access to the Code Vault. If you're not a member, Join Today!
 Links Links
AutoNumbers: https://599cd.com/AutoNumbers
What is a Form: https://599cd.com/Form
Open Form Specific Record: https://599cd.com/OpenFormSpecific
Open Report Specific Record: https://599cd.com/OpenReportSpecific
On Dbl Click Event: https://599cd.com/OnDblClick
Intro In this video, I will show you how to create a continuous form in Microsoft Access to display a list of product records, set up your product table, and design a single product form. You will learn how to set up the continuous (list) form so you can scroll through all your products, and add a button that opens the selected product's detailed form. This video is a step-by-step guide to building a product list form that lets you easily browse and access individual product details.Transcript Welcome to another TechHelp video brought to you by AccessLearningZone.com. My name is Richard Rost, your instructor.
In this video, I am going to teach you about continuous forms, otherwise known as list forms, where you can show a list of records at one time. Then I am going to show you how to make a button so you can click on it and open up the specific record that you are looking for.
Today's question comes from Wyatt, one of my gold members from Anchorage, Alaska. Wyatt asks, how can I display all of my products on a list so that I can scroll up and down through them? I would also like to be able to click on one to open up that product's form. A total count of products and my total inventory value would also be nice to see too. Thanks.
Well Wyatt, we can do this using what is called a continuous form in Microsoft Access. That is where you can see a bunch of records on the screen at one time, as opposed to a single form where you only see one record at a time.
I am going to break your question up into two parts. In part one, I am going to show you how to create that continuous form and how to click on one of them and click on a button to open up that product's form. Then in part two, which I will do in the extended cut, I will show you how to do the count of products and the total inventory value.
Let's start with part one.
Here I have a blank Access database. We are going to need a table to start with, so let's create a table. Table Design. Let's make a product table.
A real simple product: ID, an AutoNumber, the product name, which will be a Short Text field. If you want a full description, a Long Text field—that is fine too. I am not going to add one for this video, but you can add all kinds of fields, whatever you want. I will put a quantity on hand. That will be a Number of type Long Integer. That way I can keep track of how many I have got.
Now you said inventory value in your question. I am not sure if you want your cost or what you are selling the products for. You can do both if you want to. I will just pick one. I will put the unit price in here, and that will be a Currency value, and that will be what I am selling it for. So what you will have is you will be calculating the total retail value of your entire inventory. If you want to do unit cost as well, you can add that too.
Let's save this. This will be my ProductT, product table. Very key, yes, define that please, that will be the AutoNumber. I have got whole videos on AutoNumbers, and why you should use them.
Let's close this down, open it back up again, and put a few products in here. Let's put in my Star Trek T-shirt, and I have got 20 of those on hand at $25 a piece. I have got the Deep Space Nine mugs. I have got 15 of those on hand, and they are selling for $15. I have got the Chewbacca hoodie, and I have got five of those on hand, and they are 45 bucks, because they are big, and they are woolly and fluffy.
Okay, so I have got my basic products in the database. Now this is kind of what you want to see when you make your continuous form, but you do not want to work directly with your tables. It is always a bad idea, especially if you are going to have other people working with this database too. You should try to keep all of your user interaction with forms.
So let's close this. Save changes, yes.
Let's create a basic product single form first. So, Create - Form Design. I do not like using Form, where it slaps a form together for you. I do not like this. It just does not look nice. I do not like all the formatting.
Now I have got other videos available to show you how to do basic single forms. I will put some links down below in the description below the video. If you are not sure about basic form design, watch those first and come back to this one. So I am going to move through this one kind of quickly.
So, Create - Form Design. Here is my basic form. First thing I do is I have to give it a little splash of color. I do not like to have those white backgrounds.
I like to set up the record source first. So go to All, drop this down, ProductT is the only thing in there. This will be a single form, so one record at a time on the screen. Once I have set up that, shrink this up a little bit. You do not need to make that that big. That is about good right there.
Now I can go to Design. I can add existing fields. Here are my fields. Click on the first one. Hold the Shift key down. Click on the last one. Click and drag. Boom. There we go. Here are my fields.
You can change the labels if you want to. You can adjust these. Product name should probably be a little bigger. I like to gray out my ID fields that way the user understands they cannot edit that.
Save this as my ProductF. Close it and now open it up. There you go. It is a real simple product form. You have to scroll through the records using the navigation buttons right here.
Now, let's turn this into a continuous form. If you already have a good form set up, all you have to do at this point is copy it and make a few modifications.
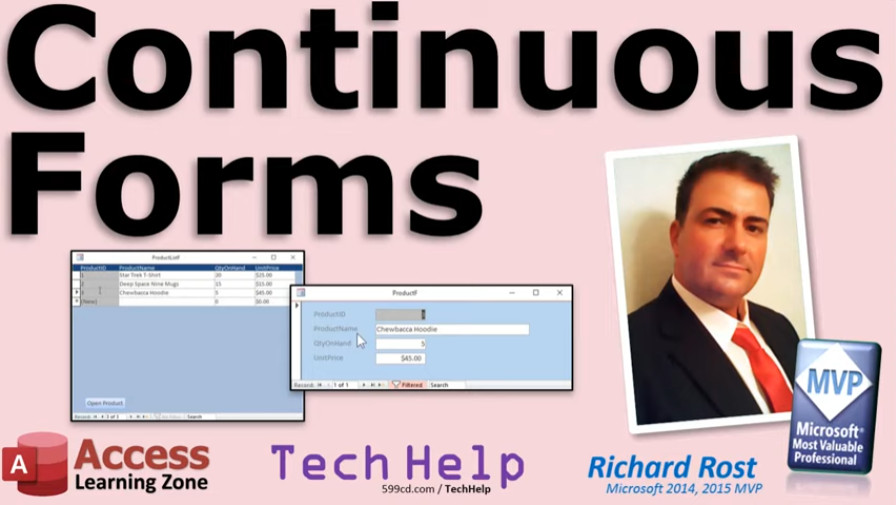
Watch this. Copy, Control-C, Paste, Control-V. I am going to call this my ProductListF. Open it up in Design View. Now we are going to open up the form properties again. Change this to Continuous Forms. Now we will see multiple records on the same screen at the same time.
If I save this now and close it and reopen it, it looks like this. You can scroll up and down through that. But that is not quite exactly what I want. I want it to look more like a spreadsheet.
We have to just do a little bit of layout changing in here. So, Design View. The first thing I am going to do is turn on the Form Header and Footer. That way I can have a header across the top and a footer at the bottom.
Right click anywhere here in the Detail section and go to Form Header/Footer. Not Page Header/Footer. That is for printing stuff out, and we do not print out forms. We print out reports, so I never use that. Go to Form Header/Footer. That puts on these things. You have a section here and a section down there. The Form Header appears once at the top of the form.
I am going to take these labels, select all the labels, cut them out, Control-X Cut, and paste them up here in the Form Header. Now I am going to rearrange these a little bit so they look like the way I want them to look. Maybe select all of them, get them right on the grid like they should be. You can change their color if you want, make them black so they are easier to see. Bring this up like that because that section does not have to be that big. You can change this background color separately if you want to. You can go with a dark background color like that and then select all those labels and give them a white foreground color if you want to.
Whatever you want, it is your database. That is why you are learning Access. Do whatever you want.
Now slide these fields up underneath the ones above. Slide them right up underneath their labels. Get that right there, get you right there, resize you a little bit, put the quantity on hand there and the unit price right there. Line them up, make them look nice.
I like to have everything left aligned, so I am going to select all of these fields and hit the left align button. I do not like labels on the left and then the numbers on the right. It just looks messy.
Now grab this bar right here and slide it up to get rid of all that empty space.
We are going to save it, Control-S, close it and then reopen it again—and look at that, there is your continuous form now.
One other little thing I like to change is right here. I do not like that alternating background color. Back in Design View, I hate that, and in my template, my basic template, I turn that off.
Open up the properties for the detail section. Double click right there. See there, there is Back Color and Alternate Back Color. Now I do not like using theme colors, Accent 5, Lighter 60. You are supposed to be able to change your theme and all your colors change. I do not like that.
So I am going to go first, let's start with the Back Color. Come in here, dot, dot, dot, pick a standard color that I like. Like maybe that guy, and then I am going to copy and paste this over the Alternate Back Color as well, so I got the same color. If you want to change the Form Footer and put the same color there, you can do that too. We will leave the Form Header dark like that. It looks nice.
Save it, close it, reopen it. There we go. Looks good. There is a little bit of space here for a scroll bar because if this is smaller or if you have more records, see that scroll bar appears. You can scroll up and down. If you do not need it, it does not show up.
Next I promised I would show you how to click on one of these guys and then open up this full product form because usually you will have a lot more fields on here. You might have your unit cost, your full description, maybe a picture, all kinds of manufacturer where you get it from. But you do not want all that stuff showing up on this simple list form. This is to find something quickly.
What you might want to do is pick one of these and then we are going to make a button right here that will open up that product form.
So, Design View. Fortunately, there is a button in the command button set that does this for us automatically. So go up to Design, find your Command Buttons right there, and drop it on the form footer.
Go to Form Operations, Open a Form, Next. What am I opening? The ProductListF, Next. Now, do I want to show all the records or find specific data to display? Click on that one. Next, link the two fields that are the same in both forms: ProductID, ProductID. Click that button to link them. Next, what do you want the button to say? I will put in here, Open Product. You can put a picture if you want, but I like text. Next, give the button a meaningful name: OpenProductForm, no spaces preferably, and then Finish.
There is my button right down there. I do have another video that covers that button in a lot more detail. I will put a link down below if you want to watch that too.
As a side note, there is no command button option to do the same thing with reports. If you want to print out a product or you want to print out a single invoice, for example, or a single customer record, there is no button up here to do it. I have a separate video on that as well. Lots of people like that one. I will put a link to that too.
Let's close this down. Open it back up. Open the Product List. Now, it is a two-step process. Click on Chewbacca hoodie and then Open Product. It will open the currently selected product. There it is. I am going to slide this over here and hit Control-S to save its position.
Close that. Click on Deep Space Nine mugs. Open Product. See that? It opens right to it. Pick the product. Open Product.
Yes, in my more advanced classes, you can make it so you can double-click on one of these up here and it just opens this form. That requires some programming. It is not quite as easy. I do have classes to cover that.
So Wyatt, there you go. That shows you how to create a continuous form to show all of your products. Click on a specific product and then hit the Open Product button to open up that product's single form.
Now in part two, in the extended cut, I will show you how to calculate a total count of products and your total inventory value.
If you want to learn more about continuous forms, in the extended cut I show you how to calculate a line total, which is right over here. That is quantity on hand times unit price to get a total for each product. Then the inventory count is right down here. That is a count of all of these guys. The count up, 20, 15, 5, so I have to sum those together. Then over here, the total inventory value, sum up these guys. These are what are called form footer totals.
That is all covered in the extended cut for members. Silver members and up get access to all of my extended cut videos.Quiz Q1. What is a continuous form in Microsoft Access?
A. A form that displays multiple records at once in a list format
B. A form that only displays reports
C. A form that prints data to a sheet
D. A form that shows only one record at a time
Q2. Why is it not recommended to work directly with tables for user interaction?
A. Tables are slower than forms
B. Forms provide more restricted and controlled user interaction
C. Tables are read-only by default
D. Tables do not store information
Q3. What is the first step after creating a table for your products?
A. Create a query to filter records
B. Enter sample product records into the table
C. Create a report
D. Start with a linked Excel sheet
Q4. Which field type should be used for the primary key in the product table?
A. Short Text
B. Currency
C. AutoNumber
D. Date/Time
Q5. What is a benefit of copying an existing single form to create a continuous form?
A. You can reuse the same layout and formatting with minor changes
B. It deletes your original form
C. It automatically converts all controls to buttons
D. It adds new fields automatically
Q6. How do you change a form to display as a continuous form?
A. Change the form's Default View property to Continuous Forms
B. Delete all records
C. Change the control source to a query
D. Set the Record Source property to Table
Q7. When would you use the Form Header/Footer instead of the Page Header/Footer?
A. For adding headers and footers to on-screen forms, not for print
B. For printing reports only
C. For adding summaries to printed pages
D. For inserting macros into the form
Q8. What should you do with the field labels in continuous form design?
A. Move them into the Form Header section
B. Delete them
C. Place them in the Detail section
D. Hide them
Q9. Which property controls the alternating background color for form detail sections?
A. Alternate Back Color
B. Form Caption
C. Control Source
D. Locked
Q10. Why is it useful to have a button on the continuous form to open the full product form?
A. To provide quick access to detailed information for a specific product
B. To calculate inventory totals
C. To print the form
D. To close the form
Q11. What operation does the command button wizard help automate on the list form?
A. Opening a related product form filtered to the current selection
B. Exporting a list to Excel
C. Printing multiple products at once
D. Sending emails to customers
Q12. In the Open Form button wizard, what should you select to show a single, specific product record from the list?
A. Find specific data to display
B. Show all records
C. Update the current record
D. Delete the record
Q13. According to the video, why would you want to keep list forms simple?
A. To allow quick identification and selection of products without extraneous details
B. To print them more easily
C. To fit the form on smaller screens
D. To avoid errors in queries
Q14. What additional features are shown in the extended cut of the video?
A. Calculating product line totals, inventory count, and total inventory value
B. Sending email reminders
C. Creating macros for automation
D. Setting up user permissions
Answers: 1-A; 2-B; 3-B; 4-C; 5-A; 6-A; 7-A; 8-A; 9-A; 10-A; 11-A; 12-A; 13-A; 14-A
DISCLAIMER: Quiz questions are AI generated. If you find any that are wrong, don't make sense, or aren't related to the video topic at hand, then please post a comment and let me know. Thanks.Summary Today's video from Access Learning Zone focuses on continuous forms in Microsoft Access, which are also called list forms. My goal here is to explain how you can display a list of records on your form so you can see multiple entries at once. I'll also cover creating a button that lets you open up the specific record you are interested in.
The question prompting this lesson is how to show all products in a list to allow scrolling, and how to open the full record for any product. There is also an added request to display the total number of products and the total inventory value.
Continuous forms are a useful feature in Access. Unlike single forms, which show only one record at a time, continuous forms allow you to view several records together in a list format. This lets you easily scroll up and down your records.
I'll break this topic up into two parts. In this first segment, I will show how to create the continuous form and add a button so you can open up a detailed product form for the currently selected item. In part two, available in the extended cut, I'll guide you through adding a count of the products and a calculation for the total inventory value.
To begin, the first step is to create a table for your products. Design a table with fields like an AutoNumber ID, a product name using Short Text, and a quantity on hand as a Long Integer. You can also add a price field using the Currency type. This setup will let you track products and later calculate total values. If you want, you can add more fields like a product description or unit cost, but for simplicity, I'm sticking with the basics here.
Once the table is defined and saved, you can enter some sample data. For instance, you might add a Star Trek T-shirt with a certain quantity and price, some Deep Space Nine mugs, or even a Chewbacca hoodie with its own quantity and unit price. Add as many products as you need at this stage.
It's generally not a good practice for users to work directly in tables. Instead, all interaction should go through forms. Therefore, the next step is to create a form. I recommend starting with a single product form. Set up the record source to use your product table. Add the product fields onto the form by pulling them from the existing fields list, adjust their size and positioning, and format them as you like. For example, you can gray out your ID field to prevent accidental changes by the user. Save and close the form, then open it up to confirm that each record appears by itself. You'll notice that you have to use the navigation buttons to scroll through the products one at a time.
Now, to show multiple records at once, you can turn your single form into a continuous form. A quick way to do this is to copy your single form and give the copy a new name, such as ProductListF. Open your new form in design view and adjust the Default View setting to Continuous Forms under the form's properties. When you open the form again, you should see all your products in a list that you can scroll through.
At this point, the layout may not look exactly like a spreadsheet, but it's easy to improve. Open the form in design view. Turn on the form header and footer so you can add a header across the top for your column labels, and a footer at the bottom for any totals or buttons you want to add later. Cut the label controls from the detail section, then paste them into the form header and arrange them above their corresponding text boxes.
You can customize the appearance by adjusting the background colors of the header, detail, and footer sections. If you want a specific color scheme, change the background and font colors as you prefer. Bring the form's sections and controls closer together for a more compact look. You can remove or set matching colors for alternating backgrounds in the detail section if you find the default color scheme distracting.
Save your changes and open the form again. Now, you should see a neat, continuous list of products. The scroll bar on the right will appear as needed, depending on how many items are in your list.
To make the form more interactive by letting users open a detailed record, you can add a button in the form footer. Design the button to open your single product form and automatically display the currently selected product. Use the built-in command button wizard to handle this. Select the operation to open a form, specify your destination form, and set the criteria to open the record where the product IDs match. Label your button with something meaningful, and place it where users can easily access it.
After saving, test the functionality by selecting a product in your continuous form and clicking the Open Product button. The detailed form will open, showing only the information for the selected product. You can repeat this for any record in your list. This allows users to scan through the product list quickly and then view or update full details as needed.
If you want to further enhance the user experience, there are more advanced techniques such as triggering the detailed form with a double-click on a record, but those require programming and are covered in my higher-level courses.
That covers how to set up continuous forms in Access, display a list of products, and enable users to open specific records. In the extended cut, I will show you how to add a calculated field for line totals—combining quantity and price for each product—along with footer calculations for the total product count and overall inventory value.
You can find a complete video tutorial with step-by-step instructions on everything discussed here on my website at the link below. Live long and prosper, my friends.Topic List Creating a product table in Access
Defining fields such as ID, name, quantity, and price
Entering sample products in the table
Creating a basic single form for product entry
Setting the record source for a form
Adding fields to a form using Form Design
Arranging and formatting form controls
Saving and naming forms appropriately
Copying a single form to create a list form
Changing form properties to Continuous Forms
Adjusting layout for a spreadsheet-like appearance
Enabling and using Form Header and Footer sections
Moving and formatting labels into the form header
Aligning fields for a clean layout
Changing back color and alternate back color for forms
Configuring scroll bar appearance in continuous forms
Adding a button to open a specific record's detailed form
Using the Command Button Wizard for form operations
Linking forms based on product ID fields
Testing button functionality to open selected records
Naming command buttons appropriately for clarity |


