User Level Security
By Richard Rost

 3 years ago
User Level Security in Microsoft Access, Part 1
In this Microsoft Access tutorial I will teach you how to add simple user-level security to your databases. We will create a user table and give each user a logon name and password.
Disclaimer
This tutorial will show you security that is "good enough" to keep most users out of your database. However an experienced Access developer will be able to bypass this logon routine. To learn the best possible way to secure your database I recommend my Microsoft Access Security Seminar.
Members
There is no extended cut, but here is the database file:
Silver Members and up get access to view Extended Cut videos, when available. Gold Members can download the files from class plus get access to the Code Vault. If you're not a member, Join Today!
Prerequisites
Links
Recommended Courses
Next Video
Keywords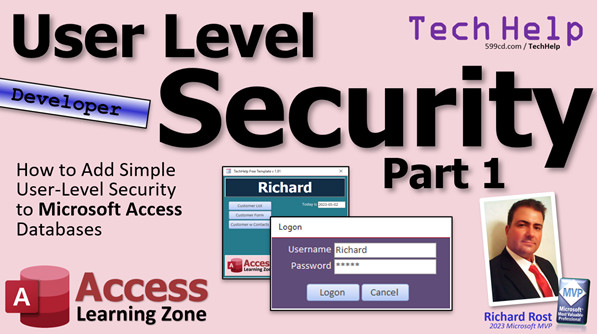
access 2016, access 2019, access 2021, access 365, microsoft access, ms access, ms access tutorial, #msaccess, #microsoftaccess, #help, #howto, #tutorial, #learn, #lesson, #training, #database, How do I set up security, What happened to user-level security, securing a Microsoft Access database, How To Manage User Permissions In Access Database, user table, usert, username, password
More InformationTranscript Welcome to another TechHelp video brought to you by AccessLearningZone.com. I am your instructor, Richard Rost. In today's video, I'm going to show you something people have been bugging me about for a while now, and that's how to add simple user-level security to your Microsoft Access database.
You want to create a simple log-on form where users enter a username and password. Boom, it logs the user in, then you can control what they have access to and track what they've been doing and so on. That's what we're going to show you how to start in part one of today's video.
This is a developer-level video. So what does that mean? That means there's going to be some VBA programming. If you have never done any VBA programming before, don't worry, it's not that hard. Watch my intro to VBA video first. It's about 20 minutes long. I'll teach you everything you need to know to get started.
You'll need to know what modal and pop-up windows are. You'll see modal windows so we can put up a log-on form and the user can't click behind it. The big granddaddy function, DLookup, definitely watch this video if you've never used DLookup before. Big, important function. We'll need NZ too, to convert null values to zero or empty strings. You should know how to write If Then statements -- very important. If this, then do that, otherwise exit the database if they don't type in the right password. And of course, message box -- we're not going to be getting a value from it, just popping it in your face and saying, "Uh-uh, wrong password." There are a few other ones, but I'll mention them as we go along.
These are all free videos. They're on my website and my YouTube channel. Go watch these first if you're not familiar with any of this stuff. Also, finally, and probably most importantly, if you have not yet watched my Simple Security video, go watch this right now. In order for the techniques I'm going to show you to have any possibility of keeping people out of your database, you need to do some of the things that I mention in that video. I'll show you how to hide sensitive objects like tables and forms, hide the whole navigation pane, disable the full ribbon, and create an execute-only ACCDE file. If you don't do these things, then you might as well not follow the rest of this video, because you've got to do this stuff if you want to lock it down.
Now, a disclaimer before we get started: this tutorial will show you security that's good enough to keep most users out of your database. If you want to keep Pat from over in accounting from getting into the engineering stuff, as long as Pat's not an expert, you don't have any problems. An experienced Access developer, however, will be able to bypass this stuff I'm going to show you in this video. To learn the best possible way to secure your Access database, I recommend my Access Security Seminar, which covers things in a lot more detail and goes over some more bulletproofing that you can do to your Access database. We'll talk more about that toward the end of this video. And of course, if your table data is sensitive, then SQL Server is the best bet for that. But again, we'll talk about that later.
Today's tutorial is for most of you, small businesses, or small departments. You've got a simple database and you want to keep people from messing it up and doing things they're not supposed to do and seeing things they're not supposed to see. But you're not worried about someone -- some CIA level hacker -- getting in there. I'm going to show you how to lock down your database good enough today.
Here I am in my TechHelp free template. This is a free database. You can download a copy from my website if you want to. The first thing we're going to do is create a table to store your user information.
So, create table design: UserID -- that's my AutoNumber. We don't need that thing over there. Let's go with UserName, Short Text; Password, Short Text. Are there other things you can add? Sure. But we're going to keep it simple for now.
Save this as my user table. Primary key? Yep, there we go. And for now, I'm just going to add myself. I'll do Richard, password 599CD. Close it. We're good. We've got our simple user table set up.
Now we're going to make a log-on form. Normally when the database starts up, this is our startup form. We're going to make a new form, which is going to be our log-on form. We're going to have that be the startup form. Then, if they log onto that properly, we'll open up the main menu.
For now, I'm just going to copy the main menu because it's got most of the attributes that I want. Copy, paste, control-C, control-V. We'll call this the LogonF. It's log on, by the way, not log in -- log on. Hit OK. Now we've got a log-on form.
Let's design this guy. I am going to delete most of the objects off here. Get rid of that. Save a text box and a button. We can pretty this thing up. This will be our username. Open up properties. Change the name from CurrentDate to UserName. Get rid of the control source and the format. Copy it and paste it. Now it's the password box. Password. This will now be called Password. We're going to make an input mask for it called Password. Just type in the word "Password" there. If you don't know what an input mask is, go watch my Input Mask video. I'll put a link down below.
Let's change the form's caption. Under Format, instead of that, we're just going to call it "Log On." We're going to make this the LogOn button. We'll call it LogOnBTN. We're going to copy and paste this because we need a LogOn and a Cancel. We don't want the user to not be able to get out of this if they don't know the password. Well, type in a wrong password, we'll exit out. We'll just call that Cancel, and that will be my Cancel button.
We'll slide these over here and make it look nice. Maybe give the form a splash of color -- I like purple. I've always made log-on forms purple. I don't know why.
Now, we don't want the user to be able to get around this form, so we're going to make it a modal form. Go to Other in the form properties. Set Modal to Yes. I don't like using Pop Up because Pop Up, where it appears, is very unreliable and unpredictable, especially on a multi-monitor system. Pop Up can make forms appear outside of the Access window. So I almost never use Pop Up, but I do like Modal. Modal basically says you can't click on anything behind me until you close me, and that's handy for a log-on form.
We are also going to go to the form properties and disable the control box and the close button, so they can't just close the form. The only way to close the form is by using your buttons. If you follow the tips in my Simple Security video, they won't be able to go to design view. They can't right-click up here and flip to design view, so the only way they can possibly get around this is to close using your buttons.
Now, we're going to set this as the startup form. Close that, go to File > Options > Current Database. Change the display form from Main Menu to LogOn form and hit OK. You'll have to close and reopen the database -- that's fine.
A couple more modifications while I'm thinking about it. Design view. We're going to make the LogOn button your default button. Go to Other and set Default to Yes. That means when the user presses Enter anywhere on this form in any field, it'll push that button. Cancel -- we're going to make the Cancel button the Cancel property Yes, so if they hit Escape, it pushes that button.
Let's make one more little tweak. Maybe make the LogOn button a little bigger. Good. You can do those little things in here, adjust it as you like. Just use little tricks and make it nice. Also, of course, tab order -- we're going to fix our tab order. Form Design > Tab Order > Auto Order, so it starts off on Username, Password. Boom.
We're going to do the Cancel button's code first, because that's the easy one. Right-click, Build Event. Now, there's a bunch of code in here from the Main Menu first. If you copy a form, you're going to get all of its code. Let's delete all of this stuff that we don't need in here. Don't keep it around if you copied a form. We don't need all this stuff here. Get rid of it all. All I need right now is my Cancel button click.
What's going to happen when the user clicks on the Cancel button? We want to just close the database. Simple enough. Quit -- that's all you need.
Save that. Come back out here. Let's go to the log-on form. It's going to pop up when the database starts. See? It's nice. It's modal and it hid the navigation pane for you automatically.
If I click Cancel -- boom, the database shuts down. Easy enough. Open it up again -- right into the log-on form.
Now, I want to go to the navigation pane. Since I haven't made an ACCDE file yet, I can still right-click and go to design view. That's one of the reasons why you want to give your users ACCDE files, because they won't be able to do that. That's very important.
Now, we have to write the code for the LogOn button. Essentially, we're going to compare what they typed in these two boxes with the information in our log-on table and make sure they're the same.
We're going to look up the username first, make sure it's in the table. If it is, it's going to bring back the user ID. Then we'll use the user ID to get their password out of the table, and then we'll compare that to what they typed in the password box. Easy enough.
Here we go. LogOn button, Build Event. We are going to need two variables. So, Dim id As Long and pw As String. First, we're going to look up their ID. So, id = NZ(DLookup("UserID", "UserTable", "UserName=""" & UserName & """")), 0).
DLookup is going to return a UserID if it finds that username. If it doesn't, it's going to have a null value -- that's where NZ comes in, and that'll make it zero. After this command is run, I'll either have a zero or a number representing their UserID. If it's zero, that means that user is not found.
So, If id = 0 Then MsgBox "User not found" : Quit End If
I like to quit instead of giving them multiple tries. It slows them down -- they have to restart the database again. If someone's trying to hack, you don't want to make it easy for them. If you want to put a counter in here with a variable and say they have three tries, that's up to you. I just quit the database -- let them restart it again.
At this point, we have a valid user ID. The username exists in the user table. Now let's look up the password. Same thing as before, but it's a little simpler this time. password = NZ(DLookup("Password", "UserTable", "UserID=" & id), "")
We're looking up the password from the user table where the UserID equals the ID that we got earlier. This does not have to be inside of quotes because it's a number. You want to use IDs if possible -- looking up strings is a pain. Since password is a string, if the password doesn't exist, we're going to return an empty string. I don't like to deal with nulls.
Now, at this point, we're either going to have a password (whatever's in the table), or no password, which will be an empty string. That's OK. You can set up users without passwords if you want to, but we're going to compare it to whatever they typed in.
If password <> PasswordBox.Value Then
MsgBox "Incorrect password"
Quit
End If
So they don't have to have a password, but if there is a password in the table, they need to enter it.
Now, at this point, you have a valid user. What do you want to do with this information? I'm going to set either a global variable or something like a TempVar with this information, so I know who the user is. Global variable is nice because it's a variable that you declare up here in a public module, and anybody can use it. The problem with global variables is that if your database has any kind of an error, global variables get reset. TempVars do not.
I've got a whole separate video coming out very soon on TempVars. They're really cool. Just keep in mind that TempVars can store information that's accessible anywhere in the database. You can use them in queries, you can use them in your VB code -- they're very handy.
So, we're going to say TempVars!UserName = UserName.Value. You have to specify Value for a text box because TempVars have to be a string value -- that can't be the actual username box itself.
Now, whatever was in that username box is going to be stored in a variable called UserName in TempVars. Now we can do stuff with that anywhere we want.
We're going to do something simple for now, and in the next video, part two, we'll do something a little more complicated. For now, I'm going to do DoCmd.OpenForm "MainMenuF", so open the main menu. Then we're going to close the log-on form, so DoCmd.Close acForm, Me.Name, acSaveYes. I just always use Me.Name because it's the name of the current form. You don't have to remember what the name of the current form is. The acSaveYes is just for me -- your end user won't be able to save the form design, but in case you're doing some work and you forget to save it, it'll save it for you.
It's going to store the username in a temporary variable in the system's memory, basically. We're going to open the main menu and close the log-on form.
Save it. Give it a quick Debug > Compile to make sure we don't have any syntax errors. We can close that. Let's open the database.
Ready? Open it up. There we go. I'll hit the log on. "User not found." Back to square one. I'll type in "Dave." Enter. "User not found." One more time. Type in "Richard" and "599CD," and I'm in.
One more thing I'm going to show you -- let's use that TempVar that we got. Let's set the main menu's label here equal to whatever the TempVar is.
Design view. Go to this form's On Load event. That's already something in there. That's my DoStartUp routine. You can ignore that -- that's just some code for me, and it resizes this window to fit my video player or recorder. You can ignore that or remove it if you want to. I'll delete it.
When this form opens up, MainMenuLabel.Caption = TempVars!UserName. That's the thing we set earlier. Now MainMenuLabel, which is this guy (the main menu label), set its caption property. Instead of "Main Menu," I want to see the user's name in there.
Close that. Save changes, yes. Let's restart the database. Open it up. Log in. There you go. You can see I now have used that username to know who's on and I put it in that box. Now the user is securely logged on, and now we can do things in the database with that information.
In the next video, part two, I'm going to teach you how you can control what forms and reports each particular user can go into and view. If you don't want them in the order form, you can keep them out of the order form. You don't want them seeing any of the invoicing reports, keep them out of there. Then, in part three, I'll show you how to make it so that users can only see the records that they've created. So if a user has created a particular customer record, they can only go back in and see their customers. I had a Platinum Member of mine request that because he only wants his sales reps to be able to view their own customers and not go and look at other sales reps' accounts.
As I mentioned at the top of this video, the techniques I'm showing you are only good to keep most average users out of your database. An Access expert, such as myself, will have no problems bypassing the security. If you want to learn real Access security, check out my Access Security Seminar. I'll show you how to create user and group controls so you can set users into different groups. You could have an accounting group, a managers' group, and so on. I'm just going to show you basic user-level stuff in this TechHelp video.
We'll also create a detailed system log, so you'll be able to see who's got access to what. I cover a lot more detail than what I'm going over in today's video, so check it out. You'll find a link down below.
Also, as I mentioned earlier, if your data is sensitive, you may want to consider upgrading to SQL Server. I have an SQL Server Online Seminar available as well, where I show you how to set up an SQL Server on a web platform, such as with Winhost. You also have the benefit of being able to access that data from anywhere across the internet, so it's not just in your office. Check that out too.
There you go. There is your User-Level Security Part One TechHelp video for today. I hope you learned something. Live long and prosper, my friends. I'll see you next time. Intro In this video, I will show you how to add basic user-level security to your Microsoft Access database. We'll create a simple user table for storing usernames and passwords, build a log-on form with modal behavior to control access, and write VBA code to validate user credentials. I'll also demonstrate how to use TempVars to track the current user and display their name on the main menu. This tutorial is aimed at Access developers looking to secure their database from most users using straightforward techniques. Quiz Q1. What is the primary function of the user-level security system described in this tutorial?
A. To create separate Microsoft Access accounts for every user in Windows
B. To prevent all users from accessing any data
C. To provide a login form for users and control their access within the database
D. To encrypt the entire database contents
Q2. Why should modal forms be used for log-on forms in Access?
A. Modal forms are the only type that accepts VBA code
B. They prevent users from interacting with anything behind the log-on form until it is closed
C. Modal forms make forms appear at random locations
D. Modal forms disable all buttons on the form
Q3. What is the purpose of using the DLookup function in the log-on process?
A. To hide the navigation pane
B. To search for and retrieve user information from a table based on the entered username
C. To display error messages to the user
D. To close all open forms
Q4. What does the NZ function do in the context of this security system?
A. Encrypts the password in the user table
B. Converts null values into zero or a specified default value
C. Prevents edits to the user table
D. Resets global variables
Q5. Why is it recommended to distribute databases as ACCDE files to users?
A. ACCDE files can be edited by anyone
B. ACCDE files are required to run VBA code
C. ACCDE files prevent users from entering data
D. ACCDE files prevent users from switching to design view
Q6. What should happen when the user clicks the Cancel button on the log-on form?
A. The application should minimize
B. The database should close entirely
C. The password should be reset
D. The log-on form should refresh
Q7. How does the system respond if the username entered is not found in the user table?
A. Shows an incorrect password message and allows multiple tries
B. Inserts the new username into the table
C. Shows a "User not found" message and closes the database
D. Opens the main menu anyway
Q8. What is the benefit of using TempVars to store the logged-in username?
A. TempVars allow the information to be accessed throughout the database, including in queries and VBA code
B. TempVars permanently store user information in the database
C. TempVars cannot be cleared out by errors
D. TempVars encrypt the data automatically
Q9. Which of the following is NOT a step recommended by the instructor for improving database security?
A. Hiding sensitive objects like tables and forms
B. Disabling the full ribbon interface
C. Creating an execute-only ACCDE file
D. Encrypting the database with a global variable
Q10. What is the primary limitation of the security method shown in this tutorial?
A. It is impossible to use with VBA
B. Experienced Access developers can bypass the security measures
C. It removes all user access to the database
D. It automatically upgrades to SQL Server
Q11. What is the role of the input mask set to "Password" for the password textbox?
A. It ensures only numbers can be entered
B. It masks the password input so it is not visible
C. It encrypts the password in the table
D. It limits the password to three characters
Q12. What happens if a user enters a correct username but an incorrect password?
A. They are allowed in with limited access
B. They see a message "Incorrect password" and the database closes
C. The password is reset automatically
D. They are directed to reset their username
Q13. Why is it suggested that you create a simple user table with at least UserID, UserName, and Password fields?
A. To store user names alphabetically
B. To allow tracking, authentication, and possible expansion of user data
C. To encrypt all data in the database
D. To allow for multiple log-ins at once
Q14. If stronger security is needed than what is shown in this tutorial, what does the instructor recommend?
A. Adding more password boxes
B. Using SQL Server for data storage
C. Storing passwords in plain text
D. Removing all security features
Q15. In the example, what is the purpose of updating the main menu's label caption with the TempVar value?
A. To display the application version
B. To display a hardcoded welcome message
C. To show the logged-in user's name for confirmation and personalization
D. To log out the current user
Answers: 1-C; 2-B; 3-B; 4-B; 5-D; 6-B; 7-C; 8-A; 9-D; 10-B; 11-B; 12-B; 13-B; 14-B; 15-C
DISCLAIMER: Quiz questions are AI generated. If you find any that are wrong, don't make sense, or aren't related to the video topic at hand, then please post a comment and let me know. Thanks. Summary Today's TechHelp tutorial from Access Learning Zone is all about adding simple user-level security to a Microsoft Access database. This is a feature that many people have asked for, and in this lesson, I am going to guide you through the process of creating a basic log-on form where users can enter a username and password. Once a user is logged in, you can control their access to different parts of your database and track their activity.
This is a developer-level tutorial, so some familiarity with VBA programming is necessary. Even if you're new to VBA, do not be intimidated. I recommend starting with my introductory video on VBA programming, which will cover all the fundamentals you need. You should be comfortable with modal and pop-up forms, using DLookup for pulling data from your tables, working with If Then statements, and displaying messages with MsgBox. It's important to know how to use NZ to handle null values and ensure you're not running into errors with missing data.
If you aren't familiar with any of these topics, I have separate free video lessons available for each one on my website and YouTube channel. Also, before getting into security features, make sure you've watched my Simple Security video. That guide explains how to lock down your database by hiding sensitive objects like tables and forms, removing the navigation pane, disabling the full ribbon, and distributing your database as an ACCDE file, which prevents users from accessing the design view. If you skip these steps, the rest of the protection methods discussed here will not be effective.
A quick disclaimer before we continue: The security system I show here is adequate for most users. It will effectively keep average users from accessing areas where they do not belong, like limiting the accounting team's access to only accounting data. However, an experienced Access developer could still bypass these protections. If you require stronger security for your Access applications, I recommend my full Access Security Seminar, which gets into advanced techniques and more thorough protection strategies. I'll share more details about that at the end of this article. If your database handles very sensitive information, SQL Server is a better choice for data security, and I'll touch on that too.
For most small businesses or departments, this approach will be sufficient. If you want to prevent users from accessing information they're not supposed to see or making unwanted changes, you will find this method quite effective.
Let's get started. I am working from the TechHelp free template, which is a sample database you can download from my website if you'd like to follow along. The first step is to create a table to store each user's login information. In table design view, set up an AutoNumber field for UserID, and add fields for UserName and Password as Short Text. You can add other fields if you like, but I'll keep it simple for now. After saving the table and setting UserID as the primary key, enter your own username and password as the first record, just to test things out.
The next step is to build the log-on form. Normally, your database loads a startup form immediately upon opening. Here, we're going to create a new form that acts as the log-on screen and set it as the startup form. After a user logs in successfully, the database will display the main menu. I like to copy the design of my main menu form for consistency and simply strip out any objects I do not need, leaving just a couple of text boxes for username and password, and two buttons: LogOn and Cancel.
For the username and password controls, ensure you name them clearly, and for the password box, use an input mask so the password appears hidden as the user types. If you aren't sure how to use input masks, I have a full video tutorial on that topic as well.
Customize the look of your form however you wish. I often use a purple color, just as a tradition. Set the Modal property of the form to Yes. This prevents users from clicking on anything else in Access until they've dealt with the log-on screen. Avoid setting the Pop Up property, since it can behave unpredictably, especially on systems with multiple monitors. Additionally, disable the control box and close button on the form. This ensures the only way out of the log-on form is through your provided buttons.
In the database options, set this log-on form as the display form so it loads first when the database opens. Consider assigning the Default property to the LogOn button, so pressing Enter anywhere on the form will trigger it, and set the Cancel property of the Cancel button so that pressing Escape will activate that one.
Fix the tab order of your form as well, making sure the cursor moves logically from the username to the password field and then to the buttons.
Let's add the code for the Cancel button first. You simply want this to close the database when clicked. When you copy a form, you might get leftover code in the module, so take a moment to clean out any unwanted procedures and leave only what is necessary for the current form.
Once you've added the Cancel logic, test your form. When the database loads, the log-on form should appear and block access to the rest of the database. If the user clicks Cancel, the entire application closes.
Since we're still in development, you can still access design view by right-clicking, but once you've distributed your database as an ACCDE file, regular users will lose access to these design tools, offering additional protection.
The main work happens in the LogOn button code. The process is straightforward: check if the username the user entered exists in your table using DLookup. If it does, retrieve the corresponding UserID and the stored password for that user. Compare what the user entered for the password against what's in the table.
If the username does not exist, show a message and close the database. If the password is incorrect, again show a message and close the database. I prefer not to allow unlimited login attempts, since that slows down anyone who might be trying to guess passwords. If you'd like to let users have several tries before being locked out, you can implement a counter, but for basic security, closing the database is enough.
Once a user has successfully authenticated, it's important to keep track of who is logged in. You can do this using global variables or TempVars. TempVars in particular are very handy, as they retain their values throughout a session, even if your code encounters errors, and they can be used in forms, queries, and modules. Assign the username to a TempVar when a user logs in. Now you can access that value from anywhere else in your database.
After successfully logging in, open the main menu form and close the log-on form. Storing the username in a TempVar allows you to display it anywhere. For example, you can write a bit of code in the main menu's On Load event to set a label's caption to the current username, so it is clear who is logged in at all times.
After saving everything and compiling your code to catch syntax errors, you should test the log-on routine. Try logging in with correct and incorrect names and passwords to confirm that your system blocks unauthorized users and lets in those with the right credentials.
This tutorial forms the basis for more advanced security techniques. In the next lesson, part two, I will explain how you can restrict access to specific forms and reports based on the current user. You can prevent certain users from opening sensitive forms or viewing confidential reports. In part three, we'll discuss limiting users to only the records they've entered themselves, as requested by a member who wanted sales reps to access only their own customer data.
Once again, remember that the techniques described here are designed for basic user-level security and will stop most average users. However, a knowledgeable Access developer can still bypass these controls. For more robust solutions, take a look at my Access Security Seminar, where I guide you through setting up user and group permissions, tracking user activity, and more advanced security features. For maximum data security, especially with sensitive information, upgrading to SQL Server is a very good idea. I also offer a seminar on setting up SQL Server, where you can learn how to make your data accessible securely from virtually anywhere.
You can find a complete video tutorial with step-by-step instructions on everything discussed here on my website at the link below. Live long and prosper, my friends. Topic List Creating a user table to store usernames and passwords
Setting up a simple user log on form
Designing the log on form with username and password fields
Applying an input mask to the password field
Changing the startup form to the log on form
Making the log on form modal
Disabling the control box and close button on the form
Assigning default and cancel properties to buttons
Setting the tab order on a form
Programming the Cancel button to close the database
Using DLookup to verify username from the user table
Using NZ function to handle null values in DLookup
Displaying message boxes for failed log on attempts
Programming the LogOn button to compare passwords
Storing the logged on username in a TempVar
Opening the main menu form after successful log on
Passing the username from TempVar to the main menu label Primary Topics Microsoft Access, user-level security, log-on forms, VBA programming, DLookup, TempVars, modal forms
Secondary Topics input masks, tab order, ACCDE files, navigation pane hiding, SQL Server as secure backend
|


