|
|
Free Lessons Courses Seminars |
TechHelp Fast Tips Templates |
Topic Index Forum ABCD |
|
||||||
|
|
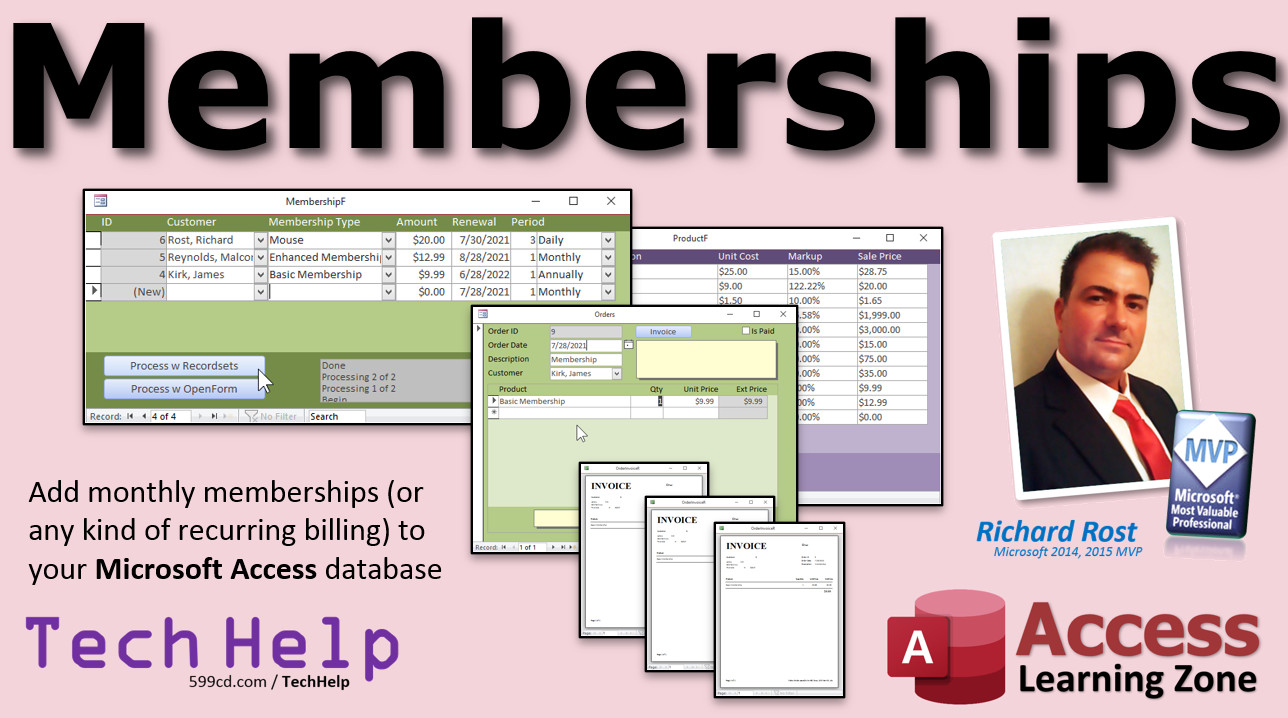
Membership Database By Richard Rost Access Membership Database. Recurring Billing In this video, I will show you how to add monthly memberships (or any kind of recurring billing) to your Microsoft Access database. Summer from Bozeman, Montana (a Platinum Member) asks: My business has a monthly membership program. I'm using your TechHelp Invoicing Database which is very helpful. Thank you. Is there any way to have the database automatically add invoices for membership dues every month? Right now I've got over 200 members and it's a pain to add them all by hand. MembersSilver Members will learn how to use VBA to loop through all of the members who are due and automatically create invoices for them with one click. Gold members will learn how to loop through the memberships with a Recordset which is far more efficient and less error prone than the previous method. We will also learn how to setup daily, weekly, monthly, quarterly, and annual billing.
Silver Members and up get access to view Extended Cut videos, when available. Gold Members can download the files from class plus get access to the Code Vault. If you're not a member, Join Today!
Links
Keywordsmicrosoft access, ms access, #msaccess, #microsoftaccess, #help, #howto, #tutorial, #instruction, #learn, #lesson, #training, #database, dues management, member management, membership renewals, member directory, member types, church database, OpenForm, recurring billing, membership template, membership tracking, church membership, template, how to create a membership database in access, membership database template, membership database example, church membership database
IntroIn this video, I will show you how to add monthly or recurring membership billing to your Microsoft Access database. We will create a membership table to track customer memberships, design a form for easy data entry, and add VBA code to automate generating invoices for membership dues. I will walk you through setting up the necessary tables, forms, and controls, plus how to use VBA to create new invoices based on membership renewal dates, making recurring billing much easier to manage in your database.TranscriptWelcome to another TechHelp video brought to you by AccessLearningZone.com. I am your instructor, Richard Rost. In today's video, I am going to show you how to add monthly memberships or any kind of recurring billing to your Microsoft Access database.Today's question comes from Summer from Bozeman, Montana, one of my platinum members. Summer says, "My business has a monthly membership program. I am using your TechHelp invoicing database, which is very helpful. Thank you." You are welcome. "Is there any way to have the database automatically add invoices for membership dues every month? Right now I have got over 200 members and it is a pain to add them all by hand." Well yes, of course, Summer, we can definitely do that. A little bit of warning, though. Any time you say "automatically" when it comes to Microsoft Access, it is going to involve a little bit of programming. You can use macros or VBA. Personally, I prefer VBA. I do not like macros. So make sure you go and watch my intro to VBA video. There is the link. I will put it down below in the link section so you can just click on it. Do not be scared. VBA is not that difficult. Once you learn it, I will walk you through it step by step. Now for the rest of you who have not used my invoicing database, go watch these videos first. My blank database is where I build the database template. We add contact management to it. Then we add invoicing to it. It is three different videos. If you are brand new to my videos, go watch those three first. Then go watch the form naming video. This is so you can know how to get a value from a form and also set a value on a different form. When we loop through the membership, we are going to have to be able to set values on the order form. So go watch all five of these if you have not yet already. They are all free. They are on my website. They are also on my YouTube channel. Go watch them right now. Go on. Get out of here. Go watch them. Okay, you are back. You watched them. Here we go. Here I am inside my TechHelp free template. Again, it is a free download from my website. If you watched those other videos, you know exactly what this is and how I built it. So we have got our customer form and each customer can have orders. What Summer has to do right now is she has to open this up, go to a new one, put in here your membership, come down here, type in "membership for July 21" or whatever, type over, type over, 9.95, and then print it. So we want to automate this process here. So she has got a list of members, what their memberships are. You can have multiple membership levels, and then click one button and have them automatically add those invoices to the system. So what is the first step? Well, the first step is going to be to set up a membership table so we can track what customers had memberships and what the details of those memberships are. So create table design. This will be our MembershipT, so we will start off with MembershipID. That will be my autonumber. Then a CustomerID, that is my foreign key so that is a number of type long integer. That is what customer this membership is associated with. Then the description, which I will call MembershipType, or you can put Description or whatever you want in there. Whatever you want it to show up on the invoice as. That will be short text. The amount of the membership, that is a currency, and then the renewal date. That will be a date/time value. Let's save that. This will be my MembershipT membership table. Primary key, yes, that is the ID. That is all good. Let's put some sample data in it. Customer 1, and of course, we will pick from a list; we do not want to type these numbers in. We will say this is the Basic membership and that is 9.95 a month. The renewal date will be, let us say, 7-1, this one was due. Today is 7-28 so this one should be due. Let's put another one in. Let's do customer 2. Let's do the Premium membership. That will be 19.95 and that was due on 7-3. Okay, let's make a form for this now. Close that, save changes, yes. Now if you watched my blank template, I have some blank forms over here that I keep so I do not have to keep recreating the wheel. So I am going to use my ContinuousF as the template for this. So copy, paste, control-C, control-V. This will become my MembershipF, the membership form, which is right down here now, design view. First thing I like to do, let's just change the colors. Let's make this look unique. Let's go to Format. Let's pick a darker green for that, and this down here, let's go a little bit lighter green for the detail section, maybe that. And, of course, there is that alternating color. Someone recently pointed out to me, normally what I do with the back color, I just copy this one to that one. It is just a habit. But someone recently pointed out to me in a comment, if you delete that, it puts zero in there, which, all zeros are black. But if you drop that down, you can also pick no color. So that might actually be a better method to do this because if you change this in the future, you do not have to keep changing it in here. So thank you whoever that was who made that comment. Sometimes I get stuck in habits of just copying and pasting and I forget that you can just pick no color from there. Okay, simple stuff. Let's bind this form. Go to the data section, bind this to my MembershipT table, which is right there. Now this form is getting its data from the MembershipT table. Let's add the existing fields. Go to Add Existing Field. Click on the first one, click on the last one to select them all, just click and drag, drop them all over here in the detail section. Now I can turn this off. The reason why I keep these over here is for formatting purposes. Watch. I can just slide these over here. Let's get rid of these labels, delete. MembershipID can go right there and I like my IDs to be gray, that is why I keep this one around. Click on that, format painter, paste whatever that, see. These guys all look pretty good so I can get rid of these now. Delete, slide that up there. Next up is the CustomerID, but I do not want to type in a CustomerID. I want to pick a customer from a list of customers, using a combo box. Again, I do not want to reinvent the wheel and I have already got a customer combo box on my order form. So save this real quick, Control-S. Let's go over to my order form, which is under Customers and then Orders. Here is a customer combo box. Let's just borrow this guy, right click, design view, click on that, copy, Control-C, close it, close that, click over here, paste. There it is. There is my customer combo box. Very little work. Delete the label. Delete this guy. Slide you right up into place, like that. A lot of working with Access is reusing controls, reusing forms. You do not want to have to reinvent the wheel every time you want to do something. MembershipType is next. That can go right there. The amount is right there. It does not have to be quite that big unless you are dealing with tens of thousands of dollars. Then a RenewalDate can go right at the end over there. Now I am going to select all these guys, right click. I am going to go Size to Grid, make sure they are all sized on the grid, shrink that up like that. Let's fix our labels. How many do we need? One, two, three more. So copy, paste, paste, paste. Just slide these over here, roughly where they go. Shrink that up. We can rename these now. This will be the Customer. Slide you over there. This will be the MembershipType. These are labels so they just have to look nice for you. This is the Amount. Let's resize you. This is the RenewalDate, slide you over there. If you have never done work like this before working with forms, go watch my Access Beginner Level 1 class. I cover all this in Access Beginner 1. It is free, it is four hours long, it is on my website. I will put a link down below in the link section. RenewalDate. OK, and let's make sure these are all sized to the grid, too. Highlight them all, right click, Size to Grid, slide that up. One more thing I am going to check is my tab order. I am going to click here on the detail section. Go to Design, Tab Order. Because, see, I added that customer combo. Hit Auto Order. That orders them all nicely. So when you are tabbing through, tab, tab, tab, tab, you do not have to worry about jumping around. Save it. Close it. Open it up. There we go. There is that nice membership form. Maybe align this guy to the left. That is another one of my pet peeves. Select that, Format, Align Left. Save it. Close it. Open it back up again. It still does not go. Sometimes if you do a group of them, I think this is a bug in Access. You have to do it individually sometimes. It does not get it with a group. Save it. Close it. Open it back up again. There it goes. I have noticed that many times. If you select a bunch of fields and you align them all, it does not always get them all. All right. Let's add someone else on here now. Let's say Jean-Luc Picard. He has got the Basic membership. I will copy and paste that, 9.95. His RenewalDate is 7-20, let us say. Let's put someone in the future in here. Let's put Will Ryker. He has got the Gold membership. That is like 29.95. But he is not due until 9-1. We do not want him to be processed yet. We will test to make sure our stuff is working. Now, let's sort this based on RenewalDates. We will sort that oldest and newest so the oldest guys show up on top up here. What we are going to do first is make a button down here in the footer. When I click on Process Renewal, it will open up an order form and add that order for me using some VBA code. Are you ready? Right click, Design view. Down here in the form footer we are going to put a command button. So find buttons up here, right there. Drop the button. Unfortunately, there is no wizard for this, so cancel. Let's rename the button caption. We will call this Process Current Renewal. Let's call it Process Current Renewal. Let's name the button itself, double-click on it. Command12 will become ProcessRenewalBTN. Alex is proud of me now. All right. Save this. Now, let's walk through the steps. Whoops, wrong button. Actually, let's put the membership on here. It is not on our menu, is it? I am just going to copy and paste one of these buttons. Copy, paste. We will change this to Memberships. Right click. Build event. It brings up my code builder. If you have not watched my intro to VBA class, go watch it. One line of code: DoCmd.OpenForm "MembershipF". That is it. Just like the other ones that are in here. Let me resize this a little bit. VBA is not scary. There we go. Close that. Save this. Let's reopen the main menu. There is my Memberships form. Looking good so far. So let's walk through the steps that I want this to take when I write my code. It is not a bad idea to put this inside of Notepad. Open up Notepad. Here is Notepad. What do you want it to do? Well, the first thing you have to do is open up the customer form. Because when we go to print our invoice, it needs the customer form. If you remember from when we built the invoicing database, it requires that to print out stuff correctly. So the first step is going to be to open the customer form for the current customer. Whoever this customer is in this box. Then we are going to open up an order form and go to a blank new order. So open order form, go to blank new order. Then we have to set the order details, including the Membership Type, the Money. Actually, this is the order, the order information. I said order details, I forgot. This form down here is actually called the Order Details form. So what I meant is the specifics for the order itself. Set order info, which is going to be the date, the description, the customer. Actually, since the customer form is open, the customer combo box will get its default value from there. But I still like to manually set that stuff just to make sure. Then once we set this stuff, we can set the order details. Set order details, which is going to be the type, the amount. Then at that point, we can print the order. So let's take our notes here, set them off to the side, just get them out of the way. But it is nice to sometimes have that; what steps do you want your code to take before you sit and just start writing code? Unless you have been doing it for 40 years like I have and I can just sit down and start writing code. But if you are just getting started out, it is good to write this stuff down. So what do we put in this button here? Design view, right click, Build Event brings up my code builder. ProcessRenewal_Click. The first thing I am going to do is check to make sure that whoever's order I am on, whatever membership I am on, is actually due. If it is in the future, just say this guy is not due yet. If RenewalDate > Date Then MsgBox "Not due yet." Exit Sub End If Save that. Come back over here. If I click it on here, nothing should happen. But if I click on this guy and hit Process Current Renewal, it will yell at me "Not due yet." So it will stop anybody who is not due from being processed again. Optionally, if you wanted to, you could put a box down here that says "Process Through xDate." Maybe if you are going to have vacation and you want to run memberships through next week so they could bill ahead of time. Whatever you want to do. So instead of using today's date, you could put the date in a message box or in a text box. But I am not going to go that far. So, what is up next? Next, we have to open up the customer form to the current customer. Now the current customer is in this combo box, which is called CustomerCombo. So next up is DoCmd.OpenForm "CustomerF", , , "CustomerID=" & CustomerCombo This says the customer ID on that customer form has to be equal to whatever value is in CustomerCombo. A little string concatenation there. That puts it together and the result will be CustomerID=4, let us say, and that gets sent to the DoCmd.OpenForm. So now if I come over here and click on me and go click, there is me. So that works. What is next? We have to open up the order form and go to a blank new order. So what we will do is DoCmd.OpenForm "OrderF", , , , acFormAdd There are different ways to open up this form. You can open it up in edit mode, which is the default, read only, which means people can only look at stuff, or add. Do not worry about property settings. Add. We are going to add a blank new record. Now that form will get the default value, but I still want to set it. So let's set the values on the order form. What are the fields we have to set? Let's go take a peek at the order form again. Customers, Orders. So the date, again, the date should be defaulted, but let's set it anyway, just to be sure. We have the description, and then we have the customer. So three things we have to set on the order form. Probably not a bad idea to also make sure IsPaid is zero. Even though these things have default values in my code, I still like to force them as well. Let's take a peek and make sure we have got the names: OrderDate, IsPaid, Description, CustomerCombo. Now we know what all these are. We can set these in our code. Let's go back to our code. Now, this is why I wanted you to review that form name thing. Because here is where we have to set a value on a different form. Remember, right now, I am sitting on the membership form. So any fields that I reference at this point, like CustomerCombo, are fields on the current form. If you want to refer to a different form, you have to use its full name. So set values on order form: Forms!OrderF!CustomerCombo = CustomerCombo Forms!OrderF!OrderDate = Date Forms!OrderF!Description = "Membership dues through " & DateAdd("m", 1, RenewalDate) Forms!OrderF!IsPaid = False Can you shorthand some of this? Yeah. There is a thing called a With statement. I almost never use it. If you want to, I will cover it in a future lesson. Send me some feedback and I will talk about it. I think I talk about it in my developer classes. I almost never use With; I think With makes the code harder to read. So now we have got our order information set. Next, we have to set the values in the order detail form. That is next. But first, a real quick commercial break. If you really want to get the most out of Access and you are enjoying these lessons, sign up for my Access Expert classes. I have got 32 levels, over 50 hours of lessons covering everything from relationships to SQL, order entry, accounts receivable, mass email, lots and lots of stuff. Go on, check out my website link. There is a complete course listing online. I will put a link to this down below. Gold members, if you sign up, gold members get one free expert level class every month. So that is one more reason to sign up as a member. Okay. Back to class. I usually put an ad at the end of the video, but I know a lot of you drop out as soon as you know the lesson is over. So I have got to start sneaking them in the middle of these longer lessons now. Sorry. Sign up. The more members I get, the fewer advertisements I have to do. Now let's set the order detail. So let's take a look at the order detail form. Let's go back to the customer form, Orders. What do we have to set in here? The ProductName, the Quantity should always be one, and then the UnitPrice. So let's take a peek and make sure we have got the names right: ProductName, Quantity, UnitPrice. Back to our code again. One thing I forgot up here: I am looking at my notes here, make sure when you are done you throw in Forms!OrderF.Refresh. Refresh says commit this stuff to the table. Remember when you are editing a record in the table, as you edit something, remember the little pencil there, it gets dirty. That means that this change has not yet been committed to the table underneath. As soon as you leave that record or issue a refresh, then this gets saved in the table. That is important when we are doing this stuff because we want this order to be saved to the table first before I start ordering or adding order details to it. So now we have committed this change to the order table. Now we are going to come down here and do Forms!OrderF!OrderDetailF.Form!ProductName = MembershipType Forms!OrderF!OrderDetailF.Form!UnitPrice = Amount Forms!OrderF!OrderDetailF.Form!Quantity = 1 Forms!OrderF!OrderDetailF.Form.Refresh This is where it gets a little complicated. We are dealing with a subform now. This is how you reference a subform. I mentioned this in the other video: Forms!OrderF!OrderDetailF.Form![FieldName]. This is how you refer to the order detail subform. Now we are going to update the membership record. We are going to say the RenewalDate for the current membership equals that same thing we did earlier, right up here. Copy, paste, and then Me.Refresh. Refresh that membership record. So what we did: - Open up the customer form. - Open up the order form (and this really is only open so we can print). - Set the order. - Set the details. - Update the membership record. - Then we are done. That is one iteration through the current member. Let's save it and test it and see if it works. Here we go. Ready. Click on the first one. Process Current Renewal. Click. Boom. Opens up me. Goes to a blank new record. Membership through 8-1. That looks about right. What was the membership date over here? Well, it already updated: 8-1. It was 7-1. Remember, my name, Basic membership 9.95. Now I can print it. I will put a button on here to print directly, whatever you want to do. Close this one. Okay, that is updated. Go to the next one, 7-3. Process renewal. Click. Boom. There you go. Membership through 8-3. Jim Kirk. Premium membership. Looks good. Click on the next one, 7-20. Go. Jean-Luc. Membership through 8-20. Then finally the last one. Click. Oh, he is not there yet. See how that works? So now we have got it working perfectly to add one at a time. Now. How can I click on the button and have it automatically add all of these orders to the system without me having to do them one at a time? I have already saved you a ton of work, Summer, by just making it one click per customer. But you can also loop through these and do them all in one shot. We will cover that in the extended cut for the members. Want to learn more? In the extended cut for the members, I will show you how to automatically process all of these at once. Click one button. Process all due. Bam, bam, bam. It will generate the invoices for you. It will loop through all of them, update the renewal date. We will also use the members-only version of the order entry database so your memberships can be entered into the product table. They will be added to the orders that way. I will also show you how to mark these invoices to be printed. They are all new when they are added to the system. That way you can generate a query later. You do not have to print them all at once. You can print all 10, 100, 500 invoices that you have to print or email them, however you handle it. In about 35 minutes, I will show you how to do daily, weekly, monthly, quarterly, or annual memberships so your memberships do not have to necessarily just be monthly. That is all covered in the very long extended cut for the members. Silver members and up get access to all the extended cut videos and gold members can download these templates. How do you become a member? Click the Join button below the video. After you click the Join button, you will see a list of all the different types of membership levels that are available. Silver members and up will get access to all of the extended cut TechHelp videos, live video and chat sessions, and more. Gold members get access to a download folder containing all the sample databases that I have built in my TechHelp videos, plus my code vault where I keep tons of different functions that I use. Platinum members get all the previous perks plus access to my full beginner courses and some of my expert courses. These are the full-length courses found on my website and not just for Access. I also teach Word, Excel, Visual Basic, ASP, and lots more. But do not worry, these free TechHelp videos are going to keep coming. As long as you keep watching them, I will keep making more. If you liked this video, please give me a thumbs up and feel free to post any comments that you have. I do read them all. Make sure you subscribe to my channel, which is completely free, and click the bell icon and select All to receive notifications when new videos are posted. Click on the Show More link below the video to find additional resources and links. You will see a list of other videos, additional information related to the current topic, free lessons, and lots more. YouTube no longer sends out email notifications when new videos are posted. So if you would like to get an email every time I post a new video, click on the link to join my mailing list. Now, if you have not yet tried my free Access Level 1 course, check it out now. It covers all the basics of building databases with Access. It is over three hours long. You can find it on my website or on my YouTube channel. If you like Level 1, Level 2 is just one dollar. It is also free for all members of my YouTube channel at any level. Want to have your question answered in a video just like this one? Visit my TechHelp page and you can send me your question there. Click here to watch my free Access Beginner Level 1 course, more of my TechHelp videos, or to subscribe to my channel. Thanks for watching this video from AccessLearningZone.com QuizQ1. What is the main objective of the video tutorial?A. To create a Microsoft Access report for memberships B. To add monthly or recurring billing for memberships in Access C. To show how to send emails to members from Access D. To design user interface graphics for an Access database Q2. According to Richard, what is typically required to automate processes in Microsoft Access? A. No programming at all B. Only using queries C. Some programming with macros or VBA D. Using Excel for automation Q3. Which method does Richard recommend for Access automation? A. Macros only B. SQL scripts C. VBA (Visual Basic for Applications) D. Manual data entry Q4. What is the purpose of creating the MembershipT table? A. To store only customer email addresses B. To track which customers have memberships and their details C. To manage product inventory D. To hold order totals only Q5. What fields are included in the MembershipT table? A. InventoryID, SupplierID, Category, Price, PurchaseDate B. MembershipID, CustomerID, MembershipType, Amount, RenewalDate C. OrderID, ProductName, Quantity, Status, DeliveryDate D. CustomerName, Address, Phone, Email, LastLogin Q6. How does Richard suggest selecting a customer in the membership form? A. Typing the CustomerID by hand B. Generating IDs randomly C. Using a combo box to select a customer from the list D. Using a button to assign random customers Q7. What is the benefit of reusing controls and forms in Access, as described in the video? A. It reduces the need for programming entirely B. It prevents errors during data entry C. It speeds up database development by avoiding reinventing the wheel D. It automatically backs up the database Q8. Why does Richard check the tab order in the form design? A. To ensure the database is backed up B. To make sure the form colors match C. To control the navigation order when tabbing through the fields D. To restrict access to certain users Q9. What does the 'Process Current Renewal' button do? A. Deletes expired memberships B. Manually opens the customer form for every member C. Uses VBA to automate the creation of an invoice for a member's renewal D. Exports membership records to Excel Q10. What code technique does Richard demonstrate to ensure that only due memberships are processed? A. Looping through all members regardless of date B. Checking if RenewalDate > Date to prevent processing future renewals C. Ignoring the renewal date D. Asking the user to confirm each due date by hand Q11. Why does Richard use the Refresh method after setting values in the OrderF form? A. So the color scheme updates correctly B. To ensure the form is closed after saving C. To commit changes to the table before adding order details D. To clear all fields on the form Q12. How are subform fields referenced from the main code for setting order details? A. Subforms rely on global variables B. By using Forms!OrderF!OrderDetailF.Form![FieldName] syntax C. Directly referencing as if they are on the main form D. Using macros only Q13. What is the purpose of updating the RenewalDate in the membership record after processing a renewal? A. To indicate the member's status is now inactive B. To reset all details to zero C. To record the next renewal period for the member D. To delete the membership record Q14. What is offered in the extended cut for members of AccessLearningZone.com? A. Only a downloadable manual B. The ability to process all due renewals at once with a single click C. Free hardware for database hosting D. Unlimited phone support Q15. What does Richard recommend if you are new to creating and formatting Access forms? A. Skip creating forms B. Watch his Access Beginner Level 1 class C. Try using Excel instead of Access D. Only use templates from Microsoft Q16. What should you do if you want your question answered in a TechHelp video? A. Email Richard directly B. Leave a comment only on YouTube C. Visit the TechHelp page and submit your question there D. Call customer service Answers: 1-B; 2-C; 3-C; 4-B; 5-B; 6-C; 7-C; 8-C; 9-C; 10-B; 11-C; 12-B; 13-C; 14-B; 15-B; 16-C DISCLAIMER: Quiz questions are AI generated. If you find any that are wrong, don't make sense, or aren't related to the video topic at hand, then please post a comment and let me know. Thanks. SummaryToday's video from Access Learning Zone covers how to add monthly memberships or any kind of recurring billing to your Microsoft Access database. I am your instructor, Richard Rost.The inspiration for this lesson comes from a question submitted by Summer, who is running a business with a monthly membership program using my TechHelp invoicing database. With over 200 members, entering each invoice for dues by hand has become a real struggle. Summer asked if there is a way to have the database automatically create invoices for membership dues each month. The good news is yes, this can be done. However, whenever we mention "automatically" in the context of Microsoft Access, you should be prepared to work with a little programming, usually VBA. I recommend using VBA over macros for this sort of automation, so if you are not familiar with it, check out my introductory video on VBA. It will prepare you for adding this functionality. For those who are not already using my invoicing database, it is important to start with my earlier series of videos. First, watch the video about building the blank database template. Next, learn how to add contact management, then invoicing. There is also a video on form naming conventions which teaches you how to pass values between forms, an essential skill for today's lesson because our code will be interacting with multiple forms. There are five key videos you should watch if you are new to my lessons. All of these are freely available on my website and YouTube channel. Once you have that foundation, here is what we have so far. In the TechHelp invoicing database, each customer can have orders. The current process for many people is to manually create a new order for each member every month, typing in the description, price, and so on, which gets tedious very quickly. To automate this, the first step is to set up a new table to track memberships. This table, which I call MembershipT, should include a MembershipID as the primary key (autonumber), a CustomerID as a foreign key to link the membership to a customer (long integer), a MembershipType or Description (short text), the Amount (currency), and the RenewalDate (date/time value). Once saved, you can enter sample data, associating memberships with customers and setting their renewal dates. Next, create a form to manage this new table. If you have watched my earlier videos, you will know I like to use pre-made blank forms as templates to save time. Using the ContinuousF form as a starting point, copy it, rename it MembershipF, and design it to suit your needs. Change the color scheme to make it stand out and bind the form to the MembershipT table. Add all the existing fields to the details section. For fields such as CustomerID, use a combo box for easy customer selection, ideally reusing a combo box you have already set up on the order form. This way, you maintain consistency. While arranging the form, adjust the sizes, align the fields, and set up the tab order so navigation is smooth. Tidy up your labels to make the form user friendly. If form design and layout is new to you, I encourage you to go through my free Access Beginner Level 1 class, which walks through all of these steps. Once your form is built, enter more membership records, making sure you have some with renewal dates in the past, future, and today. This will be useful for testing your automation later. To help manage the renewals, the goal is to add a button on the form labeled "Process Current Renewal." When this is clicked, it will automatically create the corresponding invoice using VBA. Begin by adding a command button in the form footer, and assign it an appropriate name so you can easily refer to it in your code. Plan out the automation steps. For each member whose renewal is due, the process should: - Open the customer form to the relevant customer. - Open the order form and move to a new blank order. - Set the necessary order details: date, description, customer, and ensure IsPaid is set to 0 (unpaid). - Add the order details just as if you were manually typing them in, including the membership type, quantity (which should always be 1), and amount. - Commit the new order and order details to the database. - Update the membership record's renewal date to the next due date. To ensure orders are processed only when due, add a check in the VBA code so it skips any record whose renewal date is still in the future. A quick note about VBA: if you are brand new to it, you may hear about the With statement and ways to refer to controls on different forms. In our code, we need to reference controls across forms, especially when interacting with subforms like the order detail subform, so it's vital to pay attention to naming and referencing. After implementing the above steps, test the process. Move through the membership records and click the Process button on each due record. The automation should create the order, fill in the details, update the membership renewal date, and prevent future due dates from being processed too soon. While this new system allows you to process renewals with a single click per member, you may eventually want to streamline it even further by processing all due memberships at once. That enhancement, including batch processing for all memberships, is covered in the Extended Cut for members. In the Extended Cut, I also show you how to utilize the member-specific version of the order entry database, tie memberships directly to your product table, and mark new invoices for batch printing or emailing later. I go into detail about handling recurring memberships with different frequencies such as daily, weekly, monthly, quarterly, or annual, not just monthly programs. Silver members and above get access to all Extended Cut videos. Gold members get access to a library of downloadable templates and my code vault of reusable functions. Platinum members benefit from all of the above plus my full beginner and some expert courses, covering Access as well as Word, Excel, Visual Basic, ASP, and more. Full details about membership benefits are available on my website. I am committed to continuing to produce these free TechHelp videos as long as there is demand, so your support is always appreciated. If you enjoyed this lesson, please give it a like and share your thoughts or questions in the comments. Make sure you subscribe to the channel and turn on notifications for updates on new videos. YouTube no longer sends out email alerts for new videos, so if you want to stay updated, join my mailing list through the link on my website. If you have not yet tried my free Access Level 1 course, I highly recommend it - over three hours of foundational content available both on my website and YouTube. Level 2 is just one dollar (or free to YouTube members at any level). If you want your question featured in a future video, just visit the TechHelp page on my website and submit it. You can find a complete video tutorial with step-by-step instructions on everything discussed here on my website at the link below. Live long and prosper, my friends. Topic ListAdding a membership table to track recurring membershipsDesigning the MembershipT table structure Populating MembershipT with sample data Creating a MembershipF form using a template Formatting the MembershipF form and controls Binding MembershipF to the MembershipT table Adding existing fields to the MembershipF form Replacing CustomerID with a combo box for customer selection Setting up labels and adjusting tab order on the form Manually entering and editing membership records Sorting form records by renewal date Adding a command button to process current renewal Renaming and configuring the process renewal button Adding MembershipF to the main menu with VBA Planning the VBA automation steps for invoice creation Writing VBA to check if renewal is due Using VBA to open the customer form to the selected customer Using VBA to open a blank new order form Setting order fields via VBA (OrderDate, Description, CustomerID, IsPaid) Setting order detail fields via VBA (ProductName, UnitPrice, Quantity) Refreshing forms in VBA to save and commit records Updating MembershipT renewal dates via VBA Testing the automated membership renewal process Handling members whose renewals are in the future |
||||||||||||||||||||||||||||
|
| |||
| Keywords: TechHelp Access dues management, member management, membership renewals, member directory, member types, church database, OpenForm, recurring billing, membership template, membership tracking, church membership, template, how to create a membership databa PermaLink Membership Database in Microsoft Access |