Calculator 5
By Richard Rost

 3 years ago
Build an On-Screen Calculator in Access - Part 5
This is part 5 of my Microsoft Access on-screen calculator tutorial. We are continuing to build the calculator that we started in part 1. In today's video we're going to build the memory buttons to add to and subtract from the memory value, clear, and recall the memory. We'll learn about Null math and the NZ function.
Members
There is no extended cut, but here is the database file:
Silver Members and up get access to view Extended Cut videos, when available. Gold Members can download the files from class plus get access to the Code Vault. If you're not a member, Join Today!
Prerequisites
Next Video
Links
Recommended Courses
Keywords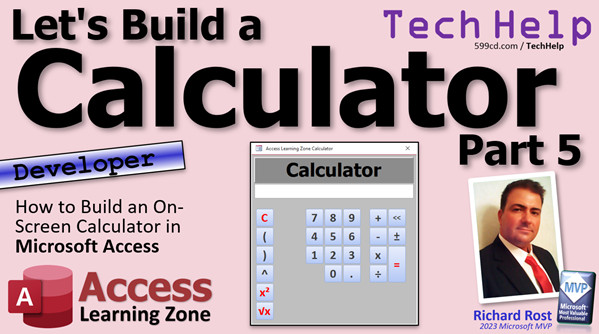
access 2016, access 2019, access 2021, access 365, microsoft access, ms access, ms access tutorial, #msaccess, #microsoftaccess, #help, #howto, #tutorial, #learn, #lesson, #training, #database, Onscreen calculator, calculator, on-screen calculator, null math, nz function
 Subscribe to Calculator 5
Get notifications when this page is updated
Transcript Welcome to another TechHelp video brought to you by AccessLearningZone.com. I am your instructor, Richard Rost.
We're back, folks. We're doing calculator part five. Of course, part five implies a part four, which implies a part three and a part two. Go watch parts one through four if you haven't watched them already. Go do that, and then come on back and we're going to do some fun stuff.
What are we doing today? Well, here's my calculator - my sample database that I built right before we started this whole thing. We're doing the memory buttons today. You put something like 36 in here and you want to add it to the memory, it goes into the memory. We stick it down here. Now we can clear this, go do some other stuff - we can multiply that by three, equals this. We can divide it by 50, whatever, equals that.
Then we can take this all and subtract that from the memory. That goes in here. This is my sample database, folks. I made this a bit too small to read, but the value is in there. It's correct.
Now we can clear this, so you can do some other stuff. If you want that memory value back, hit memory recall. It brings it back up there. That's what should be in the memory. If you want to clear the memory, it's gone.
Besides making this box too small - which, this is just my sample database, we'll make that bigger in ours - that's how memory works. You've probably seen this on calculators before. I know a bunch of people don't know how these buttons work. It's "add to memory," "subtract from memory," "recall the memory," and "clear the memory."
Now, we got an easy job because we've got a computer. Memory buttons have been around since calculators had really, really tiny memory in them. But we just drop this information into a separate box. You don't have to put it in the box. You can use a memory variable and just store it in the system memory. But I figure, why not display it? We've got plenty of room on the screen instead of just having it hidden somewhere like most calculators do. They just hide it and don't show it to you. We can show it.
Let's do this. Let's build this stuff. Are you ready?
Let's start off by making our buttons. I'm just going to grab one of these other buttons here. Let's just grab you. Actually, let's grab this guy because we don't need the event procedure that goes with it. We don't need this thing here. I don't have to clear it. It's one of those buttons. So let's just copy and paste you. We're going to take you and put you over here, like there.
This one is going to be the memory plus button. That's a bit too big. Let's drop the font size down a little bit. Maybe come down to 18. Yeah, it looks good. Let's change the color. Maybe light blue. All right, looks good.
Copy and paste. Slide you next to it over here. That'll be memory minus. We're going to copy both of these buttons and paste them down below. That'll be memory recall and memory clear. I still think they're too big. Let's make that font a little bit smaller. Maybe 16 point. That looks better.
Let's give these guys names. This will be button M plus, button M subtract, button MR, and button MC. Okay, got our button names.
Let's start with button M plus. Right click, build event. What are we going to do in here? Well, I want to take whatever value is being displayed in the calc area and save that to another location. Let's actually put that location on the form first. I'm going to copy this guy, copy and paste.
It doesn't need to be that big, but it's got to be a little bigger than the one I had, because mine was too small. Put it down here. I'm going to make it - let me show you - I'm going to make it so it's got a gray background, but then I'm going to make it transparent so it blends in because I change the background color a lot. Let's make the font small, like 12 point. Mine was too big, just so the user can see it, but we don't want to make it overpowering. So about that big maybe. We'll leave it right down here on the bottom so the user can see what's in there. Good enough room.
What are we going to call this guy? Let's call this "memoryval" for the memory value, right? "memoryval". Easy enough. So when I hit the M plus, I want to take whatever's in here and throw it down here into the memory value.
Right click, build event, and it's just as simple as: memoryval equals whatever's in the calc, alright, the eval. That eval. memoryval equals calc. The eval is a function.
Now if I come in here, save it, close it, whatever, do all that stuff, I put in 85, I say memory plus, and it adds it to the memoryval down here. But if you clear this, put in like 36, hit memory plus again, I don't want to replace that, I want to add to it. You can make a memory store button too if you want to, which just overrides it. That's fine too. I just went with the traditional buttons that are on a calculator, so we want to add to what's in there.
Okay, but the problem is - let me show you, close this and start it over again. If I come in here and say 25 and hit memory plus, the problem is what's in there now is null, and the way null math works, if you watch my null math video, is that if you add anything to null, if you do any kind of calculation with null, the result is always null. That's how null works. I told you to watch my null video in the last class, where I talk about isnull, is not null, and null functions. But go watch "Null Math." It's really cool. Null behaves weird, and you can do cool things with strings with it too. Go watch this video if you want to learn more.
I don't want to be checking for null values everywhere. The easiest thing to do is to take whatever is in the calc value and add it to the memory value, but I want to check to see if either one of those things is null, and if it's null, replace it with zeros. So I'm going to say: memoryval equals memoryval plus calc. That's the add to whatever is in memory, but if either one of these things is null, make them zero.
How do we do that? We do that with the nz function. Nz takes a value, checks to see if it's null, and if it is null, you can make it zero or any other value. For example, with strings you can make it an empty string; for a date you can set a date value like January 1st, 1900. Nz is a very powerful function. I use it with the lookup all the time. Go watch this if you want to learn more about nz.
We're going to evaluate memoryval - if it's null, make it zero. We're also going to evaluate calc because that could be zero too - nz(calc, 0).
Now if I come out here, if I start fresh and just hit memory plus, I put a zero in there because they're both null and they both got converted to zeros. Or, if I come in here and put in five and hit memory plus, I get my five. If I keep hitting memory plus, it keeps adding it up. Easy enough.
Here's one other thing to consider - what if the user puts in "five times five," and then hits memory plus? Type mismatch. I don't want to do all that, so let's evaluate whatever's up in the calc field first, and then add that value to the memory. That's real easy to do. Right here, just say: do calc. That's it.
If they come in here and put in "five times five," if I hit memory plus, it's going to evaluate it first and then add that in there. One little extra step.
Memory minus is going to be the exact same thing, just subtracting. Let me turn that border on - the border there, format, shape outline, transparent, that's all we've got. Memory minus is the same thing backwards. Take that, paste it in there, change the little plus to, you guessed it, a minus. Save it, close it, close it, close it.
Open it back up. 63 memory plus, clear it, 12 memory minus. Memory's got 51 in it now. Easy enough.
Memory recall and clear are going to be pretty straightforward and simple. Memory recall just takes what's in there and puts it up there. Right click, build event. Calc equals memoryval, and again, check to see if it's null.
The other one, clearing the memory, is literally just setting it to null: memoryval equals null. Save it.
Quick debug, compile, close it down, open it up. Nine times three equals 27, memory plus, clear, 12, negative 12 plus six equals negative six, memory minus. Now, 33. If you subtract a negative, it adds it. That's a cool thing about the eval function - we don't have to worry about all those weird math rules. Eval handles it all for us. Isn't that wonderful?
Memory recall - giving it 33 and then memory clear - goodbye. There you go. There's your memory buttons.
In the next lesson, part six, I'm going to teach you a way to have that memory stick around, so even if you close the form and reopen it, it comes back. See, watch; with mine, I come in here, I put in 36, and then let me clear the memory first because I had that other value. See, it kept it. I mean, I close it, add it to memory, close it, open the form back again, and it still kept its memory. I'll teach you how to do that in the next lesson.
Wardrobe change. It's coming here. What are we going to do? We did a bunch of colors. Let's go with something we haven't used yet. Let's go back to this blue color, like this guy. Let's go there. That's pretty cool. What do you think? Save it, close it, open it. That's a little different looking, but there you go. There's your part five.
Hope you learned something. Live long and prosper, my friends. I'll see you tomorrow.Intro In this video, we will continue building our Microsoft Access calculator by adding memory functions, just like the ones found on traditional calculators. You will learn how to create buttons for memory add, subtract, recall, and clear, set up the display for the memory value, and handle tricky issues like null values using the nz function. We will also cover how to evaluate expressions before storing them in memory and give each button a proper name and function within your Access form. This is part 5.Quiz Q1. What is the main function of the memory buttons on a calculator?
A. To save and reuse calculated values for later operations
B. To automatically solve complex equations
C. To change the color scheme of the interface
D. To export calculations to an external file
Q2. In the context of the tutorial, where is the memory value displayed?
A. In a separate box at the bottom of the form
B. Only in the system memory, hidden from the user
C. In a pop-up window
D. In the title bar of the calculator form
Q3. What happens when you press the memory plus (M+) button after entering a value?
A. The value is added to the current memory value
B. The value replaces the current memory value
C. The calculator resets all values to zero
D. The value is subtracted from the memory
Q4. What issue arises from adding a value to the memory when the memory is null?
A. The memory result remains null regardless of the value added
B. The calculator automatically resets to its default value
C. The value is added correctly and displayed
D. The calculator crashes without warning
Q5. What function is used to check for and handle null values in calculations?
A. nz
B. isnumeric
C. len
D. isdate
Q6. What is the result of pressing memory minus (M-) after entering a value?
A. The value is subtracted from the current memory value
B. The memory value is reset to zero
C. The entered value multiplies the memory value
D. The value is ignored and nothing changes
Q7. What does the memory recall (MR) button do?
A. Moves the value from memory back to the calculator display
B. Deletes the current memory value
C. Doubles the value in memory
D. Exports the value to a file
Q8. How is the memory clear (MC) button implemented in the tutorial?
A. By setting the memory value to null
B. By setting the memory value to zero
C. By hiding the memory display box
D. By subtracting all values from the memory
Q9. According to the tutorial, why is it useful to display the memory value on the form rather than keeping it hidden?
A. Because the user can see and track what is stored in memory
B. To make the interface more complicated
C. To take up extra space on the form
D. Because calculators require it by design specification
Q10. What additional step does the instructor add to handle expressions like 'five times five' before adding to the memory?
A. Evaluate the expression first, then add its result to memory
B. Disallow non-numeric values
C. Automatically clear the calculator before adding to memory
D. Ignore the input and prompt for a valid number
Answers: 1-A; 2-A; 3-A; 4-A; 5-A; 6-A; 7-A; 8-A; 9-A; 10-A
DISCLAIMER: Quiz questions are AI generated. If you find any that are wrong, don't make sense, or aren't related to the video topic at hand, then please post a comment and let me know. Thanks.Summary Today's TechHelp tutorial from Access Learning Zone focuses on building memory buttons for a calculator in Microsoft Access. For those who are just joining, this is part five in the calculator series. If you have not yet seen parts one through four, I recommend watching those first to get the full background.
In this lesson, I take the calculator form that we have been working on and add the memory button functionality, just like you might find on a standard calculator. This includes the ability to add a value to memory, subtract from memory, recall the memory value, and clear the memory.
Let me walk you through how the memory buttons work. First, you enter a value—say 36—and can choose to add it to the calculator's memory. This saves the value in a displayed location on the form so you can see it, rather than hiding the memory in the background as many calculators do. Now you can clear the current input, perform new calculations, and still have that memory value stored. For example, you could then multiply something else, divide by another number, and continue working. When you want to use the memory value again, you simply recall it, bringing it back as the current calculation. If you want to wipe out the memory, the clear button accomplishes that.
I decided to display the memory value directly on the form for transparency and ease of use. Although you could just keep it in a variable, this way the user always knows what is currently stored.
To build these buttons, I started by copying an existing button on the calculator form and adjusting its properties for our new purposes. I created four buttons: Memory Plus (add to memory), Memory Minus (subtract from memory), Memory Recall (bring back the value), and Memory Clear (reset memory to nothing). I adjusted their sizes, colors, and names on the form for clarity.
For the memory functionality itself, I set a new text box on the form to display the memory value. I gave it an appropriate name and styled it so it fits in with the rest of the design, using a smaller font and subtle coloring. This box will show the memory contents as the user works.
When implementing the Memory Plus button, I made sure it adds the current value in the calculator area to whatever is already stored in memory. However, there is one nuance in working with Access. If either value is null (meaning it does not yet have a value), trying to perform addition would result in a null outcome. To solve this, I used the Nz function, which checks for nulls and substitutes a zero in this context, ensuring reliable calculations even when one or both fields are empty.
Another detail I addressed is that sometimes the user might type in a formula like "five times five" and then try to add it to memory. To handle this properly, I made sure to evaluate the calculator area before performing the memory operation. This way, the form always works with a usable number rather than unprocessed input.
The Memory Minus button works in the same manner, except it subtracts the calculator value from the memory value rather than adding. Setting up its functionality just required switching from addition to subtraction in the relevant event procedure.
Memory Recall simply moves the memory value back into the calculator input area, again watching for nulls and handling them appropriately. Memory Clear resets the memory value back to null, essentially wiping out any stored value.
I wrapped up by demonstrating that all of these features work together as intended. Whether you add, subtract, recall, or clear, the memory components interact smoothly, and thanks to careful handling of nulls and evaluation, odd cases are covered.
Looking ahead, in the next lesson—part six in this series—I will show you how to make your memory value persist even after closing and reopening the form. Currently, the memory value remains as long as the form is open, but I will explain how to store it so it sticks around longer.
As a fun touch, I also tweaked the form's appearance, adjusting colors for variety, just to keep things visually interesting.
You can find a complete video tutorial with step-by-step instructions on everything discussed here on my website at the link below.
Live long and prosper, my friends.Topic List Adding memory function buttons to a calculator form
Designing and resizing memory button controls
Setting button names for memory actions
Creating a display field for memory value
Configuring the M plus button to add to memory
Using the Nz function to handle null values
Evaluating expressions before adding to memory
Configuring the M minus button to subtract from memory
Setting up memory recall to retrieve memory value
Setting up memory clear to reset memory value
Adjusting button and display formatting for usabilityPrimary Topics Access form design, calculator memory logic, event handling, null value handling, Nz function, user interface customization
Secondary Topics eval function, color formatting, button naming conventions
|


