Fitness 71
By Richard Rost

 4 months ago
Create Synchronized Subforms For Workout Database In this lesson, we will walk through how to create synchronized subforms in Microsoft Access, specifically by setting up a form with muscle groups in one subform and exercises in another. I will show you step by step how selecting a muscle group updates the related exercises automatically, using linked fields and filters. We will also discuss strategies for designing forms, formatting, and organizing navigation with submenus, and briefly mention plans to expand this technique to routines and programs in upcoming lessons. MembersThere is no extended cut, but here is the file download: Silver Members and up get access to view Extended Cut videos, when available. Gold Members can download the files from class plus get access to the Code Vault. If you're not a member, Join Today!
PrerequisitesLinksRecommended CoursesUp Next
Keywords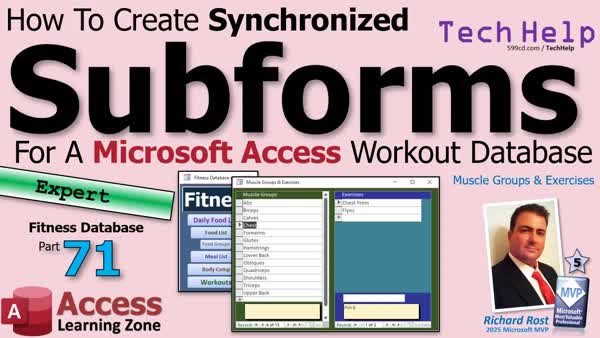 TechHelp Access, synchronized subforms, link master fields, link child fields, continuous forms, parent form, foreign key, filter subforms, muscle groups, exercises, workout tracking, form design, vba button code, sub menu, routine details, program routines, auto filter forms, data entry forms
 Subscribe to Fitness 71
Get notifications when this page is updated
Transcript Do you want your forms to work together in Microsoft Access? When you click on one thing, everything else updates automatically. Welcome to another TechHelp video brought to you by AccessLearningZone.com. I'm your instructor Richard Rost. Today, we're going to build synchronized subforms in Microsoft Access.
I'm going to show you how to put a subform on the left with the muscle groups in it and then exercises in a subform on the right. When you click on the muscle group, it will update and show you just the exercises for that muscle group. It's a real handy technique you can reuse in just about any database.
All right, so we're moving right along. We got our tables built. Now let's start working on our forms a little bit. The first thing I like to do is lay out not only the tables and stuff, but I also like to lay out some of the forms that I want to build in Excel, to get kind of an idea for what I want to do screenwise. I want to take the muscle groups and exercise and put those together on a single form with muscle groups on the left. Then you click on shoulders and it will bring up just the shoulder stuff on the right. You can still edit in both of these subforms.
We're going to do two subforms on a master form, on a parent form. I like to mock that kind of stuff up in Excel as well. Now, I open up this blank one. I like to mock this kind of stuff up in Excel as well. This will be the form, a parent form, and I'll put two subforms inside of it like this with notes on the bottom, which we do in the form footers. We're going to use my synchronized subforms trick. That's where you create a link field between them that controls. When you click on this, it changes the link field and the link field changes this guy. Click over here, changes the link field, link field changes this guy.
Here's the video where we have starships over here and then crewmen over here. You click on Enterprise D, you get the Enterprise D crew. You click on Serenity, you get the Serenity crew. Go watch this video if you need more information on that. I'm going to walk through it, but this one explains it in a lot more detail.
First, we need to set up two continuous forms. One for our muscle groups, one for our exercises. This will just take a moment. If we're going to do it, let's do it right.
Now I've got continuous forms in here. Where are they? Copy, paste. This will be our muscle group F. Design view. I'm going to make them match the same colors that I've been using in my Excel sheet. This guy is going to be green. Let's bring up format. Yeah, I'm doing the formatting. If you don't like it, too bad. I'm not going to bother with IDs because we're past that. We just need this guy. Make this green as well. Lighten it up a little bit. There we go.
You are going to be based on muscle group T. We can put a sort on. Let's order by description. You are going to be based on description, copy, paste. Actually, now that I'm thinking about it, to do our little trick, we do need to have the ID on here. We don't need to see it because the parent form is going to need to refer to it. Let's drop it on here anyway. Let's add existing fields. Actually, we need the notes down below. We can throw the description down here, too, or the ID down there as well.
All right, notes don't need to be that big. In fact, I am going to borrow notes from this form. Come here. Let's delete it off of this one so you don't get duplicates. Give me, oh, it's food log notes. It's OK. All right. They've changed it to food log note. Paste that in there. I just wanted it for the pretty colors. You're going to be just notes.
All right, this is the ID, which I'm going to stick there. Bring to front. Let's make it red for now. We're going to hide it in just a bit. All right, so we got the muscle group ID, the notes, the description. And this will just be muscle groups. I'm not sure I love that olive green. We'll keep it for now.
All right, save it. Close it. Let's see what you look like. This is good. OK, there's our muscle groups. Now, we're going to do the same thing with exercises. In fact, I'm going to copy muscle group this time because it's closer to what I want. This will be our exercise F. Exercise F, design view. Let's set it to blue. Dark blue. I know food is dark blue too, but I think, and dark blue. Make it a little bit lighter. There we go. Let's change this to exercises.
OK, now the table underneath is going to be exercise T. You're still description. You can still be muscle group ID, but we also need the URL as well. I'm going to copy this and we'll stick the URL down here on the bottom. We'll do that. We'll worry about this guy. In fact, I'm going to make that really small. Not that. We're going to put a button on there too. All right, you, you are L. Save it.
Do we need this guy's autonumber ID on this form? No, probably not. I don't think we're referring to it from anybody else. If we do, we can always pull that in later. So, exercises. There we go. I think that sorts in there. Let's get rid of that sort data. Well, no, we could leave the sort on. We can order this by description as well. That's fine. OK, looks good. So now we've got this guy over here.
Now, we're going to stick these both in a parent form that's not bound to anything. All right, so I'll use my single form here, copy, paste. This will be my muscle group exercise F. It's got both of them. Why not? OK. Design. Get rid of one of these. We'll need the second one for the linkage. Move this side out of the way here for now. This is going to be bigger. Stick you down here for now.
All right, so we need the muscle group form right there. Get rid of that. OK, we need the exercise form right over here. Get rid of that. So I do over there. Drag this down. Come on. OK. All right, save it. Close it. Open it. All right, there's our muscle groups and our exercises.
Now to apply that filter. It's going to bother me that this isn't even with this, but we'll deal with that later. Now what we need to do is set the value of this equal to whatever this is, and then we'll use this to link to that. If you watched the other video, you understand it, but I'll do it again for you right now.
So this is going to be, what's the name of this form? This is muscle group F. Let's bring up my notepad. Andy, Andy, notepad. All right. So it's muscle group F. OK. Not form bang, and then whatever the ID is in here, which is muscle group ID. OK. Muscle group ID. So that's the form name, dot form, go to its form collection, and then the field inside there is muscle group ID. That's what we have to set this guy equal to.
OK. So data. What's its name? Let's give it a good name. This will be the muscle group ID, and its control source is equal to that thing that we just created. OK. Save it. Close it. Close it. Take a peek. OK. So it's seven. Abs are seven. Biceps is five. Forearms is eleven. Chest I think was one. Yep. Chest is one.
Now, since you can't link subforms together, you can link them both to this text box. So this guy is now linked to this. As you change this, it updates this. Now, we use this as the link parent field for this subform. So, come into here. Link master fields is that muscle group ID. Link child field. Same thing. Muscle group ID. That's the foreign key on that field, right there. That little red guy.
OK. Save it. Close it. Open it. Oh, look at that. Abs: cable crunches. Biceps. Calves. I don't think we had any calves in there yet. Might as well put one in there. Calf raises. OK. Chest. See? So now they're linked together. Forearms. Yeah, I got the forearm roller. Forearm roller. It's that thing that's like a stick, and it hangs a weight in the middle, and then you roll it up, and then you roll it down, and then you roll it up.
Glutes. What do I do? I do some kind of bridge lift. You put your feet up on a bench, and then you lift your butt up. Strengthens your glutes. All right. So anyway, it's working. Now we just have to clean it up a little bit.
Let's start with the parent form here. We can turn this guy off. Design view. We don't need any of this cool formatting in here. We don't need the record selectors, navigation buttons, or scroll bars. Turn all that stuff off. Let's give this guy a better looking background. Let's go with that. I guess we can make that match. This can be hidden now too. So this can be red and view visible, no. Now we don't need to waste all that space down there, but I still want to be able to see it. So I'll put it somewhere inconspicuous or conspicuous. We'll do that. And then I'm cranking it up, I guess. Yeah, that's definitely going to bother me. They're not even.
We'll put the URL on top. Let's do that. Let's go back into the subform. Actually, we can hide both of those too, while we're at it. OK. So let's go into you. We'll make you not visible. Save. Click. Click. We'll make you not visible. Save. And then I think what we'll do is we'll put this on top, and then we can move this down. If we leave the same amount of space on top and below, it should line up.
All right. Save it. Save it. They have to line up. Sorry, they just have to.
OK. That looks a lot better, with these at least being even. All right. This caption: Muscle Groups and Exercises. Let's put it on the main menu. Design. We should probably set up a separate sub menu. Well, that's getting kind of big. Food, food, food, food, body. Yeah, I think it's time to set up a separate sub menu for the exercise stuff, because we're going to have muscle groups and exercises, programs, routines under programs. I'm going to do the same thing we just did, and we got the routine details, we got the sessions. Yeah, let's make another sub menu.
So again, I'll just copy single F, and this will be exercise, let's call it workout sub menu. Design view. We're going to keep it simple for now. We'll make it fancy later. Let's just throw a button on here. Form operations. Open form. Which one? There you are. Next. This is the muscle groups and exercise. Exercise. Exercise. Meaningful name. Muscle group button. That's good enough. More will come on here. We'll make this pretty later. Off. Off. Off. Save it. Close it. Close it. Open you up. There we go.
OK. Now, this stuff here can actually go on this menu, but there's code behind it, so be careful. So let's go into this and see what we got here behind this button. Yeah. For those of you who haven't watched any of my videos since the last fitness, I did decide to switch my VBA editor over to dark mode. It's a lot easier to see.
OK. So, see, now this is one of the reasons why I like to keep most of my code in global system modules if possible because plan plates right-click definition is in the global module, so there's very little to move if we move stuff from form to form. So we can take this, cut it out, paste it over here, put it down on the bottom.
OK. Let's make this have a darker background. Let's go with really dark green since we're sticking with green. Oh, that's not that green. Let's do super dark. There we go. That's cool.
OK. Now, we just need to grab that plate button click code from here. Cut it out. This is the main menu. Go back over here. Right-click. Build event. That will put me in here. Then we'll just paste right over that. There it goes. Same name. It should link right up. Save it. Debug compile. Status box equals blank. OK. That's good to know. So we're talking about this status box here.
Now, since this button is on this form, now we just call that its full name if you want to. Later on, I'm going to put this over here so that I want it all together. For now, let's just keep it so it works.
Now, we have to put a button for that over here. Workouts. Let's call it Workouts, and let's make it about the size of this guy. Actually, Body Comp can go over there too. Can it? Body Comp, well, no, Body Comp doesn't belong with food or with workouts, so we'll keep it here with the food. All right. Let's just recolor this guy. Let's go bright. OK. Oh, that's too bright. Oh, no, that's the same color. There we go. Good enough.
All right. Right-click. Build event. Boot command. Open form. Workout sub menu F. And it's off the screen. Sorry.
OK. Save it. Debug compile. I think we're good. Let's see, food, food. I'm going to make these a little bit smaller. There we go. And then put that there. Yeah, I like the way that looks. All right. We can actually make them a bit smaller now. Save it. Close it. Open it.
All right. I still like this popping up when I open the database. This is what I use most often, although I'll be honest, I haven't been using it the last couple of days. I've been sick, and I am to the point now where my diet is pretty much automatic. I have the exact same breakfast every day, the same coffee. For my lunch and dinner, it's almost, I can eyeball it. I eat a lot of pre-prepared meals, so I can just round it off in my head to the nearest hundred calories. So, I've been doing pretty well, and honestly, you get to that point after you've been tracking calories for a few months. Religiously, you just start to know everything, what's in the meals you eat, how many calories are in an ounce of chicken breast, that kind of stuff. It just becomes second nature.
Like I said, when we were doing that, counting calories isn't something that you will do forever, but it helps to do it for a few months so you get educated and you understand what's in the food that you're eating as far as calories go. Same thing with workouts, my workout routine now, I know I can just walk into my gym, which is in my garage. I have a home gym. I just know what I do, what weights I use, all that stuff. It becomes second nature, but it's still nice to track, especially when you're still learning this stuff.
All right, so this will go up there. Save it. You can go next to that so you can see it. There we go.
All right. So that's working well. We got this linked up. You can find what you're looking for. You can make this a little bit bigger so you can see those all at the same time. I'll probably do a little bit of formatting off camera, but it's nice to see all the muscle groups without having to scroll, and then you can just click over here and add as many exercises as you want.
Next, we'll work on the programs and the routines and the routine details. Yeah, it's coming along nicely. I'm happy with it so far.
There, I adjusted a little bit off camera. I moved the little red field back there. You can still see it. I just like it so that I can see where it is, but it doesn't need to take up any space. There. Now I'm happy.
I think what we're going to do for the next lesson is the same thing, but with program routines and routine details. We'll do three linked subforms. That'll be cool. That'll be fun.
All right. So today's big takeaway is how to use synchronized subforms so clicking one list automatically filters and updates another. There's a lot of stuff in here you can use in any database. It doesn't necessarily have to be fitness.
Next time, we're going to add on to this, doing programs, routines, routine details, and more linked subforms. Lots more coming. Post a comment down below. Let me know how you liked today's video, and if you have any questions you'd like to see answered in upcoming videos.
That's going to be your TechHelp video for today brought to you by AccessLearningZone.com. I'm Richard Rost. I hope you learned something. Live long and prosper, my friends. I'll see you soon for part 72.Intro In this lesson, we will walk through how to create synchronized subforms in Microsoft Access, specifically by setting up a form with muscle groups in one subform and exercises in another. I will show you step by step how selecting a muscle group updates the related exercises automatically, using linked fields and filters. We will also discuss strategies for designing forms, formatting, and organizing navigation with submenus, and briefly mention plans to expand this technique to routines and programs in upcoming lessons.Quiz Q1. What is the primary objective of creating synchronized subforms in Microsoft Access, as described in the video?
A. To ensure that changes in one subform automatically update related data in another subform
B. To display multiple unrelated tables on one form
C. To improve the database's speed and performance
D. To store forms as templates for future use
Q2. In the example presented, what is displayed in the left and right subforms of the main (parent) form?
A. Muscle groups on the left and exercises for each muscle group on the right
B. Exercises on the left and muscle groups on the right
C. Programs on the left and meal plans on the right
D. Users on the left and routines on the right
Q3. What technique is used to synchronize the two subforms?
A. Linking both subforms to a shared text box that holds the current key value
B. Using VBA code to reload the subforms every time a record changes
C. Creating a relationship in the relationships window
D. Using macros to control data changes
Q4. Why is it necessary to include the primary key field (like MuscleGroupID) in the subforms' design, even if you plan to hide it?
A. The parent form needs to reference it to control which records appear in the related subform
B. So users can always see the IDs as a visual reference
C. Without it, Access will not allow you to create subforms
D. It is needed for exporting to Excel
Q5. What view type is used for both the muscle groups and exercises subforms in this tutorial?
A. Continuous forms
B. Datasheet view
C. Single form view
D. PivotTable view
Q6. What is the 'Link Master Fields' and 'Link Child Fields' property in a subform used for?
A. To define the relationship used for filtering records displayed in the subform
B. To set the default sorting of the subform
C. To limit the number of records displayed at once
D. To control the size and color of controls in the subform
Q7. What is the advantage of mocking up forms in Excel before building them in Access, as described by the instructor?
A. It helps to visualize and plan the form's layout before implementing it
B. Excel automatically generates Access forms
C. It saves time writing VBA code
D. It allows for advanced database security setup
Q8. How does the video suggest cleaning up the main (parent) form design after linking the subforms?
A. Removing unnecessary formatting, record selectors, navigation buttons, and scroll bars
B. Adding extra labels and borders to highlight the subforms
C. Deleting the parent form footer
D. Minimizing the parent form to save screen space
Q9. Why might the instructor create a separate submenu form for workout-related items?
A. To keep the database organized as more features are added
B. To restrict access to the workout features
C. To automatically archive workout entries
D. To merge food and workout data
Q10. According to the video, what is a major benefit of using synchronized subforms in Access?
A. Clicking one list automatically filters and updates the other subform, streamlining data interaction
B. It makes the database immune to corruption
C. It doubles the speed of report generation
D. It allows for embedding Excel charts directly in forms
Q11. What programming best practice does the instructor mention regarding where to keep VBA code for buttons?
A. Store most code in global system modules if possible for easier maintenance
B. Always keep code in the form module it is used on
C. Avoid using modules to keep the database simple
D. Use macros instead of VBA code
Q12. What is indicated as the next step or next lesson following this video?
A. Adding programs, routines, and routine details using linked subforms
B. Importing data from Excel into Access
C. Setting up user-level security
D. Learning SQL queries for data analysis
Answers: 1-A; 2-A; 3-A; 4-A; 5-A; 6-A; 7-A; 8-A; 9-A; 10-A; 11-A; 12-A
DISCLAIMER: Quiz questions are AI generated. If you find any that are wrong, don't make sense, or aren't related to the video topic at hand, then please post a comment and let me know. Thanks.Summary Today's video from Access Learning Zone focuses on creating synchronized subforms in Microsoft Access. If you want your forms to work together so that selecting an item in one automatically updates related information in another, this lesson is for you. I'm Richard Rost, and I'll walk you through building a system where, for example, clicking a muscle group will display the associated exercises in a linked subform.
We start out with our tables already set up, and the next step is planning how the forms will look and interact. I like to sketch out my form layouts in Excel before jumping into Access. For this project, I want to display muscle groups on one side of the form and exercises on the other. This way, selecting a muscle group will filter the exercises to only show those that belong to it. Both subforms will allow editing, making the setup flexible and efficient. This technique can easily be adapted to any type of database that features related records.
The approach is to place two subforms into a single parent (or master) form. To model this, I first mock up the layout in Excel, visualizing two side-by-side subforms, with an area for notes at the bottom. The core trick is to use a link field between the subforms: selecting something in the first subform sets the value in a hidden textbox, which then acts as the filter for the second subform.
You might recall a similar example I made with starships and crew members. Clicking on a starship would show you just the crew for that ship. If you need a more detailed explanation of this approach, there is a video dedicated to that topic as well.
To get started, I create two continuous forms: one for muscle groups and another for exercises. I customize the colors to match my Excel design, and I make sure the muscle group continuous form is based on the correct table, with sorting set by description. I include the ID fields in the forms, but I plan to hide them later, since the parent form needs to refer to them for linking.
After configuring the continuous forms, including adding the relevant fields and notes sections, I set up background colors for visual clarity. I replicate this process for the exercises form, adjusting the underlying table source and adding any extra fields, such as a URL field for exercises, moving elements around for the best layout.
Once both subforms are ready, I embed them inside an unbound parent form. After removing unnecessary elements and making sure the forms line up cleanly, I assign meaningful names to the controls to keep everything organized. The main synchronizing step involves creating a textbox whose value is dynamically set to match the selected muscle group ID. Although subforms themselves cannot be directly linked together in Access, they can both refer to this textbox. The muscle group subform updates the textbox value, and the exercise subform is linked by setting its master field to the textbox and its child field to the corresponding foreign key.
Testing this setup confirms that selecting a muscle group refreshes the exercises accordingly. For example, if you click on "Abs," you'll only see relevant abdominal exercises. You can also add new exercises under each group.
To finish up, I clean up the parent form's design by removing record selectors, navigation buttons, and scroll bars, and adjusting the backgrounds to keep everything visually cohesive. Hidden fields are minimized or moved out of the way for a neater appearance. I also adjust form alignments for a polished look.
With the main navigation, I reorganize menu forms to make room for exercise-related sections, creating a new submenu for exercises, routines, and programs. I copy and revise my main menu buttons, keeping an eye on consistency and moving any relevant VBA code as needed to global modules for easier management.
After finalizing the menu and layout, I test everything to ensure that the navigation works smoothly. While mentioning some personal experience with tracking workouts and diet, I also emphasize that these linked subforms are not just useful for fitness tracking but can be applied to any scenario where two related tables need to interact seamlessly.
In the next lesson, I plan to expand this system by adding programs, routines, and further linked subforms, building on today's synchronized interface. I encourage you to leave questions or feedback for future videos.
You can find a complete video tutorial with step-by-step instructions on everything discussed here on my website at the link below. Live long and prosper, my friends.Topic List Building synchronized subforms in Microsoft Access
Designing master forms with two subforms
Mocking up form layouts in Excel
Creating continuous forms for muscle groups
Creating continuous forms for exercises
Formatting forms for color and layout
Adding and configuring form fields including IDs and notes
Setting form data sources and sorting
Linking subforms using a control field
Setting Link Master Fields and Link Child Fields
Filtering exercises based on selected muscle group
Hiding and formatting unnecessary fields in forms
Customizing form navigation and appearance
Creating a workout submenu form
Adding command buttons to open forms
Moving and editing code for command buttons
Adjusting and aligning form elements for a clean lookArticle If you want your Microsoft Access forms to work together seamlessly, so that clicking on an item in one form automatically updates related information in another, synchronized subforms are the solution. In this tutorial, I will walk you through building synchronized subforms in Access, using a fitness example that lets you select muscle groups on the left side and then view or edit relevant exercises on the right. This technique is versatile, so you can use it for many types of relational data in your own databases.
To begin, you need to have your tables set up. For this example, you should have a MuscleGroup table and an Exercise table, where each exercise references a muscle group with a foreign key. Once these are ready, start building the forms. You will need two continuous forms: one for muscle groups and one for exercises.
Open your form design tool in Access and create a new continuous form for muscle groups. Set its record source to your MuscleGroup table. For easy navigation and reference, include the primary key (MuscleGroupID), though you can later hide this on the form so it is not visible to users. Make sure to show the description or name of each muscle group. If you wish, you can add another field such as notes to the form footer for each muscle group and style the form according to your preferences, perhaps with color coding.
Next, create a second continuous form for exercises. This form should display exercises and, importantly, include the MuscleGroupID foreign key field. Add any other relevant fields, such as description, URL for reference videos, or notes. As with the first form, you can style it as you like.
Now, bring both subforms together in a new parent form. This parent form should not be bound to any table. In design view, insert the two subforms side by side: muscle groups on the left and exercises on the right. Position and size them as needed.
For synchronization to work, you need to set up a control in the parent form that both subforms can reference. Add a text box to the parent form and name it something clear, like txtMuscleGroupID. The key to linking is setting this text box's control source to reflect the currently selected muscle group from the left subform. To do that, set its control source to:
=[Forms]![MuscleGroupF]![Form]![MuscleGroupID]
Replace 'MuscleGroupF' with the actual name of your muscle group subform, and 'MuscleGroupID' with the correct control name if needed. This ensures that whenever you select a different muscle group in the left subform, the text box updates to its ID.
Now, you need to link the exercises subform to this control, so it will display only exercises for the selected muscle group. Right-click on the exercises subform in design view and open its property sheet. Set Link Master Fields to txtMuscleGroupID (the name of your text box on the parent form) and Link Child Fields to MuscleGroupID (the foreign key field in your Exercise table).
With these settings, clicking a muscle group in the left subform immediately filters the exercises in the right subform to show only those related to that group. You can edit or add records in both subforms, and the synchronization ensures you only see relevant data.
For finishing touches, you might want to hide the technical fields like IDs from the user by setting their Visible properties to No. Also, you can enhance form appearance by adjusting colors, removing unnecessary navigation buttons, scroll bars, and record selectors for a cleaner interface. Consider adding a caption or header to your parent form for clarity, and, if you are building a larger application, organize your forms into logical submenus for easy navigation.
If your parent form or submenus have VBA code behind buttons to open different forms, it's good practice to keep as much code as possible in global modules for easier maintenance and portability. In the code editor, you can copy or move code as needed to keep things organized.
With this setup, your Access database forms are now working together so that selecting an item in one updates the contents of another - perfect for any scenario where you have one-to-many relationships, from fitness tracking to inventory management.
Remember, the key steps to synchronized subforms in Access are:
1. Build separate continuous subforms for your master and detail data (e.g., muscle groups and exercises).
2. Insert both subforms into a parent form.
3. Add a text box to capture the selected master record's ID.
4. Set the exercises subform's Link Master Fields property to this text box, and its Link Child Fields to the foreign key.
This approach makes data entry intuitive and reduces the chance of errors, since users are always working with filtered, relevant information. Once you are comfortable with two synchronized subforms, you can expand the technique to more complex chains, such as adding a third subform for additional details.
Experiment with this technique in your own projects and you'll find it is a simple yet powerful way to make your Access applications more dynamic and user-friendly.Primary Topics Microsoft Access, synchronized subforms, linked forms, master-detail forms, continuous forms, subform filtering, form design
Secondary Topics form layout in Excel, formatting forms, linking via parent field, using control sources, menu setup, UI cleanup
|


