Association 8
By Richard Rost

 3 years ago
Microsoft Access Association Database, Part 8
This is Part 8 of my Microsoft Access Association Database. In today's video we are going to build the demographics form and show you how to switch between the context subform and the demographics sub form by clicking on a label that will change the subform's SourceObject property.
Pre-Requisites
Members
Members will learn how to open the helper form from a control on the subform and have it return the value entered or selected. Then we will also display the person's age next to their date of birth.
Links
What's Next
Keywords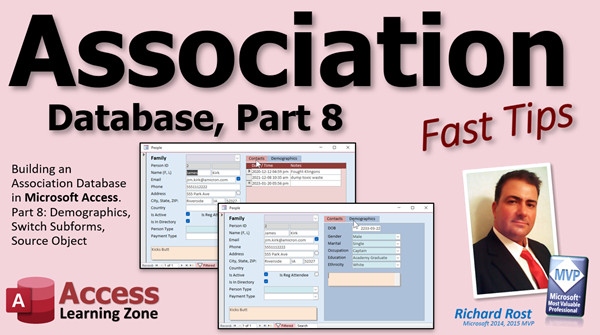
access 2016, access 2019, access 2021, access 365, microsoft access, ms access, ms access tutorial, #msaccess, #microsoftaccess, #help, #howto, #tutorial, #learn, #lesson, #training, #database, Demographic Form, 1-to-1 Relationship, More Helper Combos, Switch Subforms, SourceObject
 Subscribe to Association 8
Get notifications when this page is updated
Intro In this video, we continue building the Association Database in Microsoft Access by creating a Demographics subform and setting up combo boxes for fields like gender, marital status, occupation, education level, and ethnicity. I will show you how to establish a one-to-one relationship between the Person table and Demographics, and demonstrate how to switch between different subforms—such as Contact and Demographics—using the Source Object property and a little bit of VBA. You will also see how to set up clickable labels for toggling subforms and enhance your database's usability. This is part 8.Transcript Welcome to another Fast Tips video brought to you by AccessLearningZone.com. I am your instructor, Richard Rost.
We are continuing with the Association Database. This is part eight. We are going to build the Demographics form, which will become a subform. Then I will show you how to switch subforms between the Contact subform and the Demographics subform by manipulating the Source Object property of that subform control. There is some cool stuff today.
Time to get started with part eight. We are going to begin by copying part seven like we always do. Every day, we start the same way. Get in the habit of doing that as I mentioned yesterday.
Today, we are going to work on the demographics. We have got the Demographic table coming up, and these are all pretty much IDs that relate to either the person or to helper table type stuff. So we are going to have a bunch of combo boxes in here, and the other field that we need is Date of Birth.
This is going to be a one-to-one relationship with the Person table. That means each person is going to have one and only one record in the Demographic table. So we are going to use a single form, but we are going to put that single form in the subform on the Person form. So when you open up the person, this will show up here and have their demographic information when we switch to it, which we are going to do eventually. Maybe not today, but we are going to get to that.
So, when you open it up, you are going to see just the one record. You cannot go flipping through them.
Since it is a single form, we will borrow the single F. I will copy and paste that. Control C, Control V, Demographic F. There we go.
Let's go to design view. We are going to first change the data source, the record source, which is going to be the Demographic T.
Now if we look at the fields - we can actually look at them right here on the thing - that is our autonumber, which we do not really need on the form. Here is our Person ID, and again, we do not really need it since this is going to be a subform and the subform is going to force that relationship as long as it sees a Person ID. So we do not even need that on the form.
So really, all we need is Date of Birth and then a bunch of combo boxes. Let's get rid of the ID. This is going to be Date of Birth, which is going to be Control Source: DateOfBirth. Make sure you copy that to the name. Format is going to be Short Date. Remember, I use the ISO standard. It does not need to be that big. If you want to have their age pop up over here, we will do that in the Extended Cut. Now the rest of these fields are all going to be combo boxes based on helper data, and we already have that built-down.
Person T right here, right? Combo box. We are just going to go into here, design view, we are going to copy that, come over here and paste it.
So we have got our Person Type, which we are going to change in a minute. What is the next one? We have got Gender ID, so this is going to be Gender. Slide this over like this.
Now we are getting a little warning message here in the green thing because this field does not exist in this table. That is okay. We are going to change its control source to Gender ID. This will now become Gender combo. And we have to change the SQL, remember. You have to go to Data, and we have to figure out out of the helper types which one is gender. Well, that is type 3.
So we are going to come in here, edit our SQL (Shift + F2), and change that to 3.
That is it. Save it, close it. Let's close this and open up the Demographic form to see what we have got.
Looks good. Drop that down. There is our Gender. What else have we got?
We have got Marital Status, Occupation, Education Level, and Ethnicity. I am going to do them right now, and through the magic of editing, I am going to make it go fast so you do not have to watch me do it all in real time. Here we go.
Gender, Marital Status, Location, Occupation, Education Level, and Ethnicity. We will put data in for each of those. So we have got six: we have got Occupations. For popular occupations, I will ask ChatGPT.
Okay, that is interesting. We will go Salesperson, Cashier, Food Prep, Office Clerk, Restaurant Worker. That is good for me.
Education level would be: Some High School, High School Graduate, Some College, Two-Year Degree, Four-Year Degree.
This is interesting. I asked ChatGPT for a list of ethnicities for an employment application, and it said it is not appropriate to ask for an individual's ethnicity on the application. You are right, I should not do that.
All right, I switched it around. I said, how about the census? Since we had to, the US Census Bureau - what is the most common? I can just give you a sample: Native American, Asian, etc.
Good. I hope we have data now. I have got to go make the combo boxes.
So this is going to be: We have Gender, Marital Status, Occupation, Education Level, Ethnicity. Get them on a tight list. Okay, Marital Status, Occupation, Education. Change the Marital Status so it fits.
These are the parts here. So Marital Status - open this up, change this to Marital Status ID, this is the new Marital Status combo. I am going to do all these the same. Look into all these resources. All right. Occupation combo. Education Level combo. Ethnicity combo.
For these, we have got to go to Data now, and: Marital Status is 4, Occupation is 6, Education Level is 7, Ethnicity is 8.
What else am I missing? Demographic T - we have got our notes and ID, correct? So we do not need to put ID, decree, or anything else in every single form. We do need notes, so let's go over here because the decree gets stored in the table whether you use it or not. Copy and paste Notes.
Save it. Open it up.
Now we are ready to go back to regular speed.
That is the first time I did something like that, where I did a little fast play in the middle of a video, and you can really hear the typing and the in and out of the sound with the background noise. I am not sure how to get rid of that. I am still playing with new microphones, by the way, folks.
From what I have been told, you are about 50/50 split on my microphone selection between the Tonor mic and the Blue Yeti. So right now I am using the Tonor mic, which I thought did a better job of noise cancellation, but maybe it does not work so well in fast forward.
All right, so this is the Demographic F. In our Person form, we have got the Contact F in here.
If we look at this guy - do not click in here. Do not go to the inside of the combo or the subform - you want the frame around the outside, that border right there. You want to double-click on that, and you can see right here there is a property called Source Object. That is where you get your data from in here.
Now if I were to change this to the Demographic form that we just built - look at that, it switched. I am going to save it and close it. Now open it up, and now look, I get that.
In fact, while I am thinking about it, we can turn all these things off because we do not need them on this form, and that is done in here in design view. We do not need the record selector, navigation buttons, or scrollbars. Okay.
Open it up. There you go.
Now if I pick some stuff in here - this is Bev Crusher - so Female, Divorced, etc. If I go to somebody else now and come back, look, those things stayed in there because in the Demographic T, that Person ID is saved because of the relationship.
In older versions of Access, you could not get away with this. You had to put the actual Person ID in here and set it as the default value pointing to this Person ID. But now, in the new version - I do not know what version they added this in, it was a while ago - but if you are using like 2007 and later, this works.
Now, how do we switch between different subforms in here?
I have another video called Vehicle Maintenance where I show how to do this. Here is one subform, here is another subform. We make a couple of labels that you can click on to switch between them, and it changes that Source Object property using some VB code. One line of code is all you need. That is why I always say a little bit of VBA makes the heart grow fonder, or whatever that phrase is.
I also cover it in my Access Developer Level 21 class. This is a little more advanced. Actually, I think I waited to cover it for a while, but I should have covered it sooner. It is not that advanced. It is one line of code. You will see in just a second. Here we go.
We will take a couple labels. I already have one here for Contact History, so I am just going to copy and paste this one. Copy. What did I do? Paste. Okay, got two of them.
This one will be Demographics, and this one will be Contacts.
Now, since we are actually going to use them for something, I am going to give them good names and I am going to center the text in them. There we go.
So this guy is going to be ContactLabel, and this will be DemographicsLabel. I like to try to keep them singular.
You can add whatever color formatting and prettiness you want to them. Let's see. Contacts - what color is Contacts? I will do reddish for this one like that. We will do Demographics as blue. Did not mean to click on you. I will go with that color blue.
All we need is one line of code. Now what is the name of this control here? It is Contact F. I know it is Contact F. Let's change the name of the control. Let's call this subform SubformControl. Now the name of this control is SubformControl. CTLSubform if you like that naming better.
So it is going to be:
SubformControl.SourceObject = "DemographicF"
For the Demographics event, on click:
SubformControl.SourceObject = "DemographicF"
Copy this.
Then go over to the other guy. On click:
SubformControl.SourceObject = "ContactF"
Each of those labels changes the Source Object, and then in the default settings, put the one you want to be in there when you start up the thing. I am going to go back to Contacts, because that seems to be the most popular one: Form, Contact F. We will start with that.
Save it, close it, close it. Open somebody up and click. Look at that, and then each... Same. In the Extended Cut, we will do a little something extra with these. When we click on it, maybe they get bold or change color or something.
That is pretty handy. We will do a couple more of these because we have attendance, the person's timeline for sure, donations, we can do our order list, membership. You can do all these things as subforms in here. So if you want to see this person's attendance, you click Attendance, and it shows you their attendance history without opening other forms up. The relationships are nice and neat. So I will handle it inside the subform relationship.
I also do this with the tabs and more detail in my ABCD Part Two, where you can see here we get different tabs: email addresses, multiple email addresses, multiple phone numbers, multiple addresses, what groups people are in, relationships with other people (this is this person's parent, this is this person's supervisor), and then it creates the opposite relationship when you add one. All kinds of cool stuff. This is like my top of the line database that I am building.
Check this out. I will link to it down below if you are interested in more information.
In the Extended Cut today, we are going to do something really cool. In the Extended Cut for Part Seven, I showed how to open up the helper form by double-clicking on a combo box where you can add a value, and then when this closes, it would open up this guy and drop the box down so you can pick the new value.
But there is a problem with Access where that OnGotFocus event that we used does not fire if this control is in a subform, which this is. So we are going to spend a lot of time today - I am going to pull a trick out from my ABCD database that I built that shows you how to do this.
We are going to open up the selector form, pick a value or type a new one in or whatever, hit our own Save and Close button, which is going to remember what combo box called it, and then set the value. That is really cool, and it is about maybe 10 or 15 lines of code, but it is not super hard. I will show you how to do it.
Then we will display the age right here - that is easy, that is just one function.
So that is in the Extended Cut. Silver members and up get access to all of my Extended Cut videos, and Gold members can download these databases.
There you go. There is your Fast Tip for today, Part Eight. See you for Part Nine.Quiz Q1. What is the primary purpose of the Demographics form created in this video?
A. To store multiple records of demographic data for each person
B. To serve as a subform displaying and editing demographic data for a single person
C. To replace the Person form completely
D. To function as a navigation menu for all data entry
Q2. What type of relationship exists between the Person table and the Demographic table?
A. One-to-many
B. Many-to-many
C. One-to-one
D. Many-to-one
Q3. Which of the following fields is specifically formatted as a short date in the Demographic form?
A. Person ID
B. Date of Birth
C. Occupation
D. Marital Status
Q4. Why are combo boxes used for most of the fields on the Demographic form?
A. To directly type in any data
B. To select from values stored in helper tables
C. To sort the records automatically
D. To generate random data for testing
Q5. If you want to change the form displayed in a subform control, which property do you modify?
A. Control Source
B. Row Source
C. Source Object
D. Data Type
Q6. What VBA code is used to change the displayed subform to "DemographicF"?
A. SubformControl.RecordSource = "DemographicF"
B. SubformControl.SourceObject = "DemographicF"
C. SubformControl.RowSource = "DemographicF"
D. SubformControl.Form = "DemographicF"
Q7. In what context would you use labels like "Contacts" and "Demographics" in this application?
A. To display error messages to users
B. As clickable controls that switch the subform display
C. To summarize form data
D. Only for design decoration
Q8. What happens to the demographic data after selecting values for one person and then navigating to another person?
A. The data reverts to default settings
B. The data is lost and needs to be re-entered
C. The data is saved and persists due to the Person ID relationship
D. The subform gets reset to blank
Q9. Why is it unnecessary to put Person ID directly on the Demographics subform?
A. The Person ID is handled automatically by the relationship in the subform
B. Person ID cannot be displayed on forms
C. It would cause a duplicate record error
D. Access will reject forms without visible IDs
Q10. What is a benefit of switching subforms using VBA and the Source Object property?
A. It automatically generates helper tables
B. It provides the ability to show different related data without opening new forms
C. It hides all fields by default
D. It sorts subform data in reverse order
Q11. In newer versions of Access, why does the Person ID not need to be set as a default value in the subform?
A. Subforms automatically filter the data without needing the default value
B. Access no longer allows default values on subforms
C. Person ID is always 1
D. The default value needs to be set only in queries
Q12. What is discussed as a limitation when using the OnGotFocus event for combo boxes in subforms?
A. It works only in Access 2003
B. The OnGotFocus event will not fire for controls inside a subform
C. The event deletes the value accidentally
D. It causes the form to crash
Answers: 1-B; 2-C; 3-B; 4-B; 5-C; 6-B; 7-B; 8-C; 9-A; 10-B; 11-A; 12-B
DISCLAIMER: Quiz questions are AI generated. If you find any that are wrong, don't make sense, or aren't related to the video topic at hand, then please post a comment and let me know. Thanks.Summary Today's video from Access Learning Zone continues our series on building the Association Database, and this is Part Eight. In this session, I focus on creating the Demographics form, which will eventually serve as a subform. I'll also show you how to switch back and forth between the Contact subform and the Demographics subform by working with the Source Object property of the subform control.
As with all previous parts, I recommend starting by copying your previous database copy for safe versioning. This is a good habit to maintain, making sure you always have a backup before making changes.
Our task today centers on the Demographic table. This table is structured as a one-to-one relationship with the Person table, meaning each Person record will have exactly one corresponding Demographic record. Most of the fields in the Demographic table are IDs that link to either the Person record or to lookup tables. We will mainly use combo boxes for these, plus a field for Date of Birth.
We need only the Date of Birth and several combo boxes on the Demographic form. Displaying the autonumber primary key and Person ID is unnecessary; since this will be a subform within the Person form, Access will automatically handle the linking between Person and Demographic through the Person ID.
To create this, I'll start by copying the template for a single form and customize it for the Demographic information. The data source for the form needs to be set to the Demographic table. After confirming which fields are available, the next step is to remove any unnecessary controls like the primary key and Person ID fields. For the Date of Birth field, set the control source and adjust the format to a short date according to your preference. If you want to display the calculated age, that's something I'll cover in today's Extended Cut.
All additional fields will be configured as combo boxes that reference their respective lookup tables. Since we already have similar combo boxes set up elsewhere, I'll replicate the process by copying one as a model, then adjusting its control source and SQL row source to match the desired helper type. For example, Gender, Marital Status, Occupation, Education Level, and Ethnicity all require their own combo boxes. When setting these up, ensure each combo box's control source maps correctly to the appropriate field in the Demographic table, and that the row source returns the right helper items.
For options like occupations, education levels, and ethnicity categories, you may want to consult existing standards or sources such as the US Census. It's best to use typical selections that users will expect.
After adding and configuring all the combo boxes, do not forget to include a Notes field for any additional demographic information you may want to store.
Once the Demographic form is set up and saved, you can add it as a subform on the main Person form. Instead of displaying all records, this subform will only show one set of demographic data per person, as intended by the one-to-one relationship.
To toggle between the Contact and Demographic subforms, you can use the subform control's Source Object property, accessible in Design View by selecting the subform control's frame. Changing the Source Object from, say, ContactF to DemographicF instantly swaps which form is displayed inside the main Person form. For a tidy appearance, you may want to hide record selectors, navigation buttons, and scrollbars on the subform.
The link between the Person and Demographic records is managed by Access, using the Person ID. In current versions of Access, you don't need to handle setting the Person ID manually on the subform; Access now does this for you automatically.
To make switching between subforms user-friendly, you can add labels above the subform area that act as buttons. Assign on-click events that simply change the Source Object property to the desired subform. With just a single line of VBA code, each label can load the appropriate form. For organization and clarity, make sure to assign meaningful names for your controls and labels.
To enhance usability, you might apply formatting or color to indicate which section is active. In today's Extended Cut, I'll demonstrate how you can further improve these toggle labels, such as making the active label bold or a different color when selected.
This same approach can be used for additional subforms, like attendance records, donation history, timelines, or memberships, all accessible from the main Person form without opening multiple forms. This keeps your relationships well-managed and your forms uncluttered.
If you want to see an expanded example with tabs, multiple email addresses, phone numbers, group memberships, or even relationships between people, I reference my ABCD Part Two database. That version demonstrates organizing rich, relational data with intuitive navigation.
In today's Extended Cut, I'll tackle a more advanced topic: how to open a helper form from a combo box inside a subform, add a new value, and have the combo box refresh and select the new value upon returning. There is a particular challenge since the OnGotFocus event does not fire for controls inside subforms as it does for main forms. I'll show a workaround from my ABCD database, walking you through how to remember the calling control and set its value programmatically. I'll also demonstrate adding an age calculation directly to the Demographics form.
Remember, the Extended Cut is available to Silver members and above, and Gold members can download sample databases.
That's it for today's Fast Tip, Part Eight. I hope you found this addition to your Association Database helpful. For a complete video tutorial, including all of the step-by-step instructions on everything discussed here, visit my website at the link below.
Live long and prosper, my friends.Topic List Creating a Demographics form as a subform
Setting up a one-to-one relationship with Person table
Configuring the Record Source for the subform
Adding and formatting a Date of Birth field
Creating combo boxes for demographic fields
Setting control sources for combo boxes
Modifying SQL Row Source for each combo box
Assigning type IDs for helper tables in combo boxes
Adding combo boxes for Gender, Marital Status, Occupation, Education, Ethnicity
Copying and adapting existing combo box controls
Adding a Notes field to the Demographics form
Customizing form properties: removing record selectors and navigation buttons
Placing the Demographics subform on the Person form
Understanding the Source Object property for subforms
Switching displayed subforms using the Source Object property
Creating labels to switch between subforms
Naming and formatting labels for subform switching
Writing VBA code to change the Source Object property
Assigning click events to labels for subform switching
Setting the default subform view on form load |


