MCA Loan
By Richard Rost

 3 years ago
Merchant Cash Advance Loan Repayment in Access
In this Microsoft Access tutorial, I'm going to teach you how to calculate the completion date of a Merchant Cash Advance (MCA) loan. We're going to add it to my Account Balances template.
Zane from Denver, Colorado (a Platinum Member) asks: I recently took out a merchant cash advance loan where the lender takes 30% of my daily sales until the loan is paid off. Can you show me how to calculate what the end payment date would be?
Prerequisites
Links
Recommended Courses
Keywords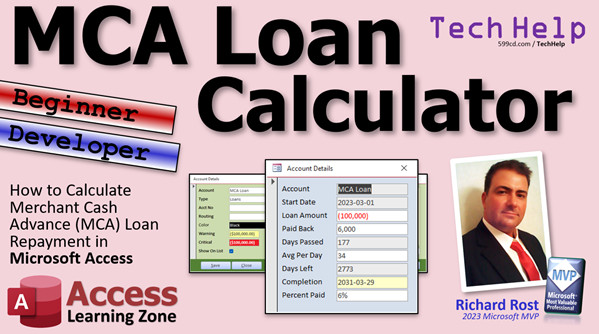
access 2016, access 2019, access 2021, access 365, microsoft access, ms access, ms access tutorial, #msaccess, #microsoftaccess, #help, #howto, #tutorial, #learn, #lesson, #training, #database, mca loan calculator, Merchant Cash Advance Calculator
 Subscribe to MCA Loan
Get notifications when this page is updated
Intro In this video, we'll build a merchant cash advance (MCA) loan calculator in Microsoft Access. We'll cover how to add a start date field to your loan records, create a dedicated form to view loan details, and set up calculations to track your loan balance, payments, days elapsed, daily averages, time left to repay, projected completion date, and percent paid. You'll see how to make the "Loan Info" button appear only for loan accounts and learn the basics of integrating these features into an Access account balances database.Transcript In today's video, we're gonna build an MCA loan calculator. What is that? What's a merchant cash advance loan? If you don't know what an MCA loan is, go watch yesterday's video. I did the same thing in Excel, and I explained exactly what it is, how they work, and how to figure out when they're gonna be repaid.
So today, we're gonna do the same thing in Access.
Now, I'm labeling this as both a beginner and a developer video because if you just care about the calculations, then just pay attention to that stuff. If you care about integrating this into my account balances database, then pay attention to the VBA stuff.
You don't need all the fancy VBA to get the calculations to work. Basically, it's just simple functions and math and chemical structures and moving parts and that kind of stuff. If you do want to learn some VBA, go watch this video first. It's about 20 minutes long and teaches you everything you need to know to get started programming in VBA.
Also, if you want to learn how I built the account balances database, go start here. It's a nine-part series plus some extra little stuff, and I explain all the different ways that I put this database together. So go watch all that stuff first and come on back, or if you don't care about all that, don't watch it. I don't care.
If you just want to see how the MCA loan calculations work, then just here we go.
Now, as far as the Access account balances database goes, I really don't care about the calculations that we did in the Excel video for forecasting and new loan. If you really want to do that, just do it in Excel. There are some things that are just faster and easier to do in Excel.
What I really do care about here in the database, though, is to put my loan in here once I have it and then use that to track my payments every month or every week or whatever, and then forecast when this loan is gonna be done. That's what we're gonna focus on today.
In order to calculate all this stuff, we need to know, obviously, the loan amount, the start date, and what our payments to date have been. We've got all the financial stuff in here as far as we can track the starting balance of the loan, put that in the balance, like this. Look at auto loan, and in fact these calculations will work just fine for any loan, because it'll still take a look at what you paid so far with the total balances.
We're gonna add a field. That's the one field we have to add: a start date field, so we know when the loan started.
Now, with a regular traditional mortgage or an auto loan, you know what the end date's gonna be because your payment schedule is already predetermined, but with an MCA loan, you don't. So what we're gonna have to do is add a start date and then we can calculate those figures based on that start date.
That means we have to go out to the table database. Remember, this is a split database, so we got to add the start date field to the account table in the backend database. So close this bad boy down.
Remember, I've got my data because you're not seeing my data, and I've got the sample data, and I've already added this table field, so it's in the account table. Go to design view, and I added, right down here, start date.
We're gonna make the default value today's date, so when you add a new loan, if you don't specify, it will put today's date there, which is a good thing to have. That's a good thing to have even for credit cards or bank accounts. You want to know when you opened that account. I'm surprised I didn't put that in there to begin with. That way, you could generate a list of your oldest credit cards. Make sure you don't close those because that'll really affect your credit limit or your credit score.
Once you've got that start date field in there, let's go back into the main database. I'm gonna open up my account form, this guy, the details form, go to design view, and we're gonna put that maybe right down here or something. I'm just gonna copy one of these, copy, paste, slide you down here.
Change to start date or date opened or whatever you want to call it. It's your database, put it together how you want. Let's get this over here.
My screen opens up wide because I have all the different forms open at the same time.
This guy is gonna be not account name, we're gonna go with start date. Copy that, paste it here, format is gonna be short date.
Close that up. Let's make this as big as it needs to be to be a proper short date.
You're gonna watch me do some formatting today because this is the final production template. This is what's going out to people who buy the whole template.
Now if we open up an account, we've got our start date. You could do this with an auto loan, for example, and you might want to put a start date. We got to put it in the tab order.
Tap, tap, tap, tap, tap. No, I actually like it where it's at. Here's one of my pet peeves: the little calendar button thing.
This is a comment for the Microsoft team: you should have a setting where this can be either inside the box or outside to the right or to the left. That's not a setting you can set. We have show date picker, but how about picker location? Any of that stuff?
What you have to do in this particular case is either move this field over, which doesn't line up, or make this a little bit extra wide. I'm gonna go with that option.
Is anyone keeping my list of notes for the Microsoft team? I had one, but no one ever listens to me, so I stopped keeping it. I just put them in my videos. Sometimes this will shrink in automatically. It's another one of my pet peeves.
You could make this as big as you want and the auto resize will still bring it in. Oh, it didn't that time. Good.
That's too big. How about there? I like that. Save it, close it. Open it back up. There we go.
Auto resize can be a pain sometimes. That's perfect. Let's go to our auto loan, maybe put a start date in here. One-one, save it.
Let's add an MCA loan of type loans. Let's make it black. You could put your account number, all that stuff, in black. These levels are fine and we'll put in here for a start date. It's got today's date and now let's put in something about five months ago. I'm gonna go with three-one. It's currently August, that'll work. Save that. That'll show up up top, that's fine.
What I like to do for loans, and I mentioned this in the other video, is I like to put the total amount of the loan in the balance field as a negative number. So let's say it's a one hundred thousand dollar loan. In the credit field, I put how much has actually been paid on this loan that's posted. Let's say we've got five thousand dollars in posted payments on that loan. Any amount that's pending - let's say you mailed them a check but it hasn't cleared yet, or you made the payment - there's your pending amount. If you do have any transactions from the transactions table, that will show up here as well. So you still basically owe ninety-four thousand dollars on this loan.
These needed fields over here, if you recall from the account balances, I've got warning amounts. I don't want to see these in bright red because that's like "hey pay attention to me." I'm gonna go into the account and set the warning levels at negative one hundred thousand; in other words, we're in good standing, and I don't need that to be all bright and blaring in my face. See, like these guys down here; I'm just gonna cheat so I don't have to look at that.
We're gonna do ten thousand here. That big bright red conditional formatting is designed for "hey, I need some attention." You're gonna go negative whatever. That's just a matter of setting the warning level equal to or lower than the balance amount. You still owe ninety-four thousand, but you're cool.
Now, I don't want to put the loan information on this form. I'm gonna make a little button here that's gonna pop up another form because I don't always care to see that value, and there's a lot of little calculations, so I don't want them all on this form - it gets too cluttered. We're gonna make a button that pops up another little form with all the calculations on it. Maybe once a week, you might want to just check and see "hey, what's my date that it's gonna be finished paying."
I'm gonna use another modal form that pops up on top of this one. So let's copy the account details form and we'll use that as a template.
Come into here, my account detail F, we're gonna copy and paste that and we're gonna call this guy loan info F. My loan info F. Then we're gonna design view this guy. We can delete everything except the account and the start date. Delete all this stuff, we don't need all this in here, get rid of notes, we don't need it, keep the start date, start date there, get rid of that, get rid of all these buttons.
We can make this a lot smaller because it's only gonna be one little column of figures, and it's gonna basically look like this when we're done. This is my quick run-through that I did first. I used to just run through the database once and then I would record the slides for the beginning of the video at the end and then patch it on the front. But now I actually run through it once on my own first and make the slides. It's called quality, people, quality.
Plus, that way I'm not surprised at all when I'm recording the video. I don't get any surprises. Let's left align you, which you already are, let's make you fit there. We can make all these the same size if you want to make it look like that. You can make those fields a little bigger, that one's a little smaller. I'm gonna change the color of this one a little bit.
Let's go with the light blue. We don't need the footer, I don't think, so we'll just go. I'm gonna set allow edits to no. Put data allow edits to no because I don't want changes on this form. This is just gonna show me information about stuff that's already on the other forms. No modifying stuff here. In fact, if you want to gray these out, that's what I usually do so that people know that you can't change this. That's a bit too gray, let's go a little lighter.
With the other form, I put my own close and cancel and save buttons and stuff down there; for this one, I don't need all that, so I'm gonna turn on the control box and the close button so we'll just use those to close the form when we're done looking at it.
Next, I need the total amount of the loan, which is the balance field from back here, and I want the formatting this guy has, so I'm just gonna copy this field, the balance field, right from here, copy and paste, then we'll bring all the formatting over with it too. We'll do that and we'll left align it, and we'll copy a label and go copy, click on that field, and then paste, and that will attach that label to the text box, if you didn't know that trick already.
Loan amount. Let's save this guy, and we need a way to open this form from the other form. So we're gonna come into accounts and then from here we're gonna open up our loan details, and if I want to see the details on this guy, like when it's gonna be due, I'm gonna click another button down here that's gonna pop up that. Let's make that button next, design view, and I'll just copy one of these, copy paste, slide you over about there.
This is just saying you have a duplicate keyboard shortcut; we're gonna fix that in a second. This is gonna be my loan info button. We'll change this to "Loan Info," like that.
The name of this will be loan info BTN. Now I only want this button to show up if the account that we're on is a loan. If you look at the account types, we got checking, credit, savings, whatever, whatever, loans is type five. For right now, I'm gonna just deal with hard-coding that as a five. That's okay - it shouldn't ever change. This is something the users can't mess with. This is like a "you" thing. In the future, if you decide to add more loan types, just add a field into this table called "is loan," like is credit type, whatever. Just add "is loan." But for today, I'm just gonna look and see if this is five. Five is all loans.
Now, how do we make this button visible or not visible if this is a loan? We're gonna fire an event off in one of two spots. It's either gonna be the form current event or the after update event for the loan type box. This will run after the user changes the value of this box, because they could change it to a loan, in which case we want to see the button. The other event, on current, will run when the form is opened or when they switch from record to record, which they can't do with this form because there's no navigation, but it will also run when the form is open. I prefer doing that in the on current event.
If you are unfamiliar with the after update event or the on current event, I have other videos for those. I will put links in the link section underneath (they're free to watch).
So in the after update event for this button, go to code builder, we're gonna put in here: ShowLoanButton. We're gonna copy that, go to the on current event for the form, and do the same thing: ShowLoanButton.
What is ShowLoanButton? Well, we get to write that. It'll be a private sub that only this form can use called ShowLoanButton. I'm gonna be doing the same code in two different spots, so it gets its own sub; I don't want to copy the same code in two different places.
So if it's a loan, show that button. If account type combo equals five (loan), then loan info button.visible = true. Otherwise, loan info button.visible = false. Always do your else, because if they switch it from a loan to something else, nothing will make it false.
Debug, compile... Oh hang on, little variable I have to define, account type combo. Let me see what happened here. One thing I forgot to tell you to do: remember we copied our form, we made the account detail F into the loan info F. Well, we didn't blank all the code out of that. We deleted all the buttons and the combo boxes and stuff. So this is the code for loan info F, the one we just made. Literally come in here and delete all the code. We don't need anything in this form.
Leave the stuff up top here and leave the copyright notice. You should be putting the copyright notices in my databases that you build on your end. Make sure that's law. These two lines should be in every module and form module. I got videos on that too, so I'll put links down below.
Now that you did all that, save it, run a debug, compile again, and we should be clean. Now we have code that will make this button visible or not, but what's the actual code that goes in that button? Right click, build event. We want to open up that loan info form we just created a minute ago.
We're going to start it off with a Me.Refresh. If you make any changes on the account detail F, you want to commit those to the table and save those before you go opening up another form. Do Command.OpenForm "loan info F", , , "account id=" & account id.
Even though the account id doesn't appear on either form, as long as it's in the record set underneath that form, you can still use the value. The record set is the table or query from which this form gets its values.
Let's go ahead and test everything out. Close this, close this. We've got this guy open in the background, close him.
Open up our MCA loan. It is a loan, so that shows up. Let's close this and open up something else and notice it doesn't appear, because this is not a loan. Let's put this back to credit. Cancel. You're good. Back to your MCA loan, it's a loan, click the button, and there's our loan info form over here.
Now, one thing that's a little bit annoying with Access: since I've got two modal forms open, I can't click behind it, which is the desired effect. But watch what happens if you go into design view on this guy. Open up its properties, you can't click over here either because this modal form is preventing it. That's another list for the Access team - fix that. I don't like that, because now what you have to do is you have to close this guy, close this guy, go back here, to get to this guy to go to design view, and now you can click over here.
It's these little teeny tiny bugs in Access. I love Access - my whole career is based on Access. It's one of the best programs ever designed, but it's got its little flaws. So just some annoyances you have to live with, just like every application.
Moving on, so this guy gets its data from the account T table, but the other calculations that we need from this form, including the actual balance and stuff like that, all come from the account U. We have to change where we're getting our data from; it's going to use the account U, it's got the other additional calculations in it. If you don't remember that, go rewatch the account balances video.
Now we can continue on with the rest of our calculations. If you did build the spreadsheet from yesterday's video, feel free to use this as a template to follow along with. That's how I built this, just by looking at the calculations I did here. Instead of E2, E3, that kind of stuff, you're going to be using fields in Access, which I think is a little better. You can name the cells in Excel too, if you really prefer doing it that way.
We want to figure out next what the balance due on the loan is. Now, balance due is basically what the amount of the loan is minus what you paid back. This actual balance here takes that into consideration. It looks at credit, it looks at pending, it looks at transaction table records, and then it comes up with that number.
To figure out the actual balance due, we add those fields together. To figure out the total amount you've paid, how much you've paid back is literally just subtract this value from this value.
So let's copy this, and this will be paid back. This guy is going to be paid back and the control source is going to be equals balance minus actual balance, and then the whole thing times negative one (to make it a positive number). Save that.
If you want to keep checking every step, you have to close this, open it back up again, hit the button. We've paid back $6,000.
Close this, back over here, right click, design view, and then continue on. I'm not going to check it every step of the way; I've already verified that these calculations are correct.
Next up, we're going to calculate the number of days past; how many days have passed since the loan was taken out.
Days past.
Here, this will be days past, and this is going to be equals today's date minus the start date of the loan. This is going to be a number, so get rid of the format.
Next up is going to be the average per day. We know how many days have passed, we know how much has been paid back, so we can calculate the average per day by dividing the two, and it's going to be another dollar amount. I'm going to copy paid back, copy paste so I get the formatting right, slide you up there.
This is going to be average per day, and this is going to be equals paid back divided by days past, and that will be a dollar amount.
Save it.
Now we got days left. We know what our average per day is, we know how much is due, so divide those two and then we get the number of days it's going to take to pay off this loan.
This is again going to be a number, so I'm going to copy days past, copy paste, and we're going to call this days left.
I'm going to zoom in for this one. It's going to be a little more typing. This guy is going to be the actual balance divided by the average per day, but I'm going to multiply that by negative one.
Equals actual balance divided by average per day times negative one, because it's going to be a negative number because the actual balance is negative.
Even if sometimes with Access, even if you specify the number of decimal places, it doesn't always work. If you don't believe me, try it. I left decimal place at zero and I still got 3.333333. So I'm going to manually round this to zero, because at this point it doesn't really matter – we're just getting a fraction of a day which isn't going to really affect our final calculation.
So now we've got our completion date: today's date plus the days left. Copy, paste one more time. This will be completion date. This is going to be equals today's date plus days left, and that will be a short date.
If you want the percent paid, what percentage of the loan are you finished with:
Percent paid. This is going to be equals paid back divided by the balance, and again times negative one. That will be a percent.
Save it, close it, open it, open it. There you go.
There's all your calculations: $100,000, we've paid back $6,000, 178 days have passed, today is August 26th, that seems about right. We're paying back an average of $34 per day, there are 2,789 days left at this rate. You've only paid back $6,000 in five months. That seems about right.
Let's change it up though. Let's close this. Let's make this a little more realistic. Let's pretend we've paid back $65,000. That seems more correct.
Open it up, loan info, and there we go. 65% completed, got 96 days to go, looks about right. Yes, I double checked the math with my actual loan and it worked, so... I have been using this in Excel for years to track loan stuff like this, so it was just a matter of porting over the calculations in Access and that's how you do it.
If you like stuff like this, if you enjoy this template, check out my full account balances and recurring expenses template if you don't want to build all this stuff yourself. This is like 12 different lessons now, which you're more than happy to build it all yourself, but I've put all this stuff together and more. There's additional love baked into this template that I didn't cover in the videos, so check this out. Every time I add new features, the price goes up and everyone who's purchased it previously gets free upgrades. If you haven't bought it yet, do it now because the price is going up in a couple days once I put this online.
If you like learning with me, check out my developer lessons. I teach all this stuff and more, lots of cool stuff. I just released Developer 44, we're doing custom ribbons and right-click shortcut menus and all that cool stuff, so check them out.
But there you go. That is going to be your TechHelp video for today. I hope you learned something, my friends.
Live long and prosper, I'll see you next time.Quiz Q1. What is the key difference between a traditional loan (like a mortgage) and a merchant cash advance (MCA) loan in terms of payment schedule?
A. Traditional loans have fixed payment schedules, while MCA loans do not.
B. Both loans have predetermined end dates.
C. MCA loans require larger monthly payments.
D. Traditional loans cannot be tracked in Access.
Q2. Why is adding a start date field to the loan table necessary when working with MCA loans?
A. It is required for all forms in Access.
B. Without it, you cannot forecast payoff dates for MCA loans.
C. It prevents errors in credit calculations.
D. The start date automatically calculates the loan balance.
Q3. In the account balances database, which field is typically used to record the total amount of a loan?
A. The credit field as a positive number
B. The pending field as a positive number
C. The balance field as a negative number
D. The notes field as a string
Q4. Why does the video recommend not displaying all MCA loan calculations on the main form?
A. To avoid slow database performance
B. To prevent users from seeing loan information
C. To keep the main form uncluttered and easier to use
D. Because Access only allows a few calculations per form
Q5. How does the "Loan Info" button behave based on the account type?
A. It is always visible regardless of account type
B. It is visible only if the account is a loan (type 5)
C. It becomes visible when the user is an administrator
D. It shows only if the balance is negative
Q6. What does the ShowLoanButton subroutine do in VBA?
A. Calculates the total loan balance automatically
B. Opens the loan info form for editing
C. Controls the visibility of the Loan Info button based on account type
D. Updates the start date every time the form loads
Q7. What is the purpose of using Me.Refresh before opening the loan info form?
A. To discard any unsaved changes
B. To commit recent changes on the current form to the table before opening the new form
C. To reload all account records in the database
D. To adjust the format of the loan amount field
Q8. What is the correct calculation for "Paid Back" on the loan info form?
A. Actual Balance minus Balance
B. Balance minus Actual Balance, times negative one
C. Credit minus Pending
D. Loan Amount divided by Number of Payments
Q9. How do you calculate "Days Past" since the start of the loan?
A. Today's date plus start date
B. Today's date divided by start date
C. Today's date minus start date
D. Start date minus balance date
Q10. What is used to determine the "Average Per Day" paid back on the loan?
A. Actual balance divided by number of payments
B. Paid back divided by days past
C. Total loan amount divided by 30
D. Pending payments divided by days left
Q11. What formula determines "Days Left" to pay off the loan?
A. Days past minus days paid
B. Actual balance divided by average per day, times negative one
C. Paid back divided by total loan amount
D. Start date plus balance minus today's date
Q12. How do you find the projected loan completion date?
A. Start date plus loan amount
B. Start date minus days left
C. Today's date plus days left
D. Balance date plus thirty days
Q13. What is the purpose of multiplying certain calculated values by negative one (times -1)?
A. To ensure negative numbers are displayed in red
B. To turn negative values into positive figures for display purposes
C. To decrease the loan balance more quickly
D. To calculate interest on the loan
Q14. Why is the "Percent Paid" calculation useful for the borrower?
A. It estimates the current interest rate
B. It shows the percentage of the loan that has been paid off
C. It displays remaining payments owed
D. It updates the account type automatically
Q15. What is the benefit of tracking pending payments in the loan calculation?
A. It makes the balance appear higher than it actually is
B. It allows a more accurate view of what is still owed versus what has already been paid
C. It hides recent payments from the summary
D. It is required by Access to run all forms
Answers: 1-A; 2-B; 3-C; 4-C; 5-B; 6-C; 7-B; 8-B; 9-C; 10-B; 11-B; 12-C; 13-B; 14-B; 15-B
DISCLAIMER: Quiz questions are AI generated. If you find any that are wrong, don't make sense, or aren't related to the video topic at hand, then please post a comment and let me know. Thanks.Summary Today's TechHelp tutorial from Access Learning Zone will show you how to create a merchant cash advance (MCA) loan calculator in Microsoft Access. If you're not familiar with what an MCA loan is, I recommend reviewing my previous lesson where I covered the same topic in Excel. In that tutorial, I explained MCAs in detail, discussed how they work, and showed how to forecast repayment timelines.
Today, we'll take those same concepts and implement them in Access. This lesson is suited for both beginners interested in the calculations themselves and more advanced users who want to weave this functionality into my account balances database using VBA. If you only care about the arithmetic, you can focus on that. If you want to integrate the tool into your database and use VBA, pay extra attention to those sections.
You do not need to work with VBA in order to do the calculations. They require just basic math and functions. But if you're new to VBA and want to see the fundamentals, I've got an introductory video that will give you everything you need to get started. Likewise, if you want to see how the account balances database is constructed, check out my multi-part tutorial series on that topic.
Let's focus now on the MCA loan calculation process in Access.
In contrast to the Excel video, where we did forecasting and new loan calculations, here the important part is entering the loan once you have it, tracking payments over time, and forecasting when the loan will be paid off. That is the main goal for our Access implementation.
To make this possible, you need the loan amount, the loan's start date, and a record of payments to date. My account balances database is already set up to track starting balances and payments (such as those for auto loans). These same calculations will actually work for any type of loan, as long as you know how much has been borrowed and paid.
The first modification we need to make to the database is to add a start date field. This is essential, especially for MCA loans where the payoff date isn't determined at the outset, unlike traditional loans. You'll go out to the back-end table (since this is a split database), add the start date field to the accounts table, and set its default to today's date. This is handy not only for loans, but for any account where knowing the opening date is useful. For example, with credit cards, knowing the oldest one can help you avoid accidentally closing it and negatively affecting your credit score.
After adding the start date field, put it on the accounts form in design view. Place it wherever you prefer. I typically copy another field on the form, paste it into place, adjust its label and properties, and make sure it's formatted as a short date. Resize it as needed and make sure it's set up properly in the tab order. I often run into frustrations with Access's calendar date picker, which has limited placement options. Unfortunately, that's just part of the way Access works, but you can make the best of it by widening the field if the picker overlaps awkwardly.
Once the start date is in place, you can try it out by entering a start date for an auto loan, for example, or for a new MCA loan. The start date will default to today, but you can adjust it to whatever is appropriate, like setting it to a date several months ago.
For entering loan data, my preference is to store the total loan amount in the balance field as a negative value. Payments already posted go in the credit field. Pending payments, like checks that are in transit, go in the pending field. Transaction records feed in as well, giving you an accurate sense of how much you still owe.
To avoid distraction, especially from conditional formatting that draws attention to low balances, you should set warning thresholds below the current balance. That way you aren't constantly staring at an alarm state for loans that are actually current on payments.
Rather than cluttering up the main account form with all the loan-specific calculations, I suggest creating a button that opens a separate form with these details. This keeps your main form streamlined, and lets you check loan details (like projected payoff date) only when you need to.
To do this, copy your account details form and save it as a new "loan info" form. Then, strip out everything on that form except the necessary fields, such as the account ID and start date. You can shrink down the form, adjust the colors, and set allow edits to no, to prevent any accidental changes. For clarity, you might also gray out the fields showing the data.
When building forms like this, it's helpful to reuse formatting by copying and pasting controls (for example, bring over the currency formatting from the main account form's balance field). For each value you want displayed, create a label and corresponding text box.
We'll need a way to open this new loan info form from the main form, which means adding a button. You might want this button visible only for loan accounts. In my setup, account types are coded, with type five denoting loans. At this stage, hard-coding the value is sufficient, but if you have more loan types in the future, consider adding an "is loan" flag in your data.
To show or hide the button based on account type, use form events in VBA, specifically the form's OnCurrent event and the after update event for the account type combo box. This way, if the user changes the type to "loan," the button appears.
In the button's click event, before opening the loan info form, refresh the current form to save any changes. Then open the loan info form while passing in the current account ID as a filter. This allows the loan info form to display the correct details for the selected loan.
It's worth noting a small annoyance: with modal forms in Access, when the loan info form is open, you can't interact with any forms behind it, which can make certain design tasks more challenging. This is one of those quirks you'll encounter from time to time with Access.
Now, the loan info form will primarily pull data from the account table. However, if you've built an account balances unified query with additional calculated values (as in my other videos), consider sourcing data from that for more advanced calculations.
Let's move on to the calculations that the loan info form will present:
- The balance due is simply the original loan amount minus what has been paid back to date. This includes credits, pending payments, and any recorded transactions.
- The total amount paid back is calculated as the difference between the balance field and the current calculated balance, and displayed as a positive number.
- Days past is the difference in days between today's date and the loan's start date.
- The average payment per day is total paid back divided by days past.
- Days left is calculated as the remaining balance divided by the daily payment average, converted to a positive number.
- The projected completion date is today's date plus the number of days left.
- Percentage paid is simply the amount paid back divided by the total loan amount, again displayed as a positive value.
You might run into minor formatting issues, such as unwanted decimal places. You can solve this by rounding numbers appropriately, especially for non-fractional values such as days left.
Try these calculations by adjusting the amount paid and see how the due date and percentage paid change accordingly. For example, changing your paid back value from $6,000 to $65,000 will immediately recalculate everything.
I've used a version of this tracking system for years in Excel to manage my own loans. Bringing it into Access is simply a matter of translating the logic into database fields and calculated controls.
If you find this type of template useful, you may want to take a look at my full account balances and recurring expenses template, which incorporates many more features and lessons beyond what I've shown here. Everyone who purchases it receives free upgrades whenever I add new features, so it's a good value if you want a ready-made solution or don't want to assemble all the pieces yourself.
For those interested in further developing their Access skills, don't forget to check out my developer-level lessons. These go even deeper into topics like custom ribbons, shortcut menus, and more.
You can find a complete video tutorial with step-by-step instructions on everything discussed here on my website at the link below. Live long and prosper, my friends.Topic List Adding a start date field to the account table
Setting the default value for the start date field
Adding the start date field to the account form
Formatting and positioning the start date control
Updating tab order for new fields
Adjusting warning levels for loan accounts
Setting and formatting loan balances as negative values
Configuring warning amounts to control conditional formatting
Creating a separate loan info form for loan calculations
Copying and modifying the account details form for loans
Disabling edits on the loan info form
Changing form controls to indicate read-only status
Copying and reusing formatted controls for consistency
Implementing a button to open the loan info form
Conditionally showing the loan info button only for loans
Using the on current and after update events for control logic
Writing VBA to toggle button visibility based on account type
Cleaning up unused code after copying forms
Launching the loan info form and passing account ID
Changing the data source of the loan info form to use account U
Calculating the balance due on a loan
Calculating the total amount paid back on a loan
Calculating days past since loan start date
Calculating the average paid back per day
Estimating days left to repay the loan
Rounding calculated days to whole numbers
Calculating the projected loan completion date
Calculating percent of loan paid off
Testing calculations with different paid amounts |


