Fitness 64
By Richard Rost

 7 months ago
Add a Quantity Box to Food Log for Faster Data Entry
In this Microsoft Access tutorial, I'll show you how to add a quantity box for faster data entry when selecting items from a list, so you can quickly input a quantity and add it with a single click. We'll also walk through simplifying a date time function, incrementing quantities by double clicking, updating form behavior so it stays on the same record when times change, and making small tweaks for a smoother workflow. This is part 64.
Prerequisites
Recommended Courses
Up Next
Keywords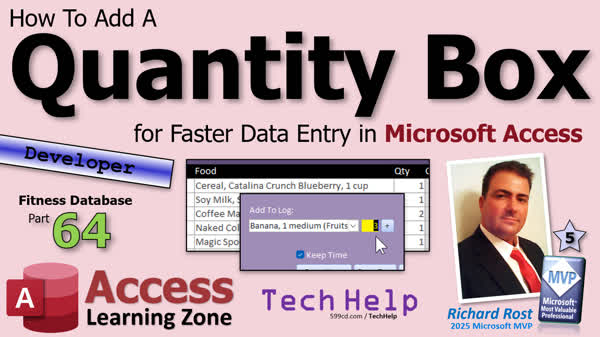
TechHelp Access, fitness database series, quantity box, faster data entry, food log, add button, increment quantity, date time function, on double click event, unbound control, default value, add quantity, pass parameter, optional quantity, multiply quantity, debug compile, reset quantity, resort list, requery, focus record
 Subscribe to Fitness 64
Get notifications when this page is updated
Transcript Today's part 64 of my fitness database series. You don't have to be following for fitness to learn some cool tricks for your database.
In today's video, I'm going to show you how to add a quantity box for faster data entry in your Microsoft Access database. This will work whether you are adding to a food log like we are, or adding products to an order, or anything like that where you are picking an item from a list and then you want to quickly type in a quantity, hit an add button, and then it adds it.
I do this all the time in my full course for adding products to an order - same concept. Instead of clicking add and then hunting down the item above, and then manually changing the quantity every time and then going back and adding another one, you will just be able to punch in a number right up front. Or you can double click in that yellow box there to just increment the quantity there.
We are also going to simplify one of our date time functions, do some quick incrementing on existing items, tweak the form a little bit so it requires and stays on the same record if you change times, and make a couple of other tweaks.
Alright, a couple of things today. First, I did a little off-camera edit. I simplified the proper log date time function. The old value did a lot of gymnastics. It checked if the log date was the same as today, built a timestamp, hunted in the table to find the most recent entry for the day, added one second to it, and so on. It was way more complicated than it needed to be. The new version just takes the date from the form and then adds the default food time text, which is the text up here that we got. Then it feeds it into this, which does that one second increment for us. So we don't need all of this. We can get rid of that.
Alright, and this is the much more simplified, more friendly version right there.
Another thing that I find myself liking sometimes is, for example, last night I had some extra raspberries. I want to be able to just quickly double click on this and increment that. That's really easy to fix.
Come over here, put an on double click event in here, and we are just going to stick in here: quantity equals quantity plus one; me.dirty equals false. And that one is that simple. Close it down, make sure it works. And more blueberries, you've got it. Beautiful. It's just little simple wish list stuff that I've got that I want to just knock off as much as I can.
Alright, next up I want to add a quantity to the "Add to Log" down here because what happens is, let's say I'm putting together a dinner. I come in here and pick chicken. Let's say chicken breast one ounce. I don't want to add it four times or then have to come up here and change it to four. It'd be nice if there was just a little quantity box right next to that where I could then maybe change it to four there, or double click on it a few times to increment it to four.
So let's do that. It's going to involve a little bit of shoehorning some code around. Let's first make some space here. I'm just going to grab one of these guys, copy and paste, slide it over here. Get rid of that label. We'll stick it right next to it like so. Maybe about yay big. That's a bit too big. We're not going to put 100 in there.
Okay, just like that. Let's call this guy. Okay, let's get rid of the after update event for that. We don't need that one. I'll leave select all on there for the on click event, that's fine. Let's name this guy "add quantity" (ADDQTY) and get rid of the control source. It's going to be unbound. Go to data. Let's make the default value one. Save it.
Let's make a quick after or a double click event in here on double click just to make it increment. So it will be add quantity equals add quantity plus one. Real simple. Don't need to set me.dirty equals false after it because we're not saving it to the record. And now we have a quick little double click in here that'll increment the counter.
Now, when it comes time to actually hit that button and add stuff, let's see what we have going on in here. I've been in here. So we've got "add to log food combo" and then a whole bunch of other stuff. "Add to log" is what decides what it is, either a food item or a meal item, and then adds it accordingly.
Now, add food item to log is just a food item. We've got a definition on that one. We've already coded this one to take a quantity, so that's going to be easy there. So for this one, we can just come right here and pass in that add quantity because we're on the same form. This is all part of the food log. It's not like it's sending it to a global variable or anything. I could just directly grab it inside of this, but it's already a parameter. I'm happy with it the way it is. In case I move this later on to a global module so that everybody else can use it, this works better.
So with that in mind, let's also pass it into this guy. Now, this guy doesn't have any extra parameters, but that's easy to do - the meal one. So we'll just tack that there and then inside the add meal to log, go to the definition on that one. Always add it as optional if you are adding it after the fact because you don't know who else has to use this guy and isn't passing that parameter in. Optional quantity as long equals one.
Then, right here, what we are doing here is we are getting the quantity out of the meal detail. Remember, a cup of coffee can be three creamers and whatever. We are just going to multiply that by whatever the quantity is up here. So if I want two of those, it'll just multiply the food item in there's quantity by whatever this quantity up top here is. So we'll just say this quantity times the quantity we're sending in, and that's all you really have to do with this.
Save it, and then let's give it a quick debug compile. The last step is after we push the button, we want to reset this quantity back to one. So we are clicking here, come back into the button, and then anywhere in here, add quantity equals one. That'll reset that after you push the button.
Alright, let's make sure it works. Come back in. Let's go to a new day so we don't mess up my actual data. Did I mess up anything already? Let's see. Yeah, I think it will. I don't have starberry, so not strawberry. Get rid of that. Right on target.
Okay, good. Let's go to here. Let's do a food item first. Let's pick the red delicious apple. Add one. Perfect. Let's add some avocado. I'm going to double click on that one a couple times, bring it up to three, and go. That works perfectly.
Let's do a meal now. I can just type in meal, and we'll do the fruit bowl and yogurt. I'm going to add five of those guys. Let's go. Perfect. Look at that.
And that'll save me a lot of time because sometimes I'll go, "Okay, I had eight ounces of chicken." Then I have to pick chicken, hit add, come up here and find it, change it to eight. It would be easier if I could just do it right down here.
I thought about making it so I could just keep clicking the add button, and instead of adding new items up here, then it would find it if it's up here and then increment the thing. But then you have to look at the timestamp too because, for example, I have yogurt for lunch and then yogurt again for the night. And then we have to look and say, "Okay, is it within a minute of this guy?" because in that seconds trick we play, there was just a lot of moving parts. I started doing it that way and thought, it's just easier to just put a quantity down here.
Alright. One more thing I'd like to add. If I change the time of something, I want this list to resort, but still stay on that item. For example, if I change this to 11:30 p.m., I want it to resort as if I hit the Requery button but stay on that item.
We already know how to do some of this. Right now, it works if we move it to a different day. If we do this and I say, let's do it to tomorrow - so that would be 12/10 at 4 p.m. It goes there and we're on that item. That works great.
But what if it's on today's date at 4 p.m.? It still does that. See if it swaps days. If I change it now to 11 p.m., it just doesn't do anything.
So let's edit that. Now, that's going to be in this guy's after update event, which is update food date time, which is right down here. We're going to do a little rearranging with this guy because it takes a look right here and says, okay, if you've changed dates, then we're going to do all this stuff, and then we are going to do this, which is the line that finds it and goes back to the item. But if the dates are the same, it just basically leaves you sitting there.
So let's make a little modification to this guy. Sometimes I write this stuff and then, as you're using it, decide you want to make some changes. So let's move this ID up to the top, and we are going to get the ID right off the bat, regardless of what happens. So right up top here. Format the field properly - that's fine. Save it - that's fine.
Now, we come here. If it's a different date, we're going to go to that date, and we're going to move this filter - the find first - we're going to move that outside of the if block. And this guy here - move the focus to that record. That can happen regardless of what happens in here.
So this just needs to, if it's a different date, go to that date. So log date equals date filter. I want the date value of this and then update the filter. Else, if it's the same date, what are we going to do? Well, I want to just requery this list. This is where a me.requery does come in handy. Requery it with the same date filters. It'll just resort the list. Either way, it should put us back on the ID that we found way up top here.
Alright, save it, debug compile. Now if I come in here and I move this banana to 4 p.m., boom. There we go. That's what I want to happen. Put it back to 11:30 p.m., boom. Move it to tomorrow, 12/10 at 5 p.m., there we go. And then back to today again, this guy, and 4 p.m. Perfect. Nice little addition there.
So that's going to do it for your TechHelp video for today. I hope you learned something. Live long and prosper my friends. I'll see you next time.Intro In this TechHelp video, I will show you how to add a quantity box for faster data entry in your Microsoft Access fitness database. You will learn how to enter item quantities more efficiently when adding foods or products to a log, increment quantities with a simple double click, and update forms so changes to times automatically resort and stay on the same record. I will also simplify a date time function and make several small tweaks to improve workflow and usability.Quiz Q1. What is the primary purpose of adding a quantity box to the database form, as described in the video?
A. To allow faster and more efficient data entry for repeating items
B. To display the nutritional value of each food item
C. To add automated alerts for low stock
D. To track the last item added to the database
Q2. How does the double-click event on the quantity box improve user experience?
A. It deletes the item from the list immediately
B. It increments the quantity value by one with each double-click
C. It opens a new form for detailed entry
D. It resets the quantity to the default value
Q3. Why was the date time function simplified in the recent edit?
A. To integrate external data sources more easily
B. To eliminate unnecessary complexity and rely on simpler logic
C. To allow for future compatibility with other database platforms
D. To increase security for user data
Q4. What happens to the quantity box after an item is added to the log?
A. Its value is removed entirely
B. It increments automatically for the next entry
C. It resets back to one, the default value
D. It displays a warning message
Q5. In addition to food items, what other scenario was mentioned where the quantity feature would be useful?
A. Tracking fitness goals by week
B. Adding products to an order
C. Calculating discounts for bulk purchases
D. Automating meal reminders
Q6. When passing the quantity to add a meal to the log, why is it added as an optional parameter?
A. So it can only be used for products, not meals
B. To enable backward compatibility with code that does not use the parameter
C. To force the user to always specify a quantity
D. So it defaults to zero if not specified
Q7. What does multiplying the meal detail quantity by the quantity on the form accomplish?
A. It ensures only unique items are added
B. It adjusts the total count for each sub-item in the meal based on the quantity the user specifies
C. It deletes any duplicate items from the log
D. It limits the total number of meals that can be logged per day
Q8. What is the advantage of having the quantity box as an unbound control with a default value of one?
A. It automatically calculates nutritional content
B. It is not tied to any specific record and always ready for new input
C. It allows multiple items to be updated simultaneously
D. It secures the input field from editing by mistake
Q9. Why did the presenter decide not to implement an automatic consolidation of repeated items based on time?
A. Because it required complex handling of timestamps and could mix separate entries meant for different times
B. Because Access does not support automatic consolidation
C. Because user feedback preferred manual entry only
D. Because it would slow down form loading times
Q10. What change was made to the after update event for the date time to improve the form's behavior?
A. It now recalculates nutritional information for all items
B. It re-sorts the list and keeps focus on the edited item regardless of whether the date changed
C. It clears all filters on the list
D. It prevents items from being edited more than once per day
Answers: 1-A; 2-B; 3-B; 4-C; 5-B; 6-B; 7-B; 8-B; 9-A; 10-B
DISCLAIMER: Quiz questions are AI generated. If you find any that are wrong, don't make sense, or aren't related to the video topic at hand, then please post a comment and let me know. Thanks.Summary Today's TechHelp tutorial from Access Learning Zone focuses on enhancing data entry efficiency in your Microsoft Access database by adding a quantity box. Even if you are not building a fitness database, you can pick up some excellent database techniques that apply to a range of Access projects, especially those where you select items from a list and want to quickly define how many of that item you are adding, such as product orders or inventory logs.
The central feature we'll build is a quantity box for faster and more streamlined data entry. This replaces a slower workflow where users have to select an item, add it, then manually search above to change the quantity for every additional amount needed. Instead, you can now enter the desired quantity immediately, or simply double click on the quantity field to increment it on the spot.
Let me start by mentioning that I recently revised one of our date time functions to make it much simpler. The previous function checked whether today's date matched the log date, constructed timestamps, searched for entries from today, then incremented them by one second. This was unnecessarily complicated. In the updated approach, I take the date from the form, add the default time text from elsewhere on the form, and feed it into a simpler routine that handles any necessary incrementing. As a result, the function is streamlined, user-friendly, and easier to maintain.
Another small but useful trick is the ability to increment the quantity of an existing item with a simple double click. For example, if I decide to eat one more helping of raspberries, I can just double click on the quantity field for that item and it will increase by one. Implementing this is straightforward: adding an On Double Click event to the quantity field, which increases the value and immediately saves the record. No complicated changes are required, and it makes adjusting quantities far more convenient.
Moving to our main goal, I want to let users specify a quantity right at the moment they add an item to the food log. This is especially helpful if you need to add multiple servings of a food, like four ounces of chicken, without having to click Add multiple times or go back and manually update the last entry. To achieve this, I copy one of the existing text boxes, adjust its size, remove any labels and data bindings, set its default value to one, and assign it a clear name like ADDQTY. I also add a double click event to this box so you can quickly increment the value just by double clicking.
Now for the back end. The code that runs when the Add button is clicked already supports passing a quantity for individual food items. I make sure that the new add quantity box is included as a parameter when calling this code. For meals, which might have various ingredients (for instance, a cup of coffee may include several creamers), it is important the quantity for the entire meal is multiplied with the quantities of each meal detail. Adding an optional quantity parameter to this code and multiplying the meal detail's quantity by the number requested ensures accuracy, especially if you want multiple servings of that meal.
After the item is added, the quantity box resets to one so it's ready for your next entry. This avoids the risk of accidentally inputting the wrong quantity for your next item.
Next, I verify this all works as expected by running some tests and adding a variety of food items and meals with different quantities. Everything adds up as planned, and it is much faster than the previous workflow.
While implementing this, I also considered whether the Add button could just increment the quantity if the item already exists, rather than adding a new record each time. However, discerning when to increment versus add a new entry gets complicated when tracking items at different times, such as having yogurt at lunch and again at night. Comparing timestamps turns out to be unnecessarily complex, so having a dedicated quantity field for quick entry keeps things much simpler.
Another feature I wanted is for the list of logged items to automatically resort itself whenever you change the time for an entry, but still keep the focus on the same item. This way, if you adjust the time of a specific item, it jumps to its new position in the list, which may reorder based on the update, but the interface keeps you on that particular item. To pull this off, I fetch the item's ID before the update, and after any requery or re-sorting, make sure the interface returns you to that record. Now, whether you adjust the date or just the time of an entry, the list updates accordingly and you do not lose your place.
That wraps up the improvements for today's lesson. You can find a complete video tutorial with step-by-step instructions on everything discussed here on my website at the link below.
Live long and prosper, my friends.Topic List Adding a quantity box for faster data entry in Access
Setting up an unbound textbox for item quantity
Defaulting quantity value to one for new entries
Incrementing quantity with a double click event
Passing quantity as a parameter to item add functions
Modifying the Add to Log button to use quantity input
Resetting the quantity box after adding an item
Multiplying meal components by entered meal quantity
Simplifying date time function for log entries
Retaining focus on the same record after resorting
Requerying form data while maintaining item selection
Modifying form logic for smoother date/time changesArticle In this tutorial, I am going to show you how to add a quantity box for fast data entry in your Microsoft Access database forms. This method is very useful when you are adding items to a log or an order, such as food items to a food log or products to a sales order. Instead of the usual process of selecting an item, adding it, and then having to manually update the quantity in the list above, you will be able to type the number of items you want directly, click an Add button, and the quantity will be added in one quick step.
To start, let's talk about a small efficiency improvement. Sometimes, when entering data, you may want to increment the quantity of an existing item with a quick double click. For example, after adding raspberries to the list, maybe you want to quickly increase the quantity by one more. This is easy to set up with some VBA.
Open your food log form in design view and select the quantity textbox that displays each item's quantity. Go to the property sheet and set the On Dbl Click event. Enter the following code:
quantity = quantity + 1
Me.Dirty = False
This code simply increases the quantity by one each time you double click, and then saves the change immediately. Test it by adding an item and double clicking the quantity box. You'll see the number increment right away.
The main improvement is to let you specify the quantity at the point of entry, so you do not have to add an item multiple times or add it once and then update the quantity afterwards. To do this, we are going to add a new, unbound textbox next to the item selector on the form (for example, next to the food picker if you are logging food).
In design view, copy an existing small textbox, paste it, and position it beside the combo box or list where you choose the item to add. Remove its label and set its width to something appropriate (about the size enough for two digits). In the property sheet, change the Name property to addquantity (for example, ADDQTY), clear the Control Source so it is unbound, and set its Default Value to 1 under the Data tab.
Now, you can make quantity entry even faster by allowing the user to double click in this box to increment its value. Add this code to its On Dbl Click event:
addquantity = addquantity + 1
Since this box is unbound, you don't have to worry about saving the value after the change. Now, whenever you double click the quantity box, it will increment quickly.
Next, you need to make sure that when the Add button is pressed, the specified quantity is used. In your button's On Click event or wherever your logic to add an item lives (for example, a routine called AddToLog), you simply pass the value of the addquantity box as a parameter. For instance:
Call AddFoodItemToLog([other parameters], Me.addquantity)
If you have separate routines for food items and meal items, make sure both take a quantity parameter. If your AddMealToLog function doesn't currently accept a quantity, you'd update its definition like this:
Optional quantity As Long = 1
Within the function, you will usually have code that loops through meal components or does the math for the quantities. Make sure to multiply the item or meal quantities by this parameter so adding two multiples of a meal, for example, will automatically multiply all components' quantities.
Once you have added a number of items, it is a good idea to reset the quantity back to one. This prevents accidentally adding too much the next time. At the end of the code that adds the item, simply add:
Me.addquantity = 1
You can now test your form. Pick an item or meal, set the quantity to a number, press the Add button, and see it added with the correct quantity. This saves time compared to editing the quantity manually in the log after adding each item.
While working on this, I also simplified a function in the database that assigns timestamps to new log items. Previously, the function checked if today's date matched, built a timestamp, searched the log table for the most recent entry, and added a second for uniqueness. The new method just takes the log date from the form and the user's default time and combines them, letting another function take care of ensuring the timestamp is unique. This makes the code shorter and more reliable.
Another usability tweak is to improve what happens if you edit the timestamp of an existing log entry. By default, when you change the date or time, the list may not automatically re-sort and refocus on your current record, especially if you only change the time on the same date. To fix this, update the AfterUpdate event handler for the date/time field.
First, make sure you store the ID of the current record at the start of your event code. Then, after making updates to the record, apply any changes to the form's filter, and finally, use RecordsetClone and FindFirst to locate and re-select the same record in the newly sorted list, regardless of if the date changed or remained the same. After requerying or re-applying the filter, you can use the following lines at the end of your AfterUpdate event:
Dim id As Long
id = Me.ID
Me.Requery
Me.RecordsetClone.FindFirst "ID = " & id
If Not Me.RecordsetClone.NoMatch Then
Me.Bookmark = Me.RecordsetClone.Bookmark
End If
This technique keeps your form in sync after every change, always highlighting the correct entry, and gives your users a much smoother experience.
All these small adjustments combine to make your Access database forms much more user-friendly and efficient, especially for repetitive data entry tasks like logging meals or processing orders. With a quantity box, double click incrementing, and smarter form refresh logic, you will be saving yourself or your users lots of clicks and time. Try these changes yourself and see how much faster your workflow becomes.Primary Topics Access forms, quantity input, food log database, data entry optimization, event handling, form controls, VBA tweaks, code refactoring
Secondary Topics optional parameters, default values, data filtering, UI usability, error handling
|


